Welcome to the third and likely final part of my series on High Dynamic Range photography. In the first part I covered what HDR imaging actually is and how it works while the second part went over DSLR camera setup for taking shots necessary for the HDR imaging process, in addition to configuring a regular Canon Point-and-Shoot camera for auto-bracketed RAW shooting. If you've been following along, you should now have several RAW images to use for HDR imaging. If not, take your camera outside and take some nice shots. I'll wait right here.
More Shooting Tips
As I said in the Part 2, you need to shoot in Aperture Priority (or Program mode and keep the same Aperture for all auto-bracketed shots) and choose an f stop in the middle so you have some room to experiment. I suggested something like f/8 in that post, but it obviously depends on your camera, lens and subject. Read up on F-number and Depth of Field if you're not too sure. In general, the F-number corresponds to how wide open the shutter is. The lower the f-number, the wider open the aperture is, the shallower/smaller the Depth of Field and less time and light required for adequate exposure. It's hard to see the effects of different F-number changes on the screen of your camera while you're shooting, so just take a bunch of shots at different settings and analyze them at your computer later.
In this article I will be using 3 auto-bracketed shots because that's the most my Nikon D90 can capture. If your camera can do 5 or more, by all means go ahead and try that. The software processing techniques I show in this article won't vary too much, if at all, with more photographs. Here's a handy list of the maximum number photos some cameras support for Auto-Exposure Bracketing. The more shots your camera can take, the lower the EV difference you'll want between each shot. In the last post, I took some example shots with an EV difference of 1 across 3 shots. I have since started shooting with an EV difference of 2 between shots for a more interesting final HDR image, but that's all subjective.
Oh and try to shoot something that isn't moving. Here's an extreme example of ghosting that will be shown in an HDR image if you are shooting a moving subject. This was created with 3 shots (-2, 0, 2 EV) and processed with Photomatix Pro with the "Attempt to reduce ghosting artifacts" option enabled:
 Visible ghosting of cars on Highway 75/85 in Atlanta, GA
As I said above, that's an extreme example of ghosting. At most, you're more likely to see a slightly blurry outline of trees moving between shots for example. Instead, you can just take one 0 EV shot in RAW and manually adjust the exposure to create 2 more shots and use those for HDR. Here's an example of such a pseudo-HDR shot. I didn't spend too much time on it so it's not the best looking final product but you get the idea:
 A simulated HDR image using the single RAW file at 0 EV on the left. HDR on the right. Look, no more ghosting of the cars on the highway!
What software to use?
Now its down to the actual meat of this entire series — how you can actually take your shots and convert them into an HDR image. But first we have a dilemma. What software should we use?
Panotools.org has the most comprehensive software overview list and comparison chart I have found. I have tested several of these and have only come to like one program, Photomatix Pro, which is available as a standalone Windows and Mac application, and a Photoshop or Aperture plug-in. Unfortunately it is not free and runs a sizeable 99 USD. Before explaining why I like Photomatix Pro, I'll talk about the basics of what we'll be doing and mention some other tools that can be used for HDR.
What We're Doing Here: So you have 3 RAW photos, ready for HDR right? Good. Some pieces of software I mention can't accept RAW files, so if you run into that, convert them to something like 16-bit TIFF files. Here are the basics, regardless of software:
-
Generate HDR image by importing the 3 photographs
-
Run a tone map and adjust settings until you like the way it looks
-
Export and save!
There's not much to it in practice, but it can be quite difficult to get the look you're aiming for depending on what software you use. After testing a handful of applications for HDR processing I've found that the free applications are generally either:
-
much more difficult to use and require users to have an idea about how to work with histograms, sometimes with toning curves, OR
-
extremely limited in what they can do.
One such application is FDRTools Basic. The interface isn't anything special and after you add your 3 exposures, you are greeted with some histograms and not much else. Even if you know what you're doing, it's difficult to get vivid final HDR images without taking your final image and then tweaking it some more in another application.
 Using FDRTools Basic requires a bit of skill.
Then there is GIMP with the exposure-blend script. This one requires a bit more hands-on work and coaxing. After importing the images you have to do things like image alignment manually and work with masks and channels substantially to get the look you're going for — not something for the first timer this article is targeting.
 GIMP with the exposure-blend script
To get a bit nit-picky, exposure blending is not the same thing as HDR, however many in the GIMP community seem to use the terms interchangeably. Also, GIMP is not very popular for HDR imaging for purists due to the fact that it doesn't support 32-bits per channel which can be seen as a real hindrance when dealing with HDR images.
And now we have a program called qtpfsgui that seems to be the exception to my stance that there are no good free tools for HDR imaging.
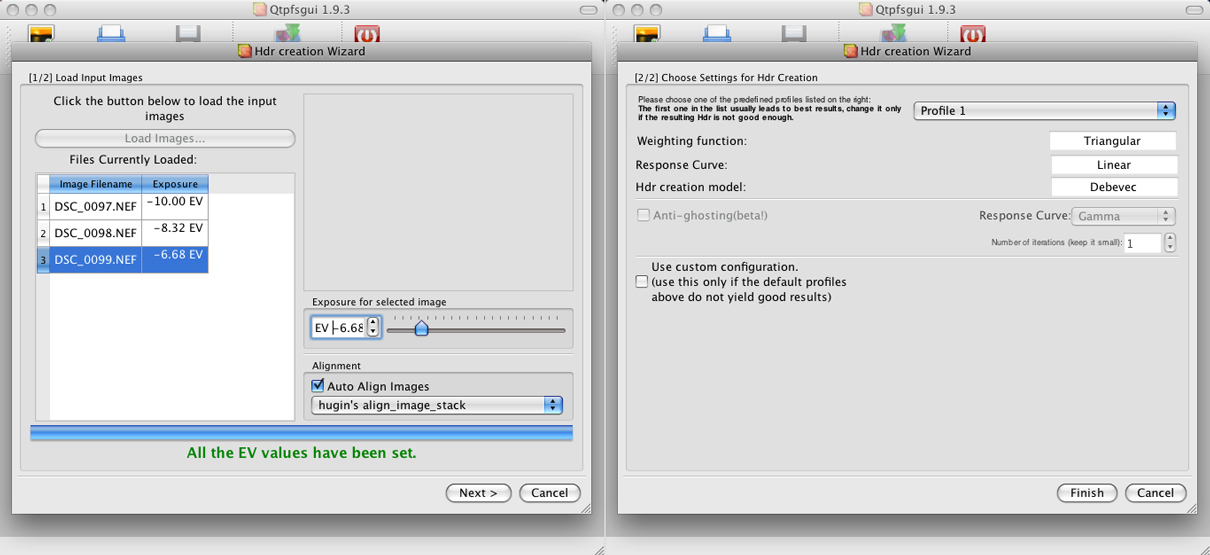 Importing files in qtpfsgui
 The qtpfsgui-created HDR prior to tone-mapping
 The "Fattal" operator tone-map in qtpfsgui
Qtpfsgui can create more dramatic final HDR images and gives you much greater control over the tone-mapping process through its various operators, but there are a few issues. Each time you change a tone-map setting, you must have it render a small preview each time. Other programs like Photomatix do this live.
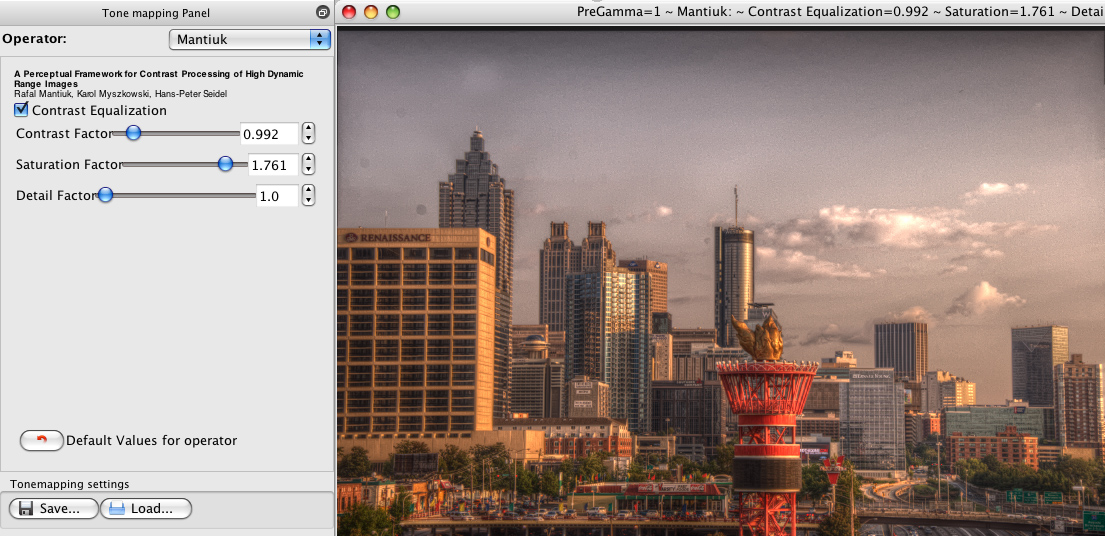 An example of the Mantiuk operator in qtpfsgui
As for the tone-map operators, each one has its own style so I have found that the best way to get an HDR out of qtpfsgui is by using two tone-maps. Essentially, I would use qtpfsgui to tone-map the same HDR twice, but using a different operator each time, and then I would open them up as layers in Photoshop, with the top one set as an overlay in the blending options, and adjust opacity until I liked the look. Unfortunately this takes a lot of trial and error and messing with different tone-maps to find something that looks good. That being said, qtpfsgui is probably one of the best free HDR tools out there. You still need to do a lot of work but you have more control over the final product without having to get dirty with histograms and levels (although I generally tweak those before I save out of qtpfsgui).
Another free application I wanted to look at was the Windows-only Picturenaut. I would classify Picturenaut as an easy to use free application that is rather limited in what it can do. After importing your exposures through "Generate HDRI", you have the option of running one of two tone-maps: Adaptive Logarithmic or Photoreceptor Physiology.
 Running a Photoreceptor Physiology tone-map in Picturenaut
Unlike qtpfsgui, changes made during the tone-mapping process are live and you can instantly see what's going on. But that's where the praises stop. While the final Picturenaut images don't look as processed and appears more natural, the final images lack the detail and contrast one would expect with a nice HDR tone-map. Moving on..
Before I get to Photomatix Pro I should mention that there is a free version of Photomatix called Photomatix Basic (Windows only).
 As the name implies, Photomatix Basic is.. rather basic.
Photomatix Basic is even less impressive than the sub-par Picturenaut, offering just a few tone-mapping settings.
Photomatix Pro
 At $99 USD, Photomatix Pro is what I would consider the holy grail of HDR tools. The two tone-mapping settings it has — Details Enhancer and Tone Compressor — cover all the bases of what you would want to do with an HDR image. In particular, I find its smoothing (light, highlights, shadows and micro-smoothing) abilities to be the most important when tweaking an HDR image. It also has powerful image alignment abilities and ghosting artifact removal, however nothing can beat a tripod and shooting a subject that doesn't move or at least waiting until the wind subsides, if it's a nature shot.
The best part about Photomatix Pro is that you don't really need to know what you're doing. A lot of photographers will argue with me here, but honestly if you are completely new to this all you have to do is move some sliders and see what combination looks best; and with the live preview, this is an easy task.
 The Photomatix Pro tone-mapping interface
Each of the Photomatix Pro tone-mapping methods has its own use. Most of the images shown here use the Details Enhancer method.
The Details Enhancer method increases local contrast. This has the effect of boosting shadows and creating a painterly effect. On the other hand, increasing local details makes noise artifacts more visible. The Tone Compressor method produces a more "photographic" look, and avoids noise and halo artifacts.
Once Photomatix Pro creates the HDR of your 3 exposures and you start tinkering around with one of these tone-mapping methods, there's not much direction I can give you. Just tweak it until you like what it looks like! After that, save as a 16-bit TIFF and if you'd like, open it up in Photoshop to adjust levels and add an unsharp mask. That's it!
 HDR of my dirty Mustang GT, with the intent of a dark and grungy, not-smoothed style.
Here are a few examples of what Photomatix Pro can create in the right hands. These were done by Eugene Buchko:


 Eugene talks about what was involved with this picture here.
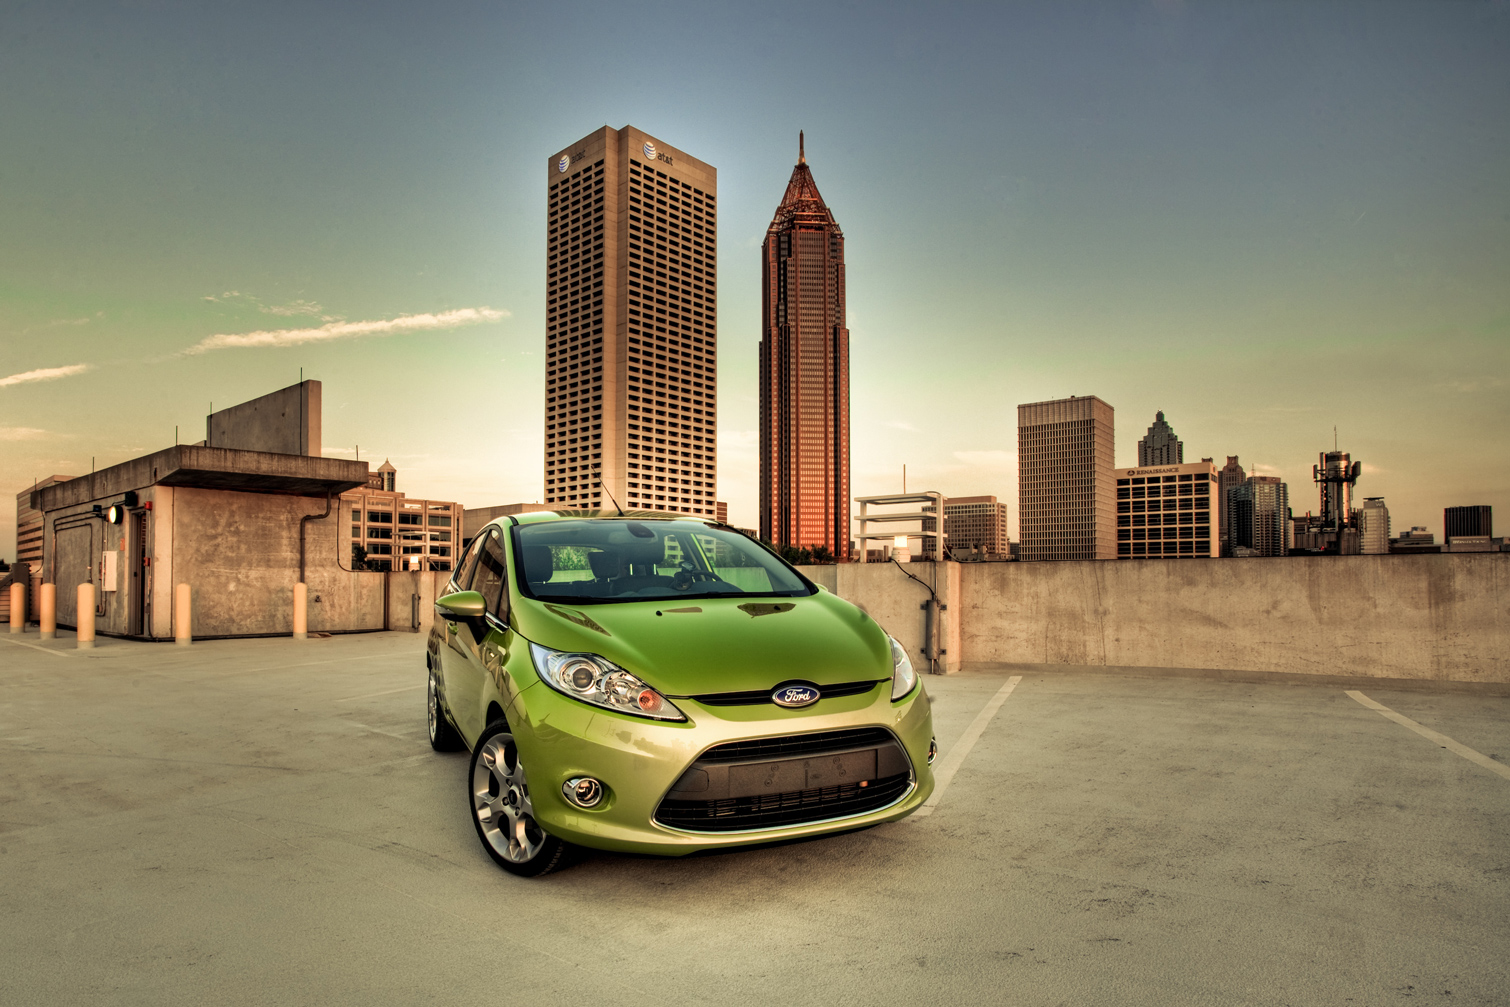
 HDR done by Tim Dorr
Photomatix Pro can also automatically create a pseudo-HDR image from a single RAW file.

What about Photoshop?
So why haven't I brought up Photoshop's Merge to HDR feature yet? Well, because many photographers believe it is not the best tool for HDR image creation. First off, you need to know what you're doing. There are four main tone-mapping methods with Merge to HDR and all of them are essentially histograms with tone curves you must tinker with.

Tone-mapped HDR images from Photoshop also tend to give a "milky" appearance. However, some photographers prefer Photoshop over Photomatix Pro as Photoshop tends to do a better job aligning images — handy if you don't end up using a tripod for your auto-bracketed shots. If you're inclined to give Photoshop a whirl for HDR imaging, here are some handy links:
 HDR done in Photoshop by Brooke Novak
Then again, you don't have to choose. You can let Photoshop do the HDR and image alignment, then save as a Radiance file (.hdr) and let Photomatix Pro do all the tone-mapping.
What's this green car I keep seeing?
I briefly mentioned it in the first part of this series, but my fascination for HDR imaging came out of a "mission" I did as part of my participation with Ford's FiestaMovement. Out of some 4,000 applicants, I (along with 99 others) won a 2011 Ford Fiesta (not out yet!) for 6 months.
![]() (not an HDR image)
(not an HDR image)
Each month we have to do a mission and document the process. This particular mission was hooking up with local shutterbugs to create HDR images of the Fiesta, hence Eugene, Tim and Brooke's HDR images earlier. Here's the video from that weekend (Update 2024: Video no longer exists).
Wrapping Up
That's it for my series on getting started with HDR photography. As usual, if you have any suggestions about what my next series should be about, use Skribit on my site or my Skribit blog profile here to give a suggestion or two! This entire series actually came out of a Skribit suggestion.
Oh and right before I was about to publish this I found out about the Hydra HDR application for OS X ($79 USD). Does anyone know how it compares to the rest of the pack?
Let me know how your HDR creations turn out — link me up in the comments! Any questions? If you enjoyed this series, do me a favor and drop me a comment. I blog for comments. ;-)