This post is part of a series detailing what High Dynamic Range photography (well, there's no such thing as HDR photography.. take photos first, use HDR process to come up with HDR images, not photos) is, how it works and how you can do it yourself! In the first post I went through the basics and some of the geeky bits about HDR photography: from showing off example HDR images, detailing why HDR images need to be processed and what you'll need to get started.
This post is part of a series:
- How To: Get Started with HDR Photography (Part 1)
- How To: Get Started with HDR Photography (Part 2)
- How To: Get Started with HDR Photography (Part 3)
The point of Part 2 of the series is to show you how to get your camera setup and get to the point where you have several sequences of photos to experiment with HDR:
 3 photographs taken with autobracketing at different exposures. Ready for HDR processing.
In my list of necessary items, I mentioned a tripod which several people said was not entirely necessary. You guys were right. There are ways of taking photos for HDR without a tripod, but they're much more advanced and generally involve aligning/stitching together the photos, or just using one RAW shot to created a pseudo/simulated HDR image. That's what the pros do when they need to create an HDR image of a moving subject.
Zachary Jones went into detail about this in a comment:
The technique you’re talking about creates a “simulated” HDR image. Basically, you take the RAW file of a shot and make two more versions of it in the photo editor of your choice. You should adjust one of them to be 1 EV (or maybe 1.5 EV) brighter than the original, and the other to be that same amount darker than the original. Then when you use Photomatix or whatever you choose, you have three photos to use. It doesn’t always turn out a good photo, but the other guy above or below me (wherever this comment shows up) got a really good shot this way.
The next point I wanted to touch on from the last article is whether or not you need a digital SLR camera to successfully carry out the HDR image processing technique. For simplicity sake, I stated in the first article that you did need a DSLR. There are, however, a few exceptions that will allow you to follow along with a Point-and-Shoot camera. Namely, if your P&S or DSLR-like camera:
- can save images in RAW
- can shoot a bracketed sequence (even better if it can do auto-bracketing)
- can use a Canon Hack Development Kit firmware add-on to get the aforementioned features
A camera that can save to RAW, an uncompressed file format comprised solely of raw sensor data, is important for processing as it gives whatever software you end up using access to everything the camera captured, instead of just what it filtered out while converting (demosaicing) to RGB. That is to say that the JPG file format is compressed based on whatever settings your camera has, and does not include the ~12-bit (12-14 if from DSLR, sometimes 10-bit from CHDK P&S cameras) original, unaltered data. While not a must, it can make for better looking final products. With RAW, you have greater control over brightness, contrast, white balance, saturation and colors. Also, if you have access to RAW, you can create a one-shot simulated HDR image as described above; handy for tricky moving shots.
Bracketing is the process by which your camera can take photos sequentially at different exposures. For example, one shot at -2 EV, one at 0 and one at +2. If your camera only has regular/manual bracketing, you will have to be there to push the shutter button for each photo. The biggest problem is that this can end up introducing alignment issues — even with a tripod — from you having to push that button each time. Auto-bracketing (also seen as Auto-Exposure Bracketing) gets rid of this issue by only requiring one button press and taking care of the rest itself. Add-on to that a self-timer and your shots will be lined up almost perfectly. If your camera only has manual bracketing, no worries, most software does a decent job at aligning shots.
Point & Shoot with CHDK Setup
So you're one of the lucky ones with a Canon Point & Shoot camera lying around, great! Chances are your camera is supported by the CHDK project, allowing you to enable lots of cool features for your camera. I have a 14.7-megapixel Canon PowerShot SD990IS that I have CHDK installed on.
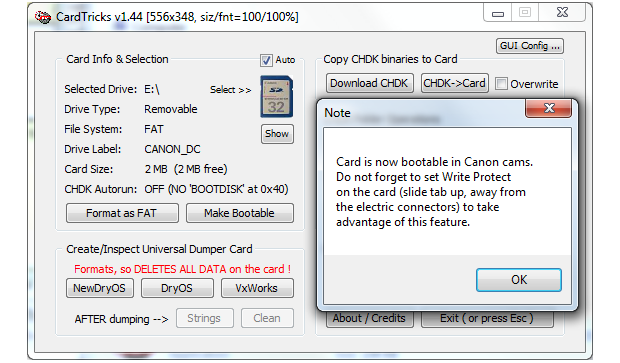
Below are some handy links that go through the details of installing CHDK. In a nutshell: find the appropriate firmware for your camera, format your memory card with a card reader, make the card bootable and install the CHDK firmware. I ended up making two partitions on my 8GB SDHC card and installed CHDK on a small 2MB bootable partition.
 A program called Card Tricks makes the CHDK installation easy for Windows users
Once you've got it up and running — (and if you run into any issues, leave a comment here and I or some other readers will help you out) — and have tinkered with it a bit, you'll want do the following (as described in the link above):
- In the camera's menu, go to the Drive Settings page (at least on my 990IS), set the Self-Timer to Custom, the Delay of 0 seconds, and set Shots to however many you want for your bracketed HDR sequence (at least 3).
 Canon 990IS - Setting Self-Timer for auto-bracketing
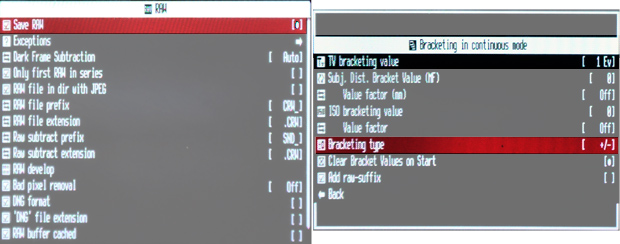
- In the CHDK menu (hit ALT then Menu) enter the RAW settings and turn on Save RAW
- Also in the CHDK menu, enter the Extra Photo Operations page and scroll down to Bracketing in continuous mode. Adjust the bracketing value to the EV offset you want for each photo in the sequence. You can start with 1. If you have more than 3 photos you can make it smaller, but you can experiment with the results. Before exiting the page, set Bracketing type to +/-.
Note: My particular CHDK version is a beta autobuild and did not appear to let me change between (Tv) Shutter and (Av) Aperture priority exposure. If you have this option, select Av. CHDK also crashed my camera whenever I did auto-bracketing and had Save RAW enabled... your mileage may vary.
 Some CHDK menu screens - RAW and bracketing settings
Here's a quick video (Update 2024: Video no longer exists) where I setup some of these settings and took 5 auto-bracketed shots. Contrary to my own advice I did not have a tripod and set the camera on a table that moved slightly after I hit the shutter button.
Despite the subtle movement between shots, I was able to come up with this HDR image below, comprised of 3 JPGs, just to show you want is possible without RAW and without a tripod. Still looks acceptable to me!
 HDR image composed of 3 JPG photos from a CHDK Canon 990IS
Unfortunately, working with RAW files created by CHDK'd cameras requires an extra step. The *.CRW files it creates cannot be opened by any professional image manipulation software. (Note: newer CHDK cameras can save to Adobe's royalty free DNG format, which can be read by some pieces of software.) Instead, the CRW files must first be converted to DNG using the DNG for PowerShot-2 converter (Mac version here).
 Using dng4ps2 to convert a CRW file from CHDK to DNG. You must first go to the dng4ps2 settings and select which camera you're using. The Mac version of dng4ps2 is currently outdated and does not include newer cameras.
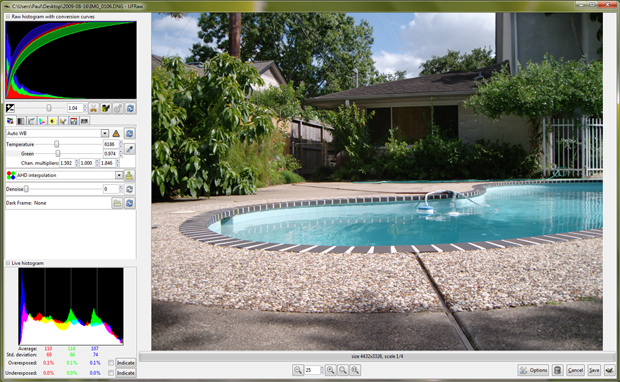
Once in DNG format they can be opened using something like Adobe Photoshop with Camera Raw, Adobe Photoshop Lightroom, Apple Aperture, or GIMP with the UFRaw add-on.
 Using UFRaw to open a DNG file and import to Gimp
That's a quick run-through of what is involved with taking auto-bracketed photos with a Canon Point & Shoot camera, thanks to CHDK. Now onto the same setup with a big DSLR camera..
DSLR Camera Setup
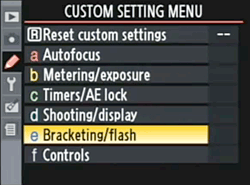
 Comparatively, getting setup for HDR is much easier with a Digital SLR camera. I can't show how to do this with every camera, so I'll just go through it with my Nikon D90 and hopefully setting it up on your particular DSLR isn't too different. The first thing you want to do is put your camera in either P or A mode. Either way, it is very important that you do not change the aperture between pictures. You want to get different exposures at the same f stop, otherwise the depth of field would vary and make for an odd, blurry HDR image. After setting it in Aperture Priority mode, I went into the D90's Custom Setting Menu, and selected Bracketing/flash.
I then set Auto bracketing set to AE only. I personally like setting Bracketing order to Under/MTR/Over, but it's not really that important.
 Nikon D90 menu - Auto Exposure Bracketing
 Nikon D90 menu - Bracketing order
Next, find the bracketing button on your camera. It's labeled BKT on the D90.

While holding down the BKT button, move the rear jog dial until the top screen shows 3F on the top left. That's the number of shots it will take. Then, while still holding down the BKT button, rotate the front jog dial to the EV you want between each shot. I'd recommend somewhere between 1 and 2. You can let go of the BKT button now.
 Now all we have to do is hold down the button that looks like it has stacked images (above the AF button), and rotate the rear jog dial until the icon changes from "S" to "L", with a stacked images icon. This is continuous shot mode.
Right now, you can hold down the shutter button and your camera will take 3 shots continuously, each with a different exposure. That's great, but this can be tied to a timer so you don't have to be there holding down the shutter button. Head back to the main menu, navigate to Timers/AE lock » Self-timer, set the delay to whatever you like, and the shots to 3 (or whatever you set your camera to do with the BKT stuff above). Finally, go back to the button that looks like it has stacked images, and use the rear jog dial again to select the same L mode, but with the timer icon next to it. Now you only have to tap the shutter once, and let your camera do the rest, undisturbed and most importantly, without introducing any unnecessary vibration.
If you want to get nit-picky, it is generally a good idea to take the White Balance setting off of auto and put it into whatever your particular scene requires. And if your camera isn't already set to save to RAW files, now would be a good time to set it do to so. That is Shooting Menu » Image Quality » NEF (RAW) on most Nikons.
Take some shots..
The next and final part of this series will deal with taking the 3 (or more) shots at different exposures and creating an HDR image with a variety of software solutions. Until then, take some shots with your newly configured camera! For those shooting with a DSLR in aperture priority mode, the aperture you should set your camera to depends on the exposure and zoom as well as your subject and available light. Set it to a middle aperture like F8 and work from there. It is also recommended to use the lowest ISO setting possible. Higher ISOs introduce noise into the photographs, which will then look worse after the HDR process (HDR techniques generally amplify any present noise).
Feel free to leave a comment if you enjoyed this post. :-) What would you like to see me cover in my next post in this series?