By now you are probably waiting for the final part of this web app series so you can actually begin putting something together from what you've learned in Part 1 and Part 2. I won't disappoint you then. I wrote an example web app available for download at the end of this article.
Handling Multiple Items
In Part 2 I finished showing you how to handle user accounts. Now it's time to show you various ways of manipulating data in your database. From now on I'll assume you have another database table other than the users table. Using the downloadable web app I made as an example for this series, we have the contacts table. The contacts table has 7 fields - id, name, street, city, state, zip and created_by.
What would I do if I wanted to list each contact stored by a particular user? I would use a while loop in the following fashion. However, before I display and explain the code let me tell you about those 7 fields. I don't think I have to explain the first 6 so let me go straight to created_by. I use this field to store the name of the user who inputted that contact. This gives me an easy way of sorting out contacts by user. In a form that I have setup (form.php in this example), the user's name (user) is automatically stored in the created_by field whenever a new contact is added. When you start dealing with a very busy database, storing the user name with each contact can become bulky. However, for this small example there won't be any noticeable slowdown.
get_contacts = "select * from contacts where created_by='user' order by name, state";
result = mysql_query(get_contacts);
//loops through the multiple results of the get_contacts query
while(contact = mysql_fetch_array(result, MYSQL_ASSOC)){
    echo "<b>" . contact['name'] . "</b><br />" . contact['street'] . "<br />";
    echo contact['city'] . ", " . contact['state'] . " " . contact['zip'];
}
First there is the query get_contacts - it retrieves all fields (denoted by *) for every contact stored in the contacts table by the logged-in user, user, and then it orders the multiple results by name and then state. I then process that query, save it as result and then initiate a while loop using the result to leave me with an array, contact, which I can access. Within the loop I can access each field from the contacts table in the array format - contact['FIELD_NAME']. This sequence of steps is applicable for a range of simple database actions.
I did a lot of concatenating while echoing the field elements, as referenced by the dots which connect elements. Any non-PHP elements must be contained in quotation marks at all times while PHP elements don't need them.
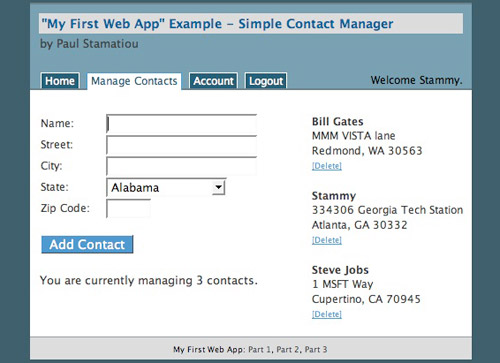
 What the finished product looks like.
One element of that screenshot not in the code I showed was the "delete" link under each contact. To get that functionality, I added one more line within the loop.
echo "<br /><a href='manage.php?delete=" . contact['id'] . "'><small>[Delete]</small></a><br /><br />";That line simply creates a special link with a "delete" parameter set equal to the id of that contact. That's all fine and dandy but it won't work until I grab that parameter and put it in a usable format. To accomplish that I must first add the next chunk of code to the top of the file.
delete = make_safe(_GET['delete']);
if(delete !== NULL){
	delete_contact = "delete from contacts where id='delete'";
	if (!mysql_query(delete_contact)){
	  	die('Error: ' . mysql_error());
	}
	header('Location: index.php');
}
Dealing with PHP url parameters is fairly easy - grab the value of the parameter with _GET, the opposite of our _POST friend from Part 2. To protect from SQL injection exploits I ran that through my trusty make_safe() function. The next phase of dealing with this new variable is to check if it is null, or is empty and therefore is not present in the url. However, if it has a value I use my if loop to execute some MySQL code to delete every field of the contact where the id is equal to the value of the delete variable.
Done for Now
Hopefully you've learned enough PHP and MySQL info to go through the code in my example web app, understand how it all works and start working on your own web application. Without any further hesitation, here is the example web application, a simple contact manager: webapp.zip (11kB) (free for non-commercial use).
I spent many hours on this web app example and these how to's, so if you learned or gained anything through them please let me know by leaving a comment or linking to them. As a disclaimer, don't trust the code presented in these tutorials for safekeeping precious data. I only know a bit about security and there's no doubt in my mind that it could easily be exploited in some way by a professional.