
A lot has happened since I published my article on the open source decentralized social networking service Mastodon a few weeks ago. I saw a lot of interest in and discourse around that post that was great to see. Since then, a few notable things have happened that have caused Mastodon usage to spike yet again.
Twitter unsurprisingly ended up entirely banning third-party Twitter clients, including hugely popular ones like Tweetbot and Twitterific. I briefly summarized the ebb and flow of being a developer working with the Twitter API in the last post:
"Long story short, Twitter made it hard. Hard to even get an API key and get your app approved. Hard to get bugs fixed or new features accessible via the API. Hard to access the data developers wanted. Hard to not hit arbitrary constraints or limits. Things were always changing, rugs were pulled, announcements about new priorities and new rugs were made, only for them to be pulled again (read this, this and this)".
Well, the final rug was pulled. Fortunately, there was a bit of a silver lining. The folks at Tapbots were able to launch their lovely Mastodon app Ivory. The launch went so well that a flood of people took that as an opportunity to take a closer look at Mastodon and join. Mastodon has grown from 500,000 active users last year to now being almost at 10 million.
Mastodon just keeps getting better. There's more authentic conversations and far less linkbait and thread spam from influencers. It feels like a place I'd prefer spending more of my time to catch up on things.
With my interest in Mastodon, I recently decided I wanted to take the next step and host my own Mastodon server for my account: @stammy@stammy.design. In my previous post about Mastodon I provided some details about different routes you could take to self-host Mastodon. Today, I'll show you how you can host your own Mastodon instance, step-by-step.
Table of contents
This is a long post and took me more than a month to write, but you don't have to go through it all. At a high-level I show two routes to hosting your own Mastodon server: a simple route employing a fully-managed webhost, and a much more comprehensive and advanced route involving a traditional webhost.
I also make sure you're good to go with maintenance tips, debugging tips, scripts to backup your database, purge storage and more.
So you want to host your own Mastodon server?
And why you would want to do host your own Mastodon server? If you've read this far, you probably already have a hunch or two as to why, but here are a few excuses to choose from:
-
You value being in complete control over your Mastodon identity, data, and privacy. You don't want to risk it on an instance where you don't know the moderators, don't want to be under their control, or simply don't trust them to maintain the server long-term.
-
You want a speedy Mastodon experience. By controlling your own instance you can set it up with the appropriate resources and hosting location near you to keep Mastodon feeling speedy at all times. That's not the case with various instances, especially the larger ones experiencing rapid growth.
-
You want a weekend project, because Mastodon is open source and able to be self-hosted
-
You see lots of people running their own instance and it seems cool.
-
You want a better Mastodon user name, one that speaks more to your identity or interests. Run Mastodon on your long-time domain name or an entirely new one, paired with whatever user name you like.
Whatever your reason for wanting to host your own Mastodon server, I'm here to help you get started. I'll walk you through the process of setting up your own Mastodon server. I'll also provide some tips along the way to help you get the most out of your Mastodon experience.
What you'll need
At a bare minimum, you'll need a domain, some money, and some time:
A domain. Picking the user name and domain name you wish to use for your new Mastodon instance is probably the hardest part.
You'll need a domain name you can connect with your new Mastodon server. You should also know the basics of how to modify DNS records on it. This varies by domain name registrar but is generally pretty easy to figure out. If you don't have a preferred registrar yet, Google Domains is pretty easy and you don't have to make a new account with two-factor auth if you're already a Google user.
Otherwise, I also like Amazon AWS Route 53, but it's a bit harder to use and they don't support nearly as many top-level domains (such as .design, .dev, et cetera) as other registrars.
Some money. For a single user instance you can get away with $6/mo with the lowest plan on masto.host. but if you have a lot of followers (or just want a beefier server), you'll want to upgrade to a bigger plan and that could run you closer to $50/mo.
And a few hours.
If you opt for a more involved hosting setup you'll need access to a few more things, such as an SMTP server to send emails, and optionally, access to a cloud service such as Amazon S3 to host media. I'll get into that in a bit.
Choose how you'd like to host
The easy way or the hard(er) way?
I'll show you two different ways to setup your own Mastodon server. For the most part I'm assuming you are only setting up Mastodon for yourself, or just a few people. This guide is not really meant for someone wanting to setup a Mastodon server that will accomodate hundreds of users as that will take you down a different path.
Option 1: Using a dedicated Mastodon host
The easiest way to get your own Mastodon server up and running quickly is with a host that specializes in Mastodon hosting. There are several, but I'll share how to use one of the most popular ones, Masto.host.
So what exactly do I mean by dedicated host? You won't have to worry about the typical setup and maintenance required with a regular host, like configurations, software updates, backups, et cetera. This might be route for you if you want the easiest possible way to get started, and having full server control is not as important to you. You won't have complete control over the hardware, the software (beyond Mastodon itself), how your media is stored and served, or anything lower level like that.
While you won't have the ability to tweak things and keep an eye on performance, but it's an easy way to get started for cheap. The most affordable Masto.host plan is only $6 per month for up to 20GB of media storage and 2GB database. For a casual single user without a lot of followers this should be okay. Masto.host lets you upgrade to higher plans if you need later on.
Personally, I did not want to use an option like this. I wanted to be able to serve my media files with a CDN, control the entire server config, as well as just know more about the hardware used in my server (SSD? NVMe SSD? etc). I always want to have significant headroom on my server in case any of my Mastodon posts goes viral. I don't want to have a bogged down server limiting the reach of my posts.
Option 2: DIY with a regular webhost and server
The other option is getting a VPS or dedicated server, setting up Mastodon and its dependencies. While this route takes considerably more time to setup, it's the most flexible by far. You control everything and you can eke out more performance and functionality. And some hosting providers will give you a head start with a Linux image with Mastodon pre-installed—there's quite a few things to configure but this makes it a bit easier.
Maybe you decide you want to modify the code to remove a rate limit, or change the character limit of posts? Maybe you want to move to a fork of Mastodon, like Hometown. Want to serve your media from a fast CDN on a subdomain that you have backed up? You can do all of that on your own server.
As expected, it will take longer to setup (a few hours) and it will probably cost more. But if you're reading this far, you probably already know your having own server is right for you.
Setting up Mastodon with Masto.host
Option 1, the easy way
This is by far the easiest way to get started. By the end of this section, you'll have your own Mastodon instance running on your own domain. You only need access to your domain name registrar (or DNS provider if use a separate service) so you can change a DNS record.
You don't have to worry about getting access to an SMTP server to send notification emails, nor will you have to figure out how to save media files to a cloud provider.
Sign up and change DNS
Visit Masto.host, choose a plan, and provide your domain name (though you can run it as a subdomain on masto.host if you wish). You'll be greeted with a page telling you to add a DNS A record so your domain name can point to your Masto.host server.
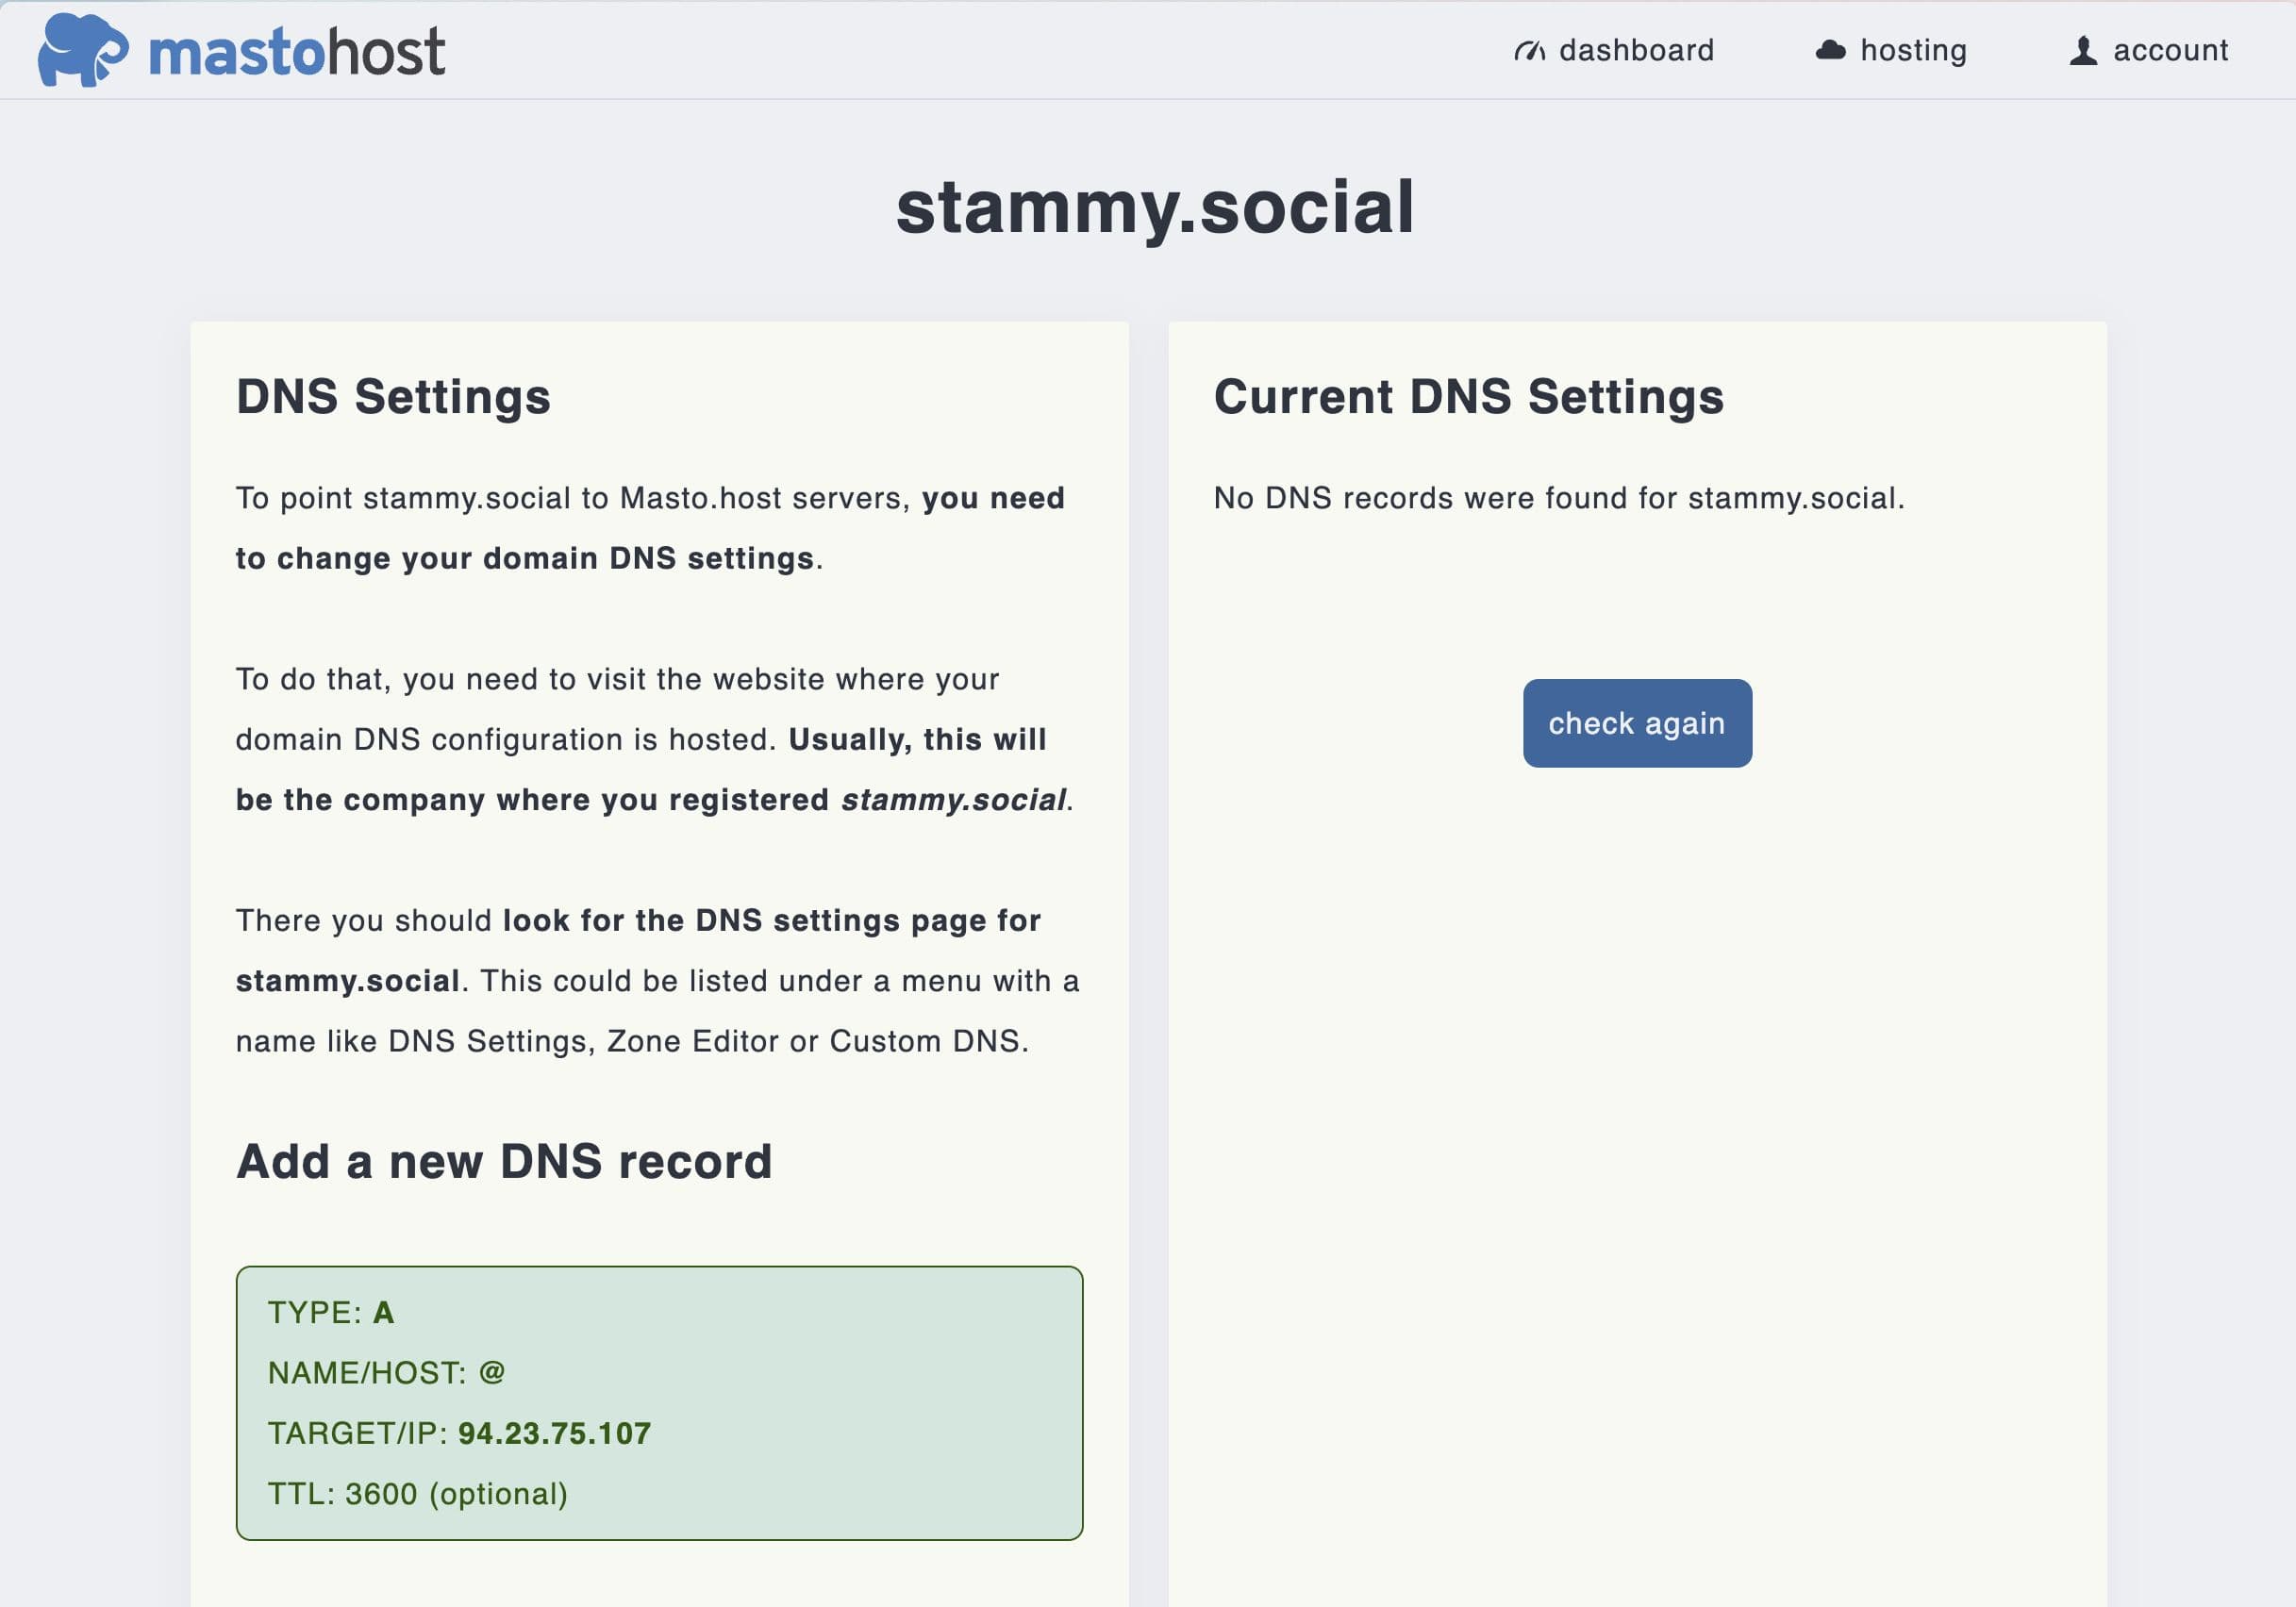
Every domain name registrar / DNS provider has a slightly different way of modifying DNS records, so I can't show too much more detail there. You'll likely need to log into where you have your domain name registered and look for some DNS or zone settings.
Installation
When you've successfully added that DNS record, Masto.host should automatically detect it and begin installation.
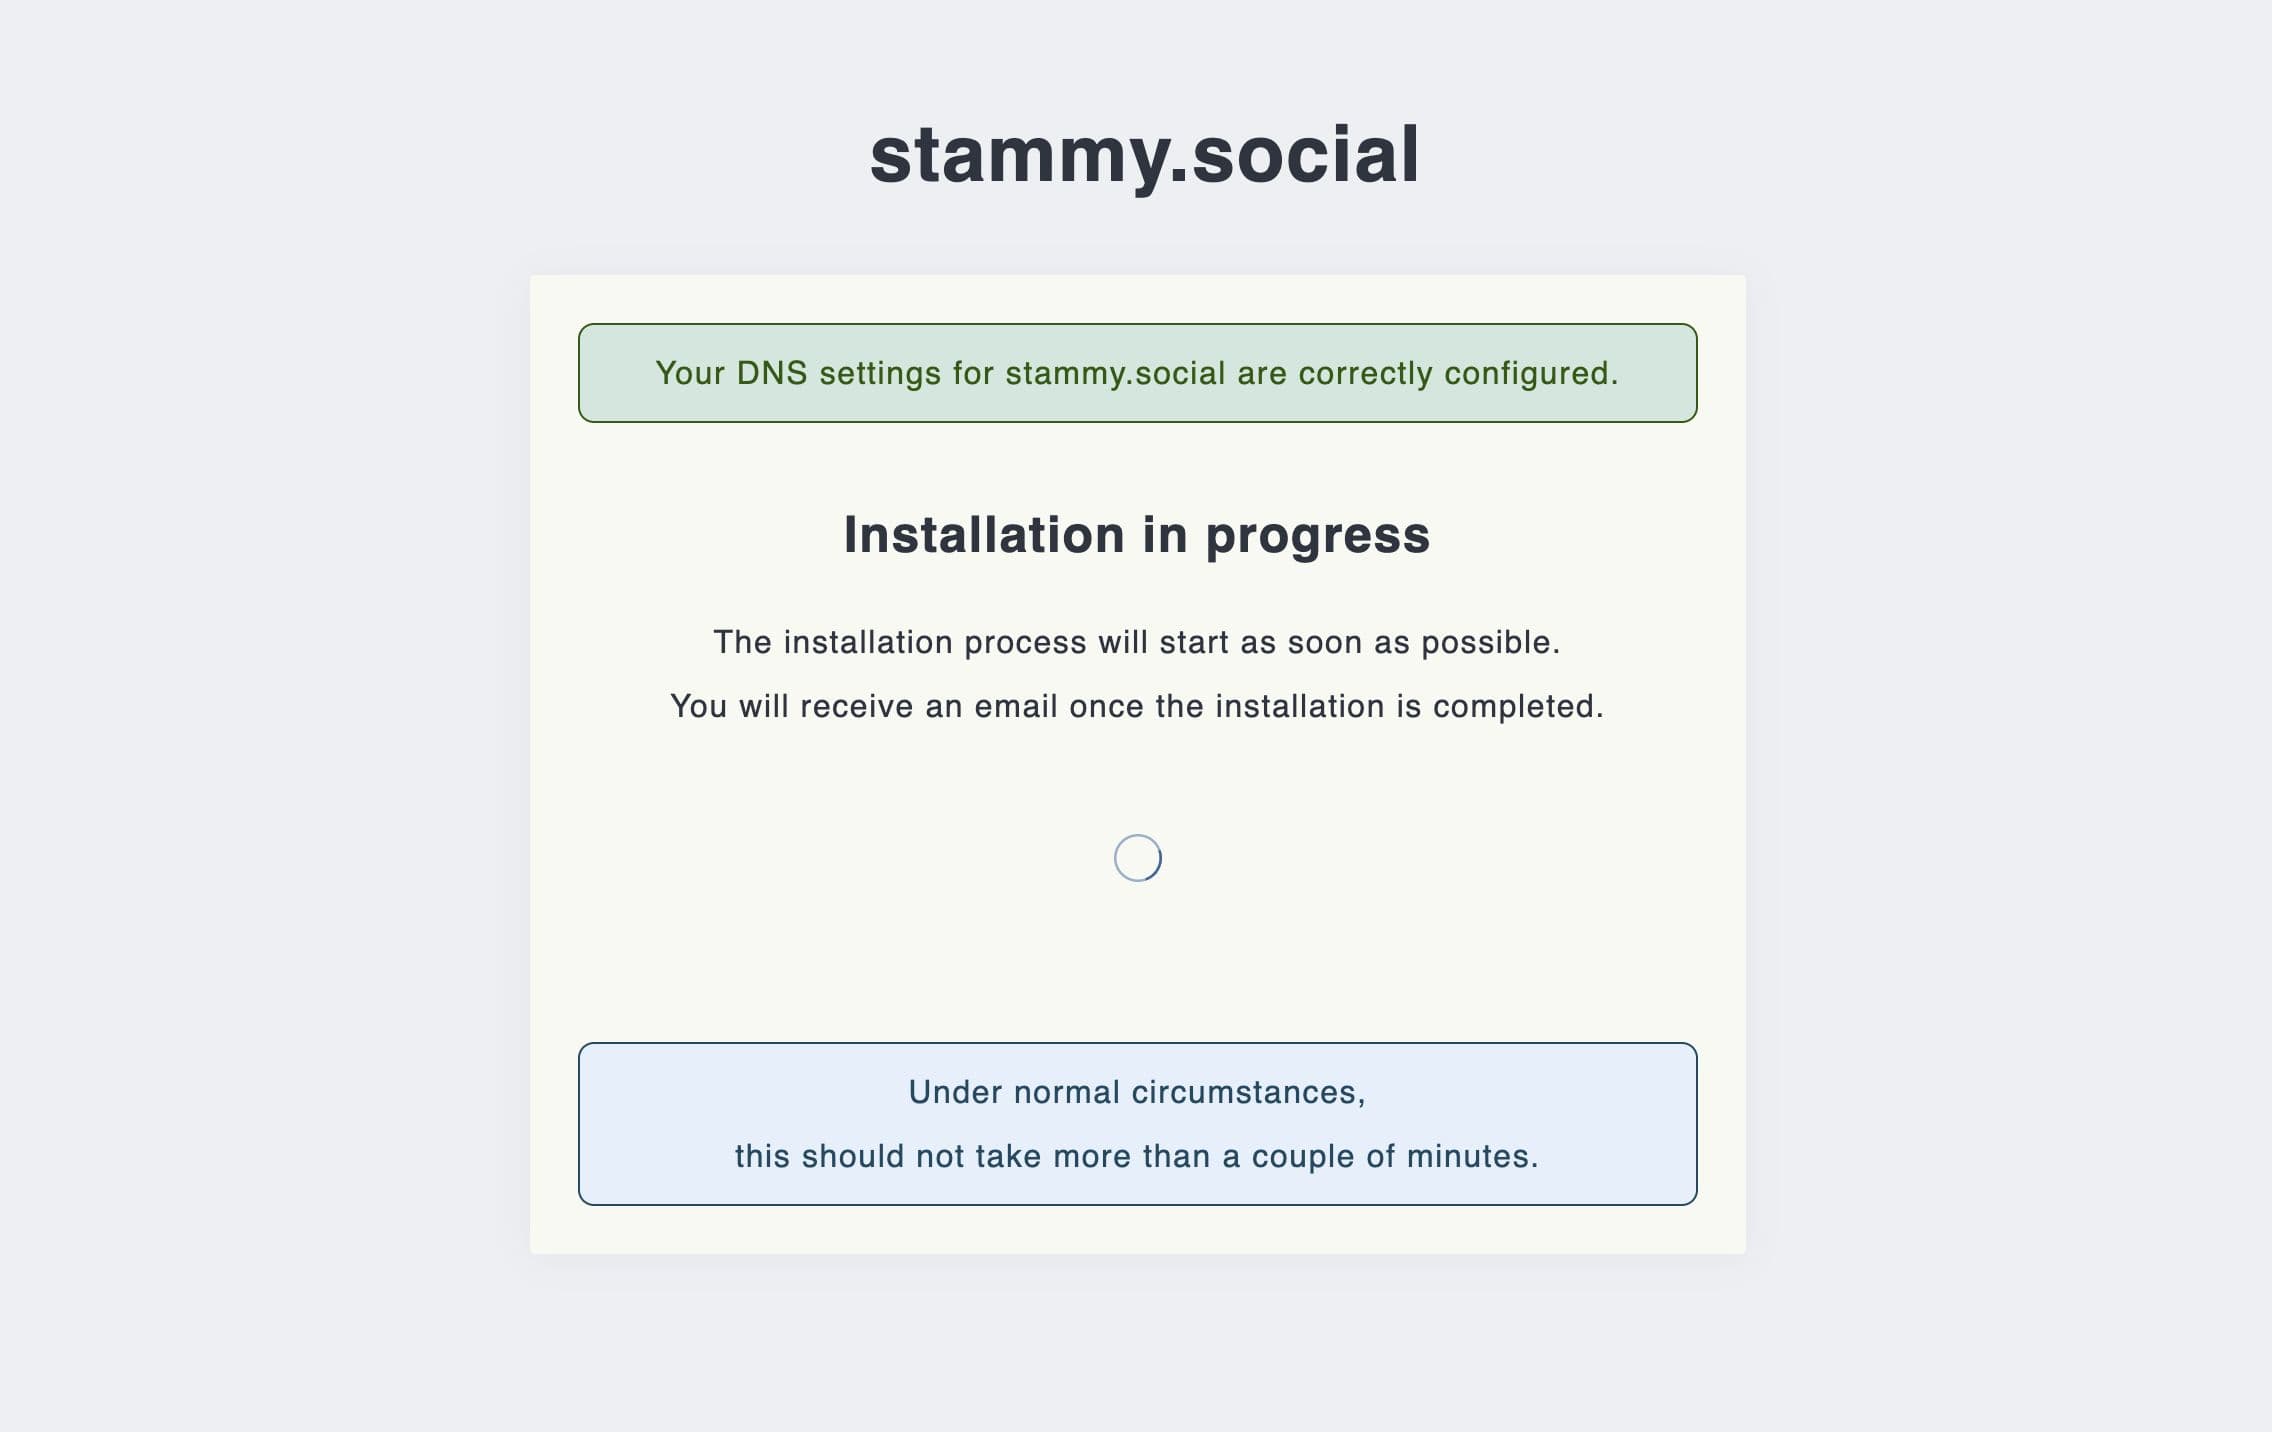
The installation screen said this process usually took a few minutes. Unfortunately, in my case it actually took a whopping 8 hours. I hope that's just temporary due to a temporary spike in new users.
Create your Mastodon user & upgrade permissions
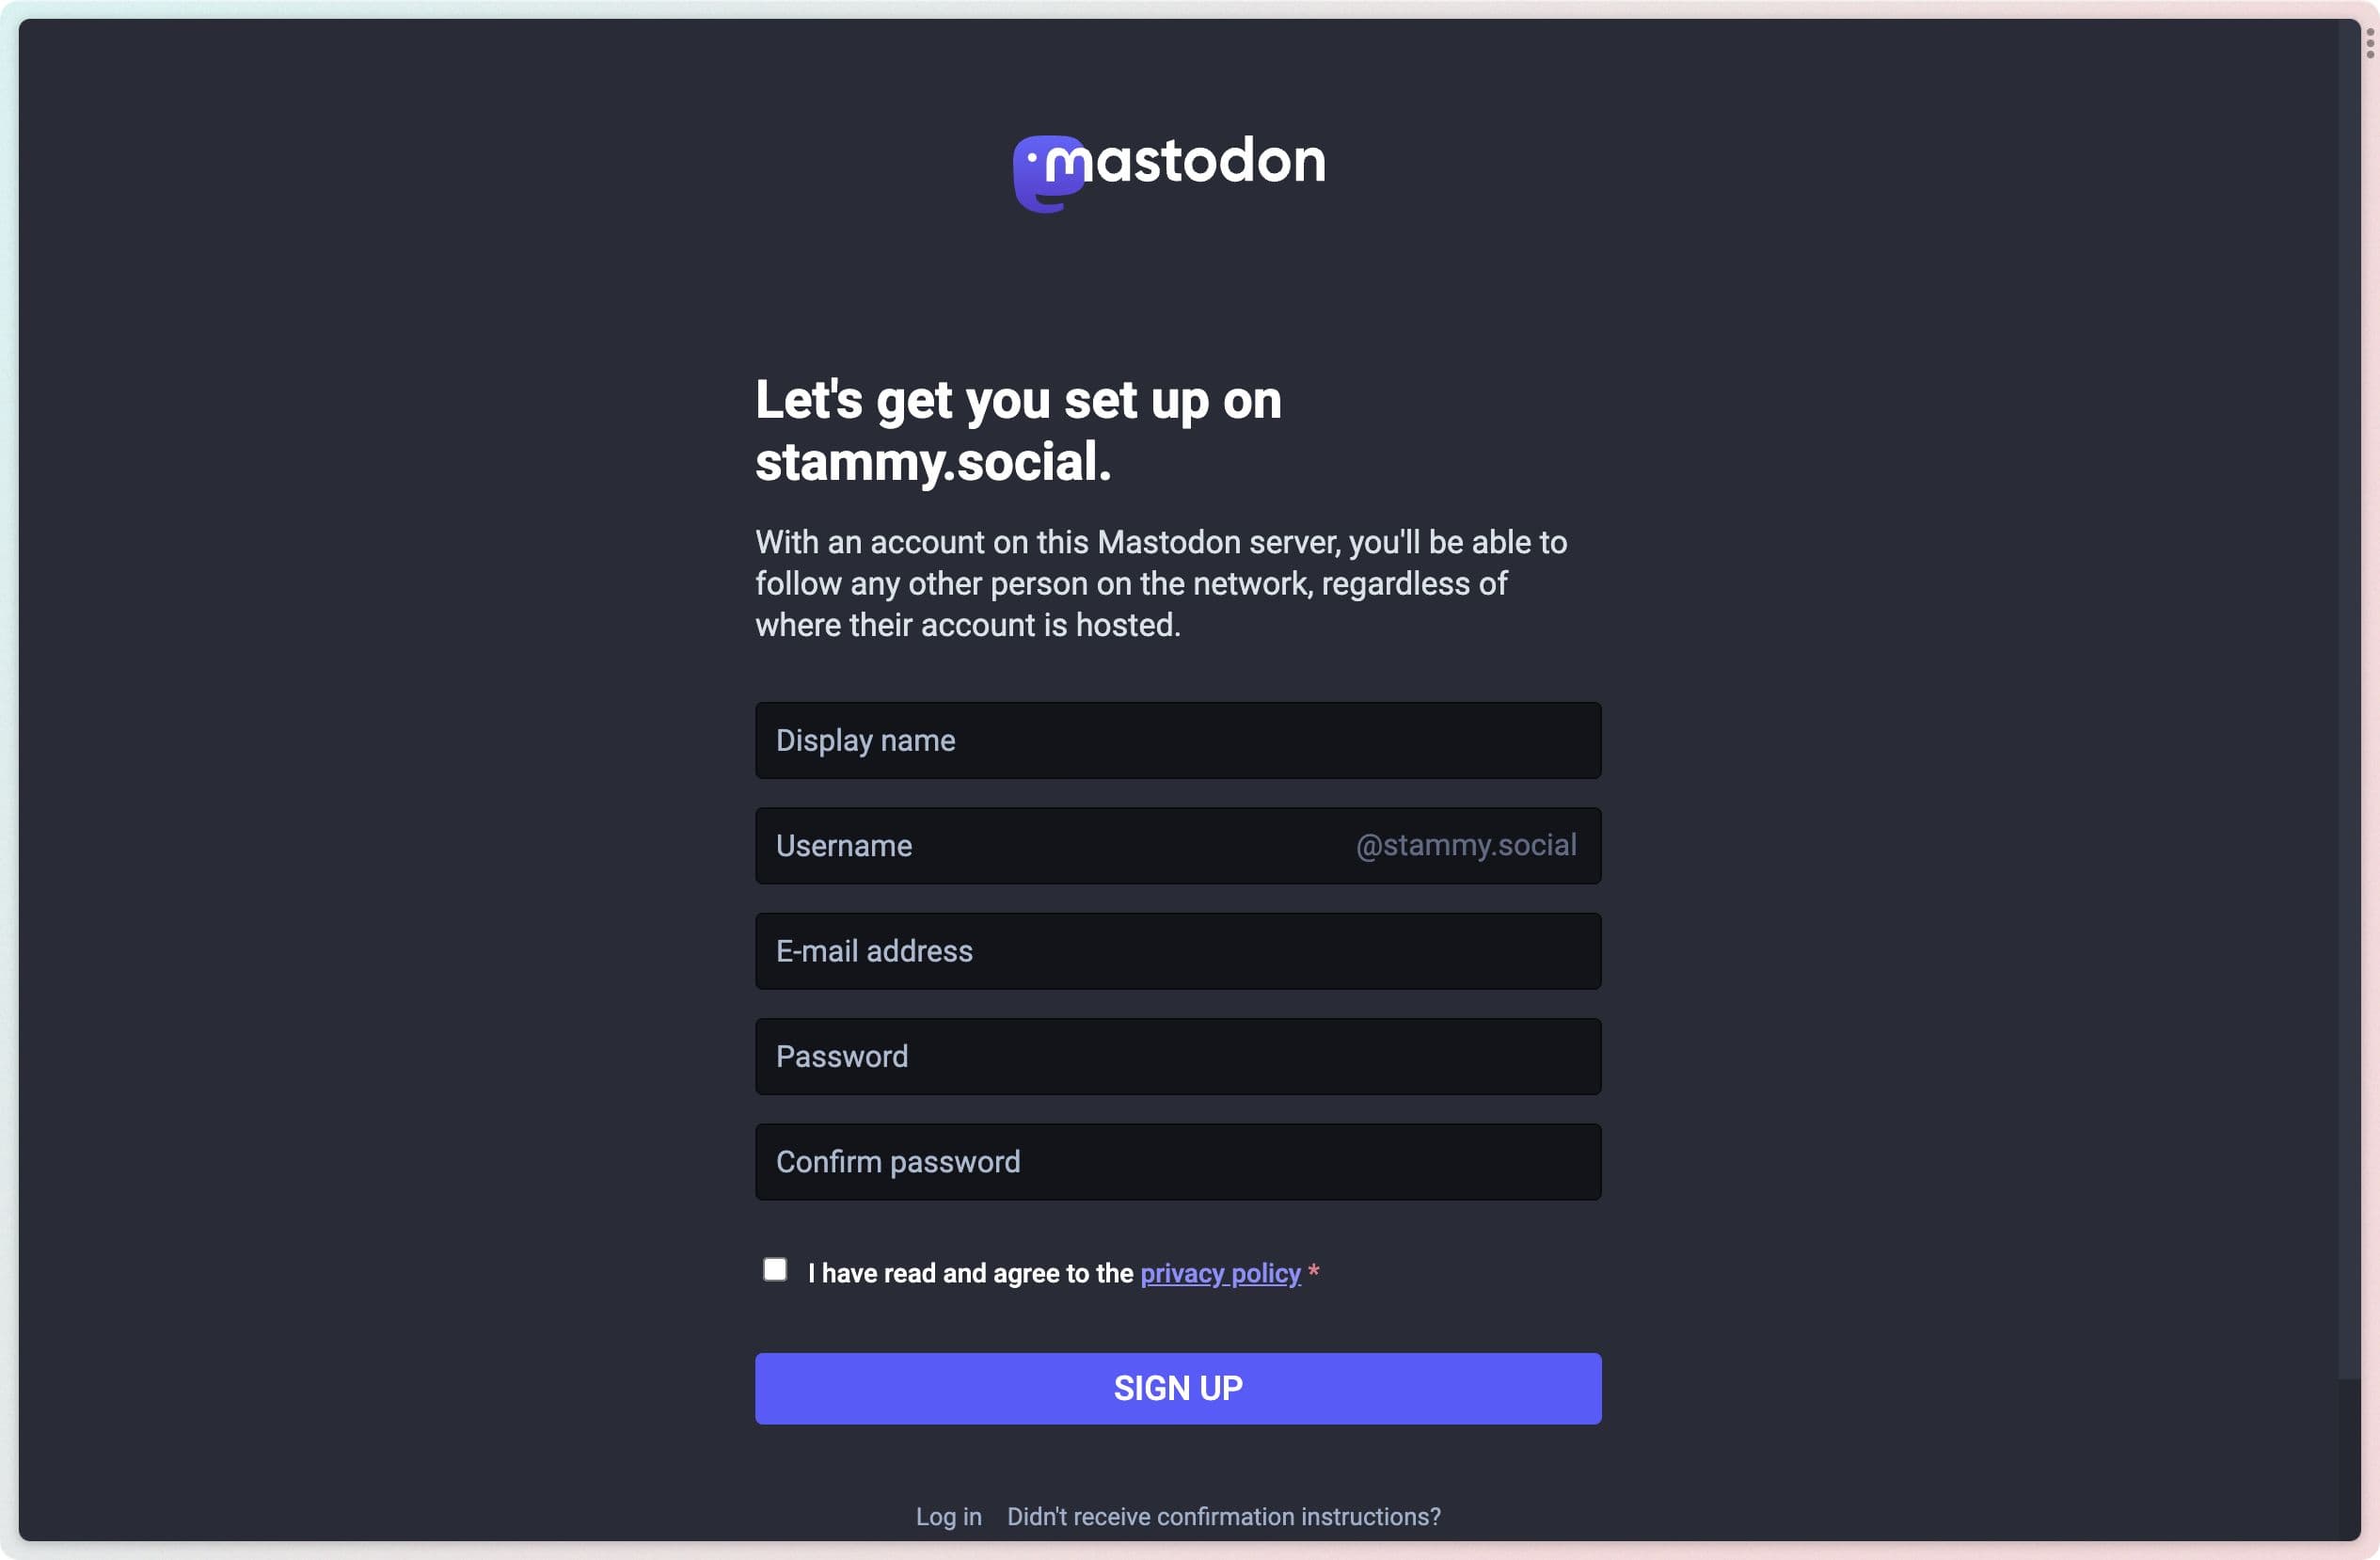
Once that's done you can go right to your new Mastodon instance and create an account. This will be your Mastodon account, so choose the username you want.
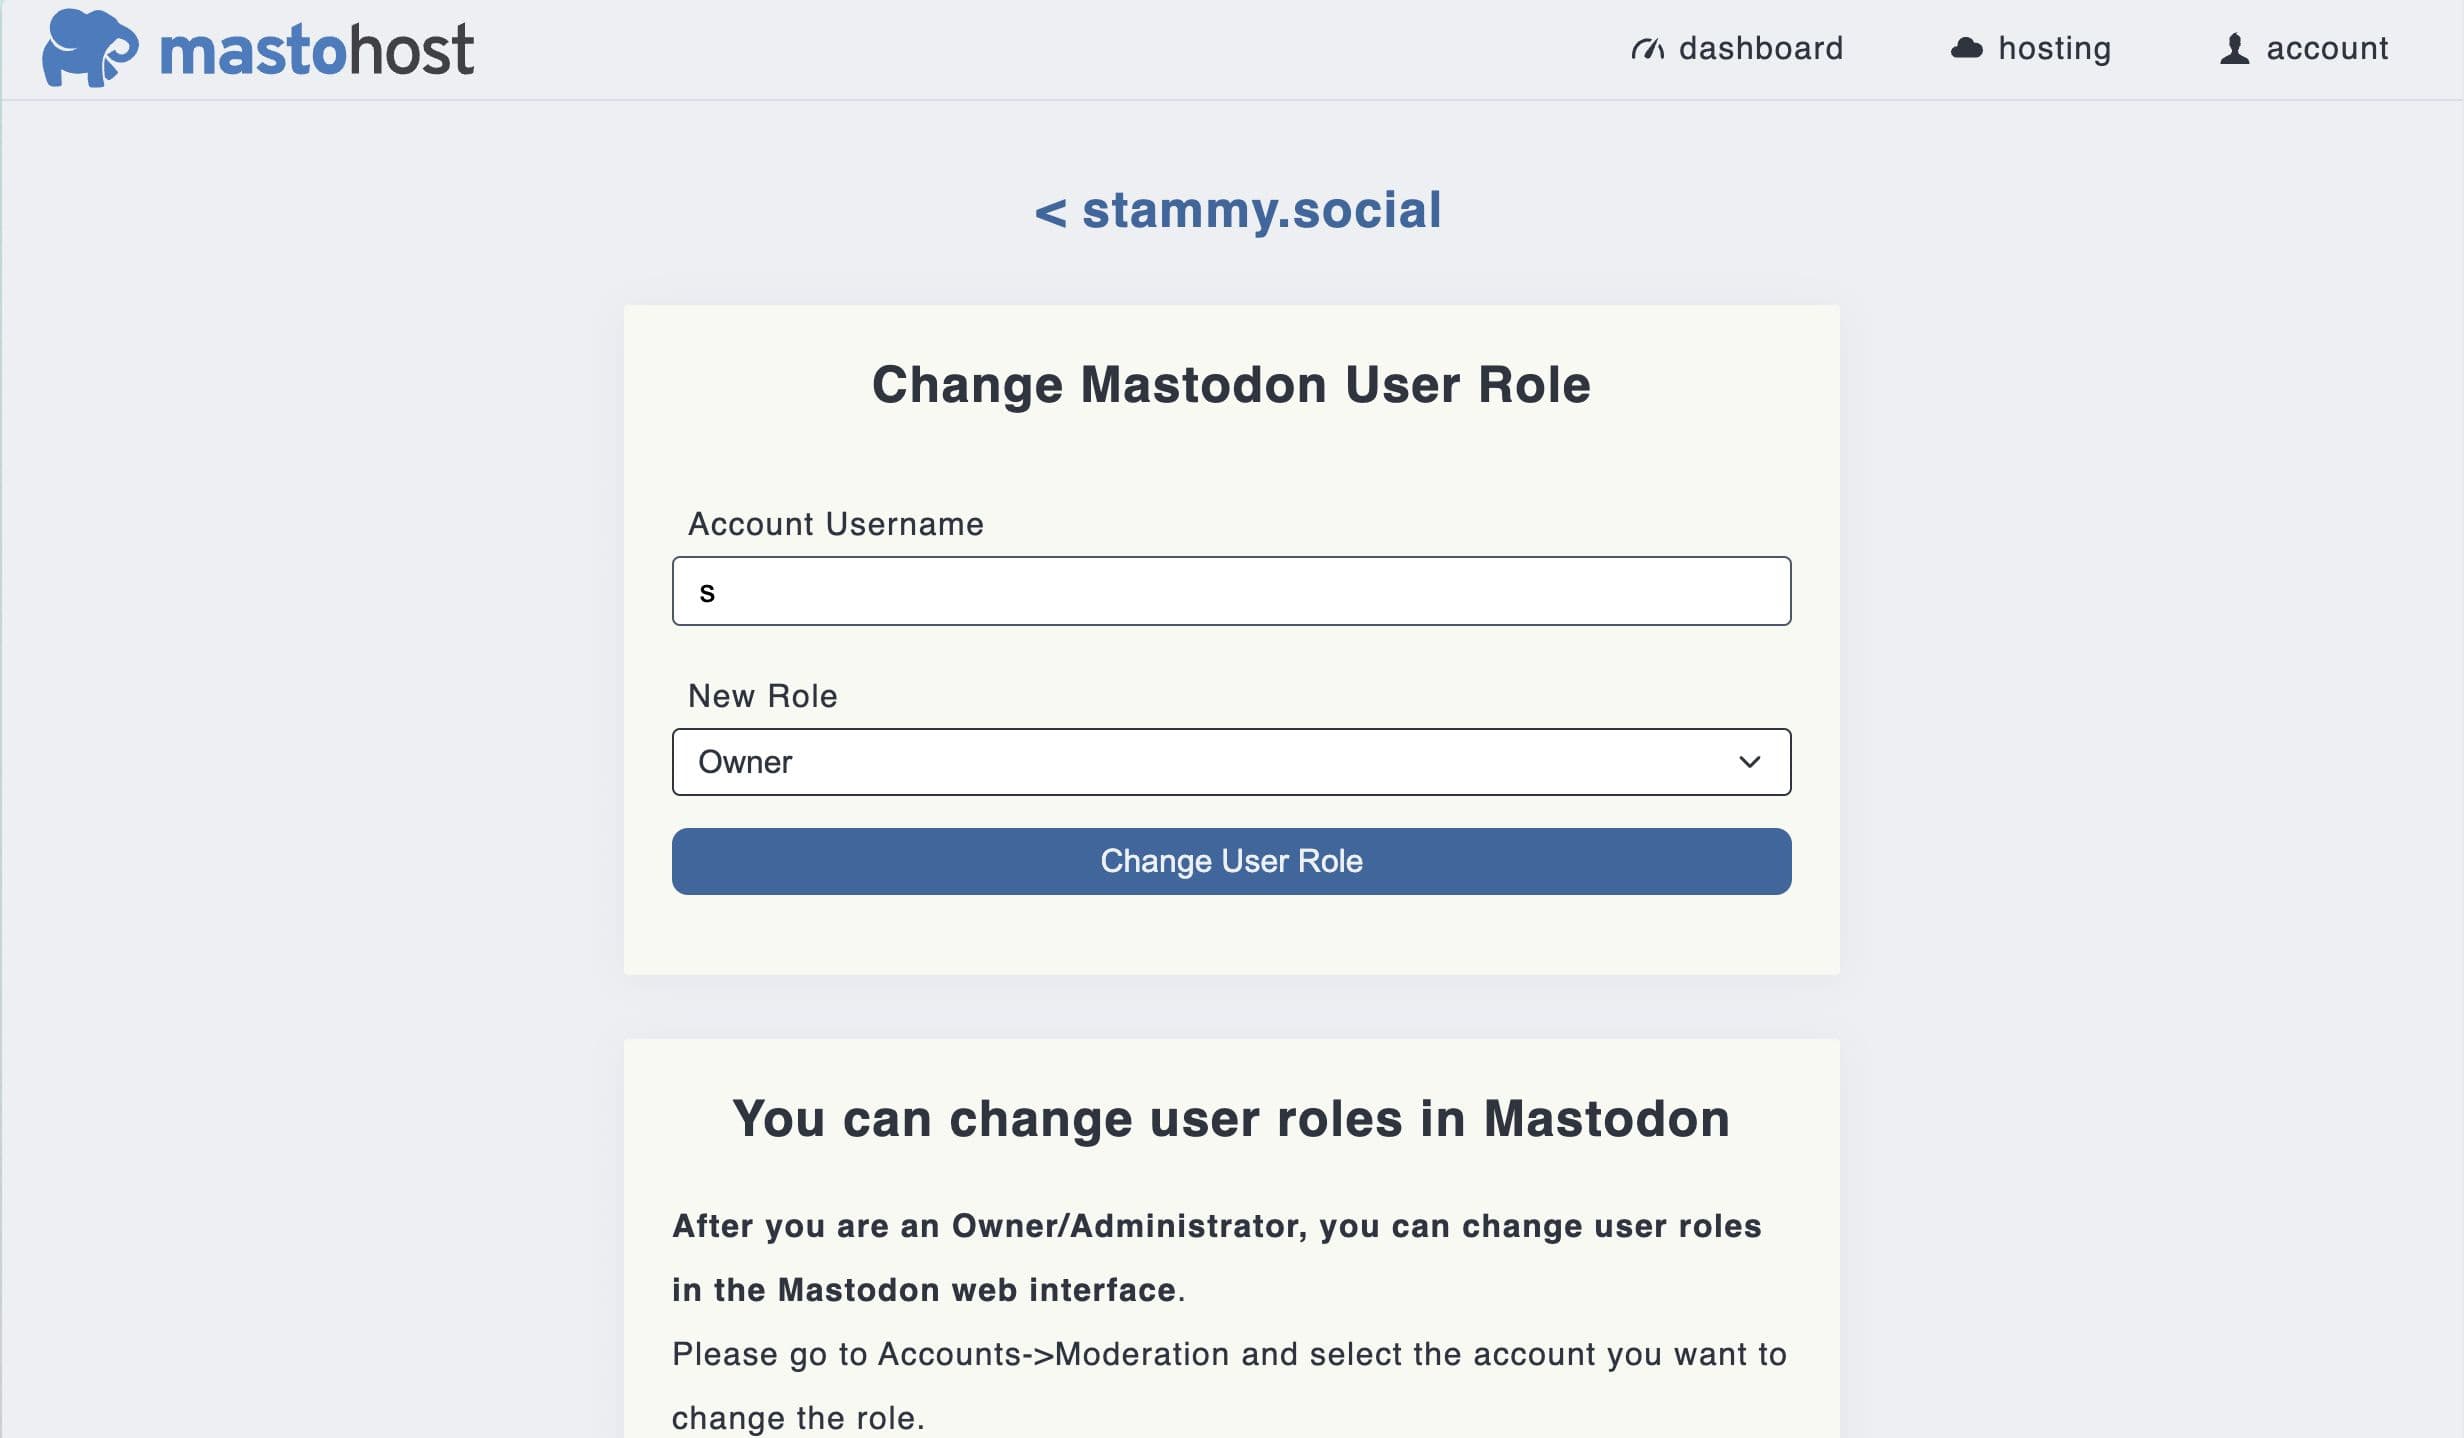
After creating your Mastodon account, you'll just need to do one more thing. Go back to Masto.host and look for a button called "Change User Role." Here you can upgrade your new account to have "Owner" privileges. Now your account will have access to a new Administration tab in Preferences.
That’s it!
That's pretty much it! There are some things to fill out, and settings to change in Preferences which I go over later in this article, but your server is now online and ready to explore!
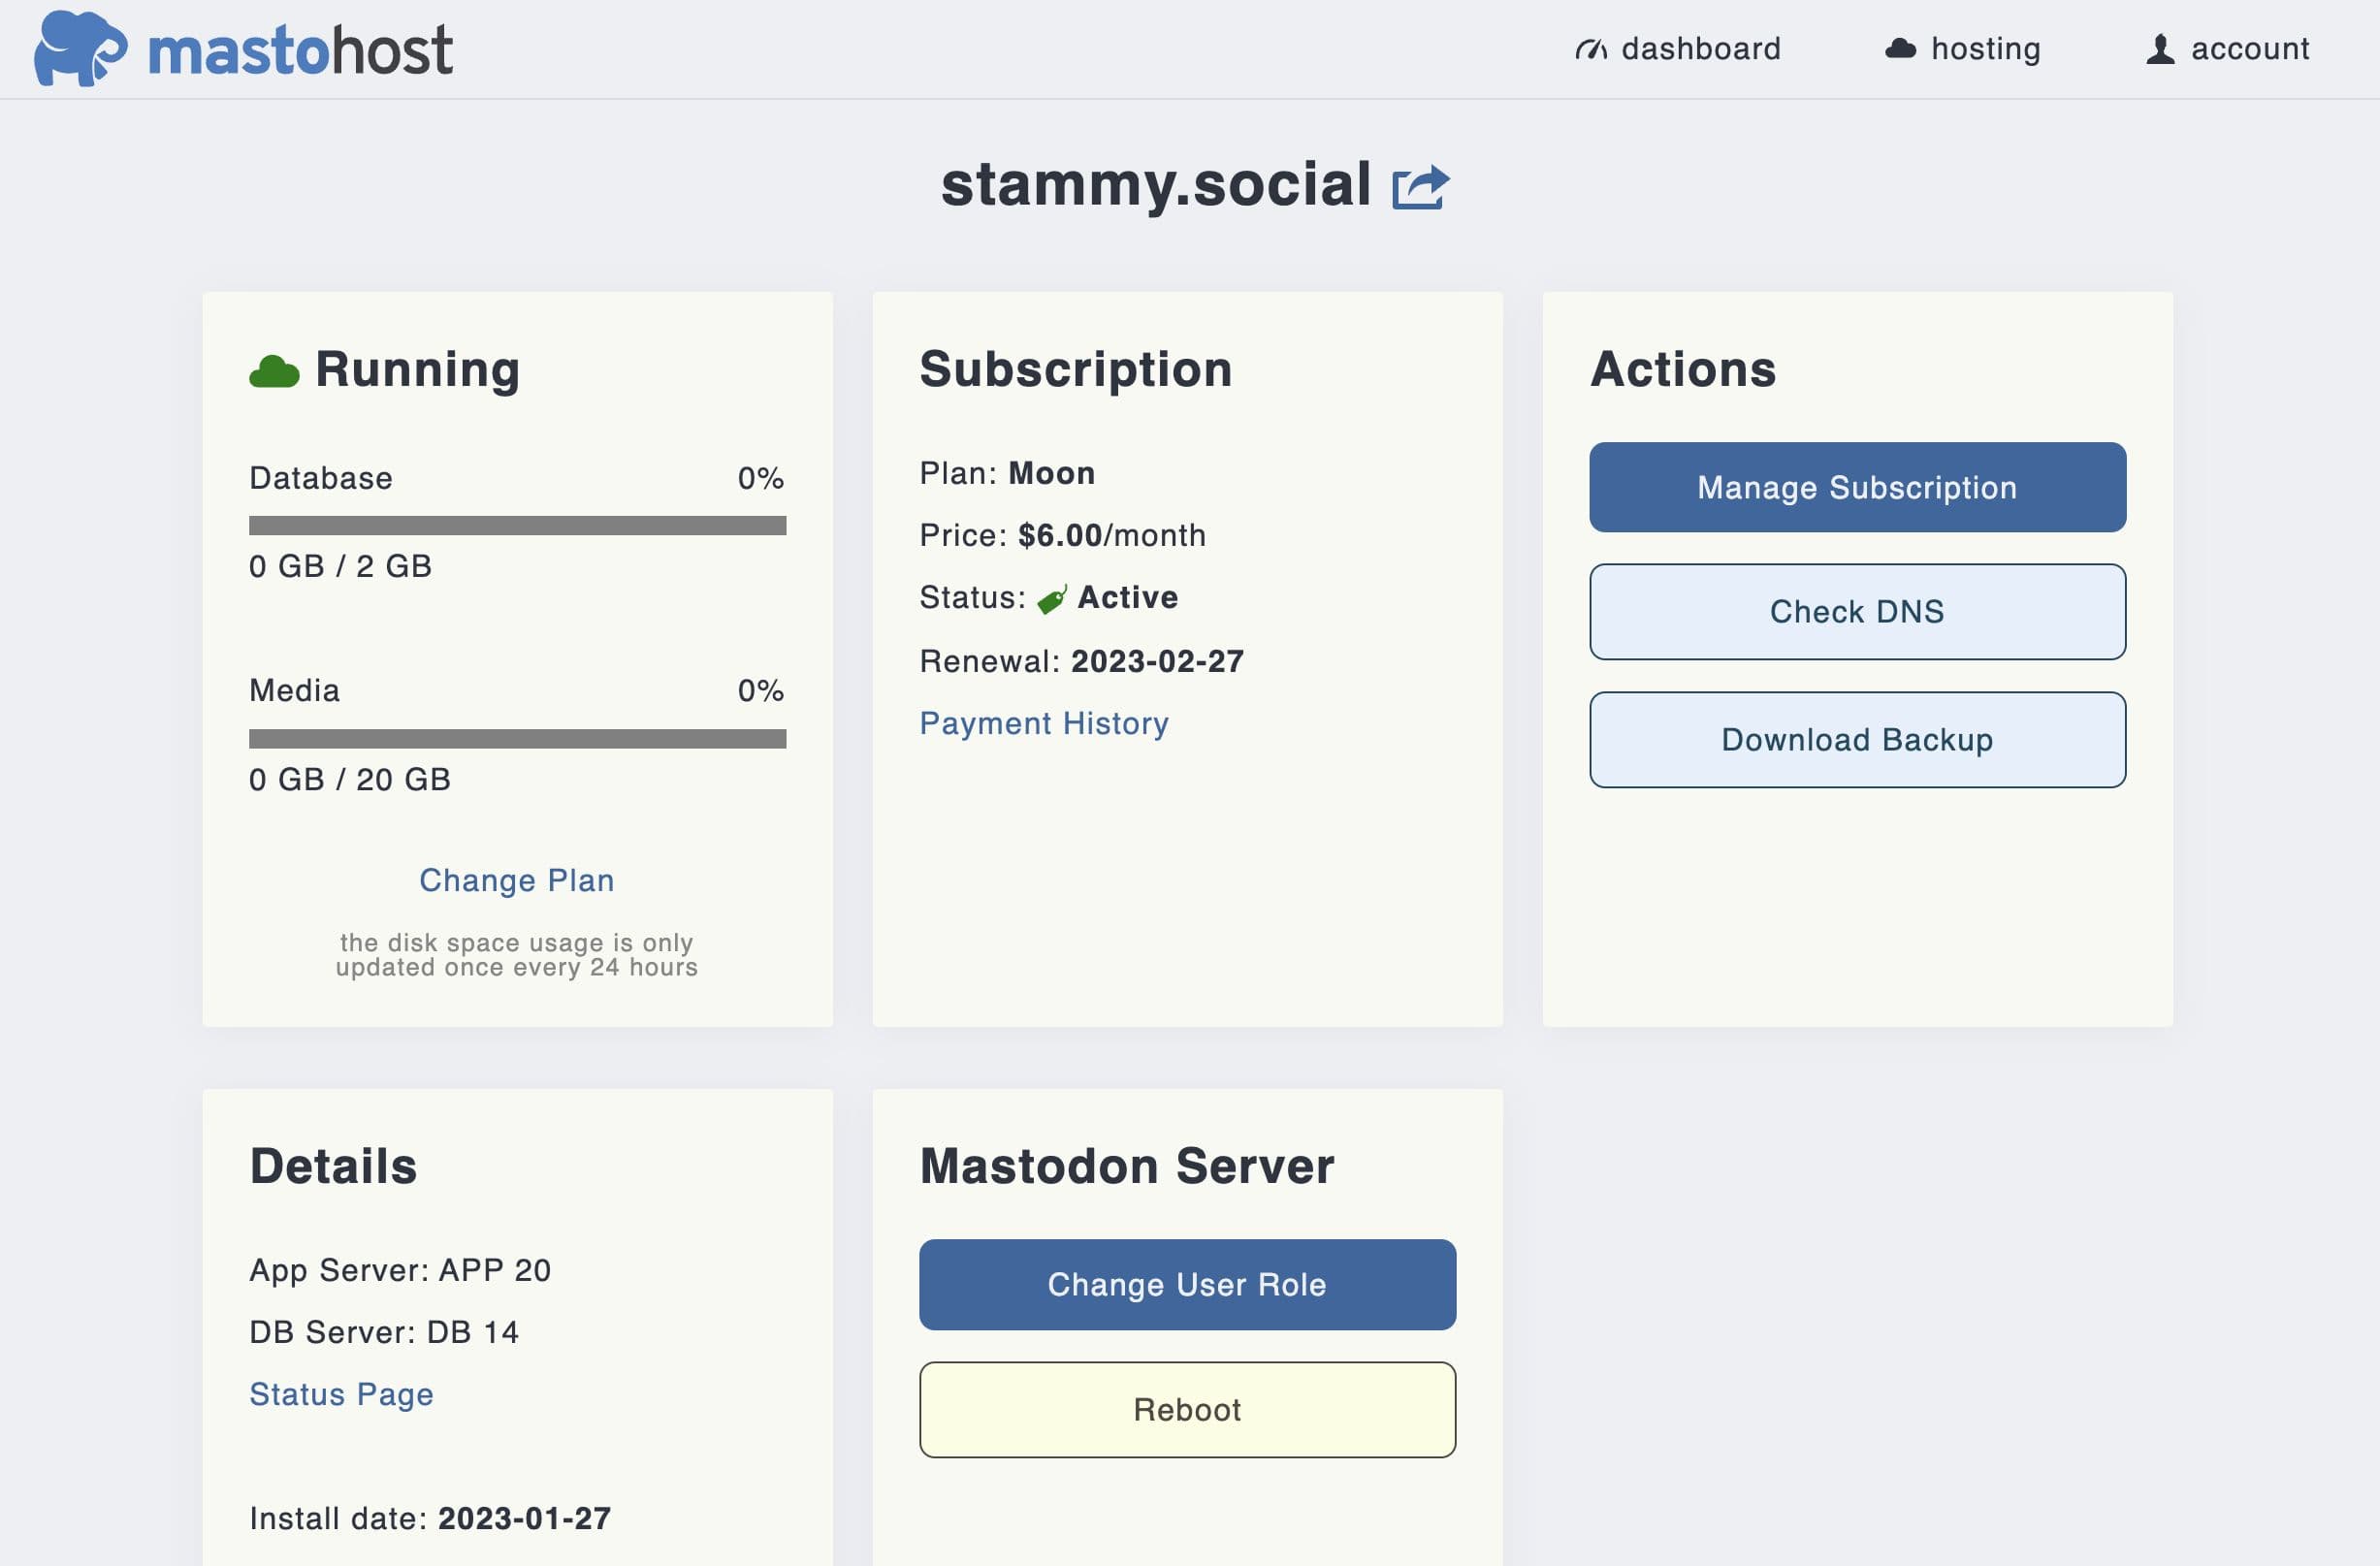
The Masto.host site leaves a lot to be desired. You can only see how much storage your media and database use.
Aside from that, there's not much you can control or change with Masto.host. The site lets you do a few things like download daily backups for your own safe-keeping, change your plan, and opt to install ElasticSearch for an additional monthly fee.
ElasticSearch lets your Mastodon instance have full-text search for logged in users to search their own posts, bookmarks, favorites, and mentions on your server. I probably would not recommend it if you have the smallest server plan as it can use a good bit of RAM; it's unclear how much RAM your Masto.host server has and how much RAM ElasticSearch is configured to use.
What you can't do
There are a few things you won't be able to do with a setup like Masto.host where you don't have control over the exact configuration. One of these is so-called single user mode. This mode makes the homepage your profile instead of a timeline of users. Typically, you would just update your .env.production file enable it. Though this is a pretty easy thing for Masto.host to build into their web dashboard as a future setting.
Similarly, you can't do a more advanced username where you could have a username like you@example.com even though Mastodon may actually be hosted on a subdomain like you@social.example.com. This is described in the Mastodon documentation as WEB_DOMAIN.
Setting up Mastodon with a regular webhost
Option 2, the not-so-easy way (DigitalOcean VPS)
This section is for people like me that want more control over their server and the software that runs on it, and don't mind a few twists and turns to get there. In this section we'll pick out server hardware and options, create an account to send emails with SMTP, setup media storage with a cloud provider, follow a setup wizard in the command line and then configure a few things.
You should be comfortable with Linux and command line basics for this setup process as well as ongoing server maintence.
Getting an SMTP server
First, we'll need to get access to an SMTP server to let Mastodon send email notifications. While this seems like a step that should be optional, it's required by Mastodon to send emails used to verify new accounts. There are many ways to get access to an SMTP server:
-
Setup and configure an MTA like
postfix,exim, orsendmailon your server. This is not a particularly easy route. You may still have deliverability issues, or your webhost may restrict SMTP. It's also not advisable to run an SMTP server on the same IP as your web server. -
Use your email provider's SMTP server. If you use GMail (details linked), Outlook, Fastmail or similar email service providers, you can try to just use their SMTP server. This will require you to provide some credentials (either by generating a unique app-specific password, or your email password), and send from the same email address and domain you currently use with your email.
-
Use a dedicated SMTP provider like Amazon AWS SES (Simple Email Service), Mailjet, Resend, SendGrid, Mailgun, SMTP2Go, SparkPost, ZeptoMail, Postmark, and many more. I personally use AWS SES and would recommend it if you're already using AWS services in some capacity. Setting up SES is a bit involved though, and you'll be in a sandbox period at first.
While I personally use AWS SES, I was looking for something even easier to setup for this article and after trying a few, had a great experience getting started with Mailjet. By comparison, trying to setup SendGrid was a disaster; way too many steps involved, including having to talk with support.
There's a few steps to follow before you can get your SMTP server login credentials but Mailjet makes it pretty straightforward:
-
Sign up for a free account at Mailjet.
-
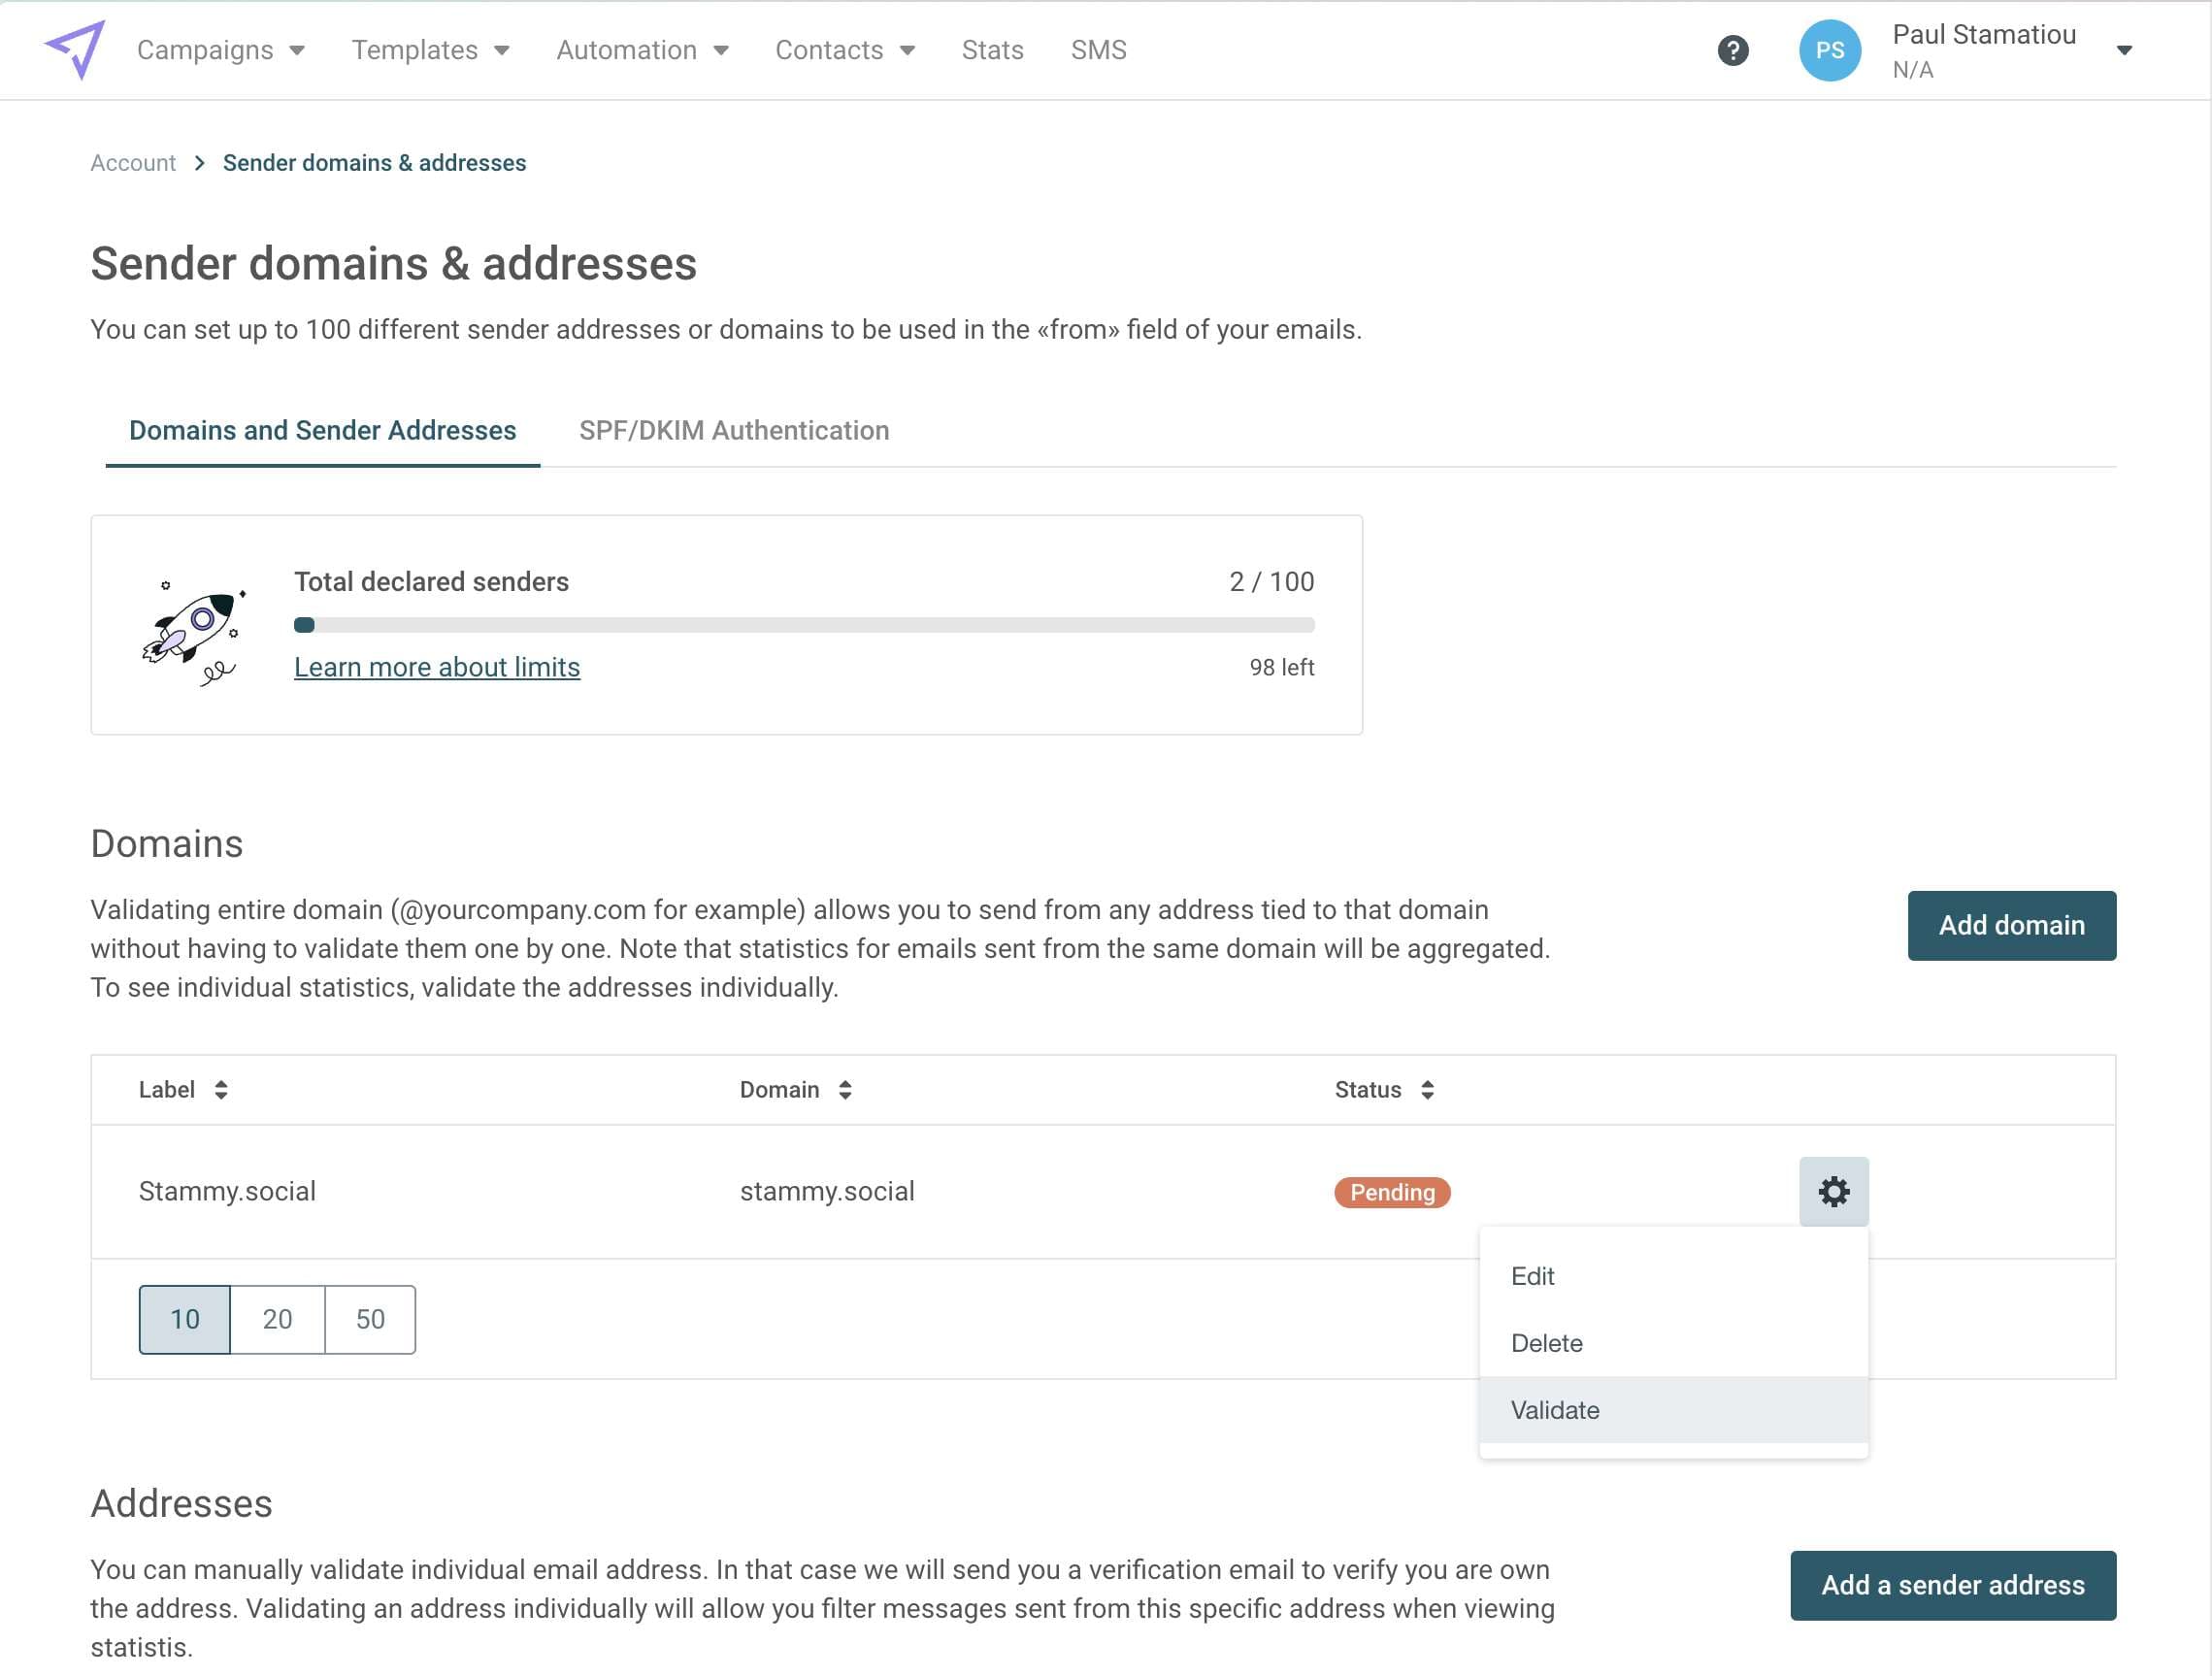
Add your domain as a new sender domain. Click "Setup my SMTP" (or navigate to Sender domains from Account) to add your domain.
-
Validate your domain by adding a TXT DNS record. You'll need to log into your DNS provider or domain name registrar to edit that.
-
Authenticate the domain by adding 2 TXT DNS records for SPF and DKIM.
-
Specify the email address you'll send from and marking it as transactional.
-
Get your API key and SMTP server URL. This can be found under "SMTP and SEND API Settings" on the Account page. When setting up Mastodon, the API key will act as your SMTP username and the API secret will act as your password.
Tip: Use your webhost for DNS too
You may want to just use whichever hosting provider you end up choosing as your DNS provider as well, instead of your domain name registrar (if they differ). Most hosts make it a bit easier to set your A record that points to your server if they also manage the DNS.
In this article I show how to use DigitalOcean as your hosting provider, so you can skip ahead to that part below or create an account and follow these instructions.

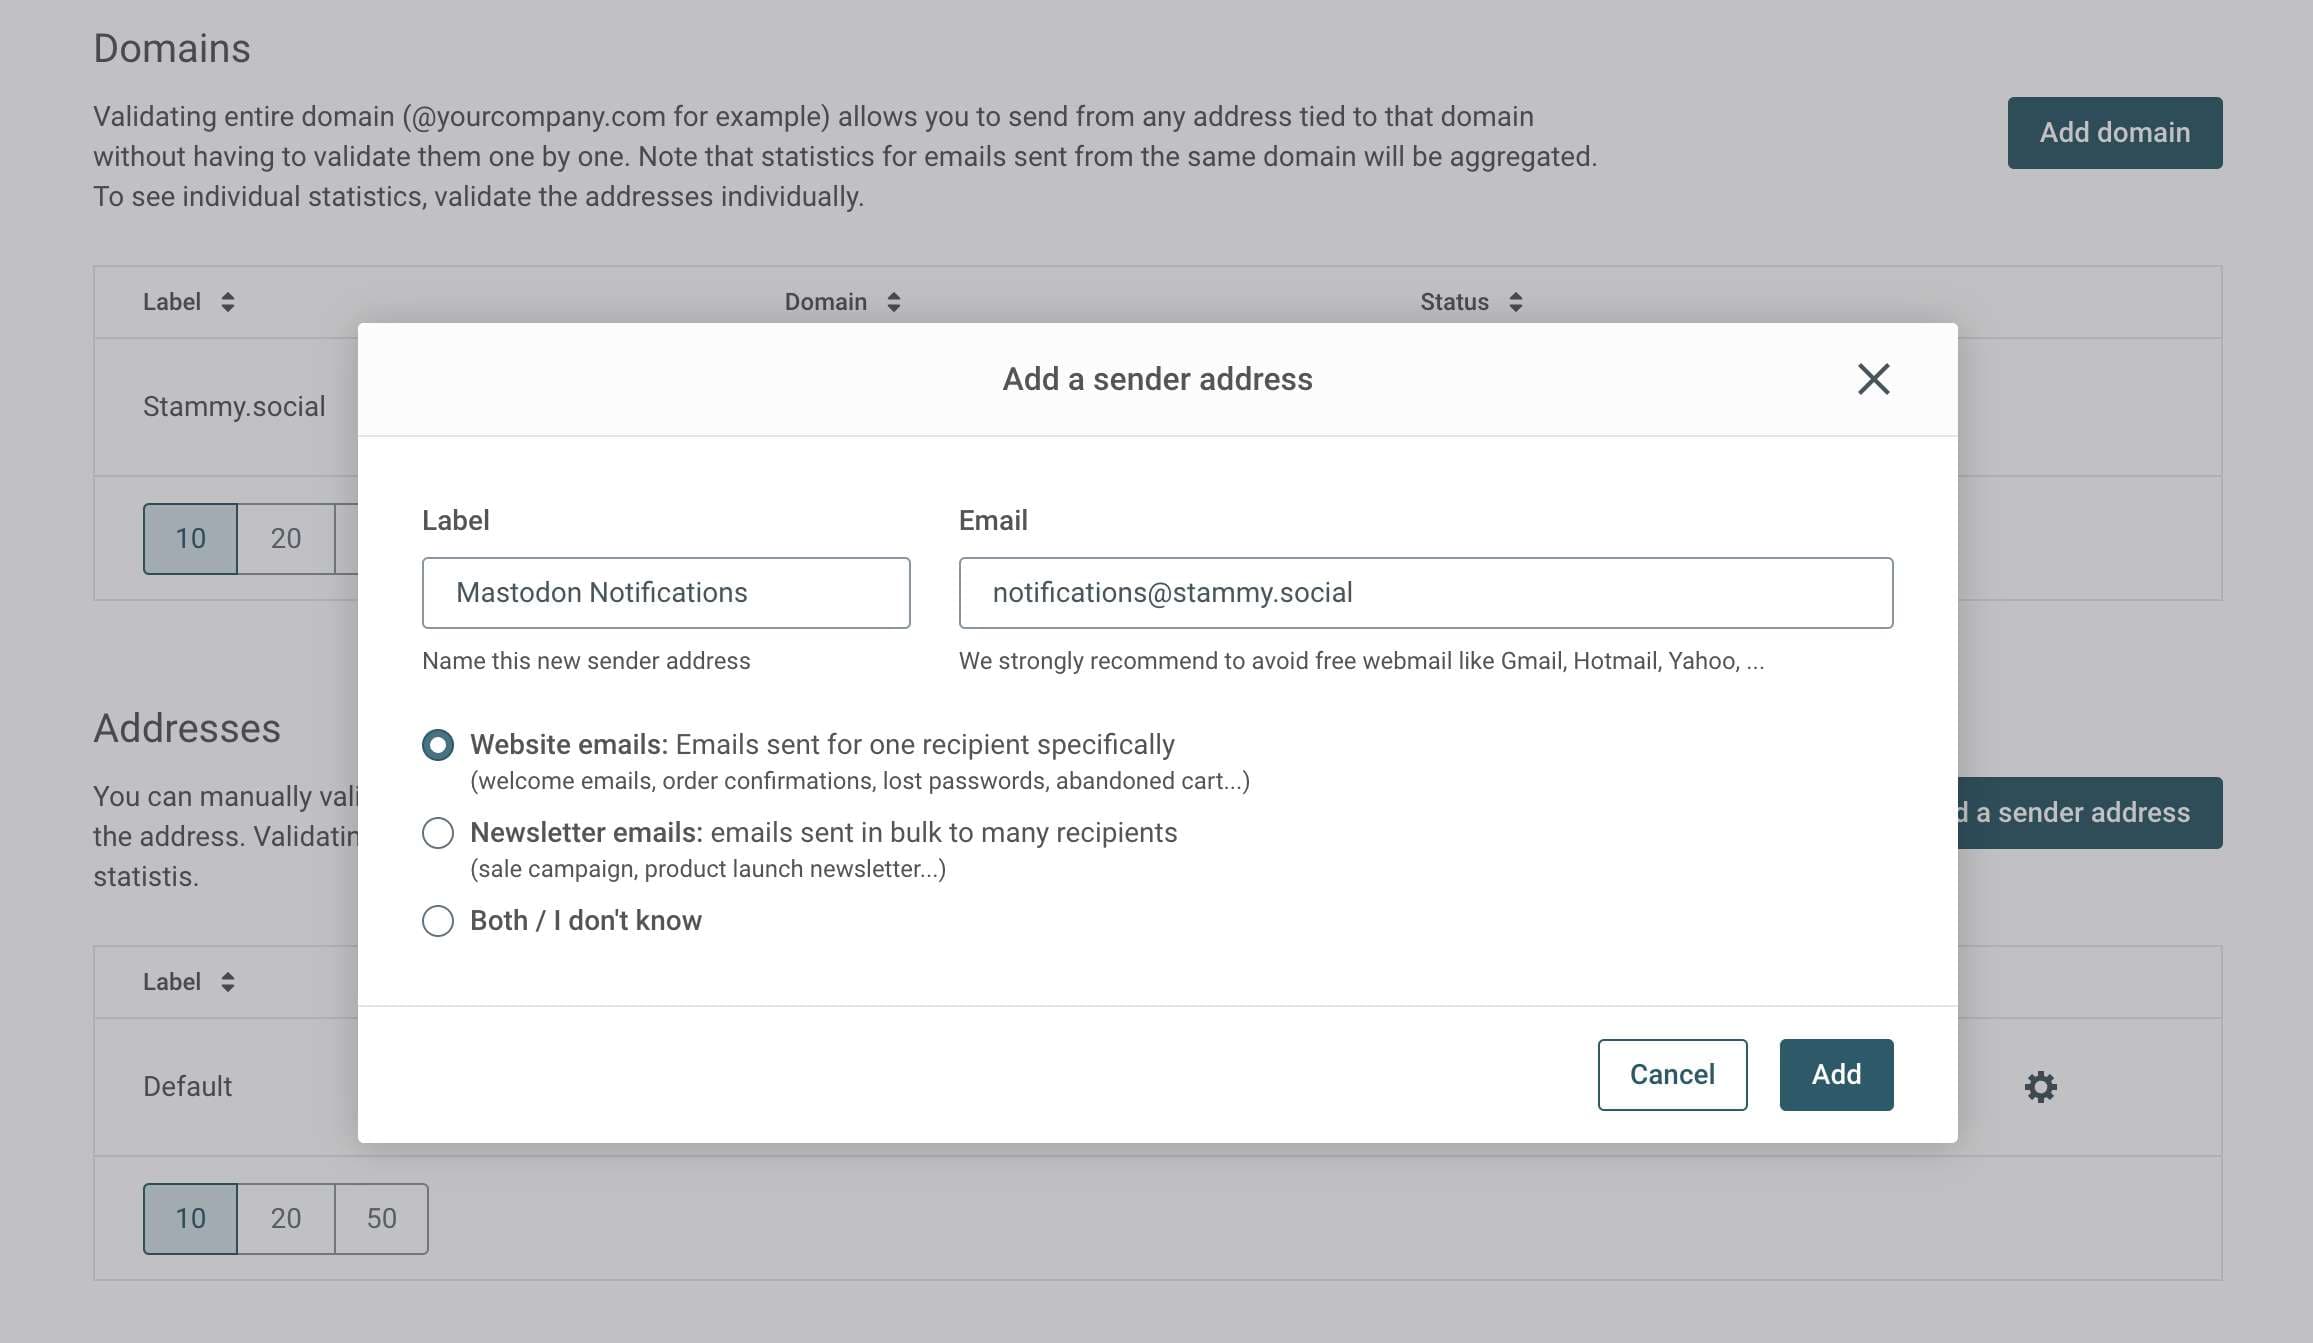

Mailjet is one of the easier ways to get access to
Keep your new SMTP credentials handy, you'll need it soon.
Picking your webhost
You can get a Linux server up and running from any number of hosting providers (like AWS EC2 or Lightsail, Linode, Hetzner, DigitalOcean, Vultr, etc) if you're comfortable with the standard Mastodon installation process. If you go this route you'll need to install various system packages, Ruby, Node, Postgres and nginx among others.
However, I'm going to focus on using a DigitalOcean "Droplet" for this article. Mainly because they have a 1-Click Mastodon installer. It saves you a good bit of time but there's still more to do after that I'll walk you through.
Droplets are DigitalOcean's name for their Linux-based virtual machines running on virtualized hardware. They have a good variety of hardware to choose from, including options for faster NVMe SSDs which I really appreciate.
Lets get started! Click "Create Mastodon Droplet" on the 1-click installer page and create an account if you don't have one yet.
Picking your hardware
After logging in you'll be sent to a page to create your new Mastodon droplet and select what hardware to use. How much CPU, RAM and storage space do you need? Storage doesn't really matter as we'll be hosting uploaded media on a separate cloud service. As for storage speed, DigitalOcean droplets only offers SSDs and faster NVMe SSDs; no slower mechanical hard drives. You can opt for the NVMe SSD if you wish (I did) but it's probably overkill for most people just setting up a single-user personal Mastodon instance.
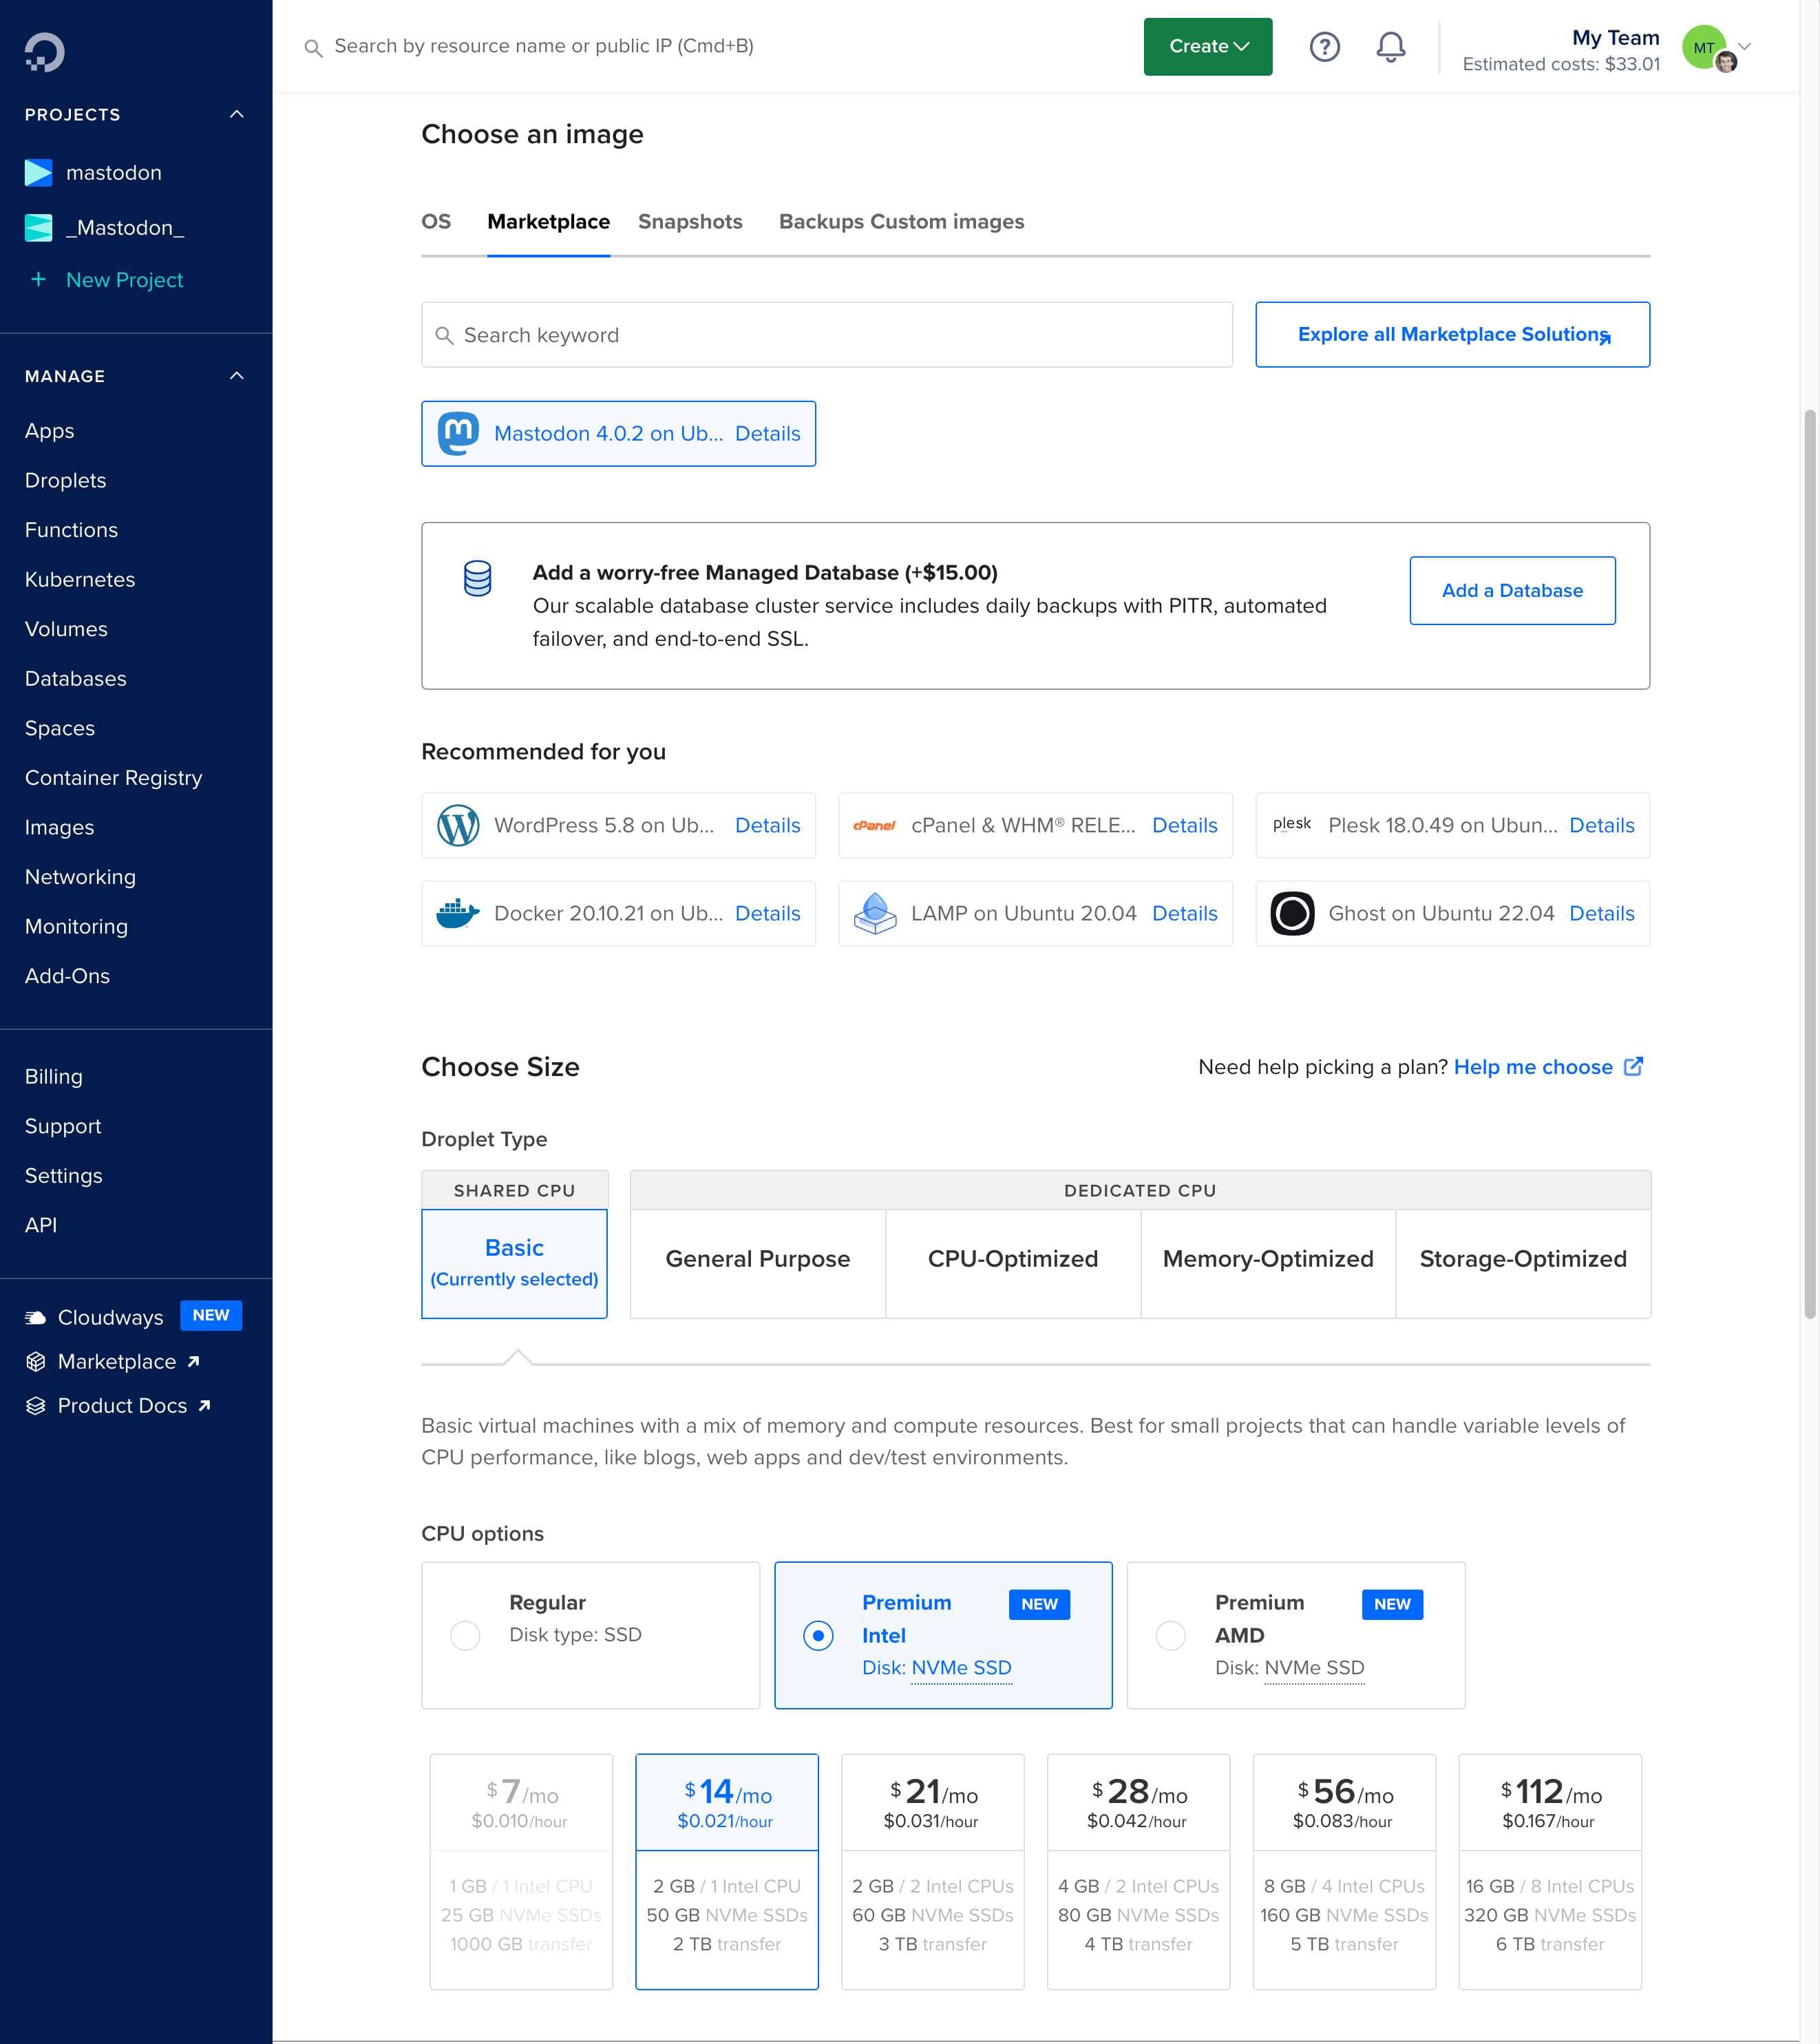
Creating a DigitalOcean "droplet" server
With CPU and RAM, it's definitely a lot of "the more, the better" and whatever you can afford, but here's some additional context to think about it with:
RAM: When it comes to RAM, while you could get by with 1GB, I would say you'd want at least 2GB, especially if you plan to run ElasticSearch on your instance. I ended up going with 4GB and my machine on average consumes about ~2GB of RAM so I have a good amount of headroom.
CPU: CPU is critical to several parts of what run Mastodon like Sidekiq, a background job processor, and Puma, the app server on top of nginx. The more CPU resources you have available, the more processes and threads you can spin up without bogging down your system. With the web server for example, if you increase the number of threads you'll use more CPU, but if you create more processes, you'll use more RAM.
I picked a server with 2 Intel cores and it has been doing fine with my Mastodon activity with about 4,000 Mastodon followers.
Tip: Start small
With DigitalOcean droplets you can easily upgrade to a more powerful machine, but you may not be able to downgrade to a less powerful machine. This is usually due to having a disk image that's too large for another server.
I suggest starting with a server that has 2GB of RAM. If you find you need more RAM, CPU, disk space, et cetera, you easily upgrade later. It takes maybe 5-10 minutes to upgrade and DigitalOcean handles everything for you automatically.
After selecting your server hardware, you'll want to select the option to enable monitoring and backups. Then, click "Advanced" and enable IPv6. And finally, you'll need to create or provide an SSH key. I highly recommend following their SSH instructions so you can use a key that your computer has so you can easily access your server with your preferred terminal app. You can still use the web console provided by DigitalOcean but it's a bit clunky.
Option: Managed Database
I ended up selecting the option to have a managed database for an extra $15 per month. If you don't mind the extra cost it's nice for it's automatic backups that let you revert to any point in time. That being said, for a single user Mastodon instance, you probably won't get any performance benefit out of it, just peace of mind. And since it's basically another remote server, you can access it with a tool like SQLPro for Postgres (if you've configured its security settings to allow your IP) if you're so inclined to poke around in the database.
Important: If you select the managed database option while creating your Mastodon 1-Click droplet, it should automatically put the correct database credentials for you, but there is one more place where you need to specify the database access credentials: /etc/environment. If you don't do this you may see Mastodon admin CLI commands fail, such as when trying to modify your first Mastodon account to give it owner privileges.
You will also want to verify that /etc/environment has the correct database name specified. By default it should be mastodon_production.
And finally, you will need to add the following to /home/mastodon/live/.env.production:
DB_SSLMODE=require
# You may also need to do the following as a hack
# More context: https://github.com/mastodon/mastodon/discussions/19917
NODE_TLS_REJECT_UNAUTHORIZED=0
And then restart the services sudo systemctl restart mastodon-*. Without those lines, you may see some errors in the streaming service logs.
And finally, you'll want to go to DigitalOcean, click on your managed database, then visit settings to ensure you restrict connections to just your IP and your Mastodon server under the "Trusted sources" section.
Click Create Droplet and your server should be ready in about 30 seconds or so.
Adding your domain & setting up DNS
Next up, we'll need to add your domain name to DigitalOcean and setup necessary DNS records.
Tip: Using a Mastodon on a domain where you already host a website, without exposing the subdomain
If you wanted to use a domain where you're already hosting a website, you may think that it's not possible to host Mastodon on that domain without resorting to a subdomain which would leave you with a lengthy Mastodon username like username@social.example.com.
Fortunately there's a a lesser known Mastodon tip that lets you host Mastodon on a subdomain but allows your username to be shown as being directly on the root domain itself, such as username@example.com. This is done by setting the WEB_DOMAIN environment variable to the root domain. This is not something that the Mastodon setup wizard will ask you about, but it's something you can do after the setup wizard is complete by manually editing the .env.production file, typically located in the /home/mastodon/live directory.
This is described in the Mastodon documentation as WEB_DOMAIN and LOCAL_DOMAIN. To sum up: with this configuration you can have Mastodon hosted on a subdomain but completely hide that from people that follow you. They'll only see your username at your root domain.
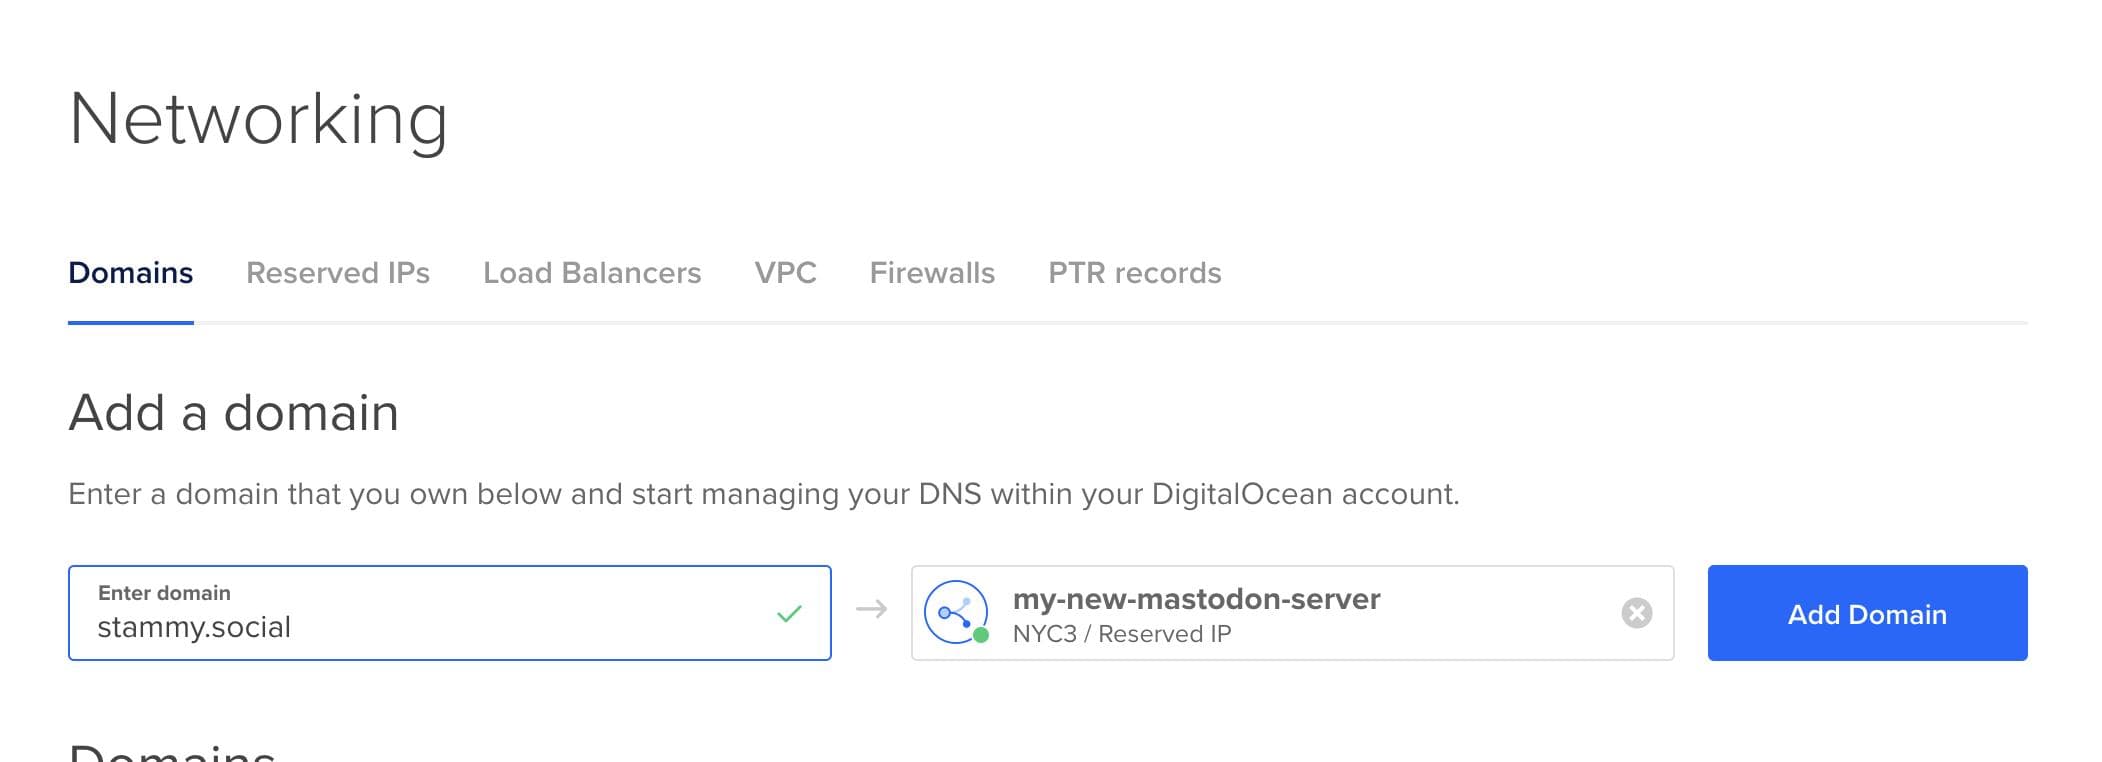
- Click the menu on your droplet and select Add a domain.
- Type in the domain you want to use for Mastodon, and select your droplet server from the dropdown.
- If you haven't done so already, you'll want to go to your domain name registrar and designate DigitalOcean as the DNS host by adding the 3 nameservers shown. More info can be found here.
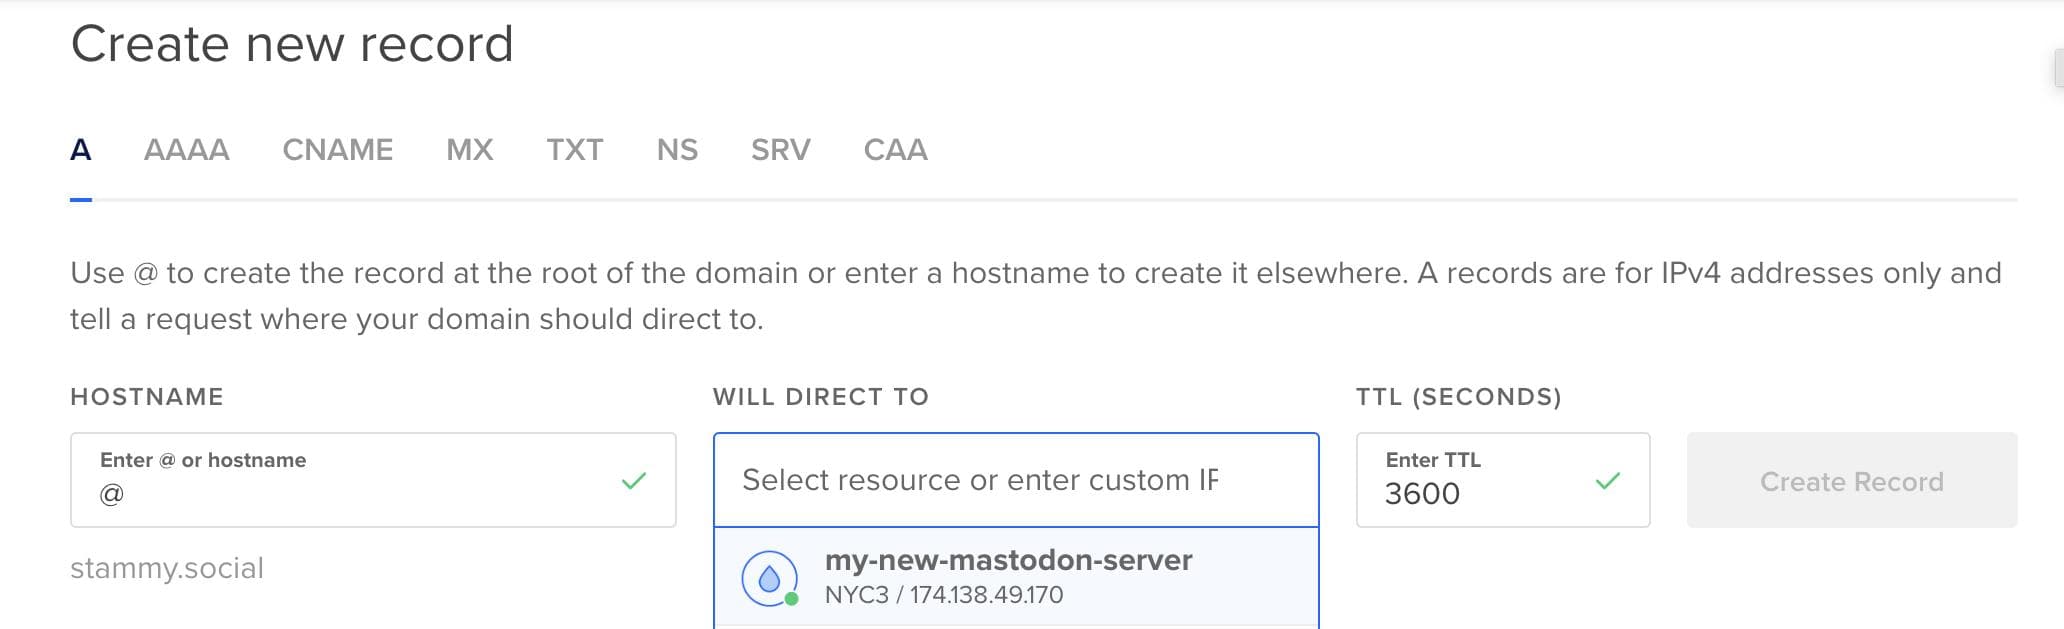
- Finally, you just need to add an
Arecord for your droplet. Just type@for the Hostname and click the dropdown to select your droplet to automatically select the IP address needed.

After DNS propagates in a few moments you'll be able to directly SSH into your server with just ssh root@yourdomain.com, assuming you setup your SSH key earlier.
Setting up cloud file storage
Before we can start setting up Mastodon, there's one more thing we need to do: setup and get login credentials for cloud object storage for all user-uploaded files on your Mastodon instance. This part is optional: Mastodon can easily host files directly from your server.
However, hosting user-uploaded files on a cloud service instead of your Mastodon server has some benefits. First, it takes the load off your web server to respond to requests for media, freeing up your server to respond to other requests. This is especially important if you have a less powerful server. It's an easy way to make things more performant. Second, cloud object storage providers are made for serving static files quickly and that's especially true if you use one with a CDN.
There are a lot of services to choose from such as DigitalOcean Spaces, Wasabi, Minio, Google Cloud Storage, Amazon S3, and any service that offers S3-compatibility like Cloudflare R2.
I personally use Amazon S3 with a CloudFront distribution (CDN), used on a CNAME subdomain. It was a bit more involved to setup, including creating separate IAM and bucket permissions, so I wanted to show a simpler solution for this article, using DigitalOcean Spaces. If you're familiar with AWS, that's a great route to consider though.
The easiest way is to use DigitalOcean's own object storage solution, Spaces. It costs $5/month for 250GB of storage with 1TB of outbound transfer. That should be more than enough space for most.
To get started, click the Create button at the top of DigialOcean's dashboard and select Spaces to create a bucket for storing your Mastodon server's files. Here you'll need to pick a bucket name and location, which should default to the same region as your droplet server. The bucket name doesn't matter much as it's not readily visible to your users unless they dig into their browser web inspector. You'll also want to check the box to enable CDN.

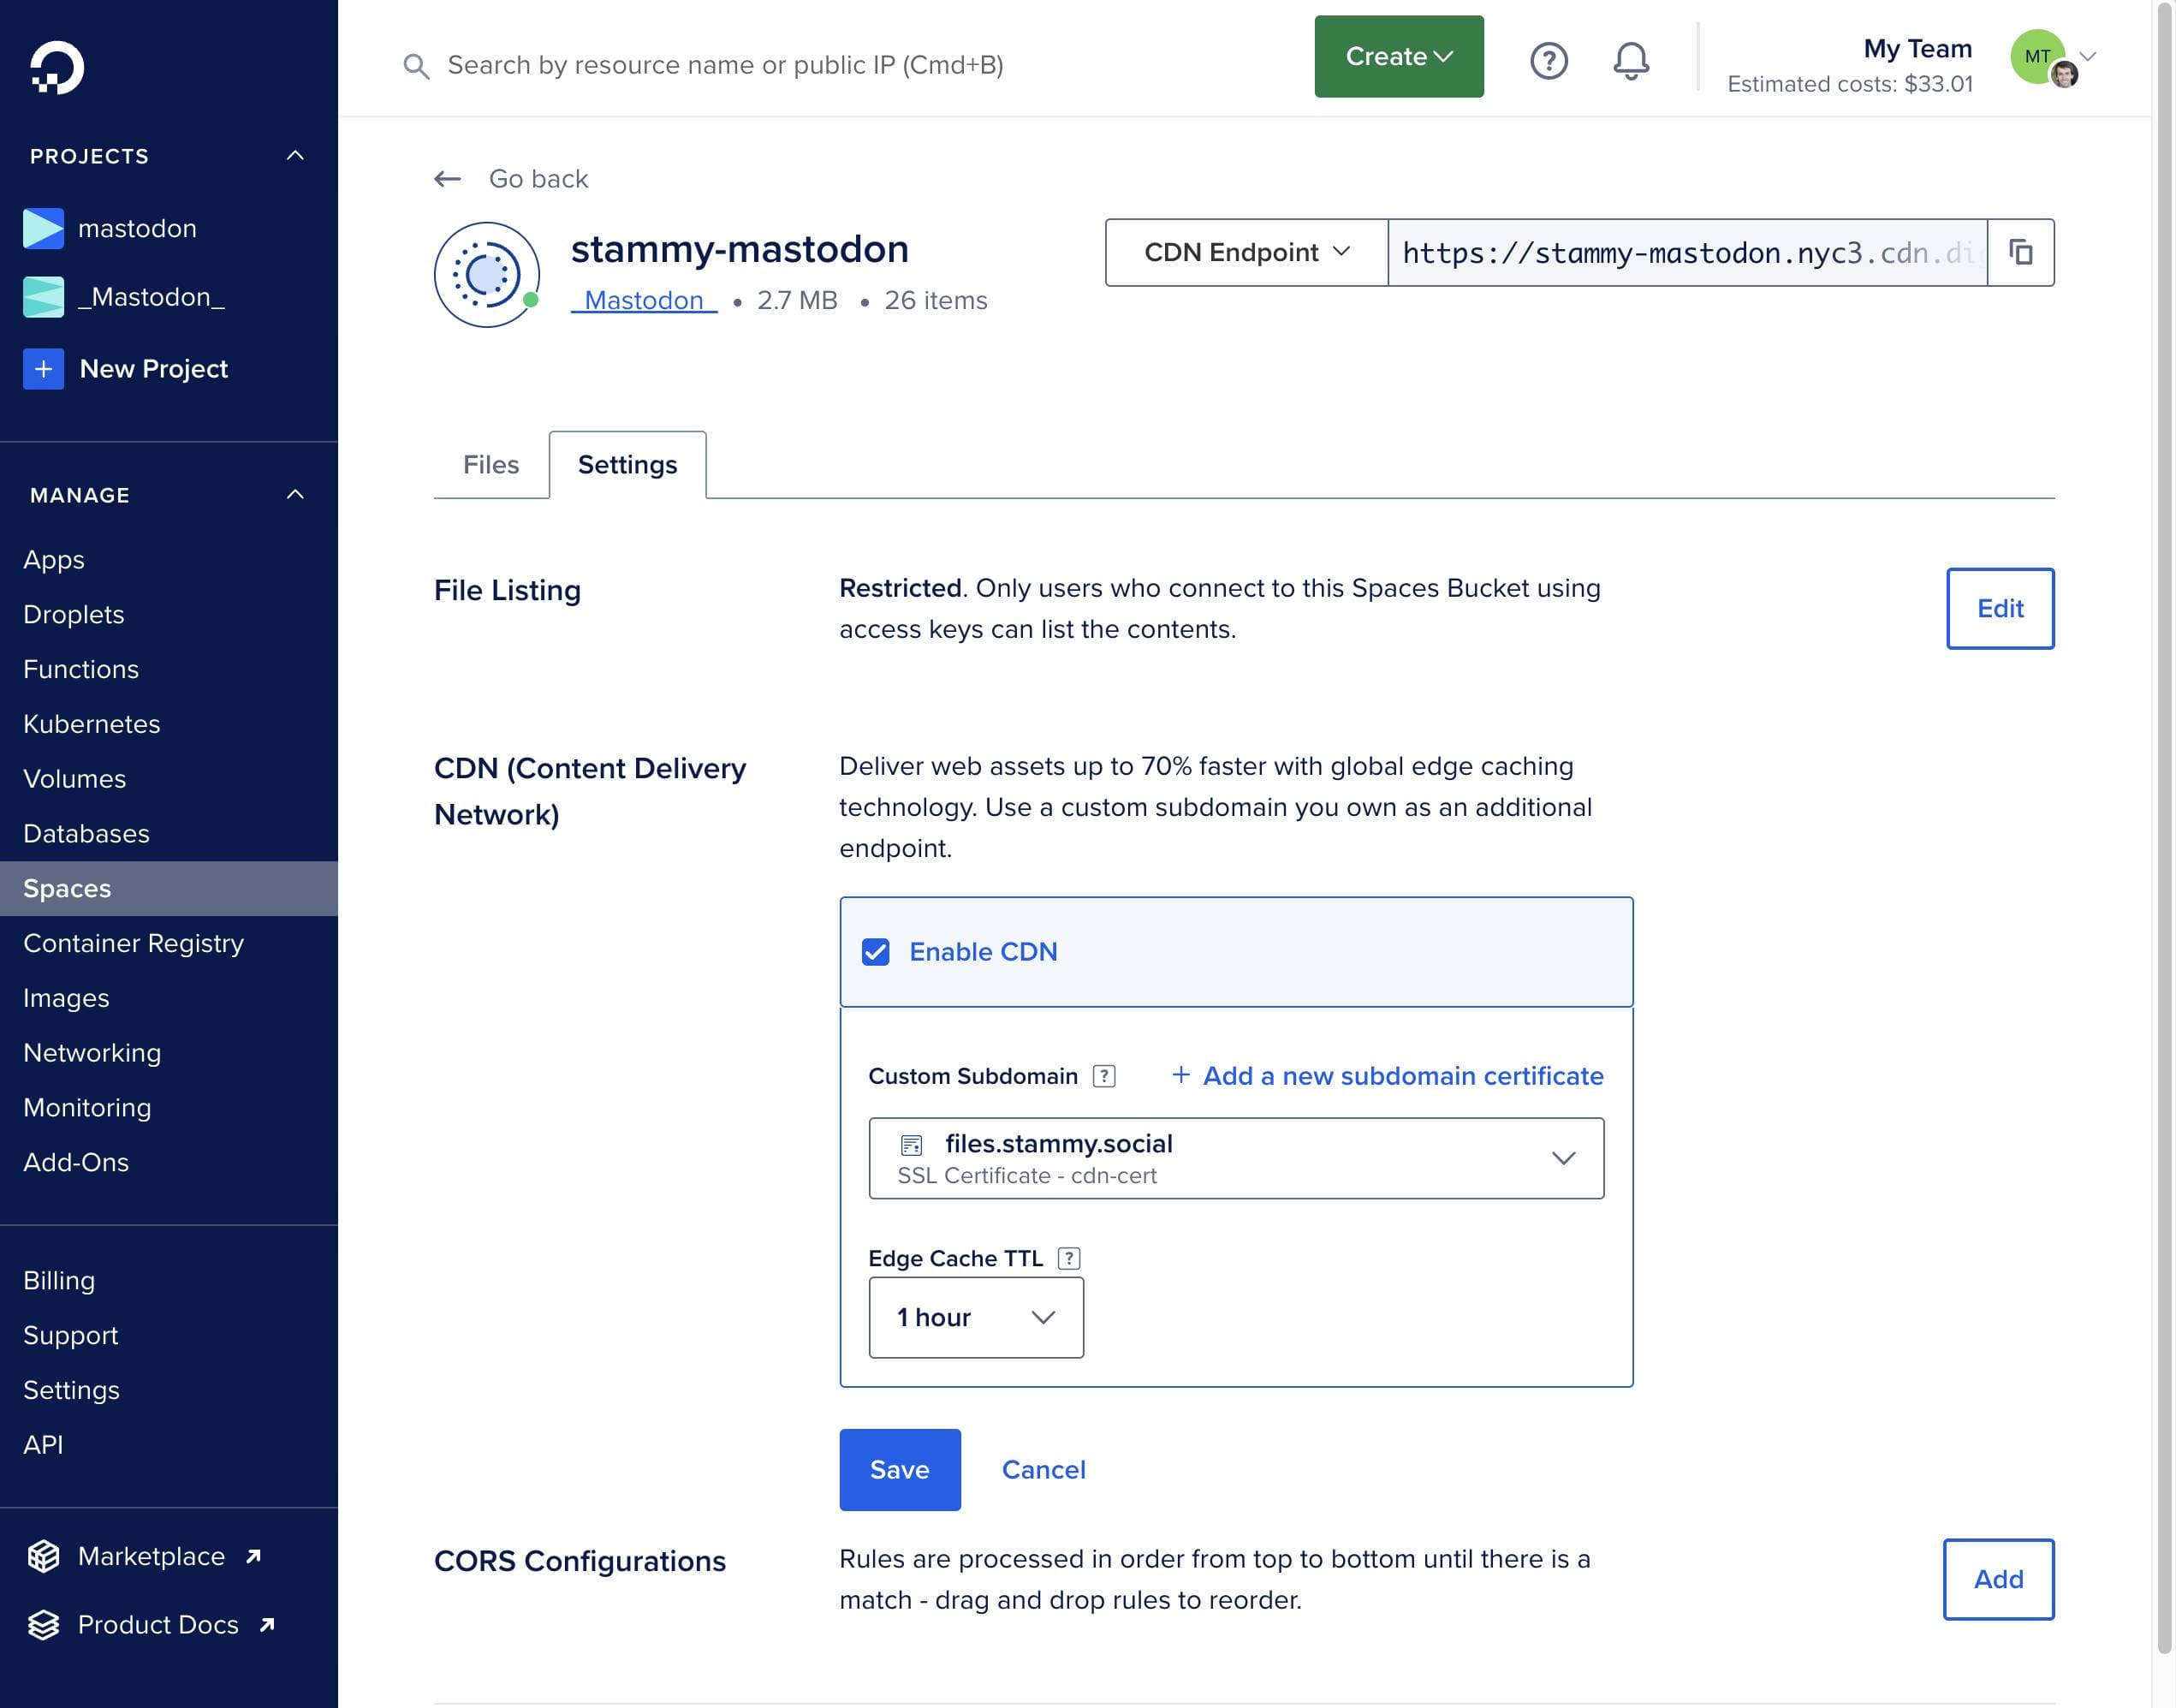
After you create the bucket you'll need to specify a subdomain to access your files from and setup an SSL certificate so HTTPS will work. DigitalOcean makes this pretty easy. Go to the Settings tab of your new Spaces bucket and click Change → Edit CDN Settings.
Select a subdomain name that you'll use for hosting user-uploaded media on your Mastodon server, like files.yourdomain.com. While this is optional, it's a nice touch. After the certificate is created, the next step is to just select it from the dropdown on the Settings page under CDN as shown below. If you're lost at any point during this process, more details can be found here.


The final step is getting the API key and secret for your new bucket. On the main Spaces page (click Spaces from the sidebar) there is a link at the top right titled Manage keys. Click that and then you can generate a new key and give it a name. Once you're done with that copy your key and secret for use later.
Setting up Mastodon
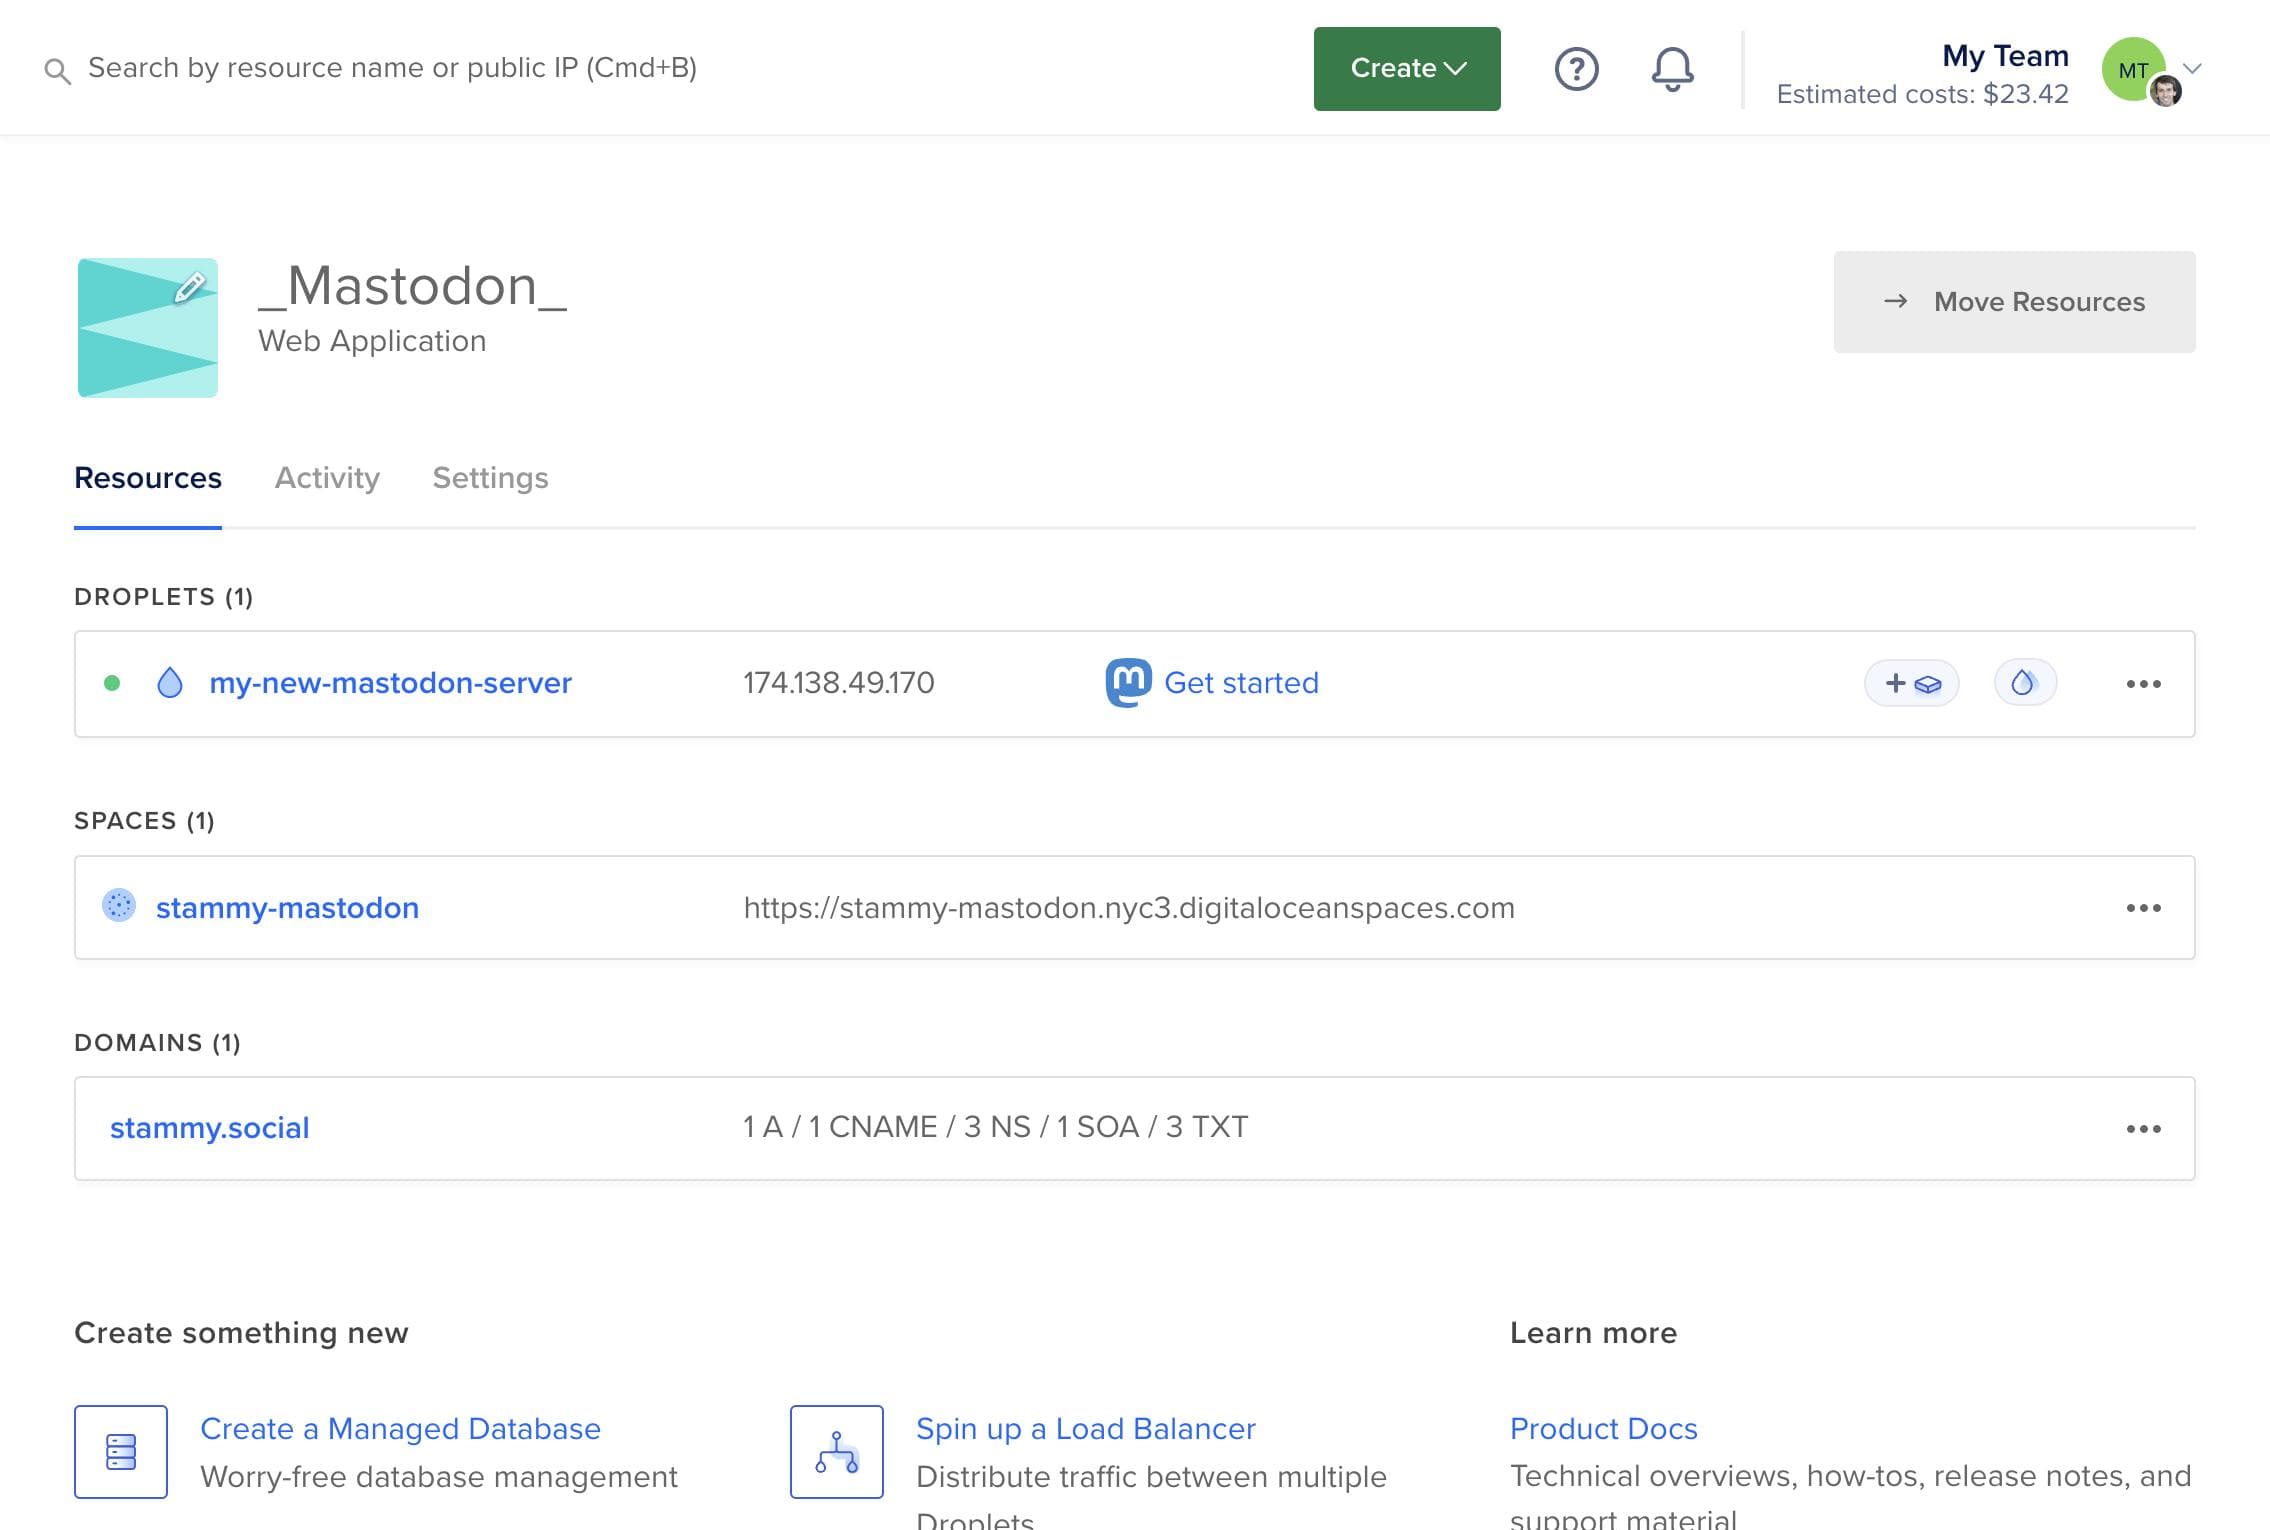
By this point your DigitalOcean project should look like this: you have a droplet server, a Spaces bucket, and an attached domain.
You're ready to begin the actual Mastodon setup! Mastodon is already installed thanks to the 1-Click Droplet installer. You just need to access the setup wizard via the command line. You can use the built-in console on the website or SSH into it with your preferred terminal app. The website console can be accessed by selecting Access console from the ... menu on your droplet. I prefer directly SSHing into the server with ssh root@yourdomain.com.
When you're connected to your server, you'll instantly see the Mastodon setup wizard start to run:
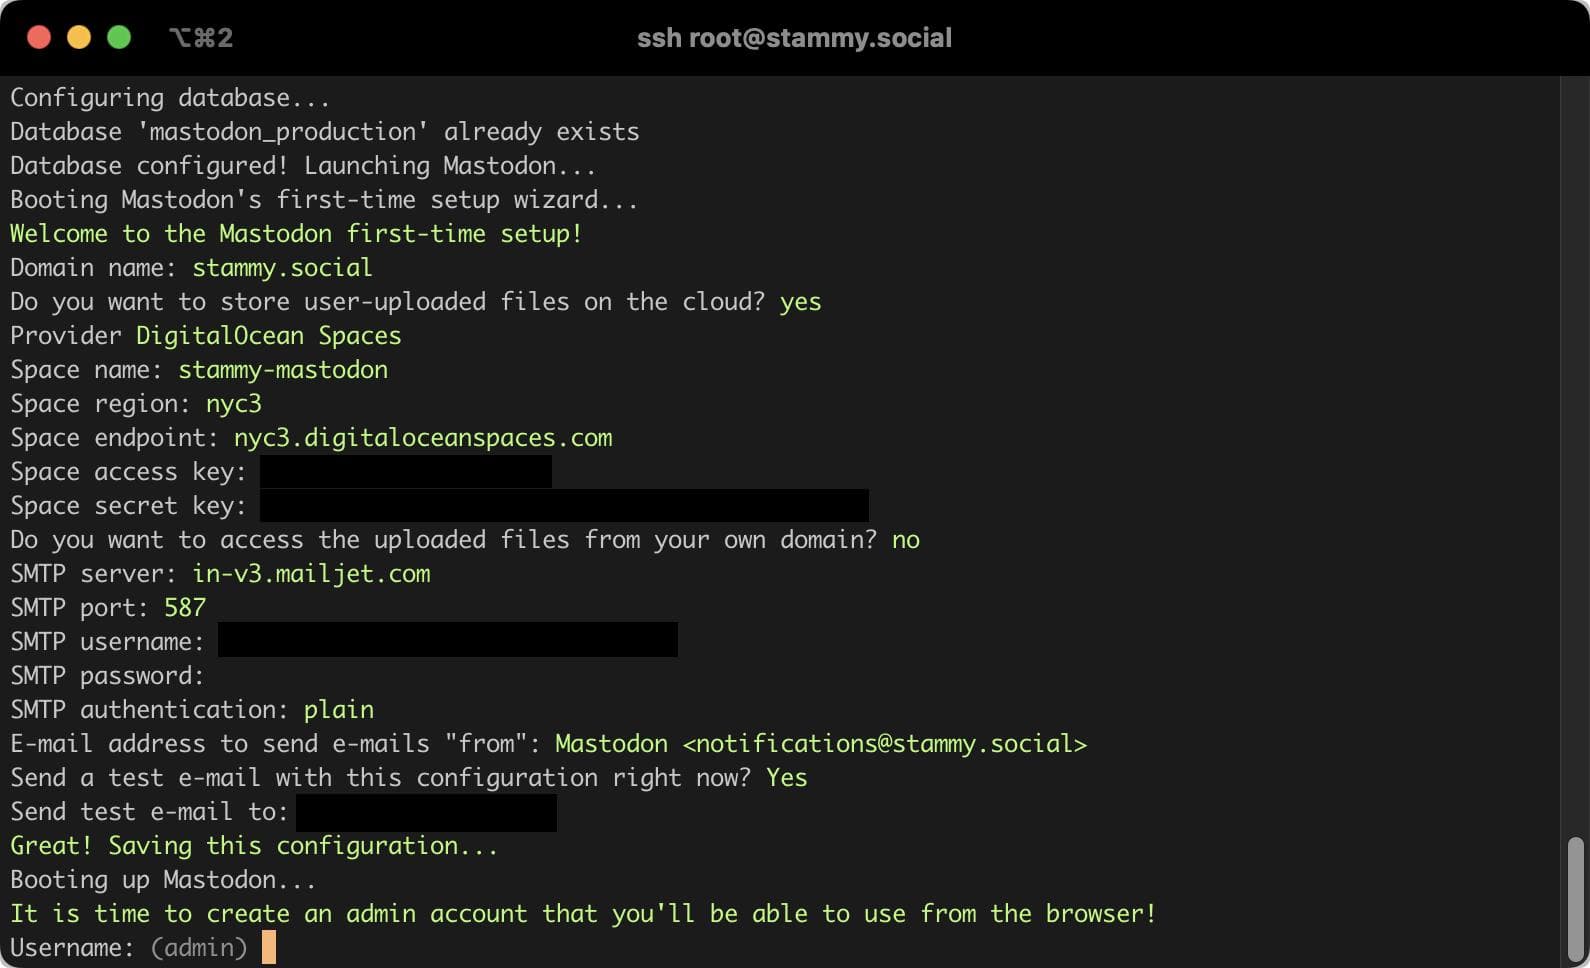
The Mastodon setup wizard
Tip: If you make a mistake...
If at any point you make a mistake while working in the command line setup wizard and need to undo something, just close the SSH session or web console, and re-open it. The setup process will start over again until it's completed.
You'll be asked to answer a few questions and fill in some details and credentials:
-
Domain name: Your domain name for Mastodon.
-
Do you want to store user-uploaded files on the cloud? (y/N): Type
yfor yes. -
Provider: Select DigitalOcean Spaces.
-
Space name: The bucket name you chose.
-
Space region: Type in the region for your spaces bucket. When you go to copy your Spaces endpoint, it'll be the subdomain after your bucket name that's short (like
nyc3) depending on the hosting location. -
Space endpoint: Your Spaces "Origin Endpoint" as seen on the DigitalOcean website but with the bucket name subdomain at the front removed. Even though you setup the CDN, for this you need the non-CDN URL or it won't work. For me it was the following but this varies based on the location you chose:
https://nyc3.digitaloceanspaces.com -
Do you want to access the uploaded files from your own domain?: This is asking if you want to use a CNAME alias for your hosted files, for example to appear as if they are hosted from your domain. I'll assume you followed the directions above for setting up Spaces CDN with a subdomain and certificate, so you can say
yes. -
SMTP server: Check with your SMTP provider, but in the case of Mailjet it was
in-v3.mailjet.comfor me. This could be different for you. -
SMTP port: Depends on your SMTP provider, but likely
587. -
SMTP username / password: Provide the username and password for your SMTP provider. If you're using Mailjet as described above the API key will act as your SMTP username and the API secret will act as your password.
-
SMTP authentication: The default
plainshould be fine. You may also be asked for an OpenSSL verify mode, for that you can usually inputpeerornone. -
Email address to send emails "from": Hit enter to accept the default
notifications@yourdomain.comaddress. -
It is time to create an admin account that you'll be able to use from the browser! Username: Pick the username that you'll want to use for your Mastodon profile.
Your full Mastodon handle will end up being @yourusername@yourdomain.com.
At this point you'll be given a password to log into your new Mastodon account. You'll want to change it to something stronger after you log in for the first time (more on that later). But before that can be done you'll need to follow the instructions to setup your SSL certificate with Let's Encrypt so https will work for your domain.
If you find yourself struggling to get the Let's Encrypt process to work, check the DNS records on your domain to ensure everything is setup correctly, particularly the A record for the domain and that you've correctly added the DigitalOcean nameservers with your registrar. Also, you can just give it some time for DNS to propagate and try again later.
There's just a few more things to do before logging into your new Mastodon server.
Fixing the cloud storage config
Unfortunately I was unable to get DigitalOcean Spaces cloud object storage with CDN working flawlessly out of the gate and had to manually edit a few lines in a config file. We'll be editing the .env.production file—where a lot of Mastodon settings live— to adjust some of the media storage settings.
-
If you're using the subdomain as shown during Spaces setup: You'll need to add a line for
S3_ALIAS_HOSTas shown below. This value is the same as the subdomain you setup earlier along with the SSL certificate. Then you'll need to modify the S3_ENDPOINT and S3_HOSTNAME values to be in this format.S3_PROTOCOL=https # Replace the following with your bucket name S3_BUCKET=stammy-mastodon # Replace with your bucket region S3_REGION=nyc3 # Replace with the subdomain you setup earlier for your Spaces bucket / CDN S3_ALIAS_HOST=files.stammy.social # Change the region in the URL below to match your bucket region S3_ENDPOINT=https://nyc3.digitaloceanspaces.com # This is your "Origin Endpoint" as found on your Spaces bucket page S3_HOSTNAME=stammy-mastodon.nyc3.digitaloceanspaces.com -
If you're not using a subdomain alias for hosting your files: You will need to remove the bucket name from your DigitalOcean Spaces bucket's "Origin Endpoint" that is used as your hostname. Ensure your S3_ENDPOINT and S3_HOSTNAME look like this. Remove any line with S3_ALIAS_HOST if it already exists.
S3_ENABLED=true S3_PROTOCOL=https S3_BUCKET=stammy-mastodon # Replace nyc3 region in the next 3 lines with your bucket region S3_REGION=nyc3 S3_HOSTNAME=nyc3.digitaloceanspaces.com S3_ENDPOINT=https://nyc3.digitaloceanspaces.com -
If you used Amazon S3 with CloudFront instead: If you went for the more advanced route of using S3 with a CloudFront distribution connected to a CNAME on your domain, you will configure it like this:
# Your S3 bucket name.
S3_BUCKET=my-mastodon-files
# Replace us-east-1 with your bucket region, lowercase.
S3_REGION=us-east-1
# Hostname is likely your bucket name + .s3.amazonaws.com
S3_HOSTNAME=my-mastodon-files.s3.amazonaws.com
# Only use if you've configured a CloudFront CNAME on your domain with SSL cert
# If you're not using a CNAME, remove this line and then change the S3_HOSTNAME to the default (such as s3.us-east-1.amazonaws.com based on your region)
S3_ALIAS_HOST=turbo.stammy.design
# You do not need an S3_ENDPOINT line
Once you've made the changes to your .env.production file, you'll need to restart the Mastodon services to apply the changes:
sudo systemctl restart mastodon-*.service
Upgrading your Mastodon account privileges
By default your new Mastodon account does not have all privileges available. Mastodon allows an account to have roles like Moderator, Admin, and Owner. You'll want to modify your account to have the Owner role. This can be done using the admin CLI tool called tootctl.
Connect to your server via SSH again (or DigitalOcean's web console) and run the following commands:
# Change from the root user to the mastodon user
sudo su - mastodon
# Change to the Mastodon bin directory
cd /home/mastodon/live/bin
# Modify your account to have the Owner role
RAILS_ENV=production ./tootctl accounts modify admin --role Owner
This may take a few seconds then you should see "OK". If you have any issues, or are using a different webhost, just confirm that you're in the right directory. If you have an error running this and happen to be using the DigitalOcean managed database, you may need to configure the database in another file. Read the managed database section for details.
Enabling single user mode
If this Mastodon account is for you and you only, you can enable single user mode to have the Mastodon homepage be a profile view of your account. By default, this is not enabled and the Mastodon homepage is a timeline view.
To enable this, you'll need to edit .env.production and then restart the web server.
# Change from the root user to the mastodon user
sudo su - mastodon
# Change to the Mastodon web directory
cd /home/mastodon/live
# Edit the .env.production file in Vim
vim .env.production
Now you'll need to create a new line anywhere in the file by moving the cursor with the arrow keys, tapping i to enter Insert mode, creating a new line, then typing in the following line:
SINGLE_USER_MODE=true
Tap ESC to exit insert mode, and then type :wq and hit enter to save and exit vim. And finally, exit mastodon user mode to go back to root by typing exit, and then restart the web server:
# Restart the web server, this can take a few seconds
systemctl restart mastodon-web.service
Ensuring your SSL cert will auto-renew without issue
Mastodon uses the popular certbot tool from the EFF to obtain certs from Let's Encrypt and enable HTTPS on your server. That part all worked great during the initial setup. Certificates from Let's Encrypt last for 90 days before they need to be renewed. Certbot makes them easy to auto-renew: it should have installed a cron with it either in a systemd certbot.timer (see it with systemctl show certbot.timer if you're curious) or in /etc/cron.d/certbot.
You'll need to ensure that your cert will auto-renew without issue. Shouldn't this work out of the box? It should, yes. However, I began poking around in my setup and noticed a configuration issue by default (not sure if this is a DigitalOcean Mastodon installer issue or a Mastodon issue) that would lead to renewal failing.
The default method used is called standalone mode and it only works when the web server is not running, which won't happen during auto-renewal unless you setup your own cron that also stops and starts the server for renewal. This is fine for the initial setup, but if you want to auto-renew your cert, you'll need to use a different method. For more context on this issue, see this commit has updated installation instructions that were never merged to Mastodon main, and this issue.
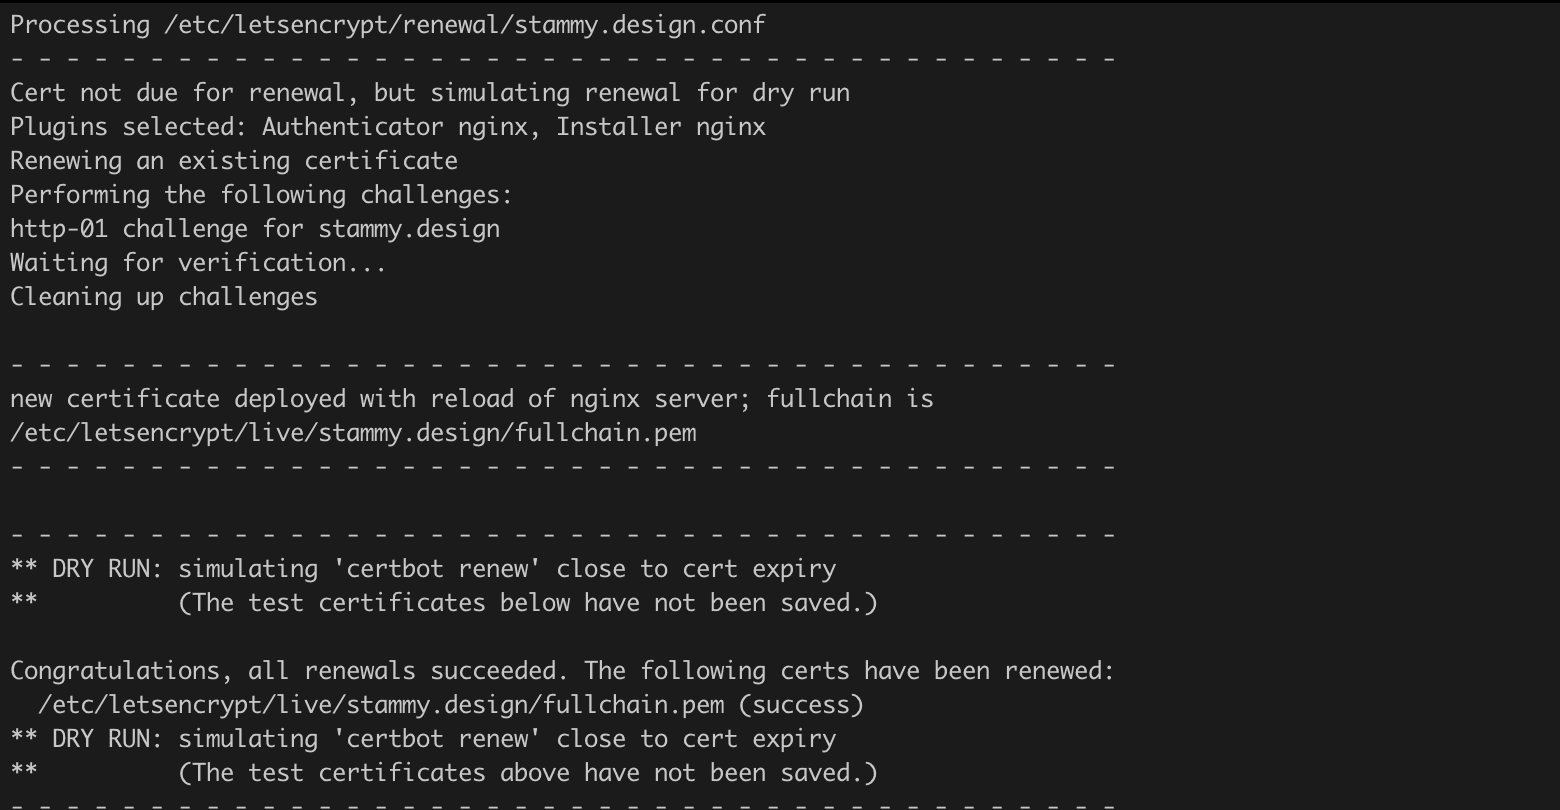
First, see if you'll even have an issue by doing a dry run invocation of the certbot renew command:
sudo certbot renew --dry-run
If the dry run says the renewal would be successful, you don't need to do anything else and your setup is all good. If it says renewal will fail, you likely need to do the following:
# Edit this config file, swapping out example.com for your domain
vim /etc/letsencrypt/renewal/example.com.conf
Then find the line that says authenticator = standalone and replace it with these two lines below and save the file.
authenticator = nginx
installer = nginx
Now you can do a dry run again and it should say the renewal would be successful as shown below:
Final setup: updating packages, enabling the firewall, etc..
At this point you could skip ahead and check that Mastodon works and log into your account for the first time, but you'll need to come back to complete a few more things. For the most part you just need to follow this Mastodon guide where you'll update system packages, configure fail2ban to block repeated login attempts and setup a firewall.
The DigitalOcean website has its own interface for configuring a firewall but after repeated attempts I was unable to get it working, so I stuck with the route recommended by Mastodon: iptables.
Optional: Configure IPv6
During DigitalOcean droplet setup you checked a box to enable IPv6 connectivity for your server. Even though that is enabled, you will need to edit some files and add a DNS record. Follow this DigitalOcean guide.
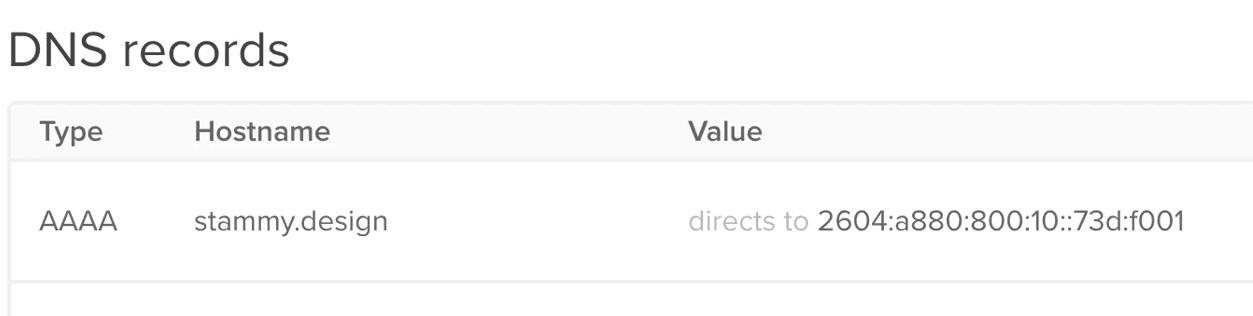
Then you'll need to add an AAAA DNS record to your domain. An AAAA record is like an A record that points to your server, but for IPv6. DigitalOcean should automatically show you your server's IPv6 address in a dropdown when creating that record.
Optional: Setting up automatic database backups
If you opted not to go for the DigitalOcean managed database upgrade, you'll want to a way to export and save backups of your database on a recurring basis. The easiest way to do this is to setup a cronjob that runs a script to dump your database, zip it up, and save it to a cloud storage bucket with the Amazon AWS command line interface. Since we already setup Spaces for cloud object storage, we can re-use that to save your database backups, though if you want to spend the extra time to use a separate cloud provider or bucket for saving only backups, that is preferrable.
First, you'll need to install the AWS CLI. You could follow this guide to install the AWS CLI, but likely you can just install it with: apt:
# Run as root
apt install awscli
# Provide your credentials for your Spaces bucket, api key and secret when prompted
aws configure
# Switch to the Mastodon user
sudo su - mastodon
# Test to see that it works by listing what's in your Spaces bucket
# Note: you need to replace the region with your region if different
# Any time you interact with the AWS CLI, you need to use the --endpoint-url option to
# specify that we are using DigitalOcean Spaces, not Amazon S3
aws --endpoint-url https://nyc3.digitaloceanspaces.com s3 ls

cd /home/mastodon

# Now we'll create the script to backup the database
vim backup_database.sh
Tap i to enter Insert mode in vim, and paste the following, replacing the Spaces region in the endpoint URL with your Spaces region code:
#!/bin/bash

# Create a filename with the date and time
FILENAME=mastodon_production_$(date +%Y%m%d%H%M).gz

# Dump the database, gzip it, and save locally
pg_dump mastodon_production | gzip > ${FILENAME}

# Upload the file to your Spaces bucket
# Important: Replace the region with your region if different
# Important: Replace the bucket name 'stammy-mastodon' with your bucket name
aws --endpoint-url https://nyc3.digitaloceanspaces.com s3 cp ${FILENAME} s3://stammy-mastodon/backups/

# Delete the local file
rm ${FILENAME}
Save the script (Tap ESC to exit insert mode, type :wq, hit Enter), then made it executable:
chmod +x backup_database.sh
Now we'll create a cronjob to run the script every day:
# Enter cron job editor. If you're asked what editor to use, select vim again.
crontab -e
Create a new line after the comment block at the time, and enter the following to create a database backup every week. If you want more frequent backups, you can customize it to your liking, such as with 0 0 */3 * * for every 3 days. Take a look at crontab.guru to help you figure out what values to input.
# Backup every week
@weekly ./backup_database.sh
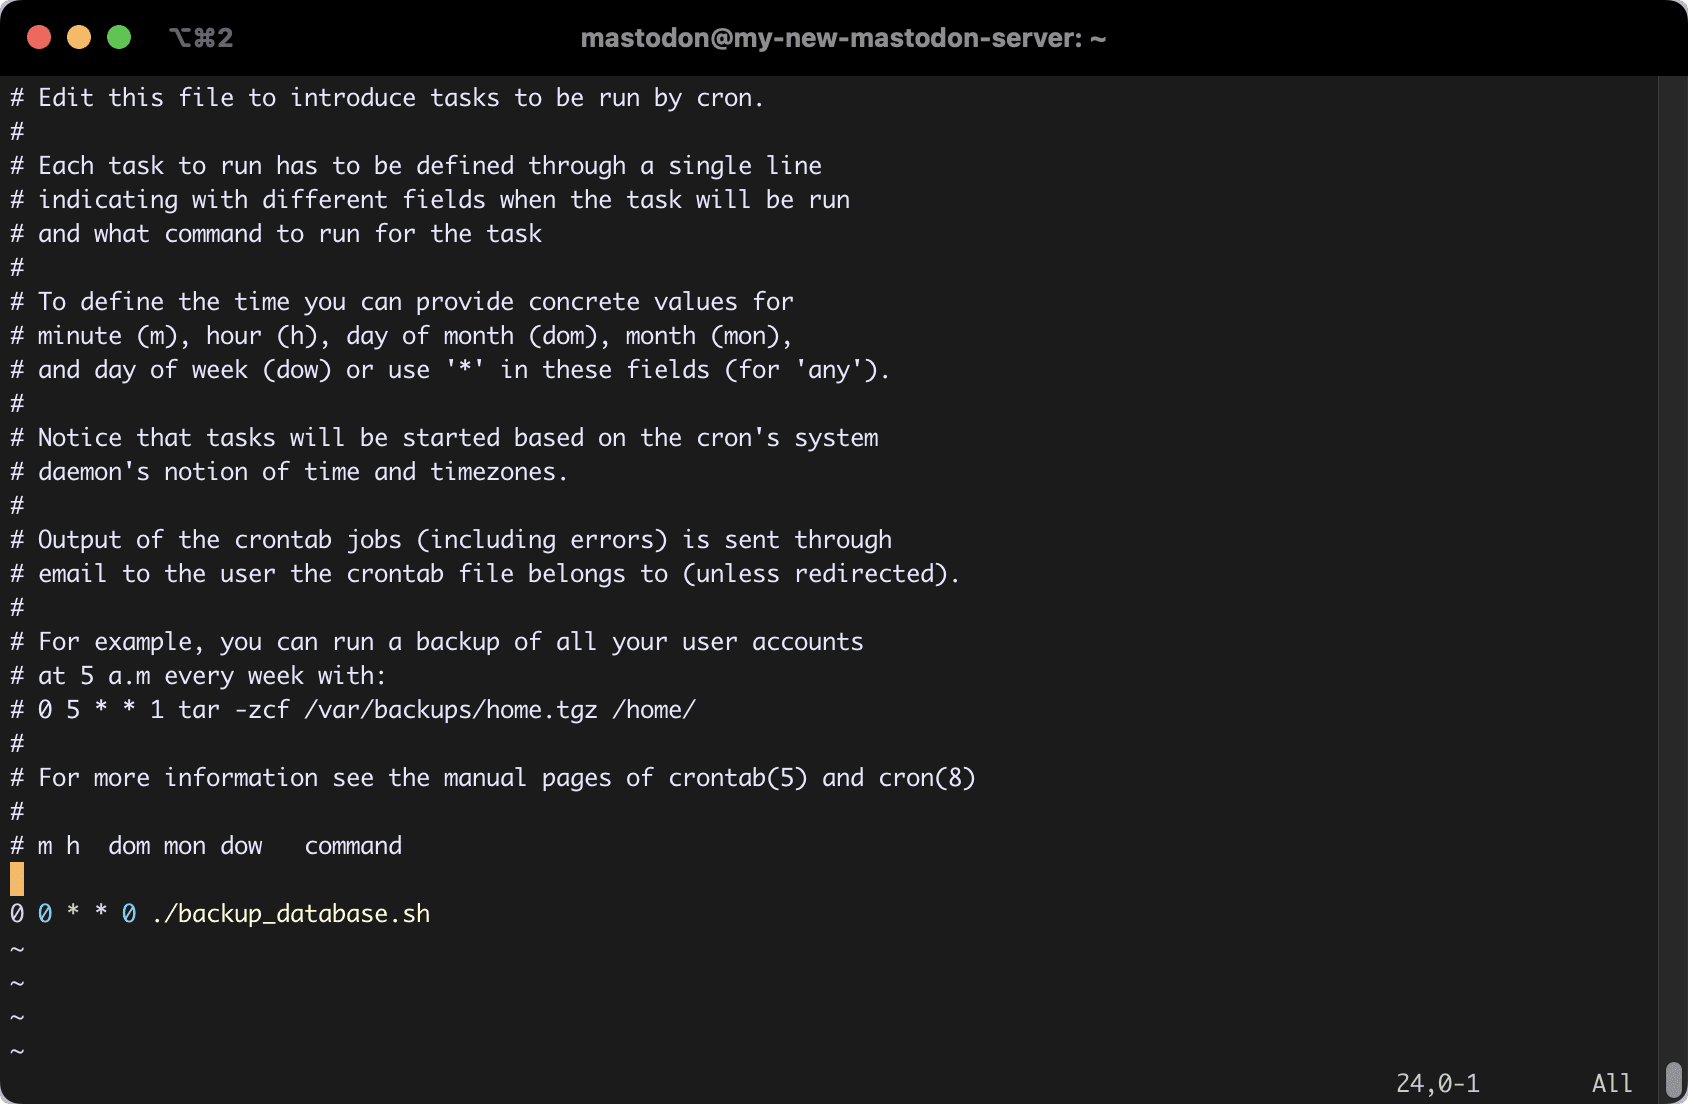
Save the file and you should be good. You may want to try manually running the script now (./backup_database.sh) to ensure it works, and check your Spaces bucket to see a new file was added to the backups directory.
Optional: Install ElasticSearch
If you want the ability for you and your Mastodon instance users to be able to search their own posts, bookmarks, favorites, and mentions, you'll need to install ElasticSearch. This is optional because it's really not that useful. You cannot search across instances, and it does not even support showing posts from other people on other servers that your server has seen but that do not mention you, even if you follow them.
It also takes a bit of RAM, so I especially would not recommend install ElasticSearch if you only have 2GB of RAM or less server. It can be done, but I don't think it's worth it.
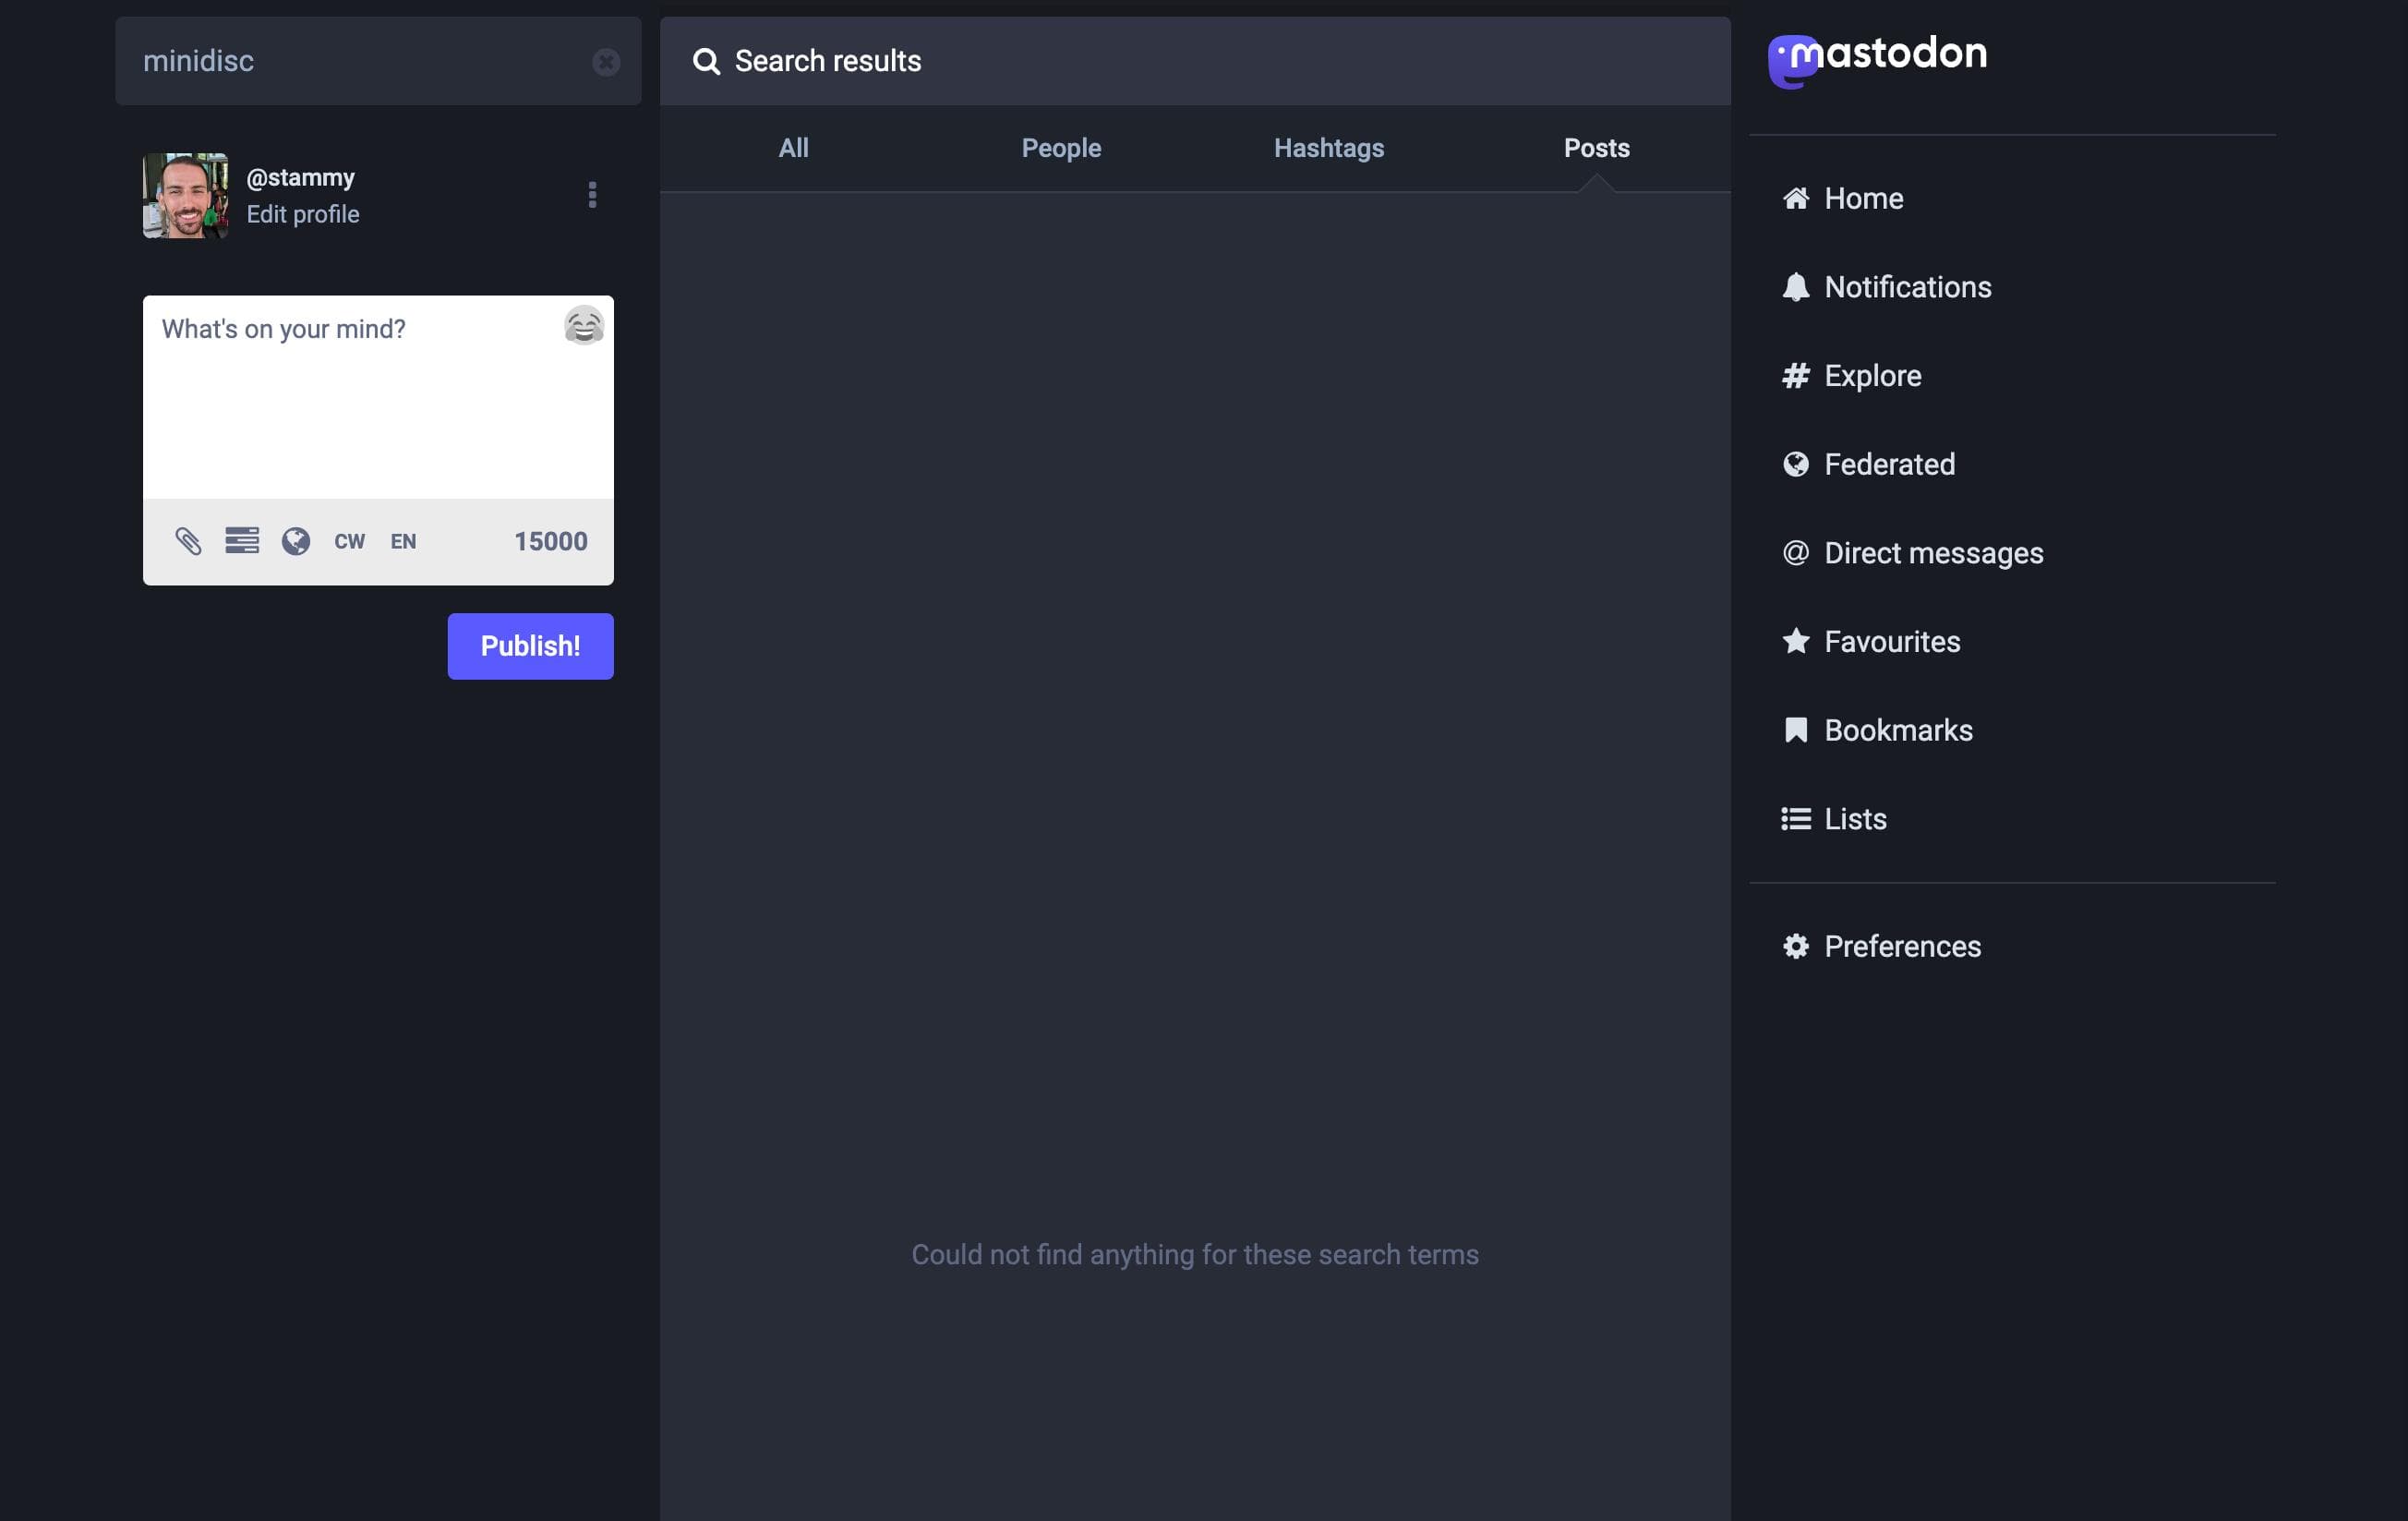
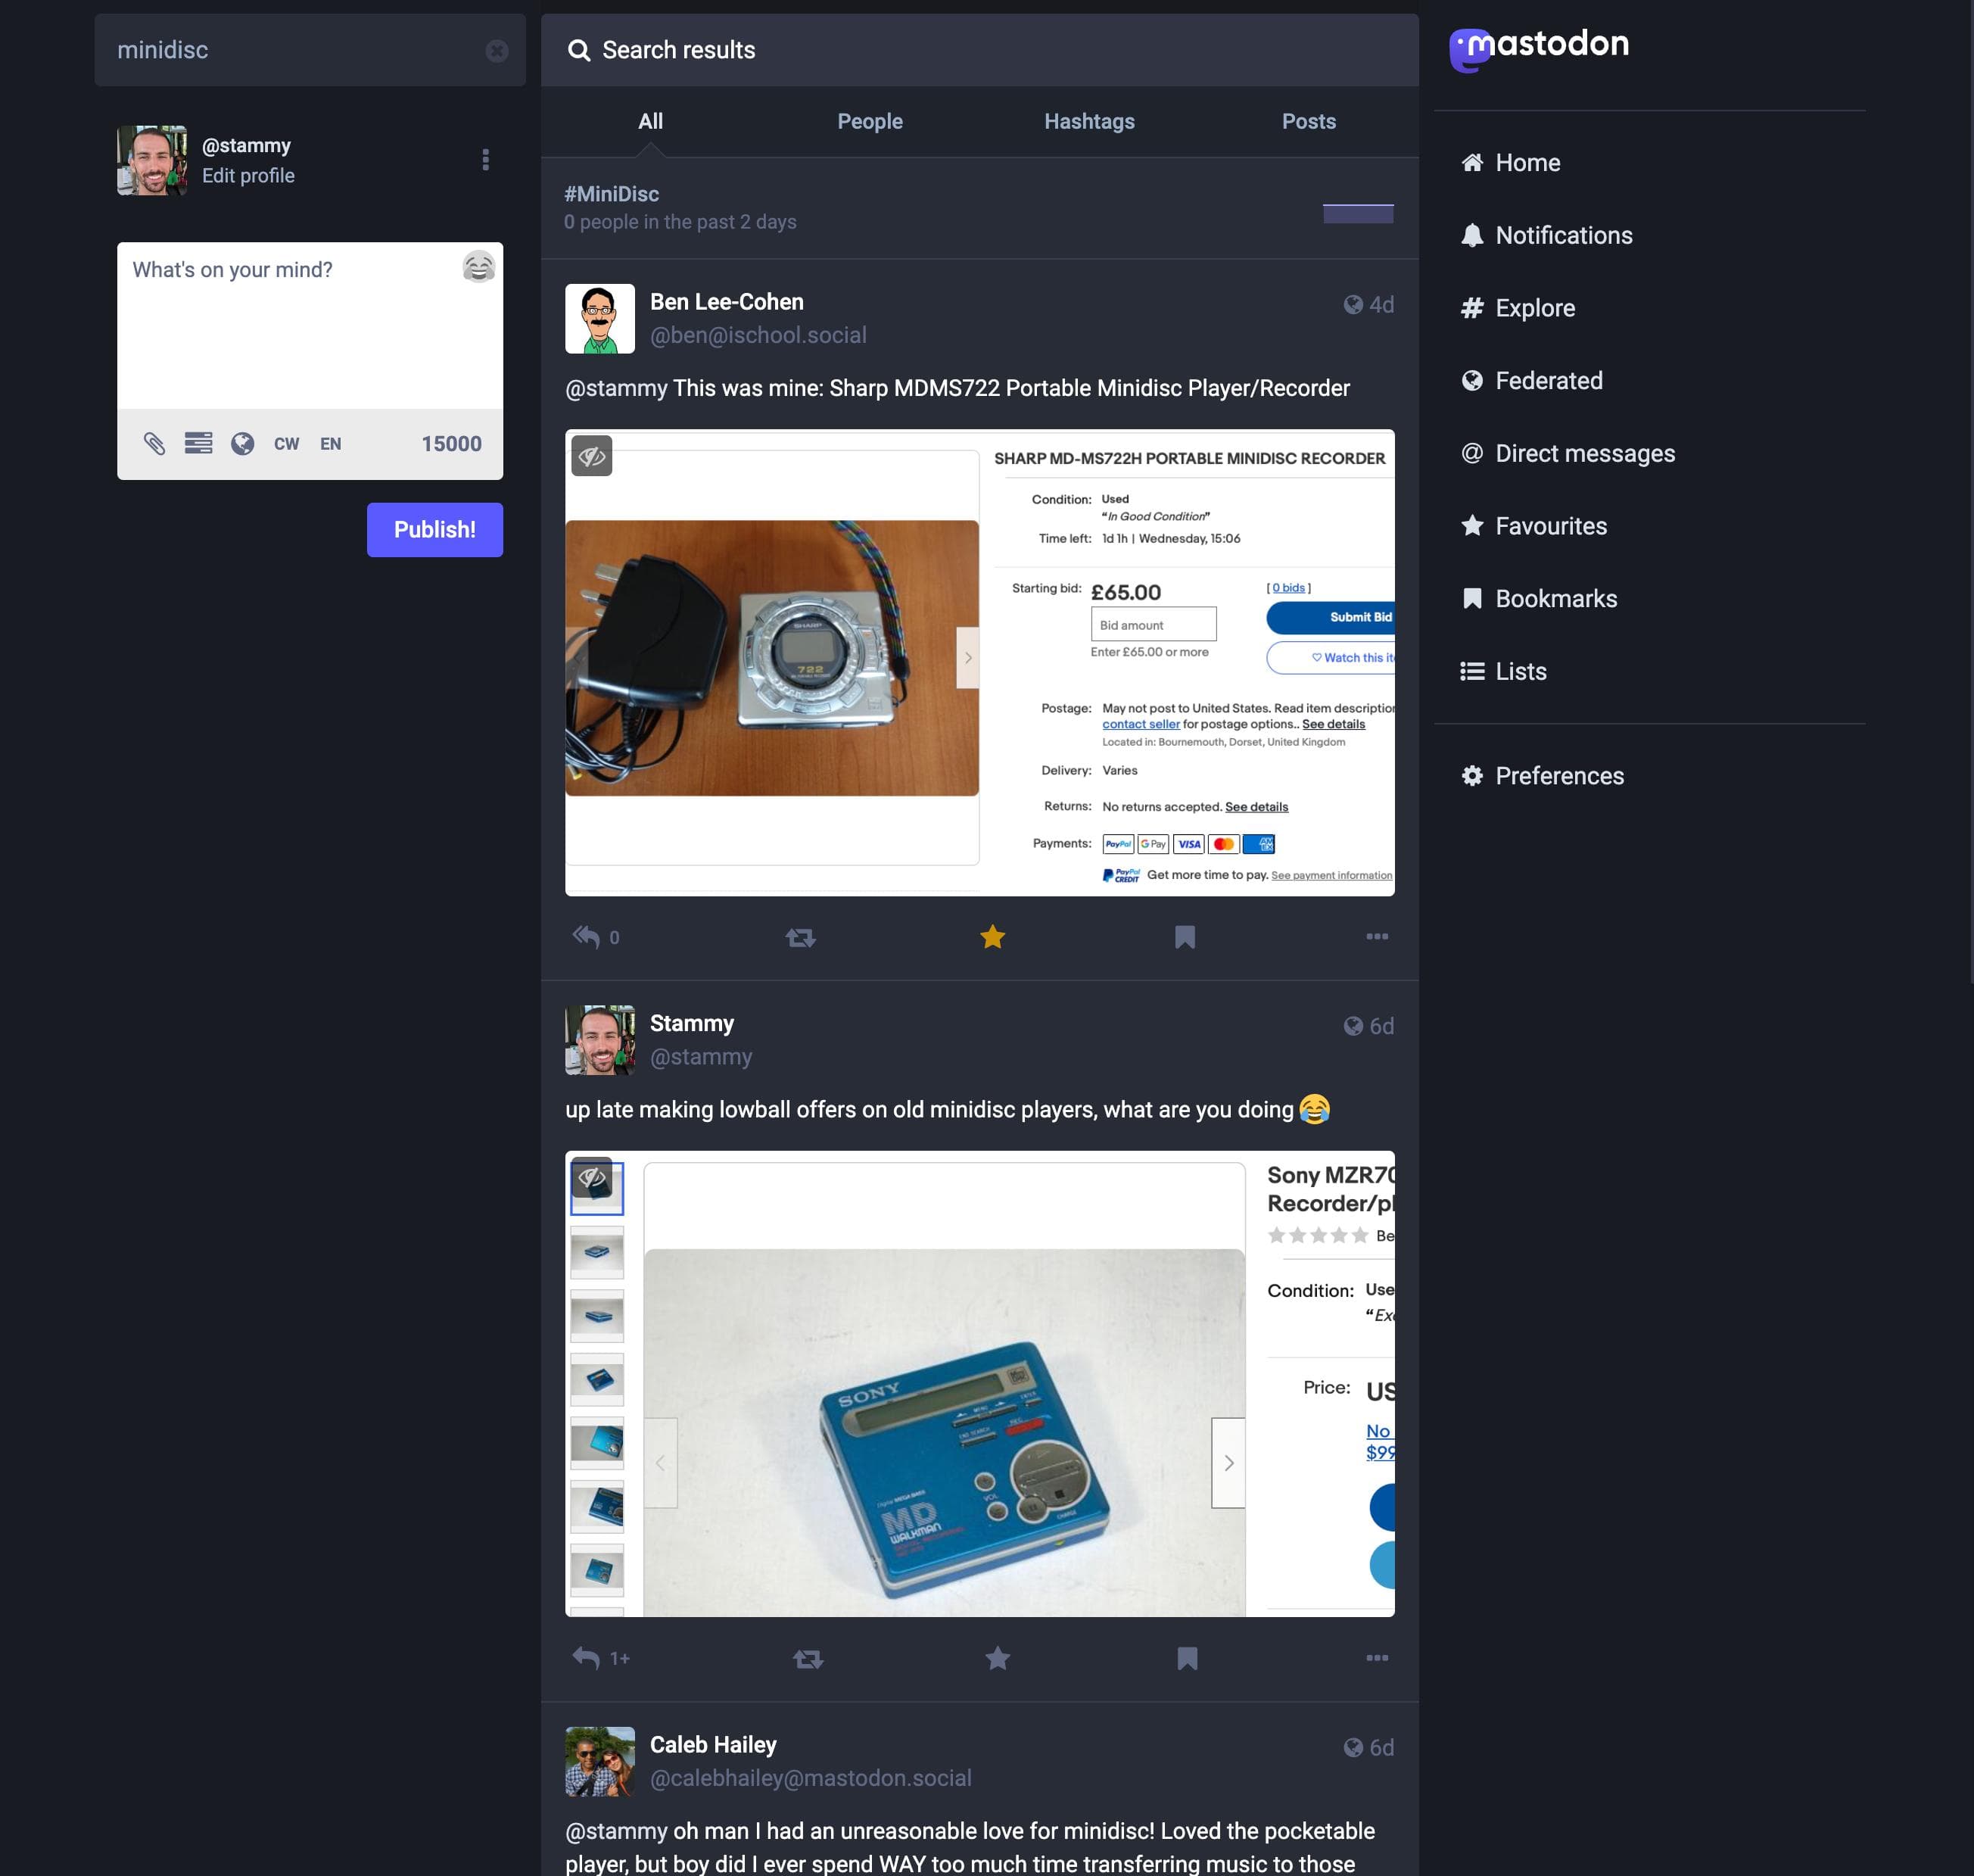
Left: Mastodon search without ES installed. Right: With ES installed, showing local results for people, hashtags and posts, including your own.
To install ElasticSearch, you can follow these instructions from the Mastodon site. However, when you get to the part of the guide that tries to enable the service, you may see this error:
Job for elasticsearch.service failed because a fatal signal was delivered to the control processed
This is likely to happen if your machine doesn't have enough RAM. By default ElasticSearch tries to take a lot of RAM, so you'll want to configure it to use less. For example, if you only wanted it to use 512MB of RAM, you can create a new file memory.options:
# Create an elastic search config file to limit memory usage
vim /etc/elasticsearch/jvm.options.d/memory.options
Then enter these two lines to specify a min and max amount of RAM that ElasticSearch can use. For example, a min of 256MB and max of 512MB:
-Xms256m
-Xmx512m
Save the file and try to start the service again:
systemctl daemon-reload
systemctl enable --now elasticsearch
Run the rest of the steps mentioned in the guide and you should have functional search on your instance. You may run into one more issue resulting in a security warning. This github thread is helpful for resolving that (though I think it was also fixed recently in Mastodon 4.1.0).If you want to go down the rabbithole you can modify more security settings but it's likely not a huge deal as we'll be setting up a firewall that won't allow port access to ElasticSearch.
Logging into Mastodon
Changing settings, configuring scripts & testing
If you used a fully-managed host like Masto.host (mentioned earlier), you've already created an account and logged in. If you've followed the guide for creating your own server for Mastodon, then you were given a temporary password to login with. Now it's time to visit your website and sign into Mastodon. You'll also want to immediately enable two-factor auth.
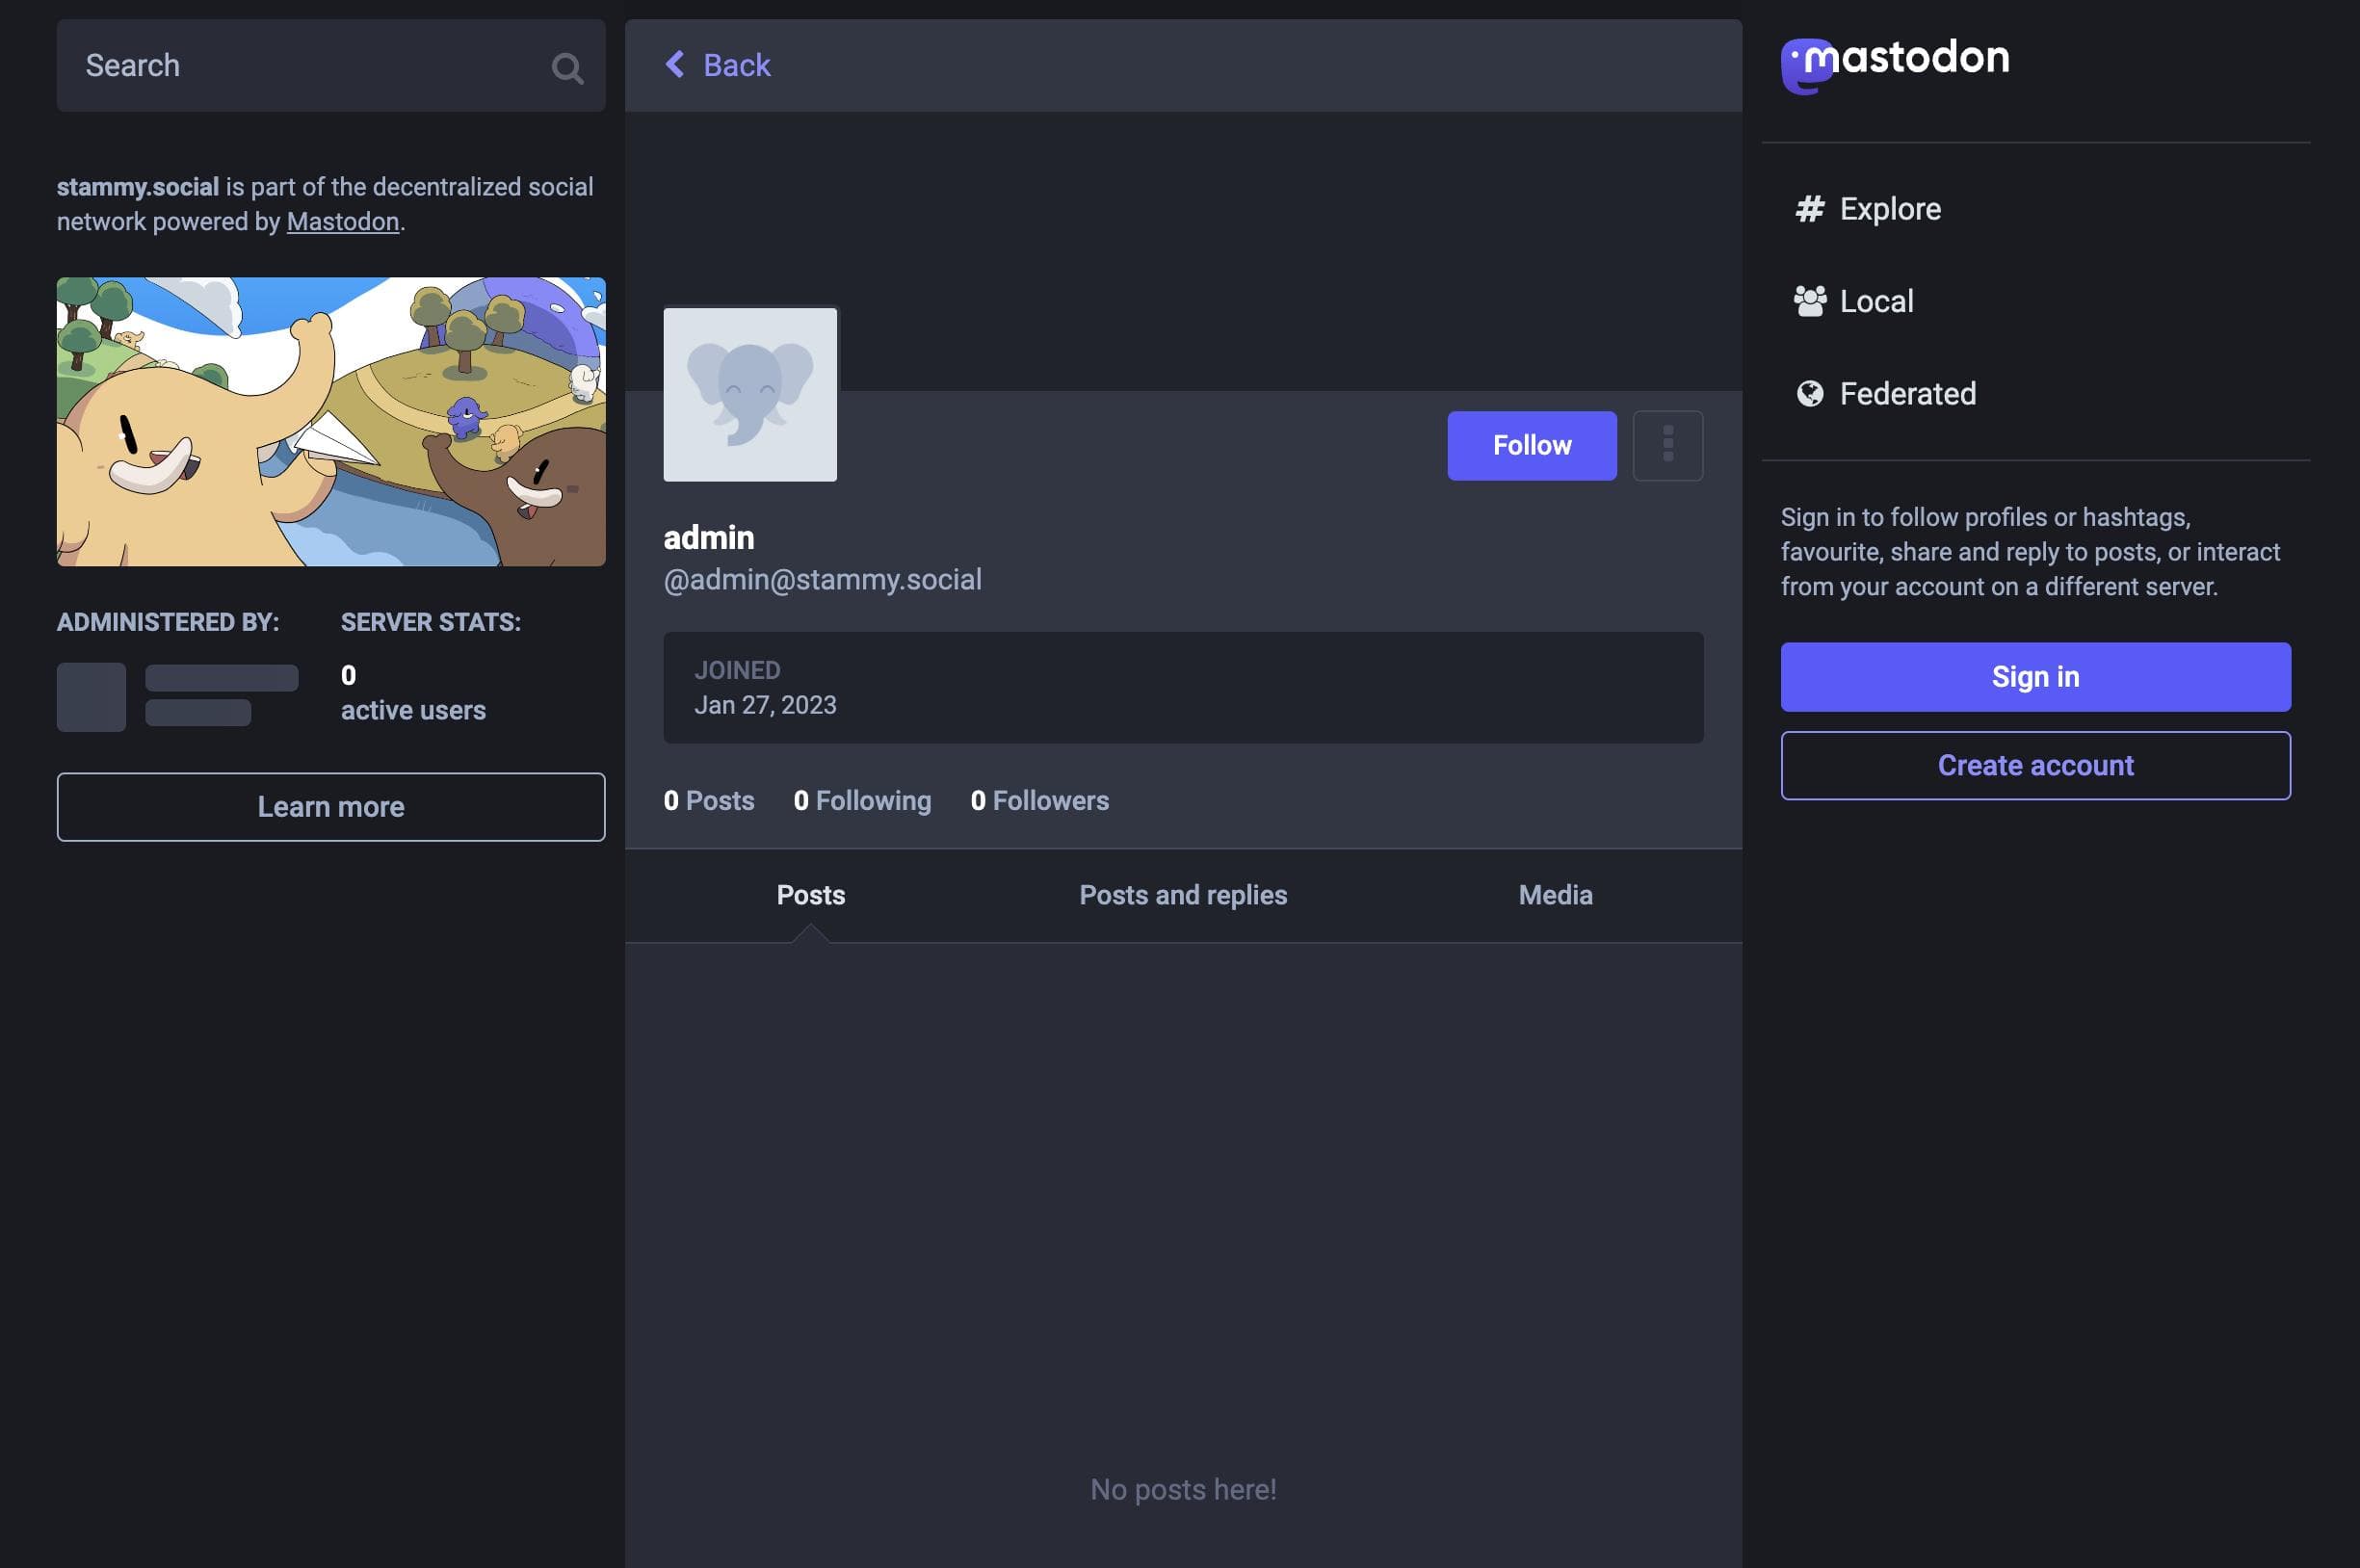
Your new homepage (single user mode enabled) will look empty like this
After signing in, click Preferences in the sidebar. The first thing we want to do is confirm that upgrading your account to the owner role actually worked. You should see a tab for Administration along with others like Sidekiq and PgHero. It should look like this:

Feel free to browse the Profile tab to fill out your bio and related settings. Importantly, I think "Require follow requests" may be on by default which you probably want to disable.
Next, here's a few things to setup:
Fill out server details
Administration → Server Settings → Branding: Fill out the name and description for your server. This is displayed alongside your profile, homepage, and posts so it's quite visible. You can also specify an image to display there.

Disable new account creation
Administration → Server Settings → Registrations: If this server is just for you, you'll want to disable account creation by changing the Who can sign-up setting to nobody.

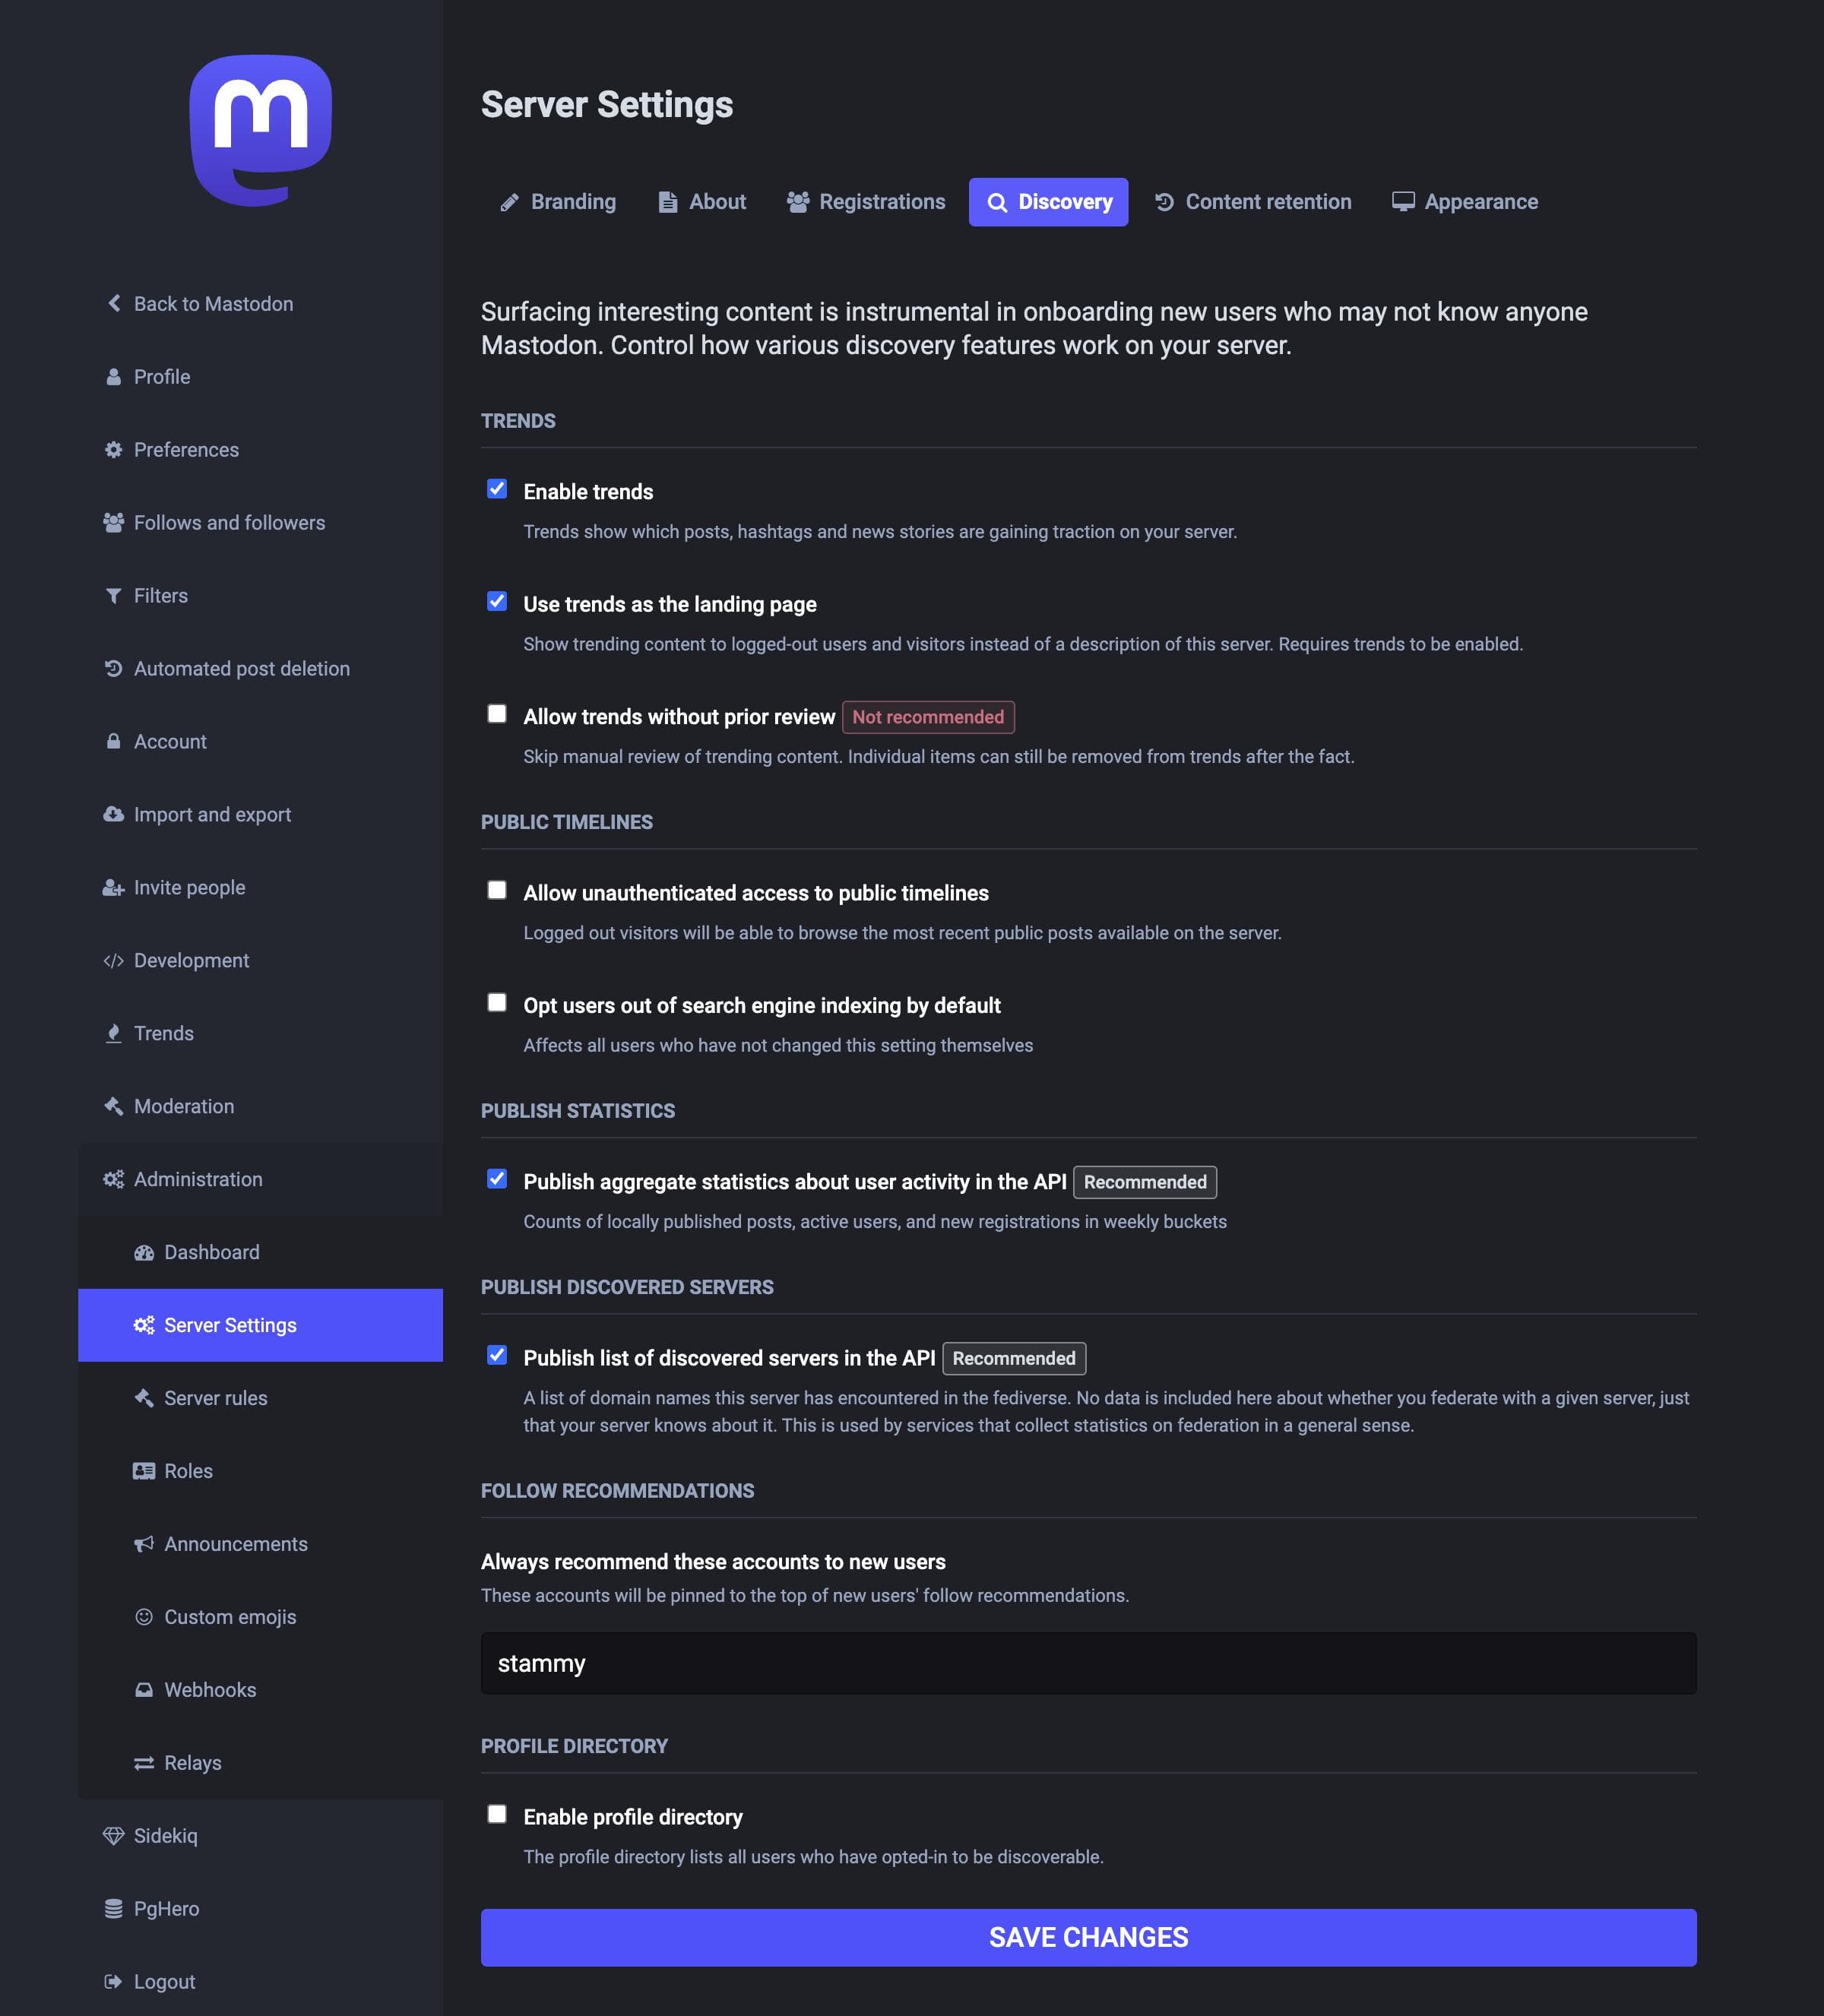
Disable unauthenticated access to public timelines
Administration → Server Settings → Discovery: This is just a preference but since this is my own server, I only want my posts easily accessible. I wanted to disable the /public (the "Federated" tab) timeline which displayed posts from other people. I'm also a little concerned about liability related to my server hosting content from other people (as mentioned in my last Mastodon post) so making those posts harder to find seems best.
As such, I unchecked Allow unauthenticated access to public timelines.
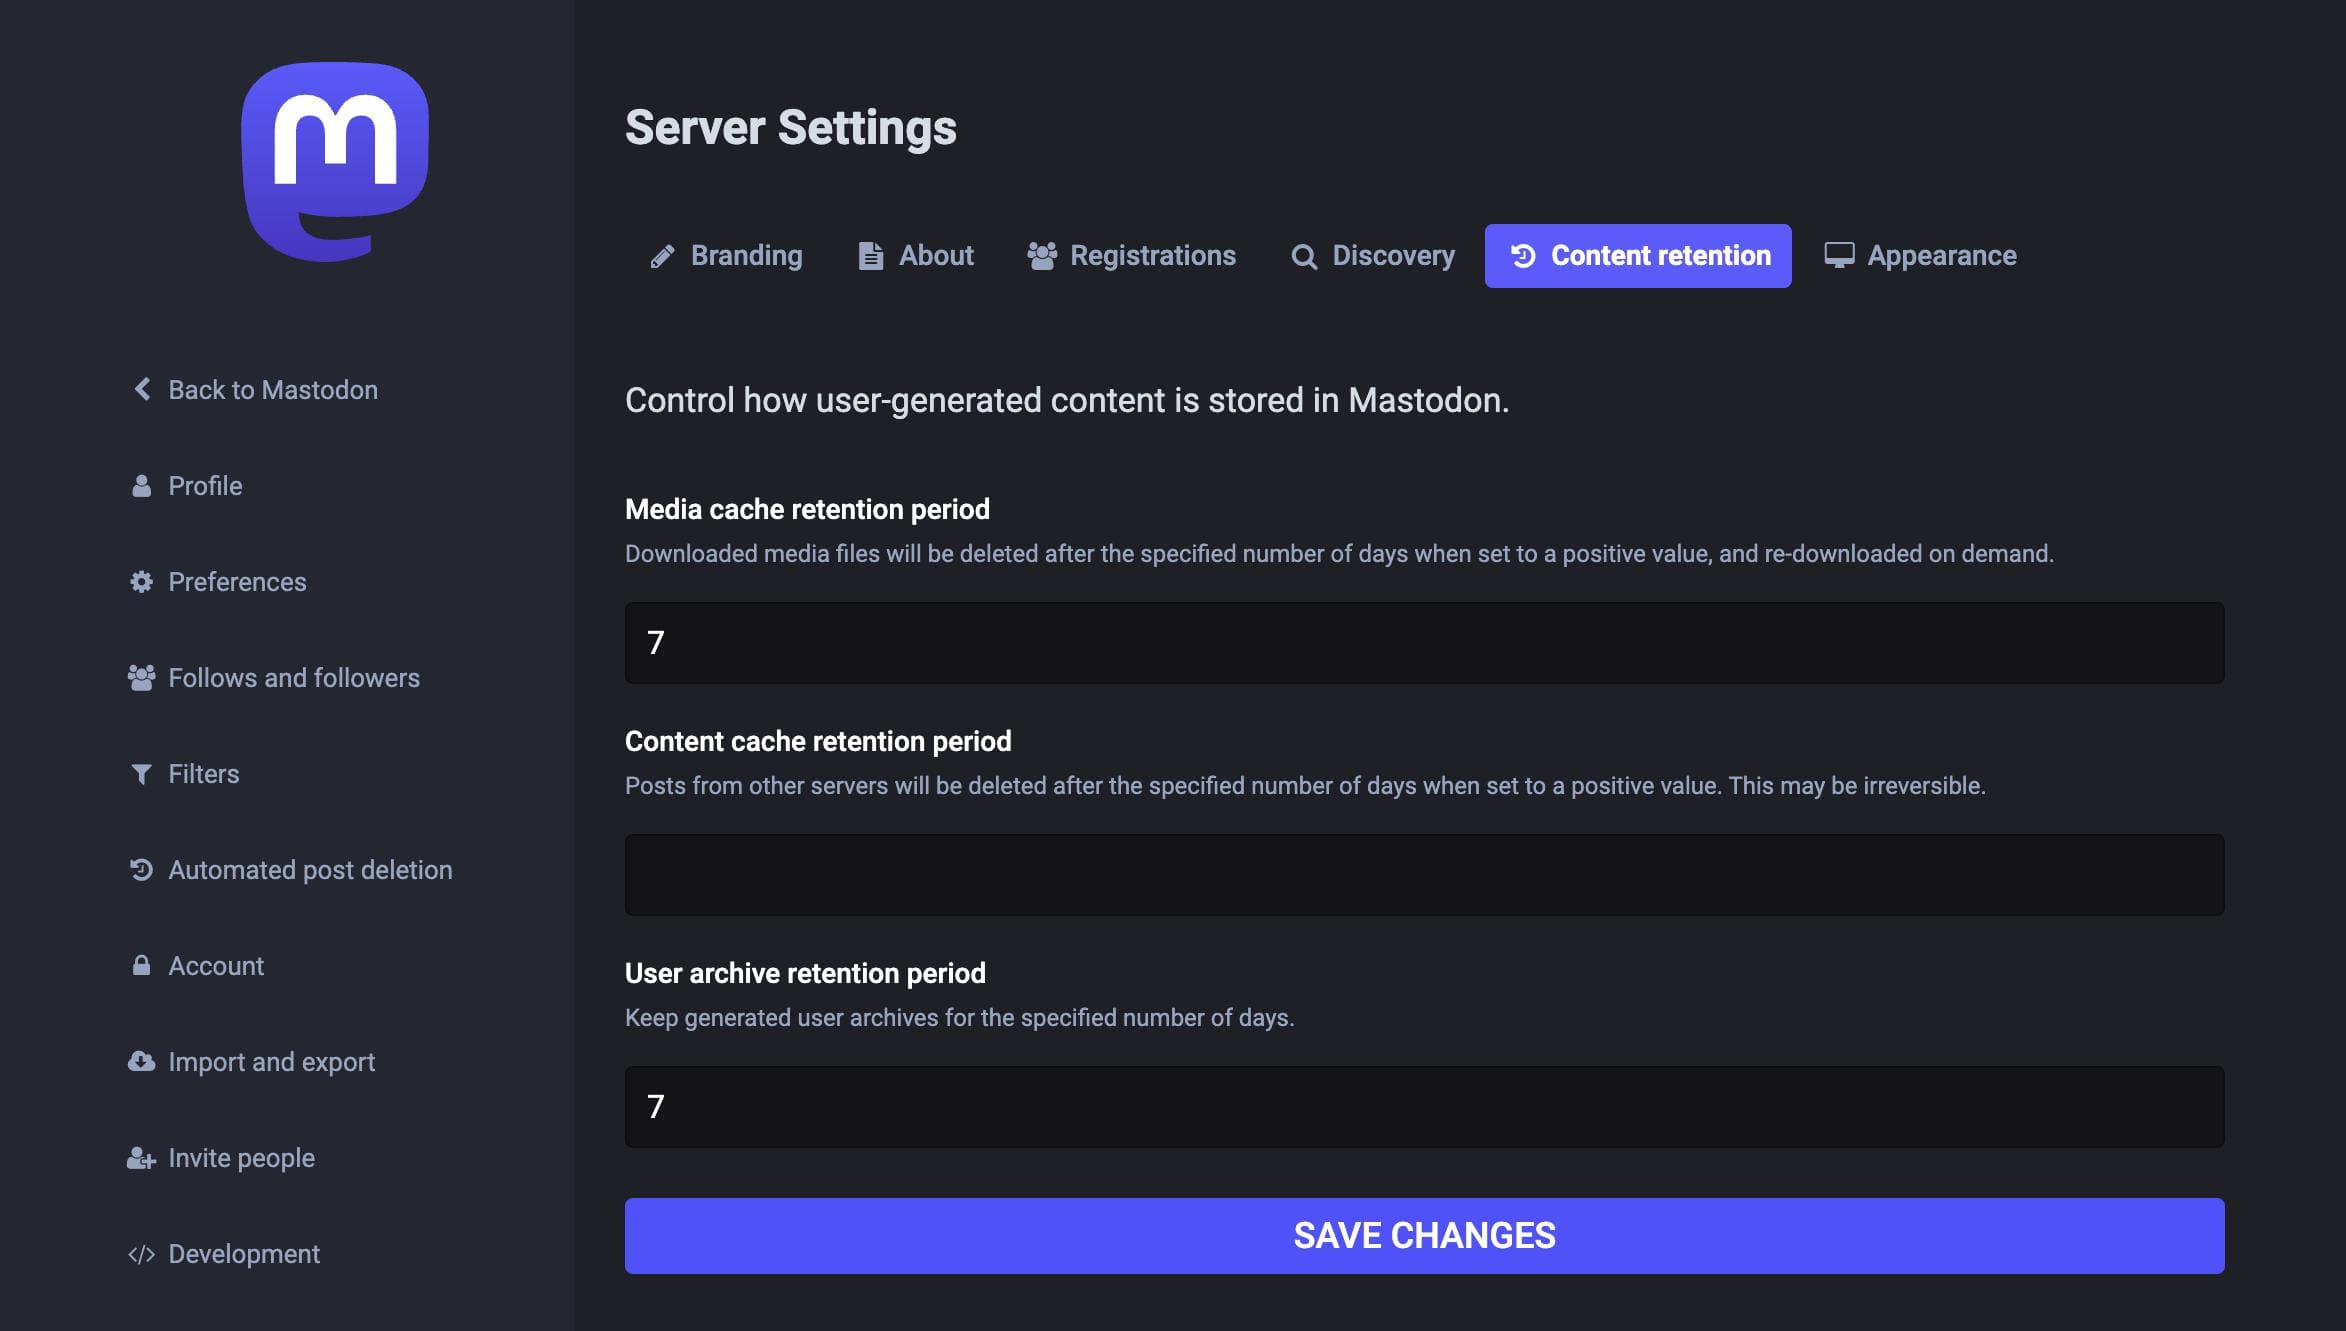
Adjust media and content retention
Administration → Server Settings → Content retention: This page has some important settings that control how much media and content is kept on your server. If you follow or interact with lots of people on Mastodon (or have any relays setup), you will see the size and costs associated with your cloud object storage provider rise.
You change safely set the media cache retention period to something like 7-30 days. I went with 7 and haven't noticed any odd behavior. This will delete downloaded media files (from other servers, stored on your server or cloud storage) after the specified period. If your server requests the media again, it will be re-downloaded so there's no real harm in setting it too low, you can always change it.
The other setting content cache retention period is a bit less safe to tinker with and will delete posts from other users on your server. I decided not to touch this and will see if I need to change it if my database grows too large over time.
Setting up a cron job for periodic cleanup tasks
The media retention setting in the admin interface is just one setting. You have far more control at your disposal with the tootctl admin command in the command line. In fact, running these commands regularly is a recommend part of setup, mentioned under periodic cleanup tasks.
For this, I have several of the commands running as a cronjob. I put them in a bash script for a cronjob to run. I could have put them directly in the crontab editor as a weekly task but it's easier to keep it in one file where I know it will run serially, without having to specify different run times for each job so they don't run at the same time, potentially bogging down your server.
Here's a list of the commands I run regularly. I put them in a bash script named cleanup.sh that I store in my home directory /home/mastodon:
# This does the heavy lifting and removes locally cached copies of media attachments from other servers
# By default its set to delete media older than 7 days.
# Adjust days with --days, eg --days 3 for a more aggressive setting
RAILS_ENV=production /home/mastodon/live/bin/tootctl media remove

# Remove local thumbnails for preview cards (the thumbnail when links are shared, etc)
# The default is 180 days and under 14 days is not recommended as they will not be refetched
RAILS_ENV=production /home/mastodon/live/bin/tootctl preview_cards remove --days 60

# Deletes remote accounts that never interacted with local accounts
# Removes many avatar and header images as part of this
RAILS_ENV=production /home/mastodon/live/bin/tootctl accounts prune

# Removes files that do not belong to existing media attachments
# For example if you attached a file to a post composer but never posted it
# This command and the one after it are slow to run, so I like to keep them for last
RAILS_ENV=production /home/mastodon/live/bin/tootctl media remove-orphans

# Remove unreferenced statuses from the database, such as statuses that
# came from relays or from users who are no longer followed by any local accounts,
# and have not been replied to or otherwise interacted with
RAILS_ENV=production /home/mastodon/live/bin/tootctl statuses remove
# Switch to the mastodon user and home directory
sudo su - mastodon
# Create bash script
vim cleanup.sh
# Make the script executable
chmod +x cleanup.sh
# Add the bash script to crontab
crontab -e
In crontab, add this line and then save:
@weekly ./cleanup.sh
I set it to run weekly but you may prefer to run it more often. I've been running my own Mastodon server for a month now and with this setup my cloud media storage is only at 8.5GB with my usage.
Use custom CSS to hide or modify things
Administration → Server Settings → Appearance: This part is completely optional but I found myself wanting to hide certain parts of the site navigation that aren't useful to others as my Mastodon server is only for me. I hid the sign in buttons for logged out users. I hid the "Local" tab for me when logged in: useless for me as I'm the only account on the server. I also hid the "Learn more" button that shows up next to the server details (felt pretty obvious that the server was just for me and I wanted to simplify things a bit).

// hide sign in buttons (you'll have to manually visit /auth/sign_in)
.navigation-panel .navigation-panel__sign-in-banner,
.ui__header__links a[href="/auth/sign_in"],
.ui__header__links button { display: none !important; }

// Hide the "Local" tab for logged in users (only do this if you're the only user on the server)
.navigation-panel a[href="/public/local"] { display: none !important; }

// hide server details "Learn more" button
.server-banner .button { display: none !important; }
Bonus: Clean up the admin UI with an Arc Boost
If you're running this Mastodon account for you, and you only, you may find the default admin dashboard has a lot of space taken up by useless information, such as showing you the number of new accounts created. I prefer to keep some of that hidden to clean up this page.
Unfortunately, just adding CSS to hide it as in the previous step does not seem to work for admin pages. So I turned to a feature from my browser, Arc, called Boosts. It's an easy way to locally inject CSS (or JS as needed) into any website. Other browsers have similar ways of doing things with extensions. I created an Arc Boost to simply hide a few dashboard modules:
# Not pretty, but it does the job
.dashboard .dashboard__item { display: none; }

.dashboard .dashboard__item:nth-child(3),
.dashboard .dashboard__item:nth-child(9) { display: block; grid-column: span 3; }

.dashboard .dashboard__item:nth-child(12),
.dashboard .dashboard__item:nth-child(13) { display: block; }

Admin UI, with a bit less clutter for single-user instances.
Try posting an image
And one last thing you'll want to do is try posting with an image attached. This will confirm your cloud object storage configuration works correctly and that your system can resize images. What you'll want to look out for is that dragging an image into the post composer shows a thumbnail preview, and osting it shows the image without requiring you to refresh the page.

Migrating your account
If you have an existing Mastodon account on another server
Now you're ready for the fun part: moving your existing Mastodon account over to your new server, along with your followers. Mastodon does a great job with this and while it's not perfect for reasons I'll mention below, your followers will automatically move with you. You can read a bit about the process from the Mastodon documentation, but it unfortunately does not go into much detail.
Here are the key things to know about migrating your account:
-
Your posts don't move with you. Posts on your existing Mastodon account do not move with you to the new server. This is unfortunate, but likely a product of how the federation is done (every server that interacted with your posts would have to update). If you only care about the content of your posts and not the engagement around them, you could repost them one by one to your new server (before you do the migration), and edit the date in the database to the original date. But that's weekend project territory to write a script to do that for you... I digress.
-
Your followers move with you. Your followers will get transferred pretty immediately. When I migrated my account, all of my ~3,000 followers were moved within a day with maybe 75% in the first few hours. It's not entirely flawless though, I did lose about 20 followers in the process.
-
You have to manually re-follow accounts you follow. You have to export a CSV file of accounts you follow from the old server and upload that on the new server. It's really easy, but it does mean that people you follow will receive a notification that you followed them. It's not ideal but people will start poking around and realize you just moved servers. I've noticed it dozens of times with people I follow and quickly pieced it together.
-
Your old profile shows a banner that you've moved to another server. And your old account will be in a locked down state. You can login but you can't post or edit anything aside from exporting data from the preferences page.
-
You can't migrate your account again for 30 days. So make sure you're using a username and domain you like.
Lets get started! The actual first step is creating an account on your new server, which you've already done.
Step 1: Create an account alias on the new server
Setting up a Mastodon account migration is a two-way process. The new server needs to be aware of the old account, and the old server needs to send everything to the new server that's expecting it.
So the first step is to log into your new server, open Preferences → Profile and click on the link under "Moving from a different account." On this page you need to provide your old Mastodon account in the format myusername@example.com.
This step is harmless and reversible—the actual migration does not start until the later steps.
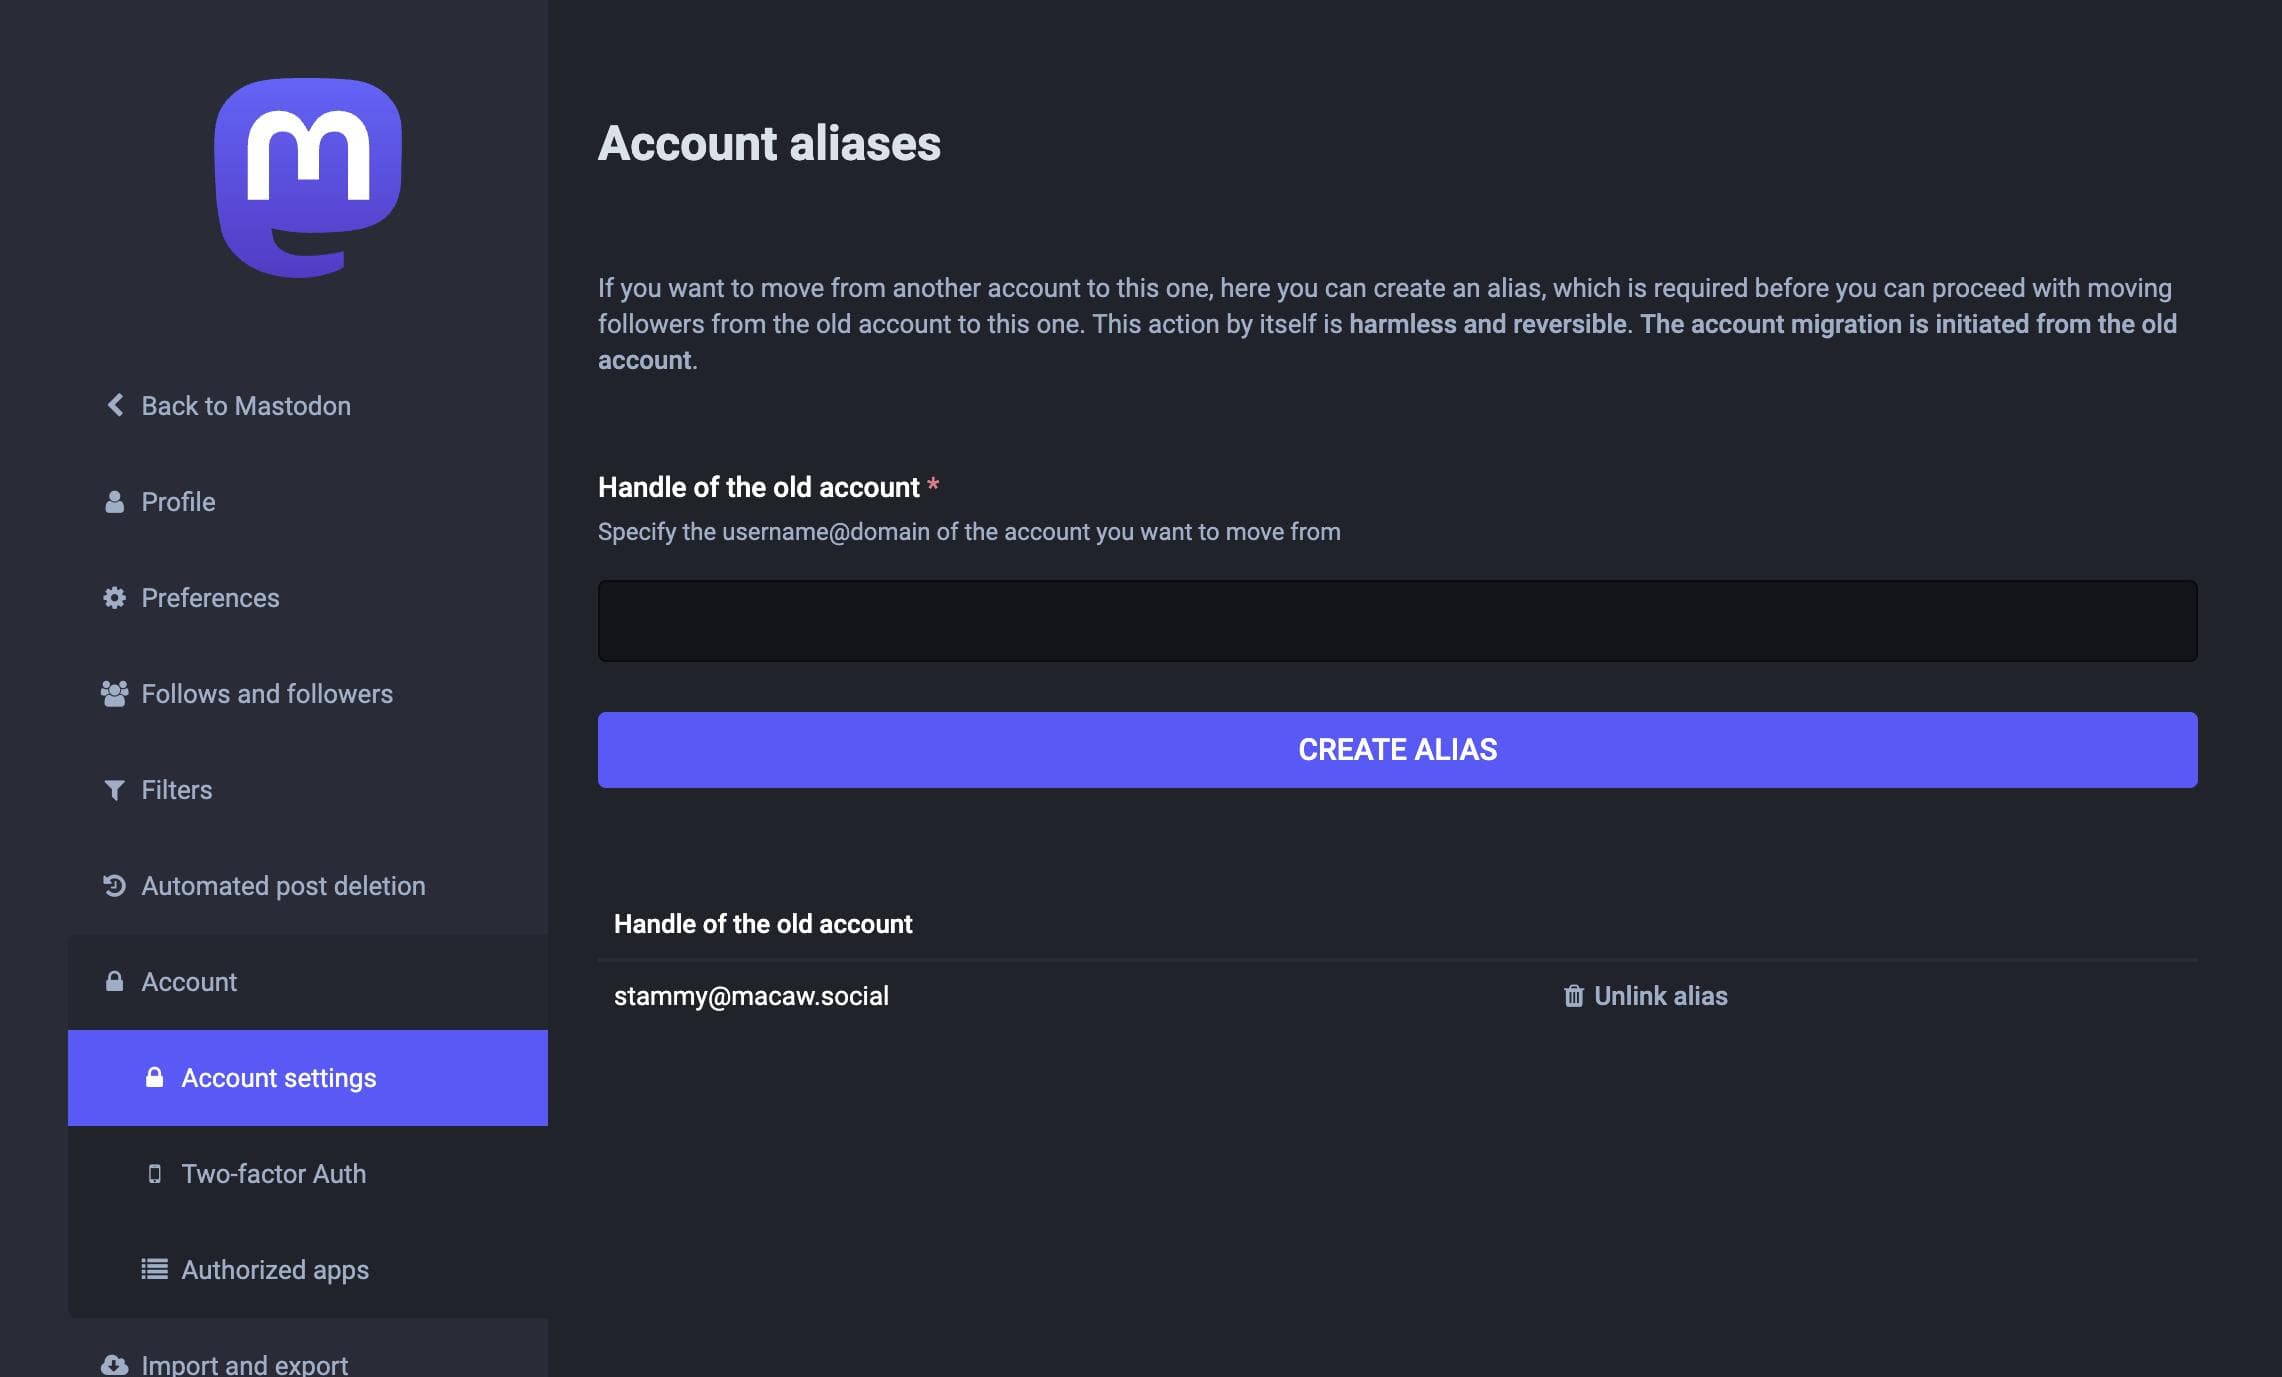
On the new server, add an alias for your old account.
Step 2: Export your account data from the old server
Next, you'll want to export data from the old server. Most importantly, you'll want to export a CSV of accounts you follow so you can later import this on the new server. You can also export files for your muted accounts, blocked accounts, bookmarks, lists, and blocked domains. Go to your old server to download these files: Preferences → Import and Export → Data export.
On this page you can also request an export of your posts and uploaded media from the old server. This is just for you to have as you can't import posts on the new server. Also, it may not work you depending on your old server. I've tried to request my archive on my old server numerous times and it never generated a download for me.
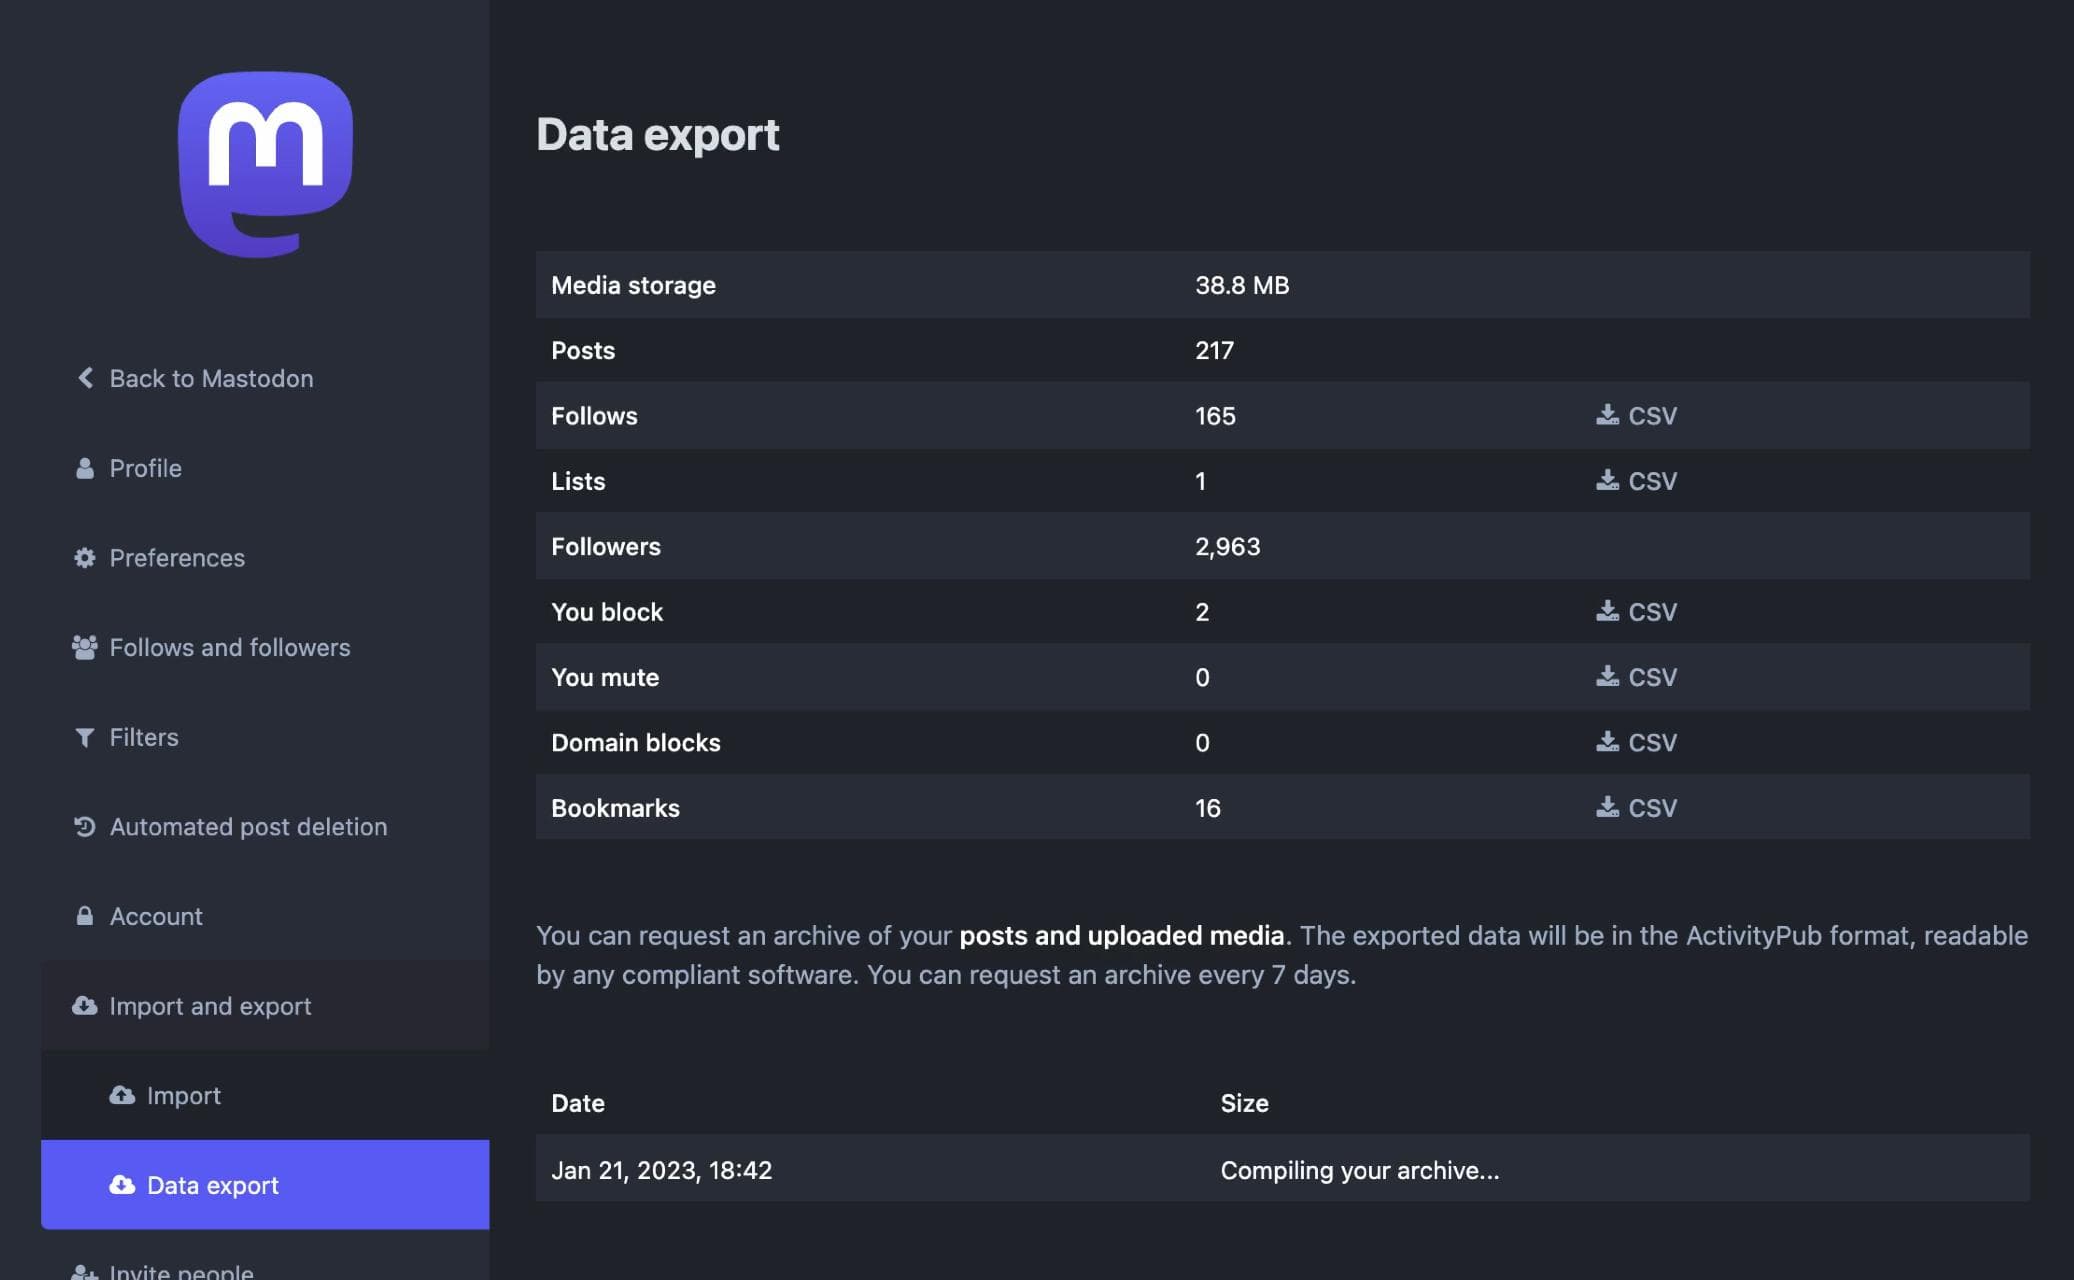
Export data from the old server, especially the list of accounts you follow.
Step 3: Begin the migration on the old server
Now it's time for the actual migration. This will move followers from your old account to your new account. This cannot be undone, so be sure you're ready and have setup your server to your liking before proceeding. This is also a good time to edit anything on your old account (edit bio, delete any posts, etc) as you won't be able to change it later.
On the old server, go to Preferences → Profile → Move to a different account and click the link mentioned. This will take you to the account migration page. Carefully read the bulleted list to understand the implications of this move. Then, enter your new account's handle and the password used for your old server.
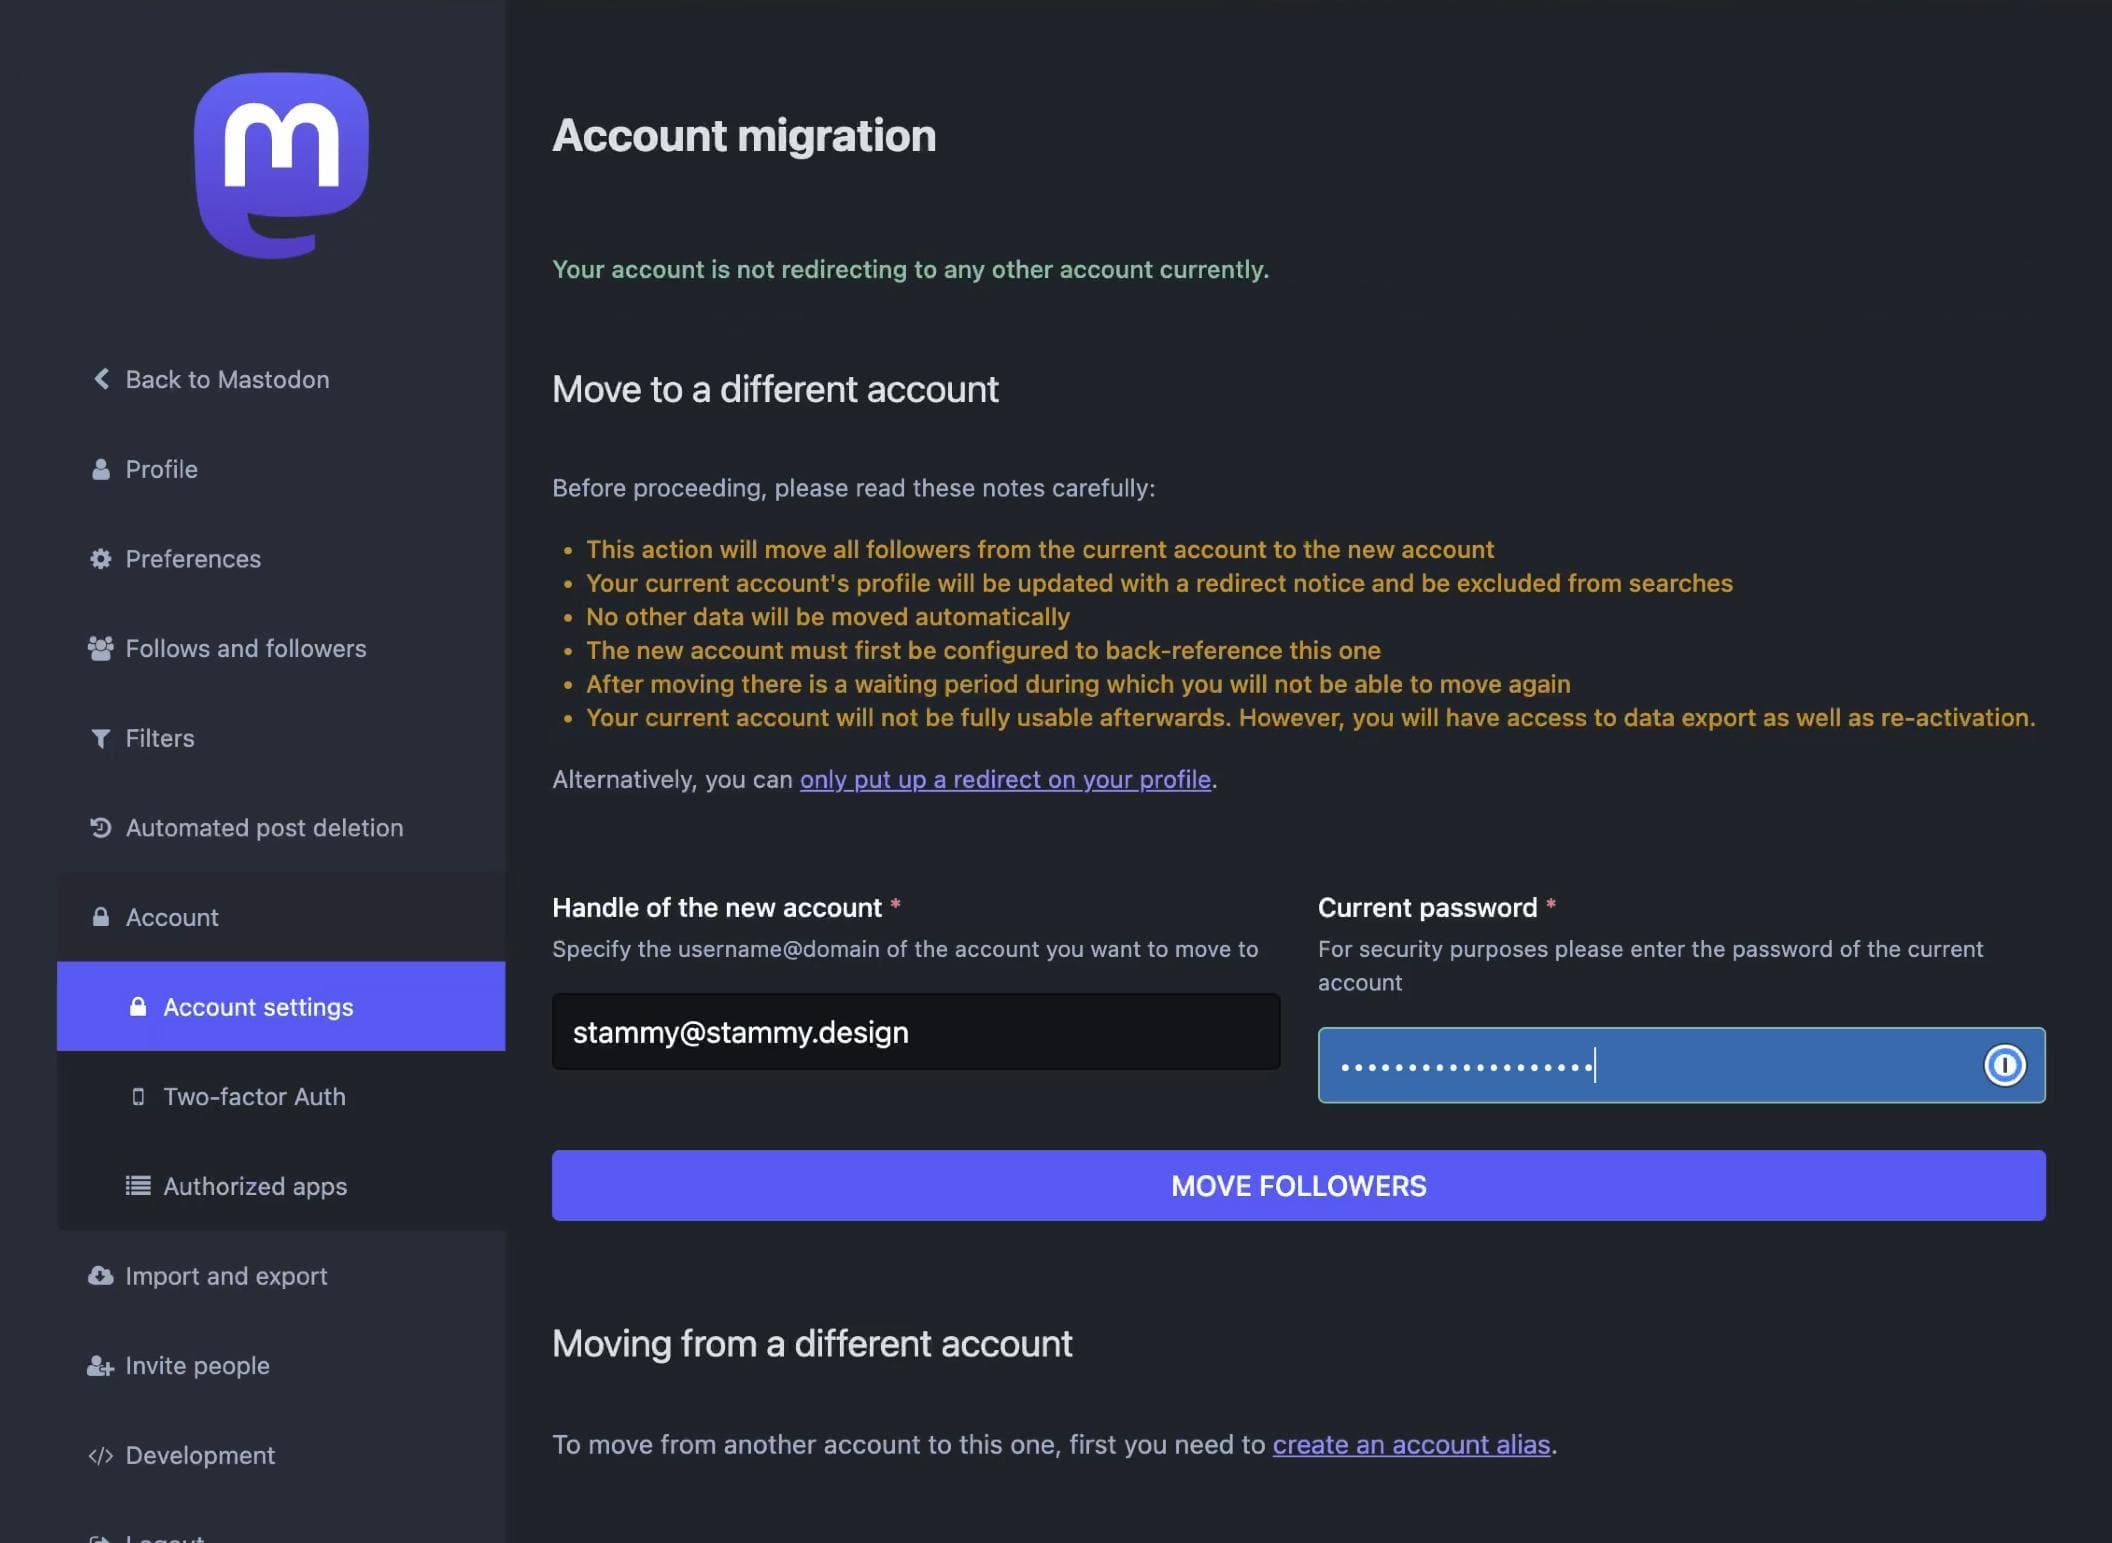
Starting the migration on the old server by providing the new account handle.
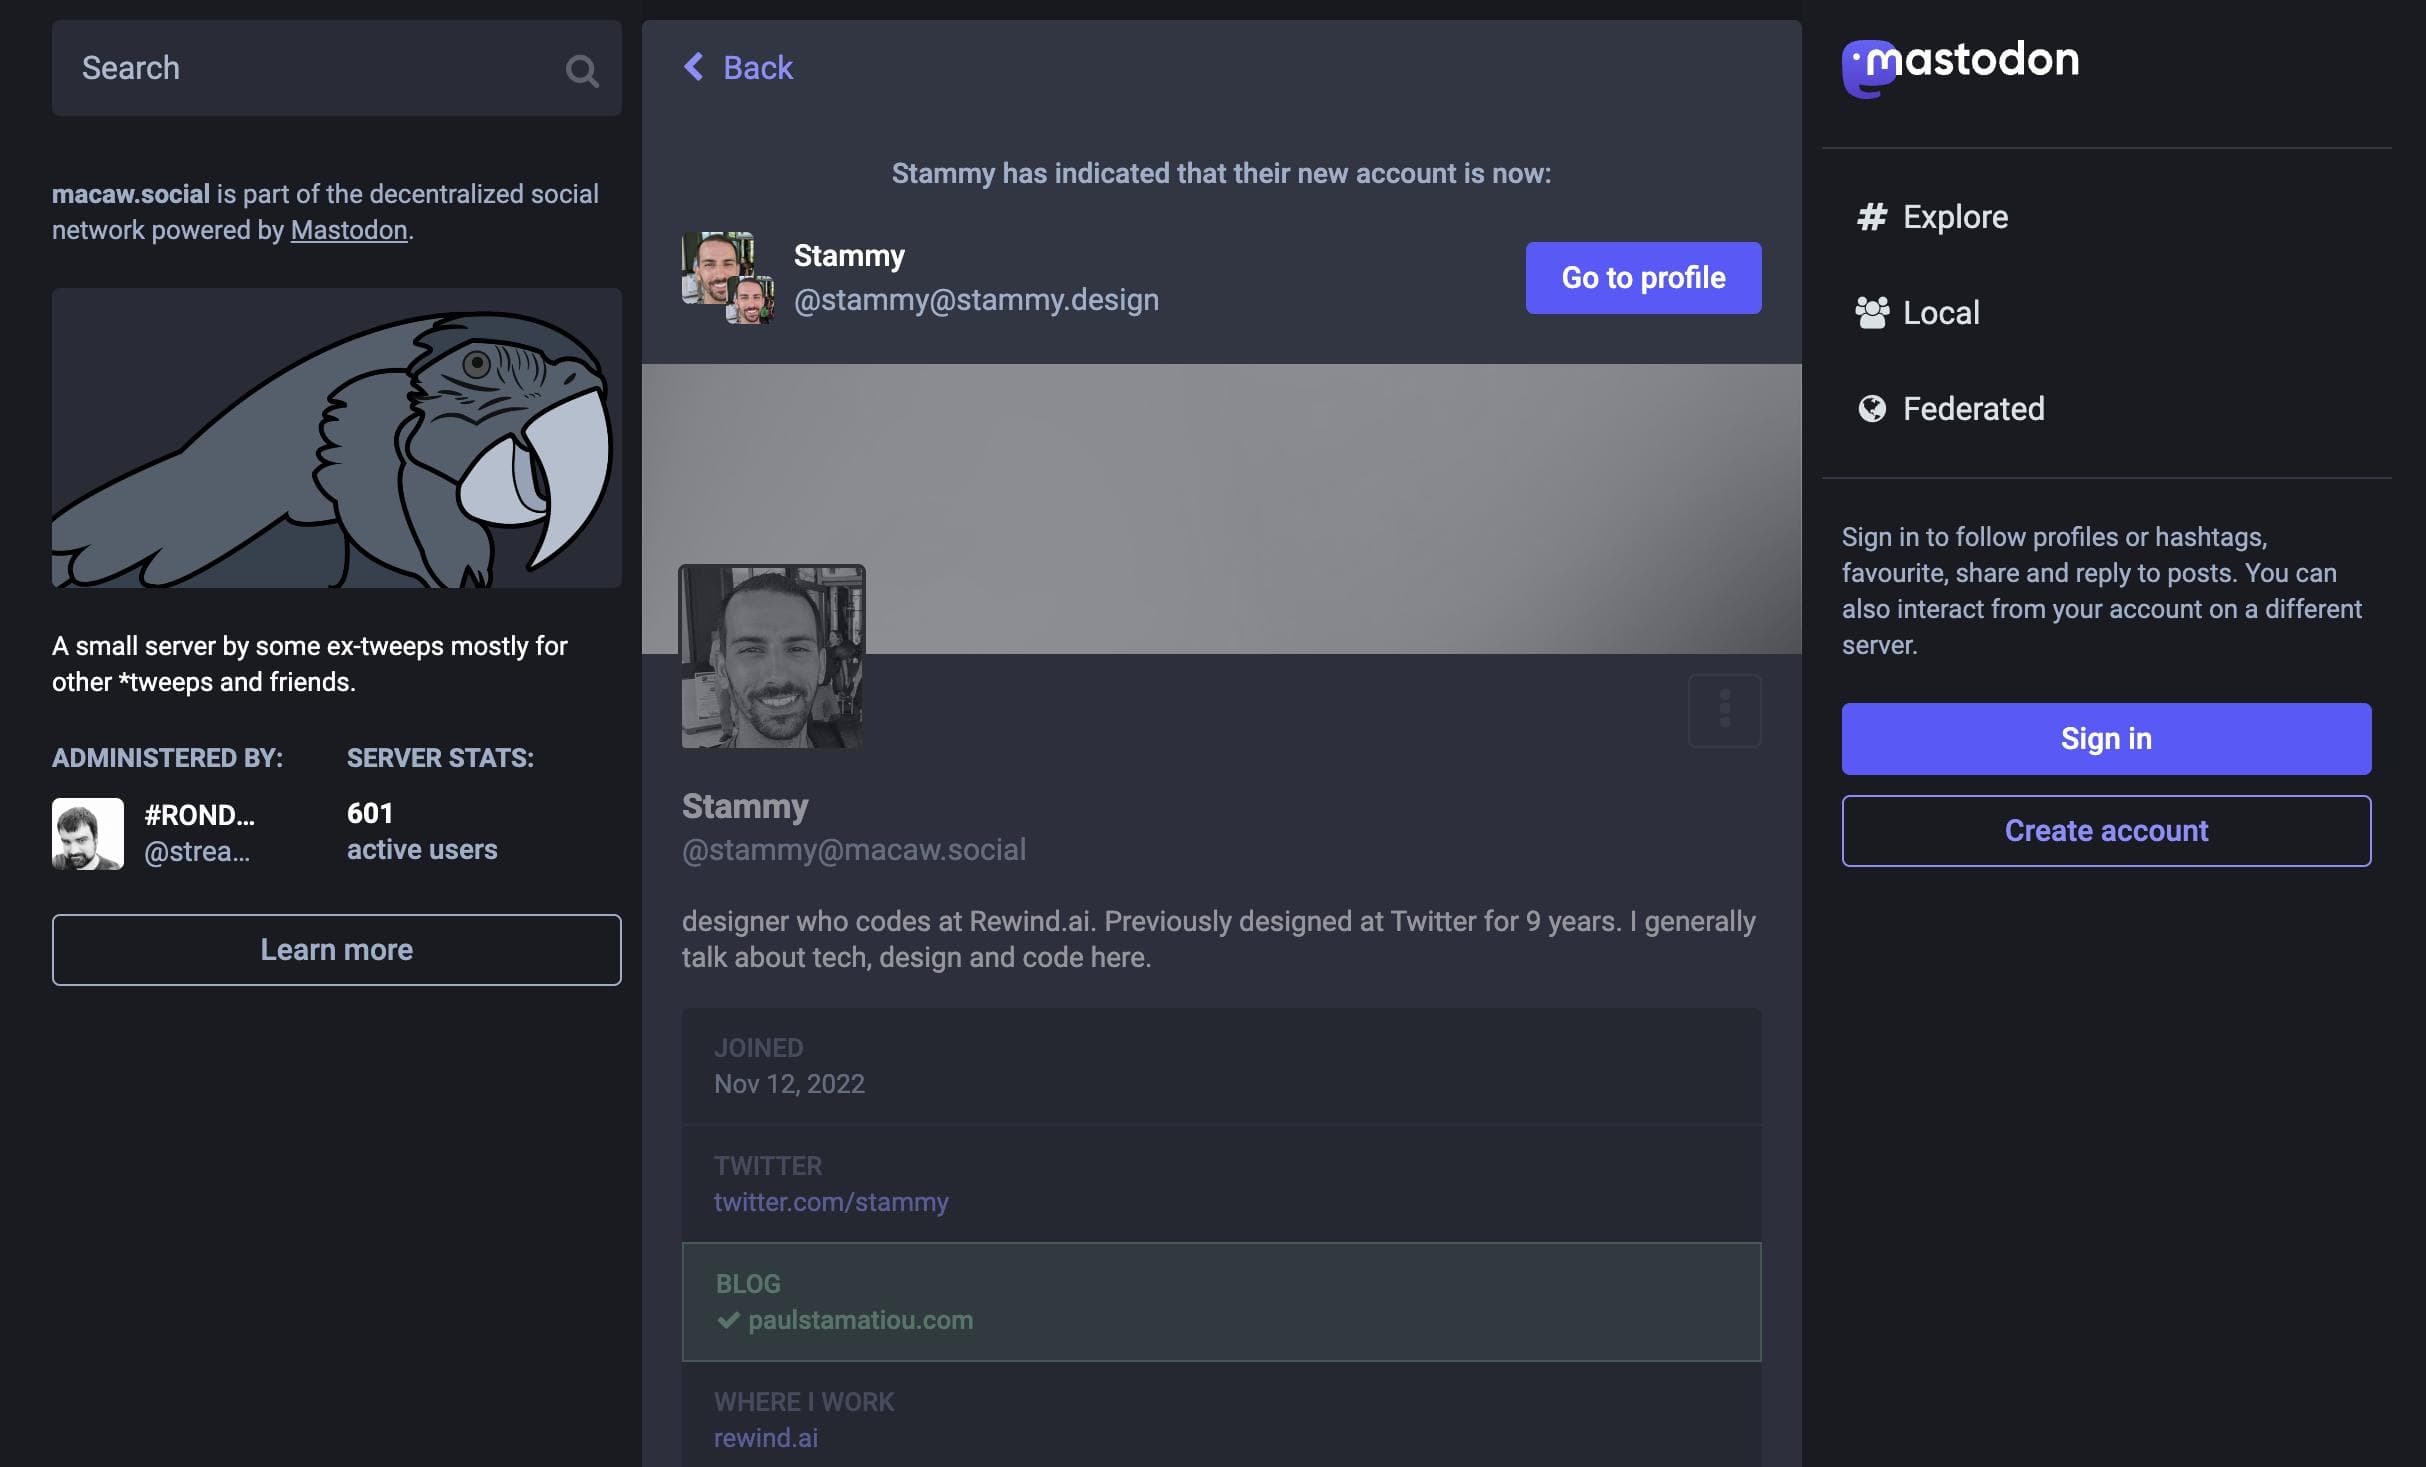
Your old account will now display header saying your account has moved.
Now the migration will start. As mentioned earlier, your posts will not move to the new server, only your followers.
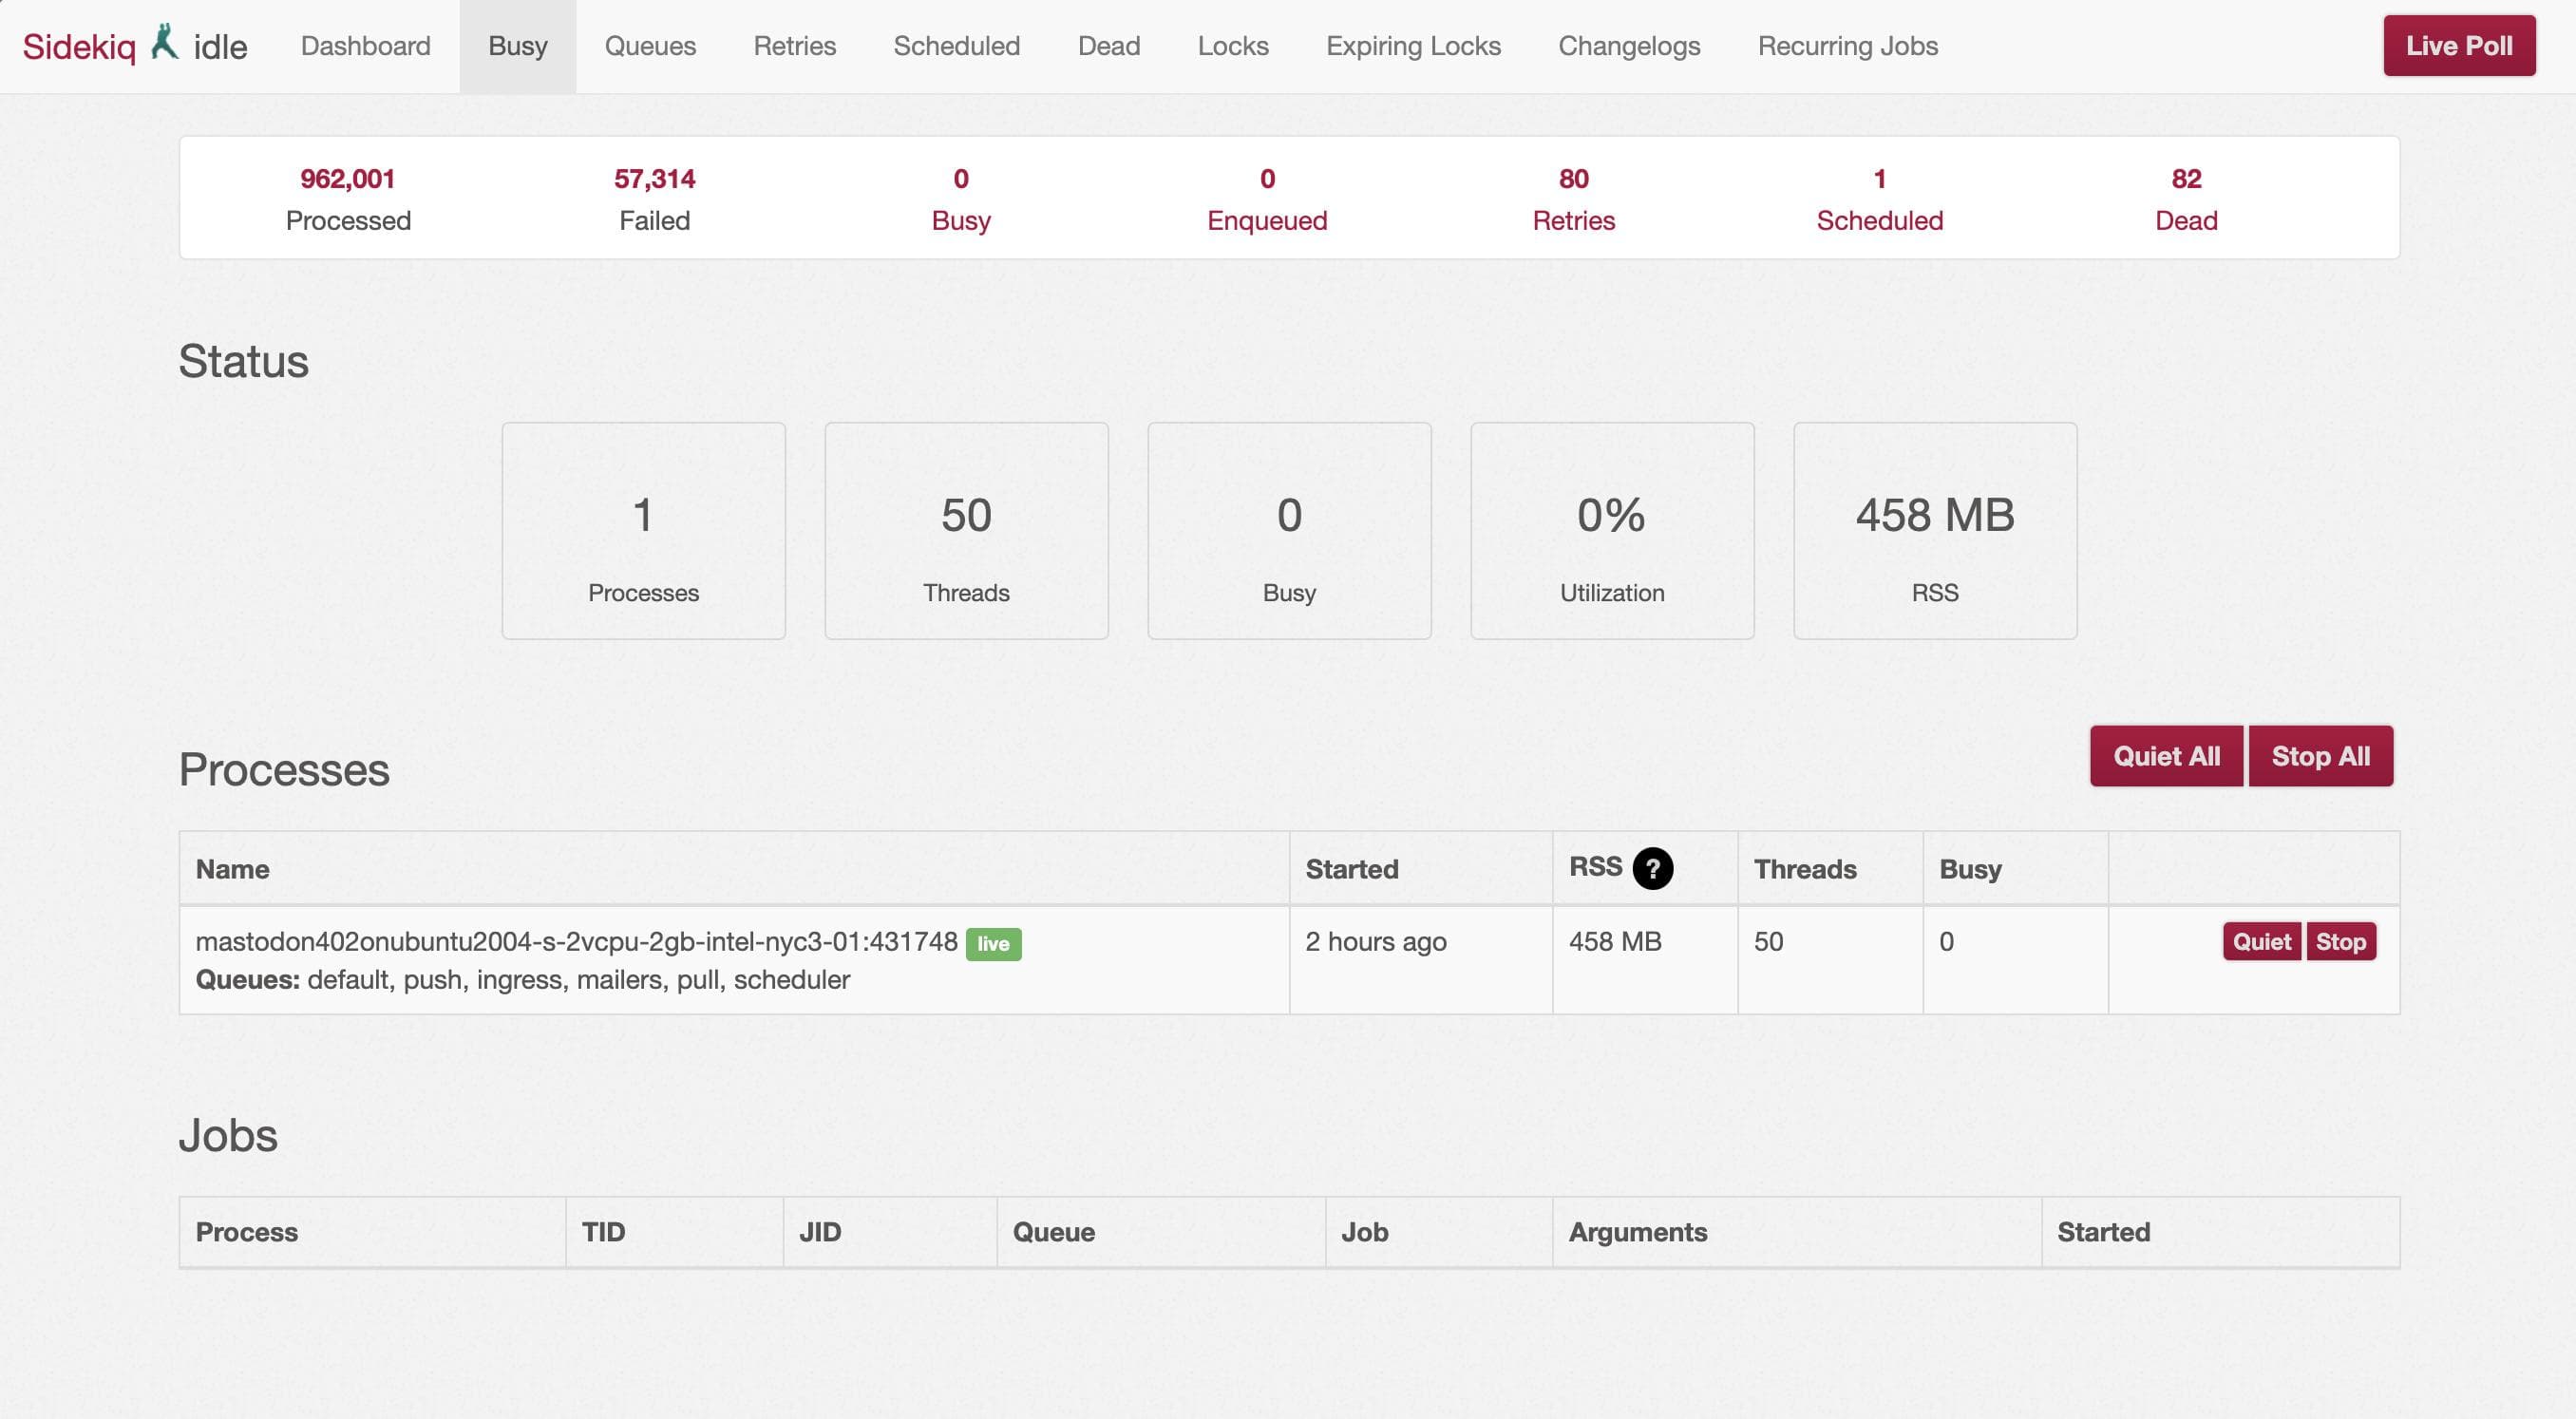
If you have a lot of followers or a particularly low-end server, it may be a good idea to keep an eye on your server as this migration process will keep it busy for a while. You can take a look at system resources with the top or htop commands.
And you can see what Mastodon is doing by looking at the Sidekiq dashboard, accessible in Preferences → Sidekiq. You can click around to see what jobs are running or failing. For the most part you don't need to worry too much. Common job failures are often related to other instances having timeouts. The only cause for concern would be an error indicating connectivity issues with your database, which could mean you may want to adjust the Sidekiq concurrency (mentioned a bit later) in /etc/systemd/system/mastodon-sidekiq.service.

Moving your followers will keep your machine busy. You may wish to keep an eye with htop.
Step 4: Import your following list
The last step of the migration process is to import the CSV files you exported in step 2, the most important of which is the list of accounts you follow. On your new server go to Preferences → Import and export → Import. Select what type of CSV file you're importing in the dropdown, select the CSV file and upload.
You can safely import all lists except the following list before you've actually started your migration (step 3) if you wish.
I recommend waiting a while after step 3 has had time to move most of your followers over before importing your following list. Your server may be quite busy with step 3 so it doesn't hurt to do this an hour later.

Importing your list of accounts you follow
That's it! All of your followers should get moved over shortly and you're ready to start using your own Mastodon server. It's probably a good idea to have a post or two so your followers don't see an empty profile if they happen to venture to your profile.
If you want to have a bit of fun, you can start looking into adding custom emojis (sometimes called emojos in the context of Mastodon) to your server. Take a look at Preferences → Administration → Custom emojis. where you can upload an image and assign it a shortcode. You can even use them in your username.
What to expect
Missing some posts and replies? Yeah, that's normal...
After you've had some time to use your new server, you may see some odd behavior that may lead you to something is broken with your server. Profile pages for accounts may be almost entirely empty, or only have a few posts. Post detail views may not have all the engagement or replies you might expect compared to visiting the original post URL on the remote server.
I'm just here to tell you this is normal. It's not a good thing, but it's the current state of how Mastodon works.
Missing posts on a profile: When you follow someone on your server, or visit the profile of someone you don't follow, Mastodon does not go and fetch all of their posts. That would be taxing on their server and yours. So what happens instead is you get some basic profile info, a post or two (pinned ones) and that's it. Then, the next time your server sees a post from this user (because you follow them or other some action lead to your server seeing this post), it will then appear on their profile. This is not ideal and it wouldn't be unreasonable for Mastodon to fetch a few more posts with a way to request them on demand.
This will get a bit better over time. Your server is brand new, you only just followed accounts and your server has yet to see a lot of new posts and fill up profiles with new posts going forward. You'll still stumble across a user account that your server has never seen before an experience the same blank profile behavior but at least now you know why that is.
Missing replies on posts from other accounts (not your own posts) is a similar situation; your server may have low federation and not be aware of some of those replies. Understanding why this is the case ends up going down a rabbithole of understanding federation more and how your server even comes to know about posts, and under what conditions another server sends a post to your server.
This Mastodon GitHub issue outlines the situations where your server comes to know about posts:
- Someone on your instance follows the person who posted, at the time it was posted
- Someone you (or anyone else on your instance) follow boosts or replies to that toot
- Under some conditions, if that post was a reply to someone you (or anyone else on your instance) follow
- The post mentions anyone on your instance
- The post was a pinned post when the account was discovered by your instance
- Someone on your instance manually fetches a post by pasting the URL in the search bar
This is a hot topic these days and I've seen discussions happening around people wanting to add buttons in Mastodon clients to explicitly load all replies on a post, or older posts on a profile, from the remote servers. There's various technical issues with some of these routes, but I'm curious to see if this situation evolves as I for one would love a refined experience here.
Maintaining, debugging, and optimizing your server
A few things to be aware of
This section is for people running their own server, not through a fully-managed host like Masto.host.
Updating Mastodon
You'll need to keep up to date with Mastodon updates to get new features, performance and security updates. You can check for new updates on the GitHub project page but it's probably easiest to subscribe to the atom feed in your news reader of choice, such as NetNewsWire.app. Here's the releases feed, or the website if you prefer.
The steps you need to follow for each update may vary, but additional steps will be mentioned in the release notes for each release. Generally you'll need to SSH into your server, fetch the latest release with git, and restart some services. Find the complete steps here: Upgrading to a new release.
You should check now that your server is on the latest Mastodon version. At the time of this writing, the DigitalOcean 1-click installer is running an outdated version.
Updating your Ubuntu server
Along with maintaining and keeping Mastodon up to date, you'll want to do the same with your server. If you followed along with the DigitalOcean route explained above, your machine uses Ubuntu OS, apt package manager and has a specific package called unattended-upgrades installed by default. That package will automatically install essential security updates, but you can modify it to update even more.
I don't want to get too in the weeds about linux server maintenance as everyone seems to have their own specific practice about when to update things, how to update them, and when to leave it alone.. you know, if it ain't broke don't fix it. Some people may prefer to update all packages every week. Not including security essentials, that's a bit too much for me and feels like I'd constantly be signing up for a potential debugging session if anything unexpected happens.
Personally, I just update available packages whenever I get around to it, perhaps every month or two. Usually with these:
# Refresh list of available updates
sudo apt update
# View list of available upgradable updates
apt list --upgradable
# Upgrade packages
sudo apt upgrade
# Remove unneeded packages not installed by you
sudo apt autoremove

# Alternatively, instead of the lines above:
sudo apt update && sudo apt upgrade –y && sudo apt autoremove -y
When things go wrong
I wanted to provide a few pointers for things to look into when things go wrong with your Mastodon server. There's no way I can provide a general solution to what could be a specific problem you may encounter, but here's a few things may be a good place to start:
-
Check service status: Run this to get a quick look at the core Mastodon services:
mastodon-web.service,mastodon-sidekiq.service, andmastodon-streaming.service.sudo systemctl status mastodon-*In addition to status of the 3 core Mastodon services (you'll want to see "active (running)" in green), this command will show the last 10 lines from the logs for each service.
-
Check the logs: This may sound obvious but knowing how to check and work with logs is critical. It's the best way to know what's going on with your machine. To access any of the logs for the aforementioned 3 services, we use a tool called
journalctlto read and filter system logs that are saved in the binary "journal" by systemd. You can always runman journalctlto see more details on how you can use it; it's very powerful.It's a good idea to go through the logs for each Mastodon service after you've set everything up to make sure that things are working smoothly. Here's a few examples of how you can use it:
# Show the last 50 lines of the mastodon-web log
# and keep showing new lines as they come in (that's the -f follow flag)
sudo journalctl -u mastodon-web -n 50 -f

# Or read the mastodon-streaming log
sudo journalctl -u mastodon-streaming -n 50 -f

# Or the mastodon-sidekiq log
sudo journalctl -u mastodon-sidekiq -n 50 -f

# Or only show me sidekiq logs that have priority level 4 (warn) or higher
sudo journalctl -u mastodon-sidekiq -f -n 100 -p 4

# And you can always pipe it to grep
# For example to show any lines from the web logs that have a status code of 500
sudo journalctl -f -u mastodon-web -n 500 | grep "status=500"
You can do a lot with these commands. This helped me initially discover database connection issues when I over-eagerly tried to optimize configs, and helped me notice that I forgot to require SSL for my remote database.
-
Restart things: You can restart or reload (like a restart but no downtime as it reloads the config, if supported by the service) these services with a command like:
sudo systemctl restart mastodon-web -
Check sidekiq: Sidekiq is the background job processor for Mastodon. It's how Mastodon manages receiving new posts, sends our your posts, and more.
Generally you don't need to worry too much about what it's doing, but there's one key scenerio to be aware of: if you have a massive queue of jobs that are piling up. What this looks like is the "Enqueued" tab in the Sidekiq dashboard will show a large number that's not going down in a reasonable amount of time.
This would mean your machine cannot keep up. You may notice significant delays in receiving new posts on your server. A Mastodon instance running well would have likely have few to no tasks busy or queued, and when when queued tasks are added, they get processed quickly. If this happens to you, it could mean your server is underpowered and trying to do too much (don't use any relays if you are), or could benefit from optimizing your sidekiq setup (more later).
There's also a tab for dead jobs in Sidekiq. These are tasks that have failed repeatedly and will not be retried. You'll just want to glance at those to ensure the issues are not related to you. Even if some jobs fail, you'll likely see that they are HTTP connection or timeout errors with other servers and likely not your issue.
Access the sidekiq dashboard directly in Preferences → Sidekiq
Optional: Extend your post character limit beyond 500
It's your server, you control the code so why not extend your server's character limit well past the default limit of 500 characters? Doing this will take just a few minutes, all you have to do is change a number in 2 files, precompile assets, and then restart some services.
This article goes into detail about the process: Customize Mastodon to Change Your Post Character Limit. However, keep in mind that you'll have to reapply these changes with every Mastodon update.
I changed my character limit to 15,000. In reality I won't be posting things that long, though I did take advantage of a 1,000 character reply which was very handy and I didn't have to try to split it up into multiple replies or aggressively truncate my thoughts. The change works seamlessly: people on other Mastodon (or other ActivityPub software) servers will see the longer posts, and all Mastodon clients should see the updated limit in their post composer interfaces.

Extended character limit recognized by Ivory and Mastodon Web.
Optional: Change your join date
One annoying thing of creating a new Mastodon server, or migrating to a new one, is that your join date—shown prominently on your profile—reflects the date you created the new account. It doesn't inherit the date of your previous account(s) that you migrated.
Since you're running your own server and have access to the database, the join date is easy to change. You can change it to your original account creation date, or any date you like. Why not? It's your server, do with it what you want. SSH into your server, or use the web console from your hosting provider and run the following commands:
sudo su - mastodon

# Enter PostgreSQL interactive terminal for the Mastodon database
psql -d mastodon_production

# Update the join date for your account...
# Replace YOUR_USERNAME with your username (does not include domain name)
# Replace date with your desired date, using the exact same format
UPDATE accounts SET created_at='2018-01-01 00:00:00' where username='YOUR_USERNAME';

# Exit the PostgreSQL interactive terminal
exit
Optimizing Mastodon for your server
Proceed at your own risk
If you're just running your own single-user Mastodon instance that you expect to be low traffic, you don't need to touch anything in this section; the defaults are fine for your system. But if you have a beefy server with extra RAM and cores to put to use, you have a lot of followers, and/or you just generally want to nerd out on squeezing more performance from your server then read ahead.
As a word of caution, changing things in various Mastodon config files can easily take your server offline. I recommend doing this before you've done a migration, or late at night to minimize the effects of downtime. Also, I highly recommend setting up Rewind on your Mac so you can easily retrace your steps when you're changing things and running commands.
By following this guide, you've already done an important performance tweak: using a cloud object storage solution for hosting all media for your Mastodon posts. The most common things advanced users will do includes modifying sidekiq to use separate processes for each queue, as well as setting up pgbouncer for PostgresSQL.
Resources
Scaling Mastodon can be a deep topic depending on your needs. I'm only concerned with running Mastodon as a single-user instance, but it's helpful to better understand the pieces of Mastodon and what can and should be changed and when.
The Mastodon website has a page about scaling your server. It's particularly good to learn the relationship between threads and processes with the web server (threads max out your CPU first, processes max out your RAM first), as well as learning about pgbouncer to help reduce any database connection bottlenecks.
Then there's the lengthy and advanced article Scaling Mastodon: The Compendium. Most of the topics in there might be a bit overkill for a small single-user instance though.
Sidekiq
I mentioned a bit about what to be on the lookout for with sidekiq earlier in this article, such as having a backed up queue. The first thing I did with sidekiq is slightly increase the number of threads. By default using the DigitalOcean droplet, you may have a default of 25 for DB_POOL and the concurrency flag -c.
However, the number of max_connections for the Postgres database by default is 100. Counterintuitely, if you opted for a separate managed database from DigitalOcean you may have only 25 database connections available, in which case you may opt to setup their pgbouncer feature called "connection pools"; that's what I did. If you do the same, you'll need to change your database connection info so Mastodon connects to pgbouncer on a different port.
What I did was edit /etc/systemd/system/mastodon-sidekiq.service and change the DB_POOL value to 50, as well as the number after -c on the ExecStart line. You don't want to tell sidekiq to consume all of our available database connections as each Puma web server thread will need a database connection too.
Environment="RAILS_ENV=production"
# Edit this
Environment="DB_POOL=50"
Environment="MALLOC_ARENA_MAX=2"
Environment="LD_PRELOAD=libjemalloc.so"
# and the number after -c
ExecStart=/home/mastodon/.rbenv/shims/bundle exec sidekiq -c 50
Then I also configured sidekiq to automatically restart every 6 hours. There seems to be an open issue where sidekiq memory usage continually creeps up over time. Honestly, this was one of the firs things I configured and never ran without this setting so I'm not entirely sure how necessary it is. But I haven't had any issues.
Restart=always
RuntimeMaxSec=21600
After modifying mastodon-sidekiq.service, you'll need to run these:
systemctl daemon-reload
systemctl restart mastodon-sidekiq.service
Puma
The other thing I did was adjust the number of threads and proccesses used by puma, the Mastodon web/app server. If you expect a lot of web traffic, or just like to be prepared, you may be interested in tweaking puma as well.
I initially looked into this because had some unused RAM on my server and wanted to let puma use a bit more. In the process I learned that the it's recommended to allocate 1.5 processes per CPU core. So my server has 2 cores, so I can get away with 3 processes for puma. I set it to also use 10 threads per process.
Edit /etc/systemd/system/mastodon-web.service and add these two lines (or modify if they already exist):
# Set this to 1.5 * number of cpu cores
# Find your # of cores by running: cat /proc/cpuinfo | grep processor | wc -l
Environment="WEB_CONCURRENCY=3"
# The number of threads per process. If you're RAM constrained, you may want to lower this.
Environment="MAX_THREADS=10"
Save the file and restart the service:
systemctl daemon-reload
systemctl restart mastodon-web.service
That being said, you don't really need to mess with puma much. For a single user instance the vast majority of your traffic will be from people interacting with your posts via a Mastodon app/client through their server—not directly via your website—which is not served by the web service.
This is barely scratching the surface with what's possible for optimizing and scaling Mastodon. I'm just running my own single-user instance and it's been running great so far. If you're not sure what to do, I would recommend not touching anything and seeing how your server works for a while. You can keep an eye on system logs as mentioned earlier, as well as sidekiq.
The end
This article has been in the works for a while now but hopefully it has helped you get a better understanding what's involved with hosting your own Mastodon server, how to keep it running smoothly, and how to tweak it to your liking.
It's a bit of work to get running but the benefits of owning your online identity and data with Mastodon are well worth it. If you've enjoyed this article, please share it with anyone that might find it useful, and of course follow me on Mastodon on my new instance: @stammy@stammy.design.