If there's one thing that will make even the most powerful computer feel like a 7 year old rig, it's Adobe Lightroom paired with RAW files from any high-megapixel camera.
In my case, I spent over a year of spare time editing 848GB worth of 11,000+ 42-megapixel RAW photos and 4K videos from my New Zealand trip and making these nine photosets. I quickly realized that my two year old iMac was not up to the challenge.
In 2015 I took a stab at solving my photo storage problem with a cloud-backed 12TB Synology NAS. That setup is still running great. Now I just need to keep up with the performance requirements of having the latest camera gear with absurd file sizes.
I decided it was time to upgrade to something a bit more powerful. This time I decided to build a PC and switch to Windows 10 for my heavy computing tasks. Yes, I switched to Windows.
Update
June 2019
This post is about 1.5 years old now. While the vast majority of it is still relevant and accurate, one main thing has changed. I built a new, smaller PC to replace the one outlined in this article.
Everything in this article related to how I use Lightroom and how I built the PC remains accurate, so please read the rest of the post after you read this update, and feel free to follow and ask me questions on Twitter.
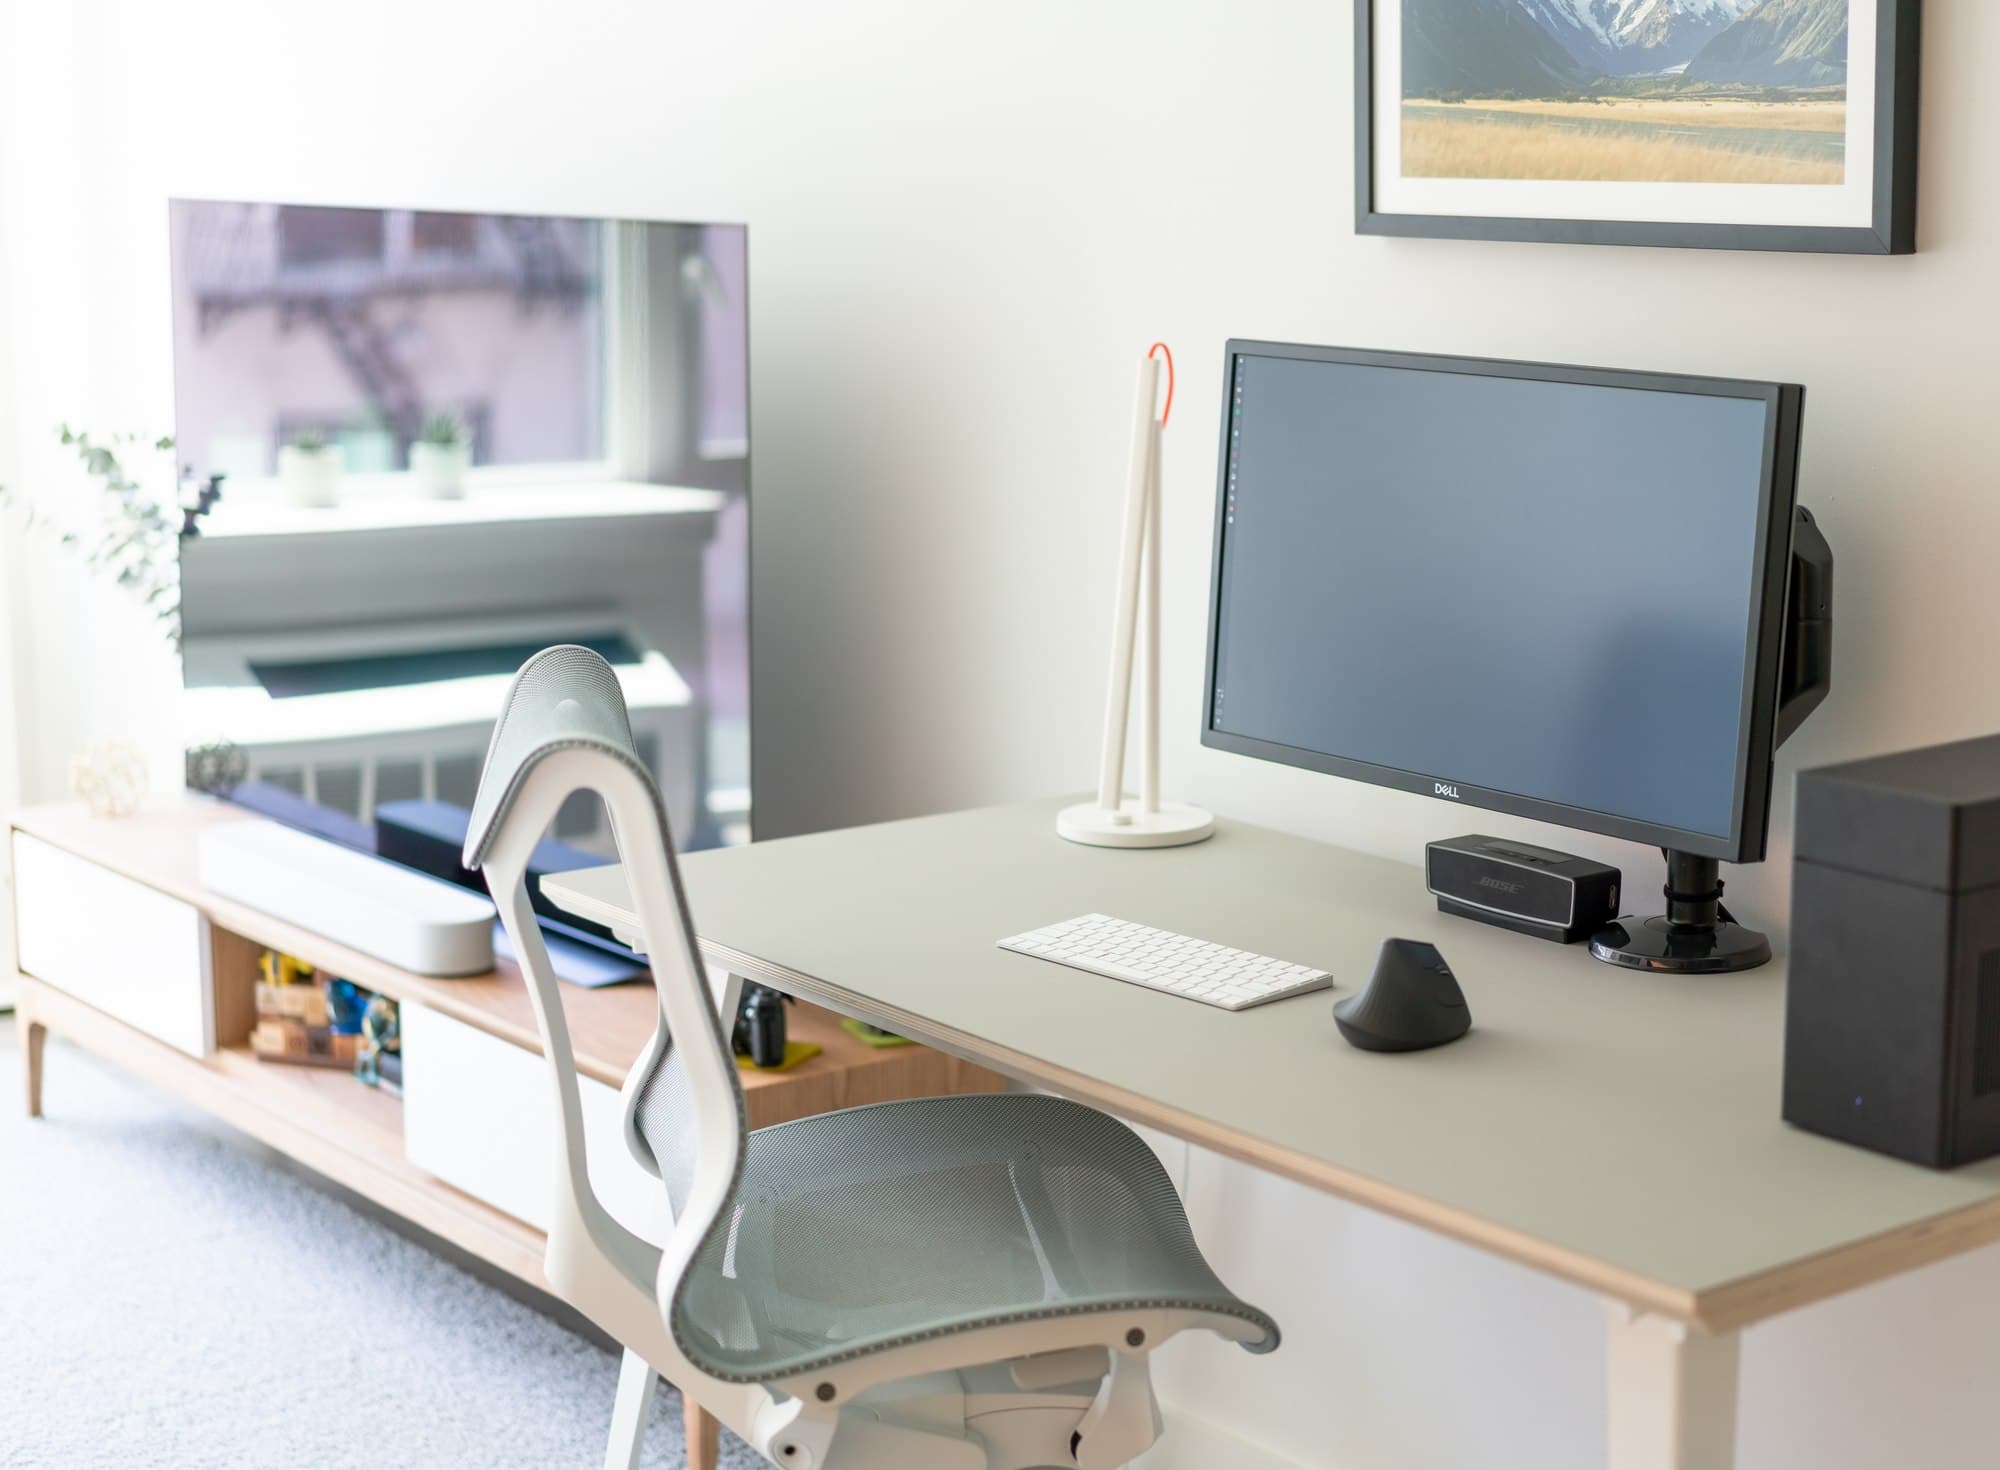
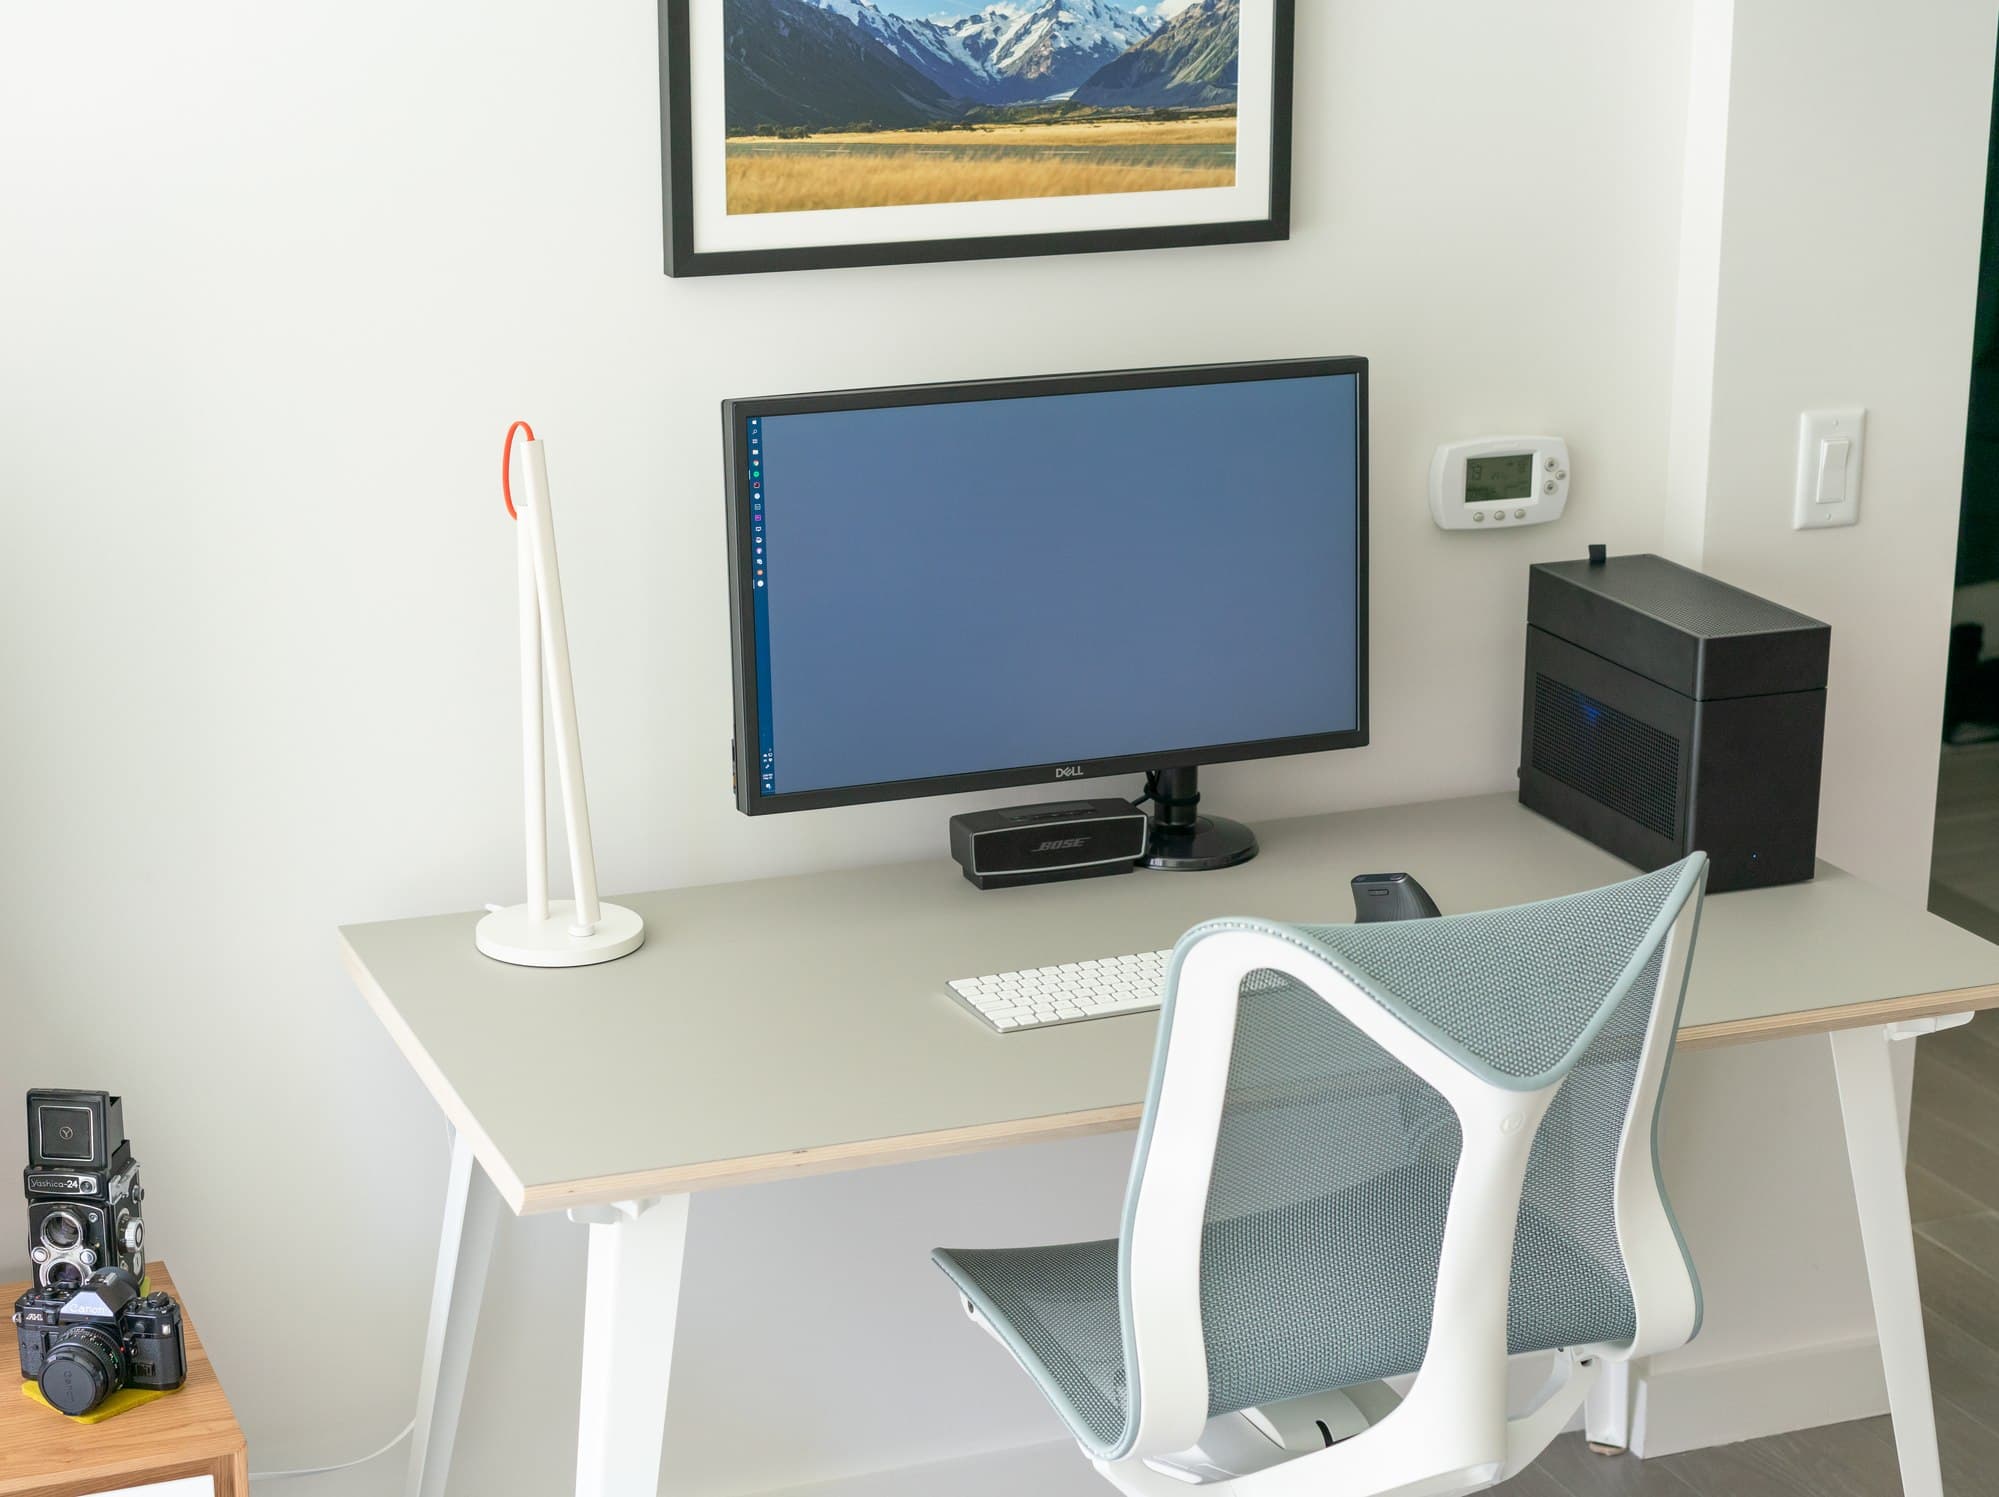
The updated PC setup in my NYC apartment.
Still a better choice than a Mac?
A custom PC for my photo-editing and development is definitely still the right choice for me.
When I wrote this post, the new Apple Mac Pro was purely rumor and had not been announced. Only the iMac Pro, which has the same problem iMacs have always had: they don't come with the most bleeding edge high-end components and after you purchase it you can't ever upgrade it as easily as you can swap out a graphics card or motherboard and CPU in a PC to jump to the next generation.
Then at WWDC 2019, Apple announced the new Mac Pro. And while it is a beast of a machine with custom graphics modules and can be configured with up to 28 cores and 1.5TB of RAM and can be paired along with an amazing 6K 32-inch Pro Display XDR, it is decidedly for actual creative professionals. Ones that can justify the minimum business expense of at least $11,000 for a base model Mac Pro and display. Not prosumers or advanced hobbyists like I might categorize myself.
It's exceedingly unlikely that the Mac Pro will find its way into many households, but rather fit in at creative agencies that will put it to work for advanced video editing and rendering.
So that leaves us where we started last year when I wrote this article: building a custom Windows 10 PC is a fantastic option for those desiring more power and the ability to continually and easily update the performance and capabilities of their computer as they see fit.
If anything, the Mac Pro news is perfect time for you, the casual prosumer hobbyist photographer/videographer/gamer, to consider building your own PC. Haven't yet updated my Lightroom PC post, but I recently built a tiny i9 9900K + RTX 2080 Ti PC https://t.co/FGRUr7O8Tg pic.twitter.com/gEi0agfWRp
— Paul Stamatiou 📷 (@Stammy) June 4, 2019
Why did you build a new PC?
In February 2019 I said goodbye to San Francisco—my home for almost 9 years—and moved to New York. In preparation for the big cross-country move, I wanted to slim down some of my possessions. I fully expected I would end up in a smaller apartment in New York than what I had in San Francisco.
My large desktop computer tower was my first target. (I also downsized to a smaller NAS storage device). This time I knew I wanted to go for a much smaller SFF (Small Form Factor) mini-ITX build, but something that wouldn't compromise on performance too much, or at all.
I was excited to build another SFF PC. Long ago I became acquainted with Shuttle XPC brand barebone SFF PCs and had built three over the years, including an AMD64 system running Gentoo Linux with a minimal window manager I loved at the time called fluxbox that I took to college my freshman year.
Not much has changed in the Intel landscape since my last build. They're still based on a 14nm process but Intel now has 8 core chips based on Coffee Lake using a newer Z390 chipset. The other noticable change has been Nvidia's release of their RTX line of graphics cards. Although AMD has some interesting stuff coming out soon with their 7nm 16-core Ryzen 9 3950X chip, Lightroom is still historically most performant with Intel processors (but I am eager to see how it performs once they get released) and has diminishing returns with more than 8 cores nowadays except for certain tasks (exporting) which aren't a priority for me.
The other thing that has changed in the last year and a half is that Adobe Lightroom Classic CC—since renamed to just Lightroom Classic—has received a steady stream of updates addressing performance. While it has not been a massive difference, Lightroom Classic does seem to be markedly improved at using additional cores, especially with respect to the Develop module where I spend most of my time in Lightroom.
2019 PC build parts
When I began to think about what I would put in this PC, I knew I did not want to compromise on the CPU or GPU. I picked the 8-core Intel i9 9900K and Nvidia RTX 2080 Ti graphics card. It took a while to find the RTX 2080 Ti in stock at the time I was looking for it, and in a 2-slot version that would fit in a small form factor case.
For the power supply I knew I would be getting the Corsair SF600 Platinum SFX form factor power supply that had just been released, following great reviews of the SF600 Gold version. (As I write this now, Corsair now sells a SF750 Platinum model). There were only a few models of mini-ITX Z390 chipset motherboards out at the time so I went with an ASRock model that seemed to have good-sized heatsinks on the PWMs and VRMs, but didn't have a massive shroud that could interfere with whatever cooling or heatsink I wound up putting on the CPU.
For storage I had been very happy with the Samsung 960 Evos in my last build, so I went with a larger 2TB 970 Evo for this computer. Then I took one of the two 1TB Samsung 960 Evos from my last build for a combined 3TB of storage. When it came to picking RAM I was concerned about the height of RAM sticks and how they might interfere with various cooling options for the CPU, so I went with low-profile RAM from Corsair that was made for confined spaces and didn't have overly tall heatsinks.
At this point I was certain I was going to build this computer into the Dan Case A4-SFX that I had already purchased over a year ago and had lying around. I began researching air cooling options for my 9900K. And that's when it became clear how tight the dimensions for this case were. There were only a few common air cooling options and none felt like they could handle the 95W TDP of the 9900K; and definitely not overclocked and definitely not quietly. Another popular option for that case was using a single fan radiator AIO watercooler. However, that would make for an extremely cramped build (some folks would even use an external power supply!) and one that still wouldn't handle cooling the 9900K that well.
It seemed like I was pushed in a corner and began considering sticking with my 6-core 8700K or choosing some other processor that would generate less heat. Instead, I decided to sell the A4-SFX case and get something a bit larger that could accomodate my hardware needs but still be considerably more compact that my previous desktop tower.
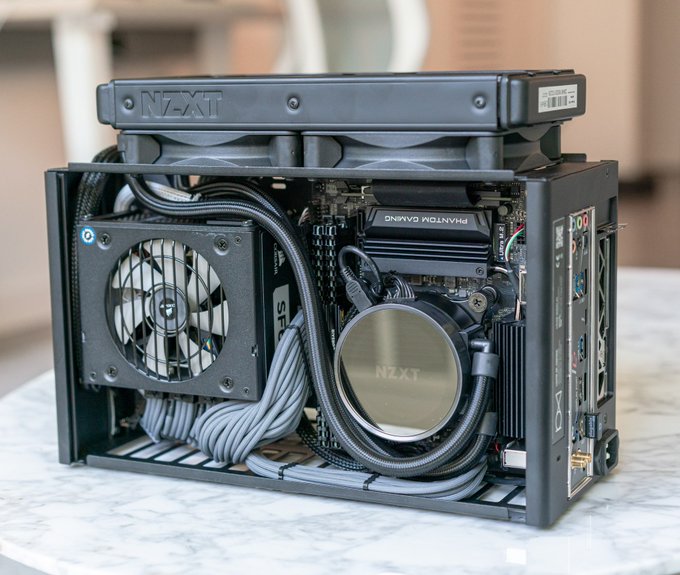
I went with the lovely Louqe Ghost S1.
The Louqe Ghost S1 is a tad larger than the A4-SFX case (7.2L vs the S1's 8.2L) but features a really interesting chassis design that allows for not only the sides of the case, but also the top to be removed. Then, if you so choose, you can add a "tophat" that extends the case to provide a bit more extensibility for whatever you need: be it more space for hard drives or added room for fans or other cooling solutions.
The downside of adding a tophat is that it does of course make the case taller and a bit less aesthetically appealing. I initially considered simply air cooling the 9900K in the Ghost S1. Despite the confined space, there are considerably more air cooling options for the Ghost S1, and they've been put to the test by Louqe themselves.
But I still thought that air cooling would not leave me with much headroom to overclock if I wanted to on the 9900K and may be louder as well. I went forward with a large tophat and installed the Kraken X52 AIO watercooler with a 240mm radiator.
Here's the complete parts list for this build:
- Intel Core i9 9900K CPU, DELIDDED
- NZXT Kraken X52 AIO liquid CPU cooler CPU cooler
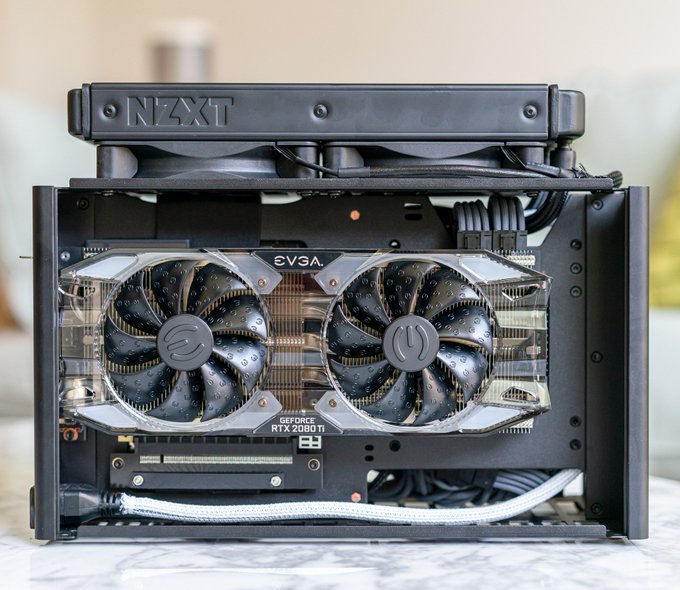
- EVGA Nvidia RTX 2080 Ti XC Black Graphics card
- ASRock Z390 Phantom Gaming ITX/ac Motherboard
- 2x16GB Corsair Vengeance LPX DDR4-3000 CL15 LOW-PROFILE RAM
- 2TB Samsung 970 EVO M.2 SSD Storage
- 1TB Samsung 960 EVO M.2 SSD Storage (TAKEN FROM LATE 2017 BUILD)
- Corsair SF600 Platinum PSU
- Louqe Ghost S1 (MkI) with large tophat Case
- Custom paracord sleeved cables PSU cables
Completed build
I ordered all the parts between December 2018 and January 2019 and was eager to build the new PC right away. Unfortunately, I was about to move and decided it would be safer to have the components shipped instead of the assembled computer, so I had to hold off until I finished moving to New York. Finally, about 2 months after I had packed everything, I was able to build the computer:
Okay got it functionally built today. But jeez it needs custom short cables for everything. So cramped. (Case panels and top shroud hat not attached) Watercooled delidded i7 9900k RTX 2080 Ti 2TB 970 Evo ssd 1TB 960 Evo ssd 32GB ram pic.twitter.com/DVw7O1adoV
— Paul Stamatiou 📷 (@Stammy) March 10, 2019
After the initial build I quickly realized how badly this build needed custom length modular PSU cables. The default Corsair cables were way too long for the confined space, leading to stuffing them anywhere I could to get them out of the way. It looked horrible and probably wasn't great for case airflow either.
After some research it quickly became apparent that the best option for custom cables was going to be from pslate customs. The cables are customized not only to the case but also the motherboard and graphics card to ensure optimal length, but also orientation: even in an individual cable, some wires are shorter than others to help promote a natural cable bend. It's pricey but the cables were great and aesthetically and functionally added quite a lot to the completed build.


Overall impressions
First off, I absolutely love the size of this case, even with the additional tophat. It's small enough to go on top of my desk and not be a bother.
Second, this computer is so quiet! Most of the time the PSU fan is completely off (a feature of the Corsair PSU for low loads) as well as the graphics card fans, leaving just the two large radiator fans spinning slowly (and the pump which I can't hear). It's noticeably quieter than my previous build. Of course, when dealing with a larger load the fans do ramp up, but the majority of the time it's whisper quiet.
Performance
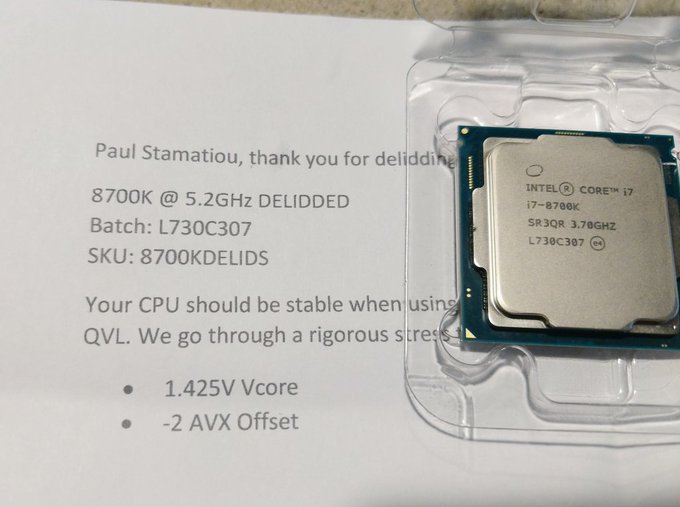
I purchased the binned CPU (4.9GHz on all 8 cores at ~1.287V) from Silicon Lottery and had them delid it as well, so that's definitely contributing to my quiet setup and reasonable temps for the 9900K. By default the Intel i9 9900K has a base frequency of 3.6GHz, with a Turbo Boost ranging from 5GHz for 1-2 cores to 4.7GHz for all 8 cores. (I talk more about how Turbo Boost works later in this article).
While I'm still tinkering with my ideal overclocking settings, I'm running at around 4.9GHz stable on all 8 cores. I'll update this post when I have more info on my settings and idle/load temperatures.
Of course, my build is already slightly outdated as Intel just announced the i9 9900KS; an incremental update to the 9900K allowing for single-core and multi-core loads to ramp up to 5GHz, with a base frequency of 4GHz.
I no longer have my previous desktop computer with me (it now lives at home with my parents in Texas) so I couldn't run any side by side Lightroom benchmarks like I did with the last build on the latest version of Lightroom, so you'll have to trust me that this build is faster. :-)
Misc updates
One thing I have discovered since writing this post is Windows 10 Debloater. It's an excellent script you run on a clean install of Windows 10 that will, as the name implies, debloat and uninstall all the extra cruft and silly games that Windows comes with by default.
I also began using QuickLook for file previews instead of my previous recommendation, Seer. I have also become accustomed to modifying the time and date display in Windows by using T-Clock Redux. And finally, ProcessHacker gets an honorable mention and is something I've recently been using to dive deeper into system activity.
Read the rest
This update really doesn't change much for this post: just that I got updated parts. Most of this article will be accurate for a long time, so please continue reading. I had spent a few months of spare time writing it and hope you find some value in it. As always, if you have any questions as you're reading feel free to send me a Tweet!
A note to the reader
This is a long blog post. The longest I've written on this site—over 32,000 words—and consumed many of my weekends for about 4 months. Typically these "I built a computer" posts are rather useless a few months down the line when new hardware comes out and it's nothing but an old parts list. While I can't avoid that, I aimed to provide enough information about my reasoning for why I chose certain parts or how I configured things so that this post may still be helpful a year or three down the line. Enjoy!
If you like this post, please share it with your friends, followers or anyone that might be interested.
What I use my computers for
For the last few years I have more or less had some variant of the same setup: a beefy desktop computer for heavy lifting and a small laptop for travel and casual use. My desktop usage, in order from most to least frequent, is largely comprised of Adobe Lightroom, web development for this website, Adobe Premiere Pro and some occasional gaming.
While I did love my 5K iMac, I hated that the only way to upgrade a year or two later was just to replace the entire thing. I hated that even the newest models were typically behind Intel's release schedule and you couldn't get the absolute latest and greatest hardware, much less be able to overclock them a bit for even more performance.
Apple has failed to provide the option for high-performance, user-upgradeable machines for years and even the new iMac Pro continues that trend. Perhaps the rumored upcoming Mac Pro will be different but I just don't see a world where you'll ever be able to hear about the latest Intel chipset and processor launch, immediately buy a new processor and motherboard and upgrade your Mac that weekend.
I'm not the only one with this mindset. More and more creative professionals that demand the most from their machines are getting over Apple for their high-end computing needs. Filmmaker Philip Bloom recently moved to a Windows machine. Photographer Trey Ratcliff did the same and I've been seeing more and more friends in the creative space do the same.
Nothing is really holding me to macOS on the desktop. I go in there, edit some photos or do another large task then I retreat to my 13" Macbook Pro.1 The Adobe suite works on Windows and there is now official Linux support via WSL on Windows 10 so I can run my development environment easily.
I would be lying if I didn't mention one of the main reasons I wanted to build a PC: finally having a modern full-size graphics card, for both GPU acceleration in creative applications as well as for gaming. With my iMac I casually played a few games on Steam, but with paltry settings. Even if I were to purchase a new high-end Mac, you just can't get the best graphics card on the market (even with the new iMac Pro2). Much less just be able to easily swap it out with a better card a year later.
When I began planning this new build around April 2017, I considered making it a dual-boot Hackintosh and Windows 10 PC. At the time a hackintosh build sounded promising: Kaby Lake processor support and Nvidia drivers for Pascal GPUs for macOS had just been announced.
Then I began thinking of how I actually use my computer. The idea of constantly rebooting to hop into Windows for a bit to play a game, then reboot to go back to macOS seemed like a major inconvenience. It also meant that I couldn't just upgrade to the newest hardware — I would have to wait for hackintosh support to arrive. Not to mention the associated hackintosh annoyances I've dealt with in the past: tricky software updates and reliability issues. I knew what I needed to do.
The goal: Build a fast, yet quiet and understated desktop PC with a healthy overclock aimed at improving my photo workflow while giving me the ability to upgrade parts of it later on.
What makes Lightroom fast?
But first, let's talk about what Lightroom needs to thrive.
One thing to note, and this kind of defeats the purpose of this whole post: I've never seen any hardware improvement, no matter how drastic, turn Lightroom into a pure speed demon when dealing with the kind of huge RAW files I work with. I might experience single digit to low double digit percentage improvements in certain tasks, but nothing that would blow my socks off. Nothing instant. If someone claims their Lightroom setup is instant, they're lying or they're working with tiny 12-megapixel JPGs. Here's more on the topic if you're interested.
In addition, any performance improvements gained on new hardware are often then negated when upgrading to newer and newer cameras that shoot higher megapixel photos and higher resolution and bitrate videos. It's a vicious cycle. I have even thought about downgrading to a lower megapixel camera to make editing easier; but I love being able to have room to crop photos and videos. And the extra megapixels helps when I frame some of my photos.
What would make Lightroom really fast is the software itself receiving dramatic optimization and performance updates. It has been around for ages, I'd imagine there is quite a bit of code cruft that Adobe would love to refactor and rethink. Adobe has even stated that they know Lightroom is slow and they're working on it. Nothing I can do here but cross my fingers and wait for software updates.
How I use Lightroom
Here's what I do in Lightroom that can feel slow.
I spend a lot of time in Lightroom. What exactly do I do to my photos? Increasingly less and less (more on that below), but there's still quite a few tasks from culling to pick the best shots out of hundreds or thousands all the way to numerous adjustments made individually on each photo.
I have been interested in photography for over a decade but didn't really start taking it seriously until I built out my photoblog and started crafting photosets of trips. At first I enjoyed making photos seem surreal and dramatic. I was all too eager to yank the saturation and clarity sliders and even use programs like Photomatix Pro and Aurora HDR that started out basically encouraging the creation overly gaudy HDR images.3
Over the years I have tried to hone my photography aesthetic to be more realistic and only edit to try to capture what it was like to be there and see something with your own eyes — recovering highlights and shadows, removing spots created by a dirty lens in a long exposure, adjusting color temperature to communicate the warmth of that day, remove noise to share the clear night with bright stars and so on. And sure, sometimes that vibrance slider might find it's way to +15 to accentuate some glacial blue water, but I rarely touch the saturation slider these days.
And like designing4 a product interface, there's just as much work if not more that goes into keeping things simple and have it communicate effectively. Sometimes I'll spend the most time leveling a shot and finding a good crop.
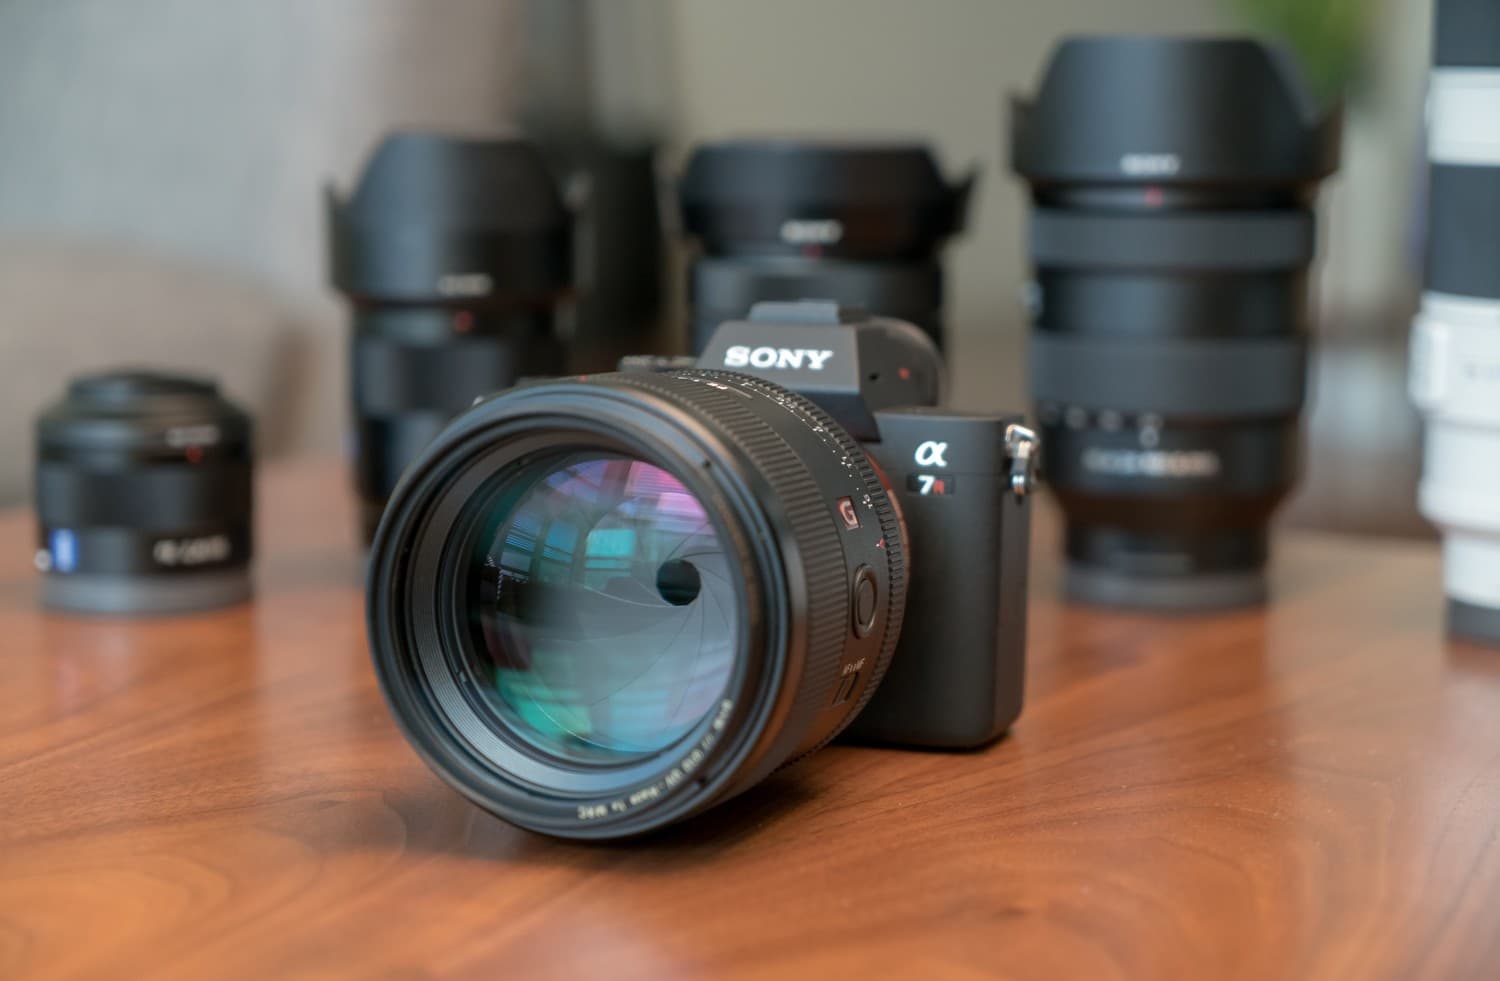
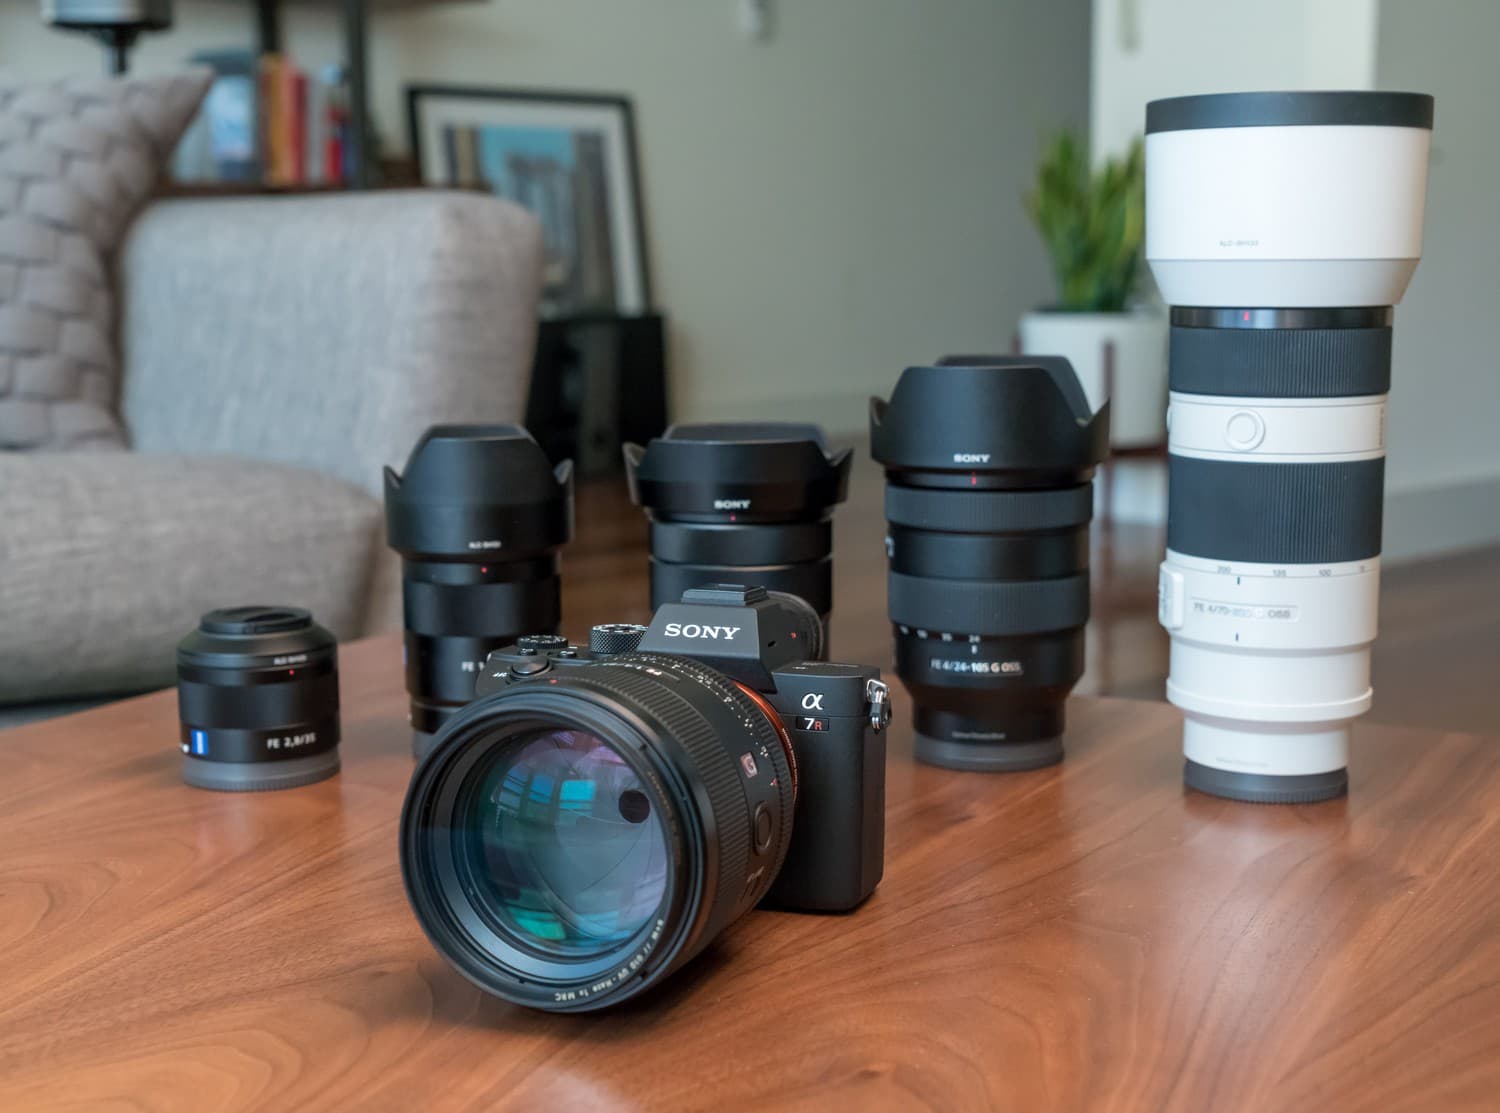
Sony A7R III with some of my lenses.
I love working in Lightroom on a high-res display in full-screen mode. I often zoom 100% into one of my Sony a7R III's massive 42MP RAW photos to find the sharpest and most in focus of several similar shots.
Unfortunately, all three of these behaviors incur a significant performance cost right off the bat.
If you're familiar with Lightroom you probably know about the different modules of the app. I spend the vast majority of my time in Develop module and some of my time in Library module. The different modules act as tabs — changing between them brings up a new set of functionality and contextual side panels.
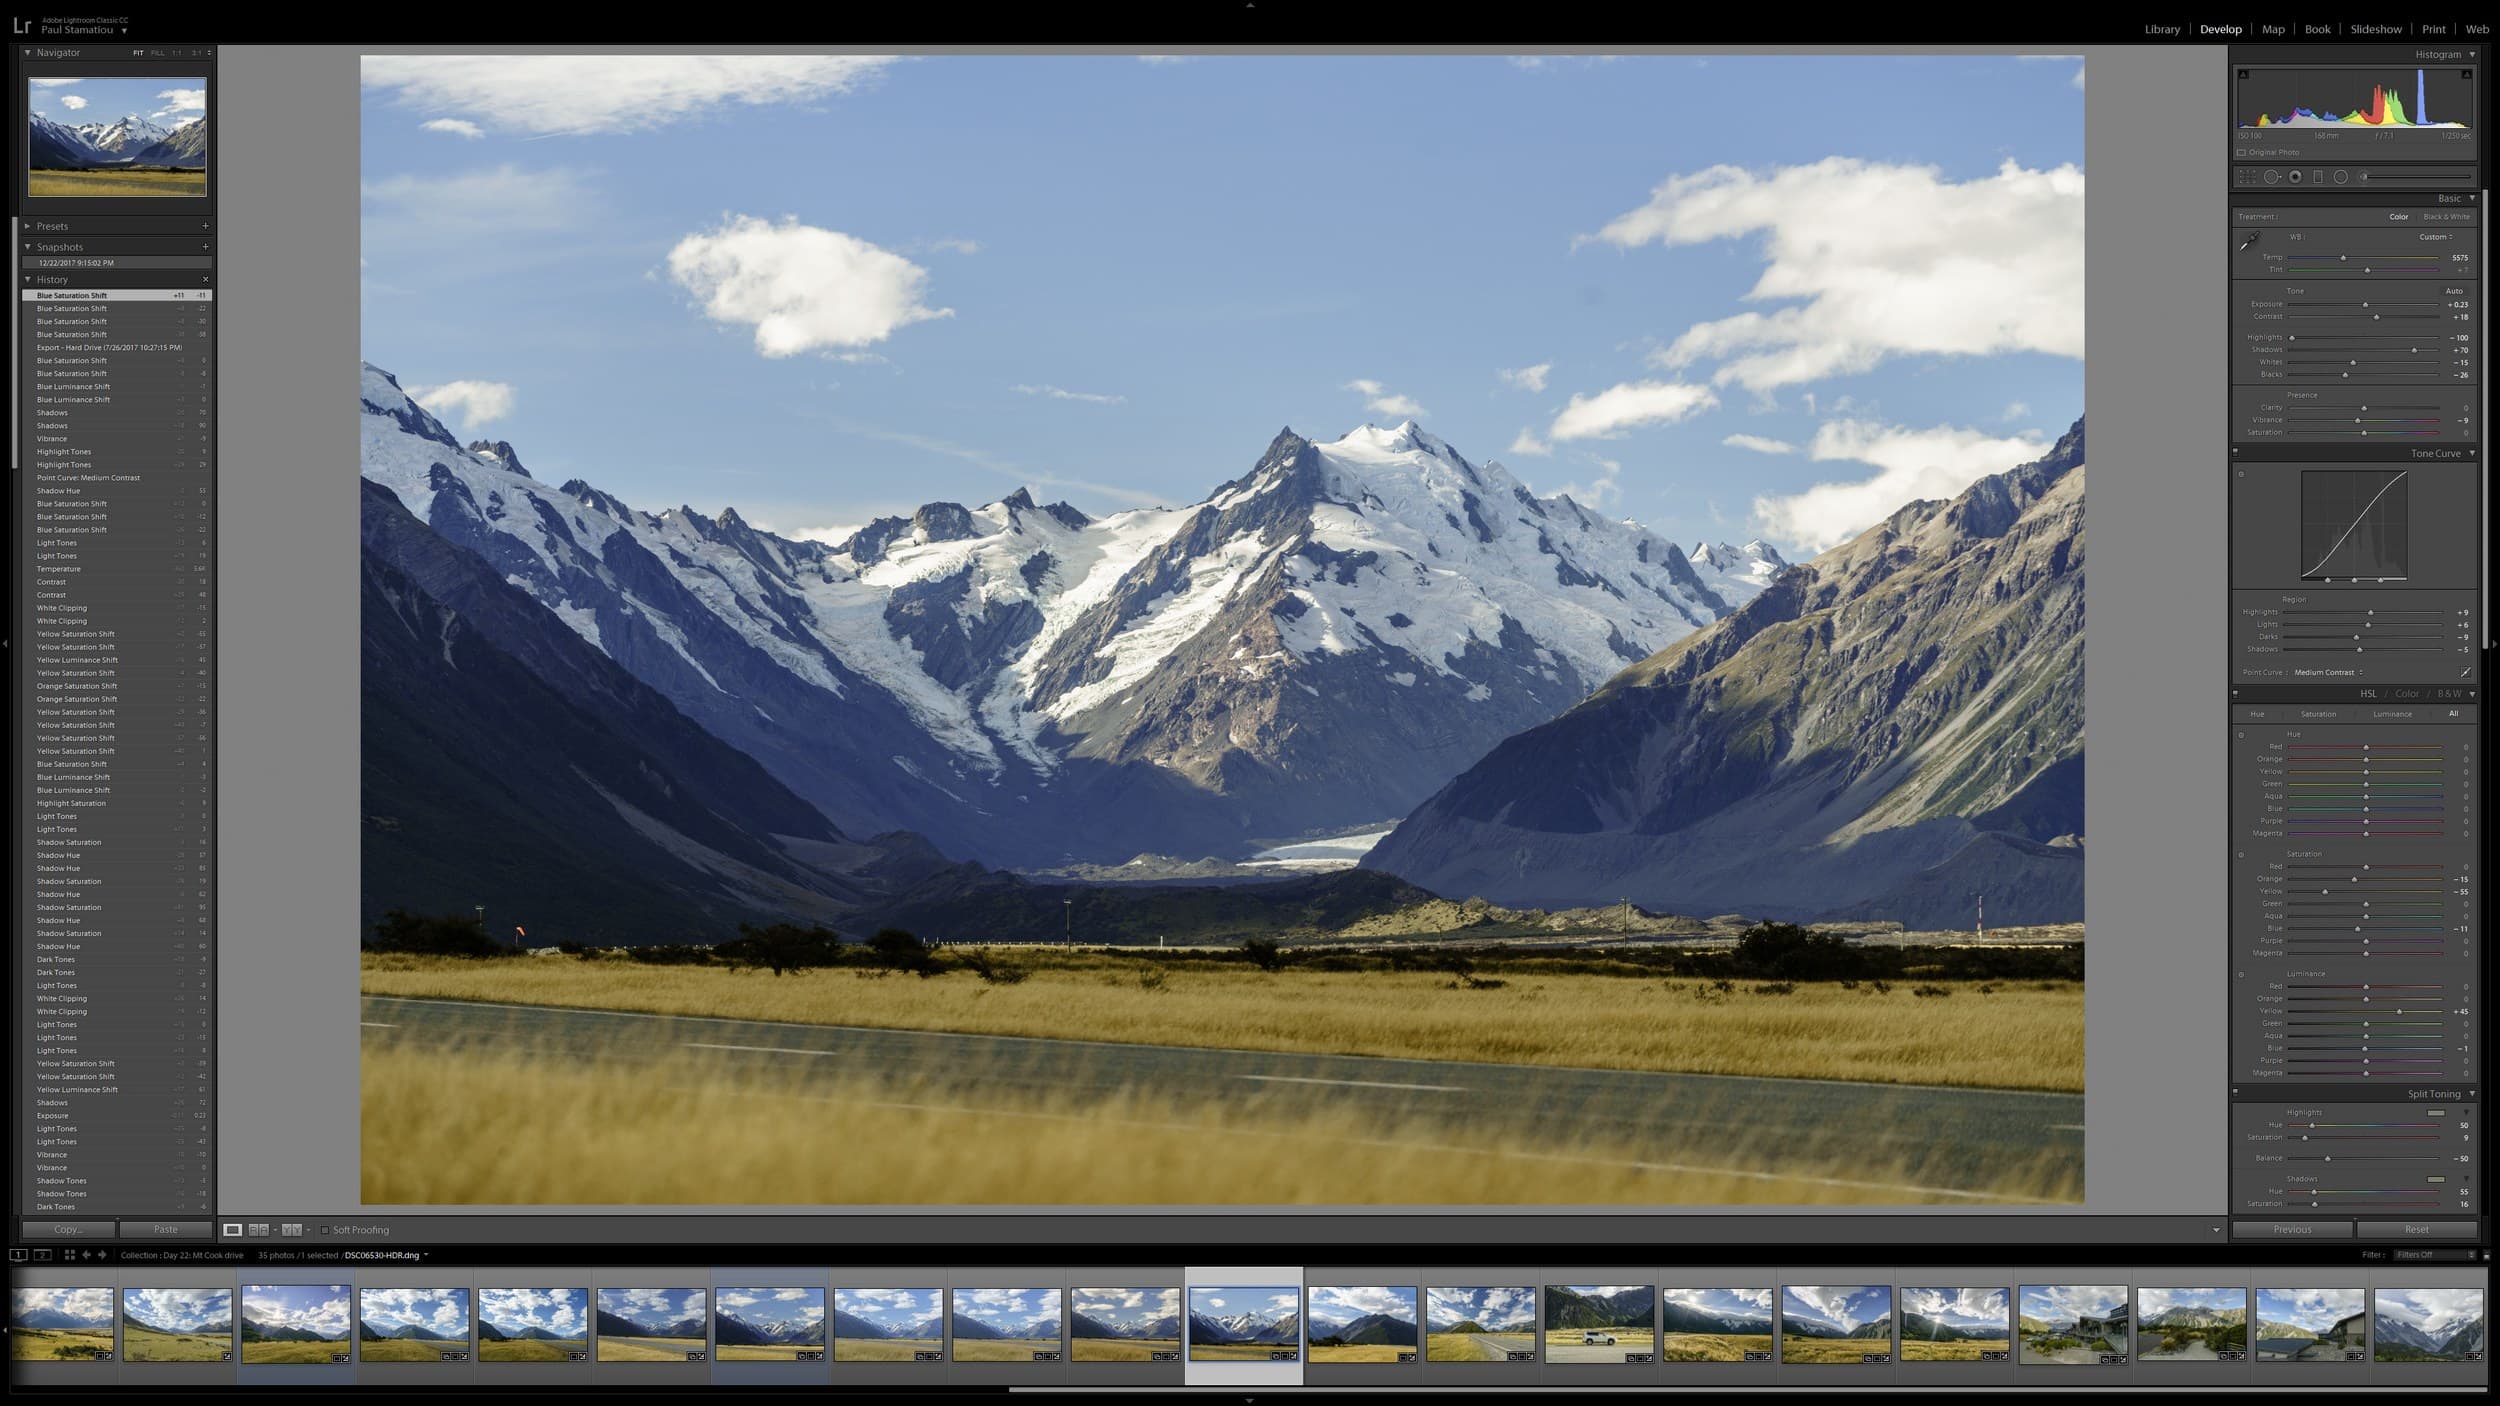
Lightroom Classic CC fullscreened at 3840x2160 in the Develop module working on an HDR image. Photo: Mount Cook, New Zealand
When I’m doing basic culling, I try to stick around in the Library module where there are performance benefits at the expense of not being able to do any real editing to the shots. It's possible to make filmstrip scrolling and browsing in the Library module fairly speedy by generating previews either manually or on import.
Generating previews in advance means that Lightroom doesn't have to fire up the Camera Raw engine to process and then cache a large compressed RAW file each time you click on a photo, an action that can take up to 3-5 seconds per photo on a large screen.
There are several kinds of previews in Lightroom, but I generally have 1:1 previews created when I import a new set of photos. They're processed, full-size versions of the RAW photo. It takes a lot of time to generate them but it's done all at once. I don't mind that upfront cost as I can just go make a coffee, read and come back in 30 minutes.
However, I often hop over to the Develop module while culling to see what the photo could look like with some basic adjustments or a crop to see if the shot is worth keeping. Unfortunately, 1:1 previews are not utilized in the Develop module and even if I had generated Smart Previews which are used in the Develop module, they only create previews up to a max size of 2540px on the longest edge of each photo.
So where does this leave me? Spending the majority of my time in the Develop module where generated previews won't help on a large display with frequent 100% zooming. The only savior we have here is that the Develop module is the only part of Lightroom with GPU acceleration:
Lr can now use graphics processors (GPUs) to accelerate interactive image editing in Develop. A big reason that we started here is the recent development and increased availability of high-res displays, such as 4K and 5K monitors. To give you some numbers: a standard HD screen is 2 megapixels (MP), a MacBook Retina Pro 15" is 5 MP, a 4K display is 8 MP, and a 5K display is a whopping 15 MP. This means on a 4K display we need to render and display 4 times as many pixels as on a standard HD display. Using the GPU can provide a significant speedup (10x or more) on high-res displays. The bigger the screen, the bigger the win.
Even with that, it's still very early for Lightroom GPU hardware acceleration and it leaves much to be desired. GPU acceleration can make most Develop controls quicker but it seems that can come at the slight expense of two things: the time it takes to load full-resolution images as well as moving from image to image. Also, actions like panorama stitching, HDR photo merging, the adjustment brush and spot removal tools do not seem to get any boost here.
Update Feb 2020: Lightroom Classic now brings full GPU acceleration for Lens Correction and Transform adjustments.
Inside the Develop module
Okay, here's my typical Lightroom workflow
After I have mostly completed the culling process and selected the better shots to keep in my collection,5 I go over each photo with a series adjustments as needed. I most commonly visit these settings:
-
Camera Calibration → Profile: The profile determines how Lightroom processes the RAW and serves as a basis for all your adjustments. Depending on the camera you use and Lightroom's support for it, you will see different options here. I believe the goal from camera manufacturers is to have the profile mimic the camera's own creative style settings had you had any enabled and shot a JPG; those settings don't affect the actual RAW.
I rarely use the default Adobe Standard profile and have Lightroom configured to use Camera Standard as the new default profile. Depending on the photo I may use something like Camera Landscape for more contrast and color but often find it too saturated and have to manually compensate for that. There's a wealth of information about Camera Profiles out there, but here's a starter.
-
Remove Chromatic Aberration & Enable Profile Corrections: I tend to have these on by default. The latter will load a lens profile if one exists to correct any distortion (like barrel or pincushion) with your lens. One school of thought is to rarely use profile corrections as they can reduce detail and also lead to some minor cropping at times. But I find this to be a bit nitpicky and won't readily be able to discern a significant loss of detail by enabling it.6
-
Transform: On certain occassions, like having a shot of a building that was taken at a slight skew, it can come in handy to enable a perspective correction. With more complex subjects, such as trying to tame two similar but slightly off leading lines in a photo, Lightroom has the guided transform feature. However, I try to only use these if the effect does not do too much. It can look pretty unnatural in those cases.
-
Basics: The essential controls that I fiddle with on every shot: Exposure, Temperature, Tint, Highlights, Shadows, Whites, Blacks and to a much lesser extent clarity and vibrance. At times I will jump directly to the Tone Curve but I often really only go there to tweak one or two RGB curves a bit, not everything at once.
-
HSL: Sparingly, I'll find myself wanting to reduce the luminance, saturation and rarely hue of a particular color in a shot. Most commonly I'll use it to decrease the prominence of a particular color in a scene I find distracting. Like if I adjusted the color temperature of a photo to be a bit warmer and it's making some yellow/orange foliage in a shot look obviously too saturated. Or if I wanted to adjust the luminance of blue to make a body of water darker or brighter to maybe compensate for other adjustments that may have made it appear a bit off.
-
Spot removal, adjustment brush, graduated filter: Spot removal gets a good amount of use. Most frequently to clean up anything caused by a dirty lens. When you're out shooting all day you tend to get some dust specks, mist and other tiny debris that only becomes obvious when capturing long exposures. I use the "Visualize spots" mode of the spot removal tool to easily track down and remove these spots.
I use the adjustment brush much less, but in recent memory I used it to select a mountain range in the distance that had decreased visibility due to clouds/fog and increased the clarity and contrast a tad. But I'm using it less and less these days.
Graduated filter rarely gets used anymore, but in the past I liked placing it above the horizon to make the top of the sky a bit darker, reduce highlights, boost contrast and clarity to make clouds pop.
Lightroom Classic CC has a new range mask modifier for these actions that makes them easier to control that I've used a few times.
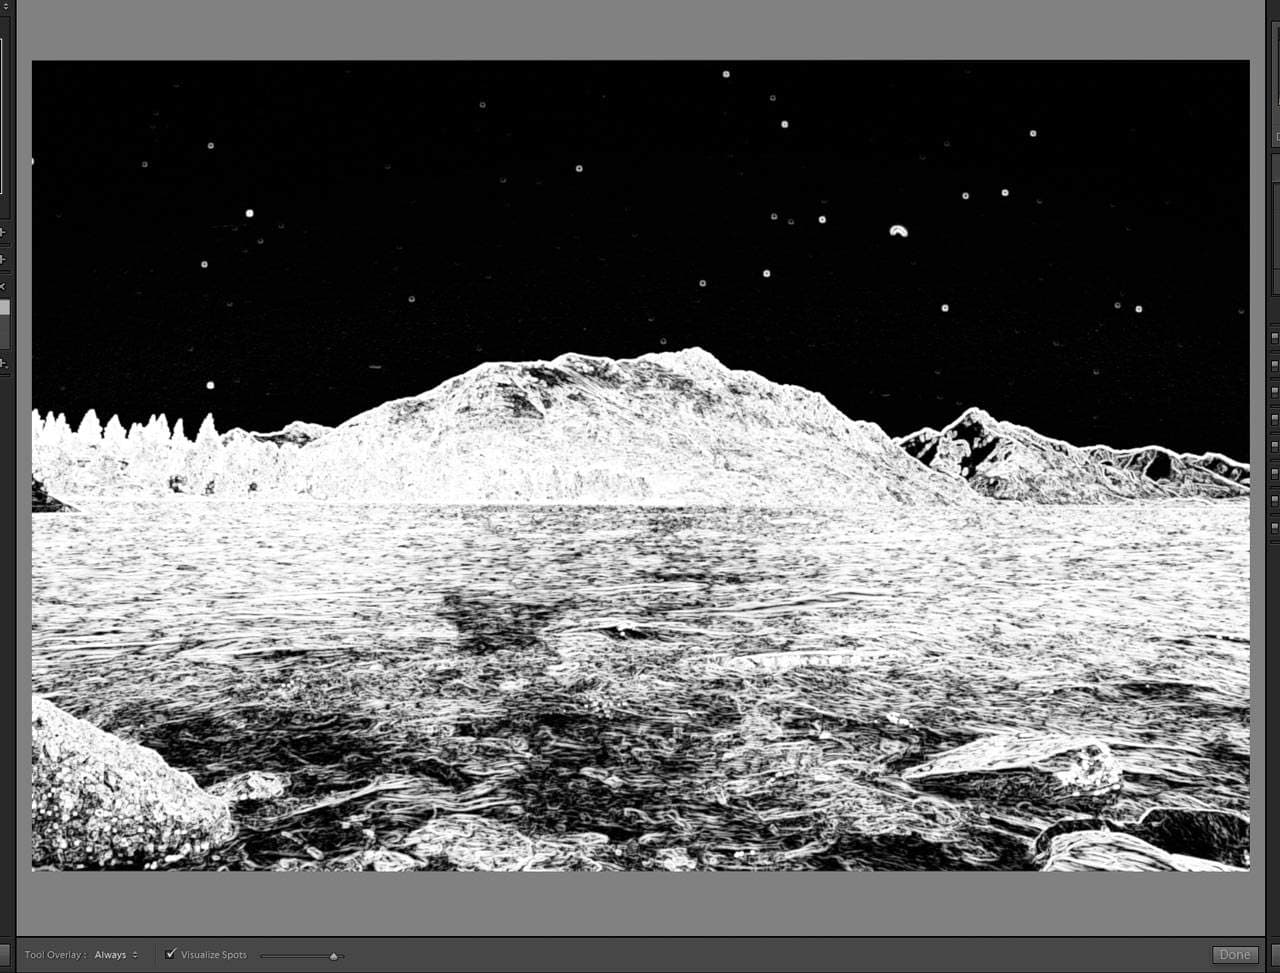
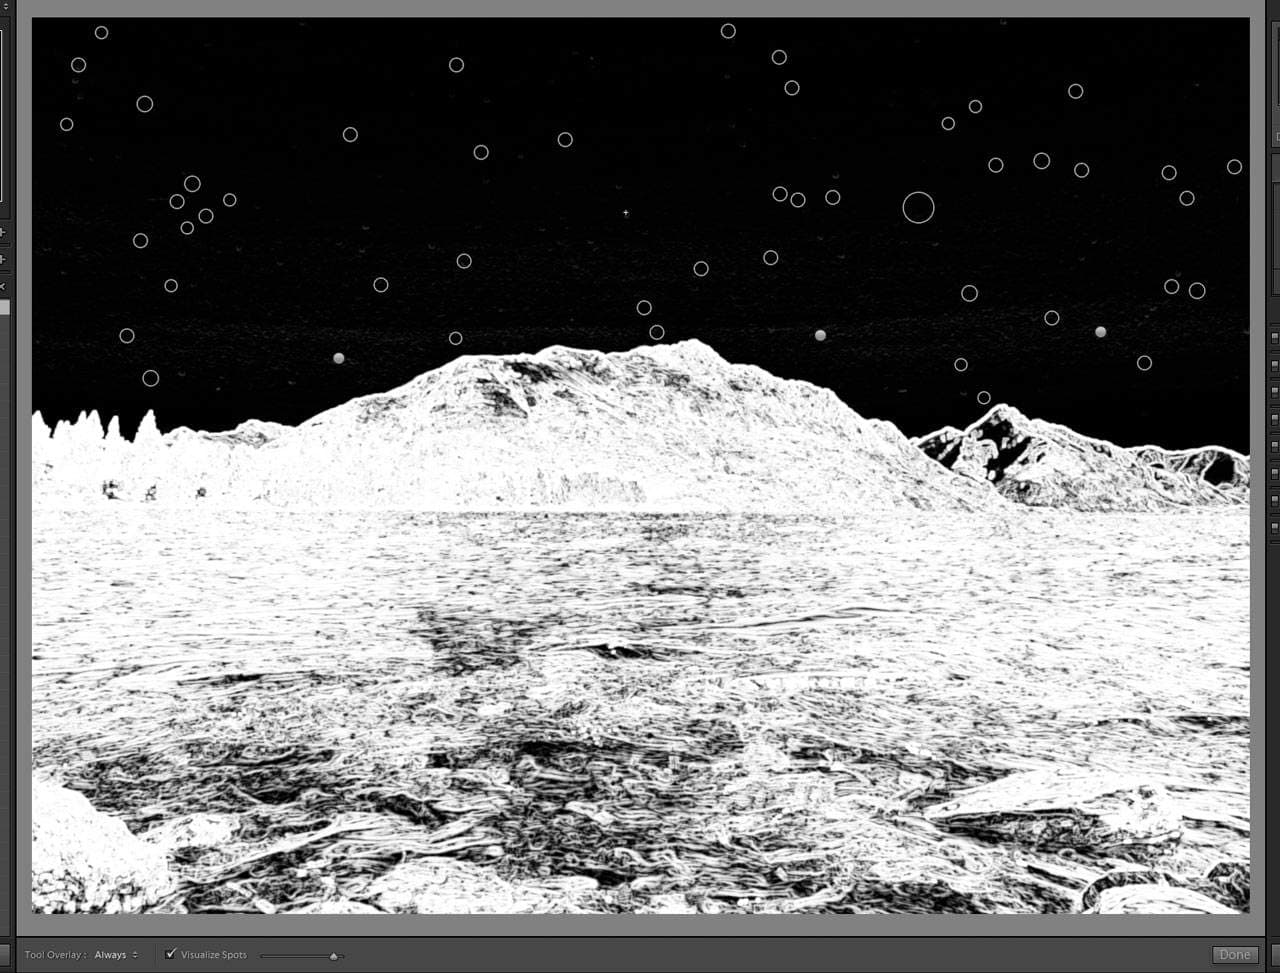
The visualize spots mode for spot removal. Left: Dirty lens from shooting near the water a lot one day with lots of spots obvious in the sky (the largest spot was actually a tiny scratch in my polarizer). Right: With corrections applied.
- Merge HDR: When necessary depending on the scene, I will turn on bracketing and shoot a ton of 3-shot brackets. I've done several 5 shot brackets but didn't find enough value in the difference to make up for all the extra storage and time required for those. In Lightroom I will stack each 3-shot bracket then select a few of the stacks and begin them in parallel with the headless HDR processing mode. Just press CTRL (windows) or Cmd (mac) + Shift + H when you have a few stacks selected. This is only good if your HDRs are from the same scene and fairly similar as the headless mode skips the HDR Merge Preview dialog and just goes with whatever setting you last used.
Even though I consider this light editing, that's still a ton of actions to do on one photo. Even something seemingly as simple as a profile correction can end up increasing the number of calculations Lightroom has to do on all subsequent actions. Adobe even recommends a particular order of operations in the Develop module to speed things up:
The best order of Develop operations to increase performance is as follows:
- Spot healing.
- Geometry corrections, such as Lens Correction profiles and Manual corrections, including keystone corrections using the Vertical slider.
- Global non-detail corrections, such as Exposure and White Balance. These corrections can also be done first if desired.
- Local corrections, such as Gradient Filter and Adjustment Brush strokes.
- Detail corrections, such as Noise Reduction and Sharpening.
Note: Performing spot healing first improves the accuracy of the spot healing, and ensures the boundaries of the healed areas match the spot location.
Once I've adjusted each shot to my heart's content — and gone back and forth over each shot multiple times — I happily initiate an full-size JPG export. This takes a long time but I don't care as much compared to speed in the Develop module; I use the opportunity to take a break and do something else while the computer works.
A word about presets
Why don't you just have a few presets to pick from instead of adjusting everything manually?
Having a robust set of custom presets tailored to your personal photography aesthetic can save a ton of time when faced with a new set of imported photos. But that's not really my thing. I simply don't like using presets as one-click-and-done filters. I always want to manually adjust things to see what a certain photo is capable of and not "leave anything at the table" by just using a preset I have lying around. It could get the job done but wouldn't be what I would have ended up with had I started from scratch.
The thing that speeds up my workflow more than anything is not presets, but actually just a quick way to copy and paste develop settings with shortcut keys. I use VSCO Keys to do this using . and , hotkeys. It's quick and effective — I fiddle with settings on one photo to my liking, copy and use that as a base for any subsequent photos that are similar.
Many folks use presets in a similar way to speed up basic, repetitive things you typically do then stack them to provide a quick base to work from. You might have a handful of presets to do things like boost contrast, increase shadows and so on. And by making them for distinct actions and not set any other values, you can stack them by continuing to click on other such presets. Some folks love this flow but I never really got into it.7
Hardware considerations
What do you need most? Disk I/O, GHz, CPU cores, GPU?
As you know there are a few main levers that affect the majority of a computer’s performance: storage, RAM, GPU and CPU. To be more precise: storage throughput, RAM size, RAM speed as well as the number of CPU cores and clock speed. In the case of Lightroom, CPU plays the most important role in overall application performance and to a much lesser extent GPU.
Storage
Surprisingly, storage speed is not of the utmost importance to Lightroom as long as you have something decent. It's especially a non-issue if you have some kind of SSD and store everything on it. That can be rather expensive and you may opt to have a smaller SSD that only stores the Camera Raw cache, previews and catalog and then a regular hard drive to store the images themselves. Even with that setup the Lightroom performance difference is fairly indistinguisable. There are minimal benefits between a regular SSD and a superfast NVMe SSD as far as Lightroom is concerned.
Whatever your storage solution, you'll want a lot of storage space when dealing with hefty RAWs. Or consider investing in a NAS setup to archive shots when you're done with them.
RAM
As for RAM, you probably don't need more than 16GB for Lightroom. However, if you aggressively multitask and/or use Adobe Premiere Pro you'll want at least 32GB. You can definitely exceed that amount and go with the maximum amount supported by your motherboard.
But there are some things to keep in mind. First, RAM is not as cheap these days as it used to be for a variety of reasons, and low latency RAM is even pricier. Second, if you care about bleeding edge performance and overclocking, you should find your ideal amount of RAM in 2 sticks, not 4. It's harder to maintain an aggressive overclock with 4 channels of RAM putting a larger strain on the integrated memory controller, especially if the CPU only has dual-channel support like the Intel i7-8700K and if the CPU itself is running an aggressive overclock.
GPU
Lightroom can use a good graphics card for hardware acceleration but it really doesn't take the most advantage of it. You might notice the benefit if you are using a 4K or better display and do basic actions in the Develop module.
On lower resolution displays I've heard that having GPU acceleration enabled can actually hurt performance as your computer spends time sending data between the CPU and GPU that the CPU could have just done on its own in a shorter amount of time.
Hopefully Lightroom will make better use of high-end graphics cards with future software updates. You definitely don't need a top of the line card for Lightroom but if you're going to get one anyways you'll want to learn towards an Nvidia card. Adobe software seems to be more optimized for Nvidia graphics cards.
CPU
Adobe's recent upgrade to Lightroom Classic CC brought some performance improvements, largely related to increased multi-core performance for generating previews. Overall though, Lightroom does not make the best use of many CPU cores. The Develop module can to a degree but the performance makes it obvious that it's not terribly efficient. This is a theme with all of Lightroom in regards to performance: it could always be better.
For my needs Lightroom loves the highest clock speed it can get, as opposed to a ton of lower clocked cores.
Having more cores in Lightroom can help you if you care more about exporting images and generating previews. That is not something I care about as it happens so infrequently compared to me fiddling with sliders in Develop. Otherwise, you're better off with fewer cores with a very high clock speed. This will help with:
- Scrolling through photos in the Develop module
- Performance and responsiveness for adjustments in Develop
- Converting images to DNG
- Merging HDR images and stitching panoramas
If you shoot a large amount of photos and hate waiting for images to export or previews to generate, then a higher core count CPU like the Core i7 7820X 8 Core, Intel Core i9 7900X 10 Core, or even the Core i9 7940X 14 Core may be a great choice depending on your budget. You certainly give up general editing performance as you get into the higher core counts, but a 30-40% reduction in the time it takes to export and generate previews can be a massive time saver. However, if this isn't a major consideration and you just want the smoothest editing experience possible, then the Intel Core i7 8700K is still our go-to recommendation for Lightroom.
What about video editing?
Premiere Pro is great at using multiple cores and a beefy GPU
I wouldn't consider myself anywhere near savvy in any video editing apps, but I have been shooting more and more video footage on my trips. I've gone from making edits in iMovie to Final Cut Pro X then After Effects and finally to using Premiere Pro. A good chunk of my footage is now captured in 4K. Better Premiere Pro performance is a nice to have for me but not a priority compared to Lightroom performance.
On the completely opposite end of the spectrum compared to Lightroom, Adobe Premiere Pro has much, much better multicore efficiency. It also seems to put a powerful graphics card to good use and will most definitely make use of as much RAM you can give it.
My common tasks in Premiere Pro — rendering previews, warp stabilization, Lumetri color adjustments and exporting — all take advantage of additional processor cores. And the faster the clock of each core, the better.
Why build a PC?
Building a PC is easier than ever today
I'm no stranger to building a computer from scratch; I have built dozens by now8. However, quite a few things have changed from the last time I built a computer.
These things are now fairly commonplace and welcomed additions to the building process:
-
AIO (all-in-one) liquid cooling systems Back in the day if you wanted a high-performance and relatively quiet cooling option for your overclocked processor, you would have to source a radiator, fans, pump, reservoir, tubing, CPU/GPU/Northbridge waterblock and assemble it yourself. You'd have to fill it up, put some anti-algae chemicals in, get all the bubbles out, do hours of leak testing and then change the liquid coolant out every 6 months or so. It was a huge hassle.
Now you can just buy an all-in-one system that comes with everything you need in a simple closed loop. Most AIO units these days even have a USB connection and some desktop software to help monitor and automatically ramp up the fans and pump depending on CPU or GPU activity.
-
Fully-modular PSUs Why should a computer with a million internal drives and accessories have the same number of power supply cables as a basic setup with just one SSD? There's no need to have 20 extra power cables taking up space in your case if you don't need them.
Modular power supplies let you connect only the cables you need, reducing clutter from your case. And most offer attractive sleeving styles to boot. Just don't ever mix and match cables from other PSUs — there is no standard pin layout for the connections on the PSU and rookie PC builders often burn their PC by accidentally keeping old cables in there when switching to another modular PSU.
-
Operating systems are sold on USB sticks now. No longer do you need to buy a cheap optical drive just to install the operating system and never use it again. Windows 10 is now sold on a tiny USB stick.
-
Cases with no 3.5" and 5.25" drive bays! And on that note, why should you have a case with unsightly internal and external drive bays you may never use? Case manufacturers have started offering cases entirely devoid of 5.25" optical drive bays as well as 3.5" racks, or they have removable racks.
-
M.2 NVMe SSDs: Probably the biggest innovation for me personally. SSDs in a small PCIe stick that offer a tremendous performance advantage over even regular 2.5" SSDs. Something like 3-5x faster.
-
Case windows use real glass now. Modern high-end computer cases actually use real glass instead of scratch-prone and flimsy lucite or plexiglass. I still think windows in computer cases are kind of silly though.
-
Wireless mice are actually good now. Okay, I'm really dating myself here but for the longest time wireless mice were laggy. Noticeably laggy cursor. Impossible to use for even the most basic gaming and they came with horrible battery life. I have been using wired Logitech mice for about a decade... but I recently switched to a Logitech MX Master 2S. Wireless mice with great battery life and nice customizability are finally here.
In the past you sort of had to wing it when it came to picking parts for your build. You would have to read a bunch of reviews for motherboards, graphics cards, RAM and so on. Then you might need to actively participate in a computer forum to see what folks were running, if there were any compatibility concerns, order everything and then hope everything worked as expected.
PCPartPicker.com is one relatively new resource that I have found to be invaluable. People share their build lists, photos and more there. It helped me answer very specific questions on numerous occasions:
- Does this graphics card fit in this case?
- Will this watercooler fit?
- What does this case look like with these parts?
- What is the smallest case that will fit this motherboard?
Chances are someone out there has built a machine identical to what you want to build and you can just look up pictures of that rig.
In addition, I've found a few other handy resources while building: the active Reddit r/buildapc and some popular YouTube channels like Bitwit, Linus Tech Tips and JayzTwoCents.
Though I would be remiss of me if I did not mention why it may not be a great time to build such a PC: RAM prices and graphics card prices have skyrocketed in the last year. The latter mainly due to insane high-end graphics card demand from cryptocurrency mining.
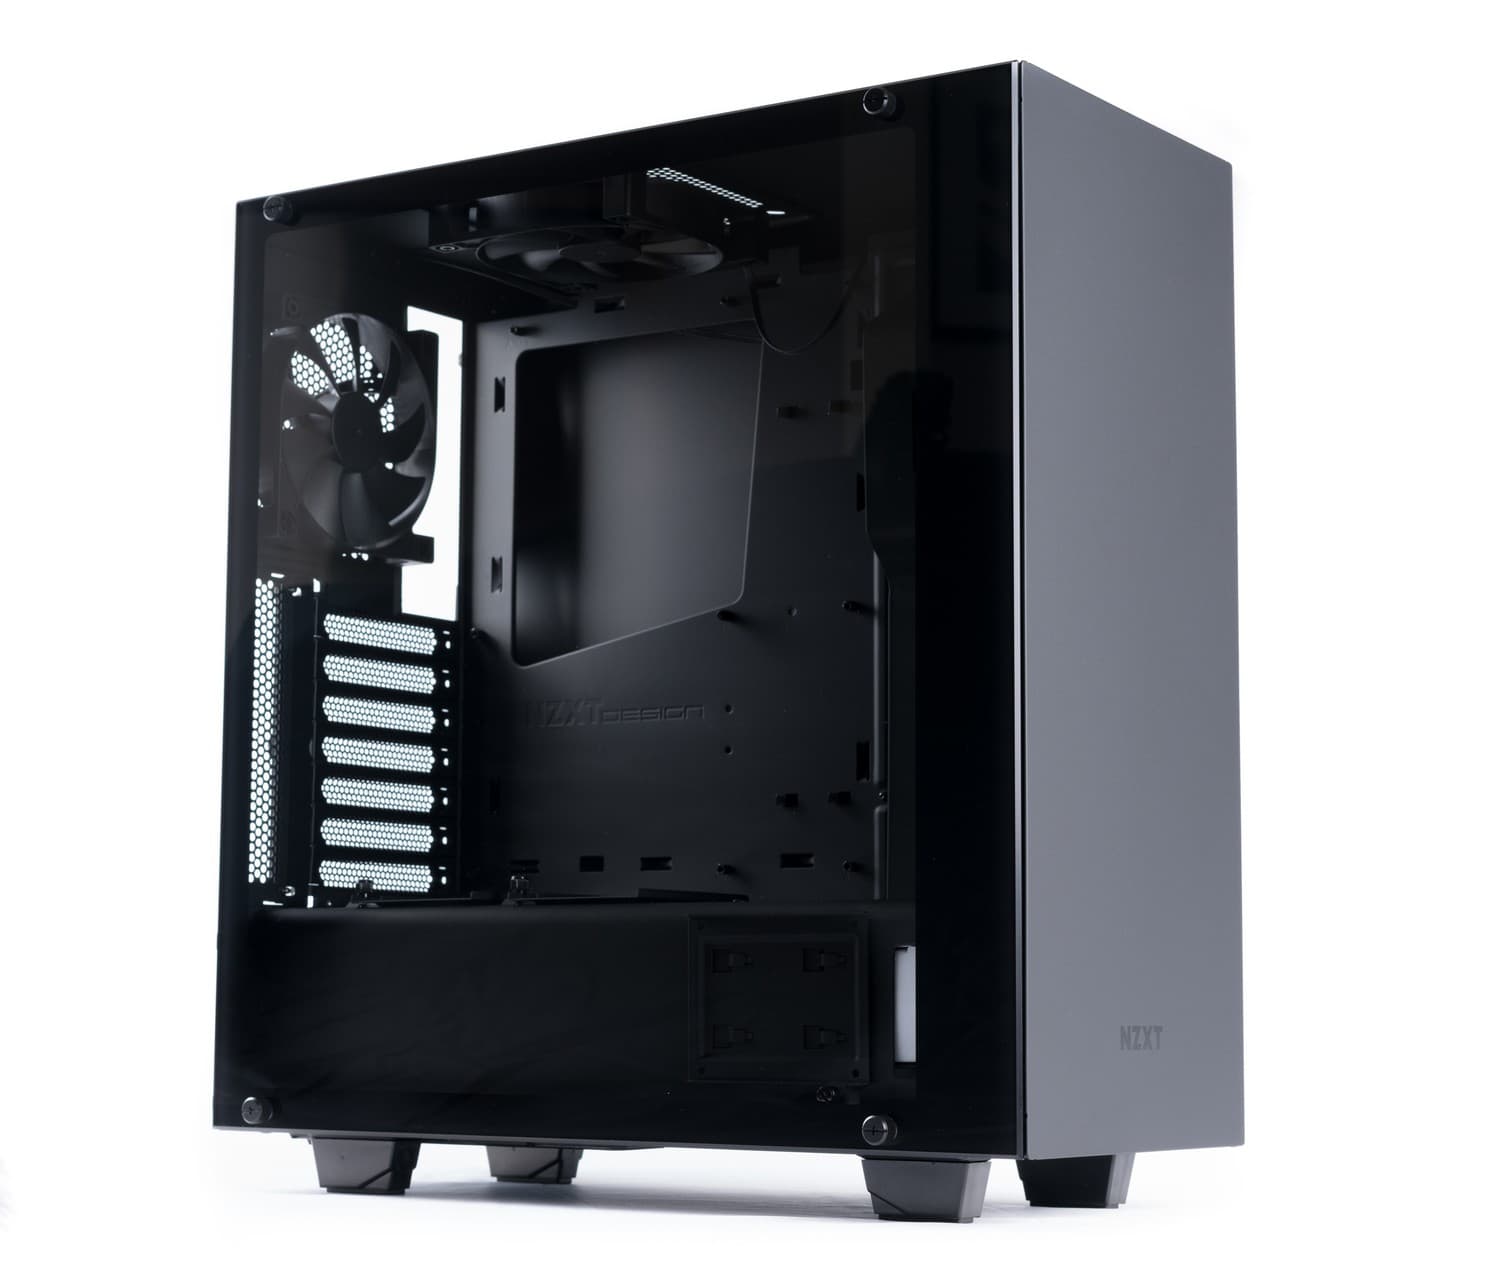
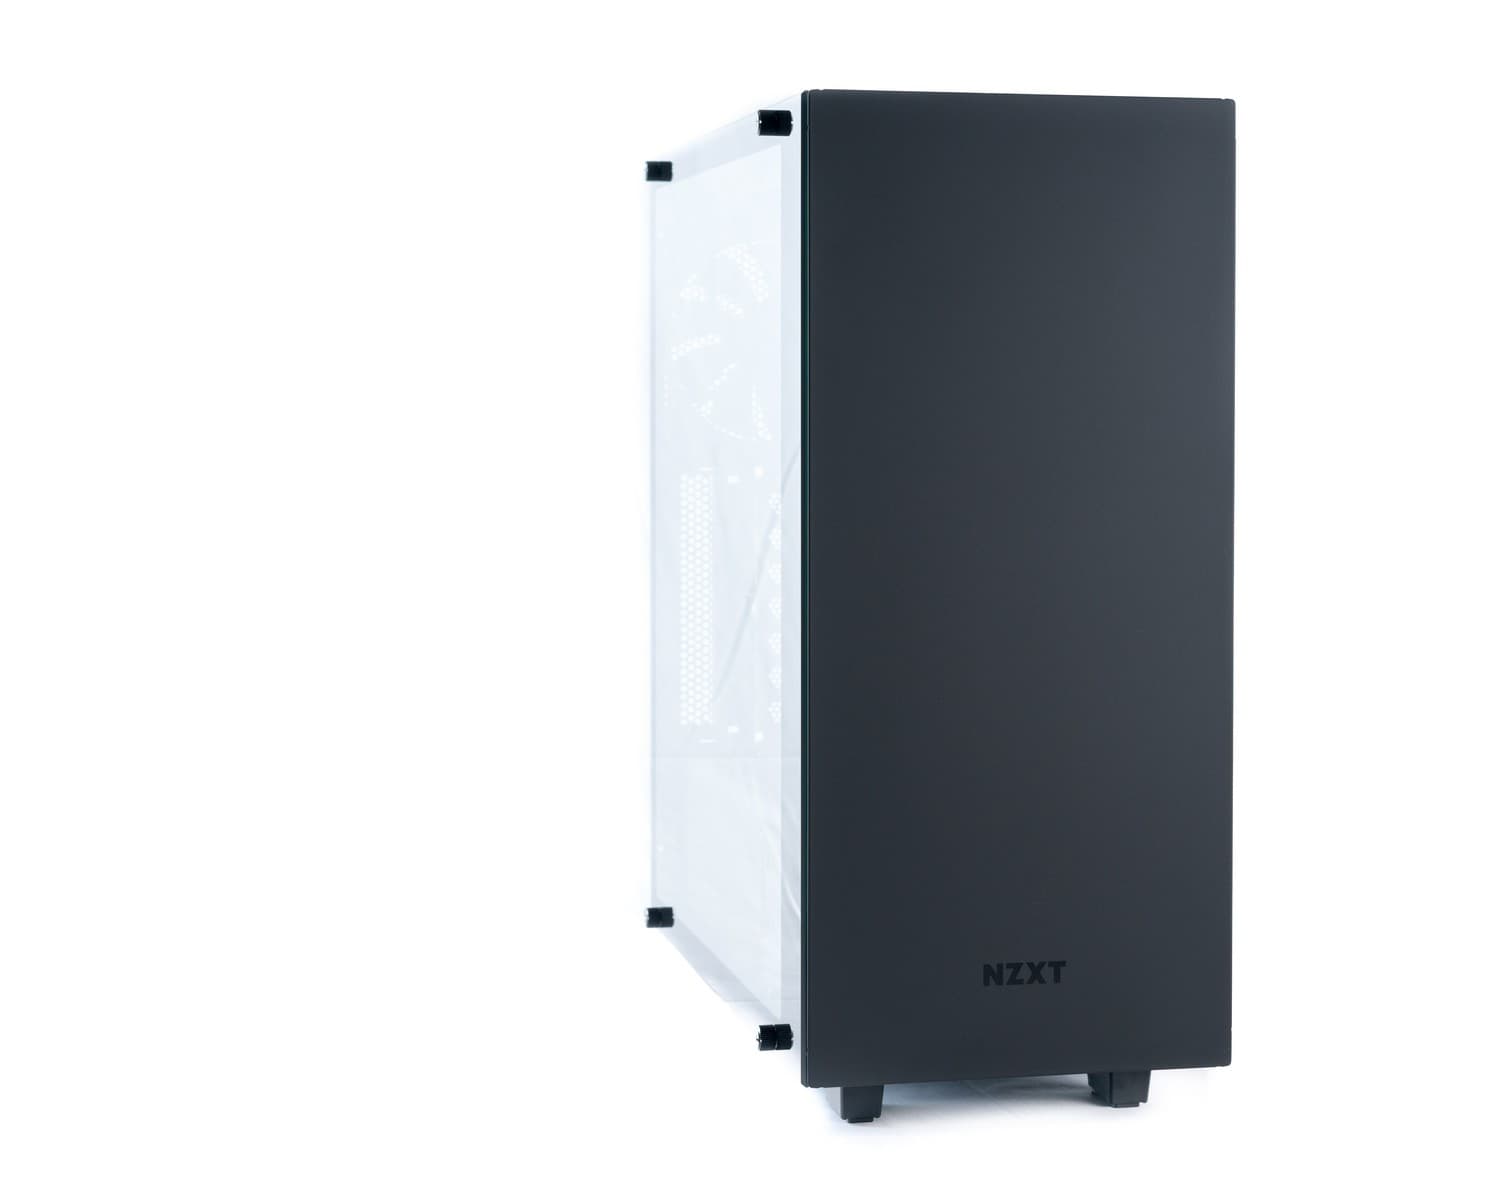
The case
Finding a good case will never be easy
Unfortunately, one thing has not become easier over time. Finding an attractive, understated and simple case. Case manufacturers seem to only cater to the gamer stereotype of excess and gaudy.
I'm in my 30s, I'm a designer... I want something simple but that doesn't mean I don't want to have the best hardware, support for large water-cooling radiators and expected case ammenities like thumb-screws, anti-vibration features and other noise considerations. I could care less about LED fans, weird intake designs and other questionable aesthetic choices.
In the past I tended to like small form factor computers, having made quite a few Shuttle SFF computers. So I started there, thinking I could get a micro-ATX motherboard. This would prove to be a challenge given my desire to have a long full-size high-end graphics card.
There were a few that were somewhat close to what I was looking for like the Define Mini C and Corsair Air 240, at least size-wise. Then I found a Kickstarter for a ridiculously small case called the DAN Cases A4-SFX that used a micro-ITX motherboard and could house a full-size graphics card. It was dubbed the "world's smallest gaming tower" at roughly the size of a shoebox. Sure, it had some tradeoffs (non-ATX PSU, limited motherboard selection, limited heatsink-fan options and not the best cooling in general) but it seemed perfect.

Unfortunately, it was sold out everywhere. A second version eventually launched on Kickstarter and I ordered it. Though it won't arrive for a while. Maybe I'll use that for a separate build later on.
The more I thought about it, I wanted a case large enough for me to pick a motherboard with great overclocking capabilities, the ability to have a water-cooling setup and the room to expand to two graphics cards via SLI if I so decided in the future9.
The searching continued for a case that could accomodate an ATX motherboard as well as a large 280mm radiator. I'll spare you the details, but after looking at a bunch of cases (ones from NZXT, Define, Corsair and Lian Li mainly), I landed on the NZXT S340 Elite VR. NZXT also has a newer model called the H700i that seems interesting and has a bit better internal cable management but I'm not a fan of some of the perforated panels it has on the top.
Shot these photos myself! Got a studio lighting setup just for this article.
The parts
What parts I chose and why
I first built this computer in April 2017 with a quad-core i7 7700K and Z270 chipset motherboard. But later that year Intel released six-core i7 8700K processor and Z370 chipset. I ended up upgrading both the CPU and motherboard at that time.
Processor
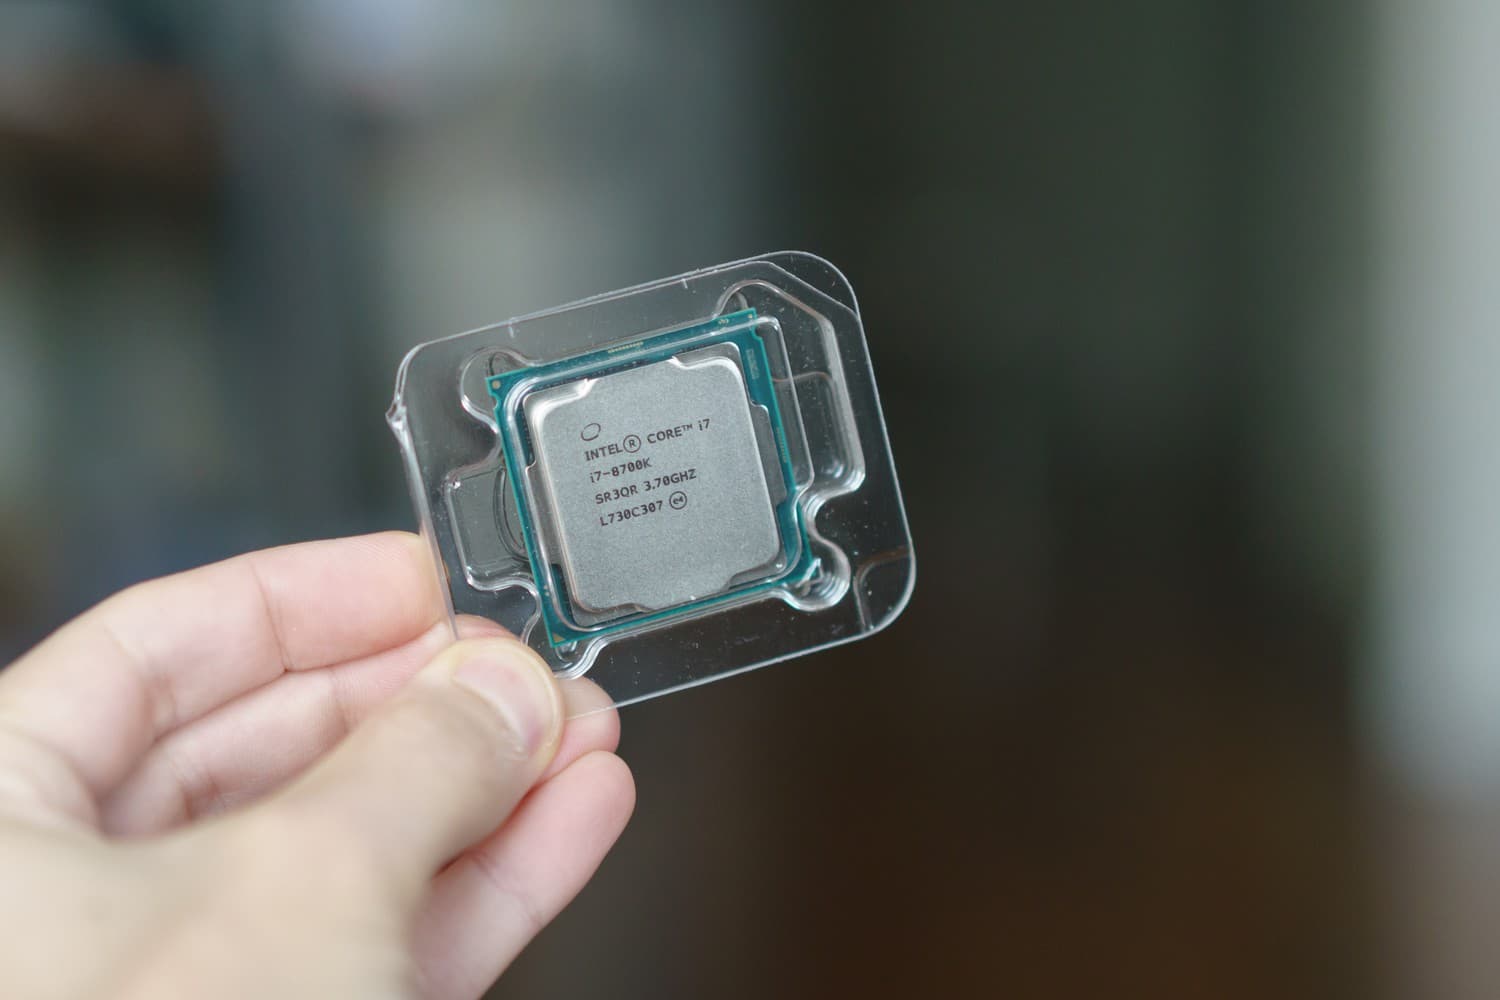
Intel Core i7 8700K
I went with the hexa-core Coffee Lake Intel Core i7 8700K processor running at 3.7GHz (4.7GHz with Turbo Boost). At the time I built this computer, the 8700K was the best processor for gaming as well as performing well in Lightroom compared to other chips. It's not the best for Adobe Premiere Pro but it's better than a 7700K with fewer cores.
Why not go for more than 6 cores?
There are processors with more cores — from both Intel and AMD — but I don't think they would be better for what's important to me: Lightroom and gaming. Two uses that traditionally prefer higher clocks and don't make good use of too many cores. Typically when you get a processor with more cores, the lower the clock speed per core.
For example, each core in the ridiculous $2,000 18-core Intel Core i9 7980XE has a mere base clock speed of 2.6GHz but with a Turbo Boost (v3.0) up to 4.4GHz. There's some extra clarification to be made here: Turbo Boost does not mean every core gets that speed. In this example, only two cores get 4.4GHz. If there was some magical processor that had a ton of cores where each core had a very high clock speed as well, then the case may be different.
This does also apply to the 8700K. While the Turbo Boost is listed at 4.7GHz that's only for one core. If the computer decides two cores should be boosted, then they are each at 4.6GHz. That continues down to all cores running at 4.3GHz with Turbo Boost. Compare to the 7700K that has a Turbo Boost of 4.5GHz for one core and 4.4GHz for all four cores. So yes, the comparable all core Turbo Boost speed of the 8700K is slightly slower than the 7700K chip.
Then why did I get the 8700K if that's the case? Because I'm going to overclock the heck out of all cores on the 8700K — and a bit of a spoiler but I got a good chip and was able to overclock higher with the 7700K.10 And as a nice secondary benefit the extra two cores means I have better performance for applications that make good use of multiple cores and many threads, like Premiere Pro.
I would try to explain more of the current landscape of Intel processors... but it would take way too long to even begin to explain and it doesn't really matter.11
CPU cooling
Corsair Hydro H115i AIO liquid cooler
As I mentioned above, all-in-one liquid cooling options are affordable and highly performant alternatives to creating your own water-cooling loop, not to mention the related hassle and maintenence. These systems are easy to use, as long as your case is large enough to support the radiator size you want.
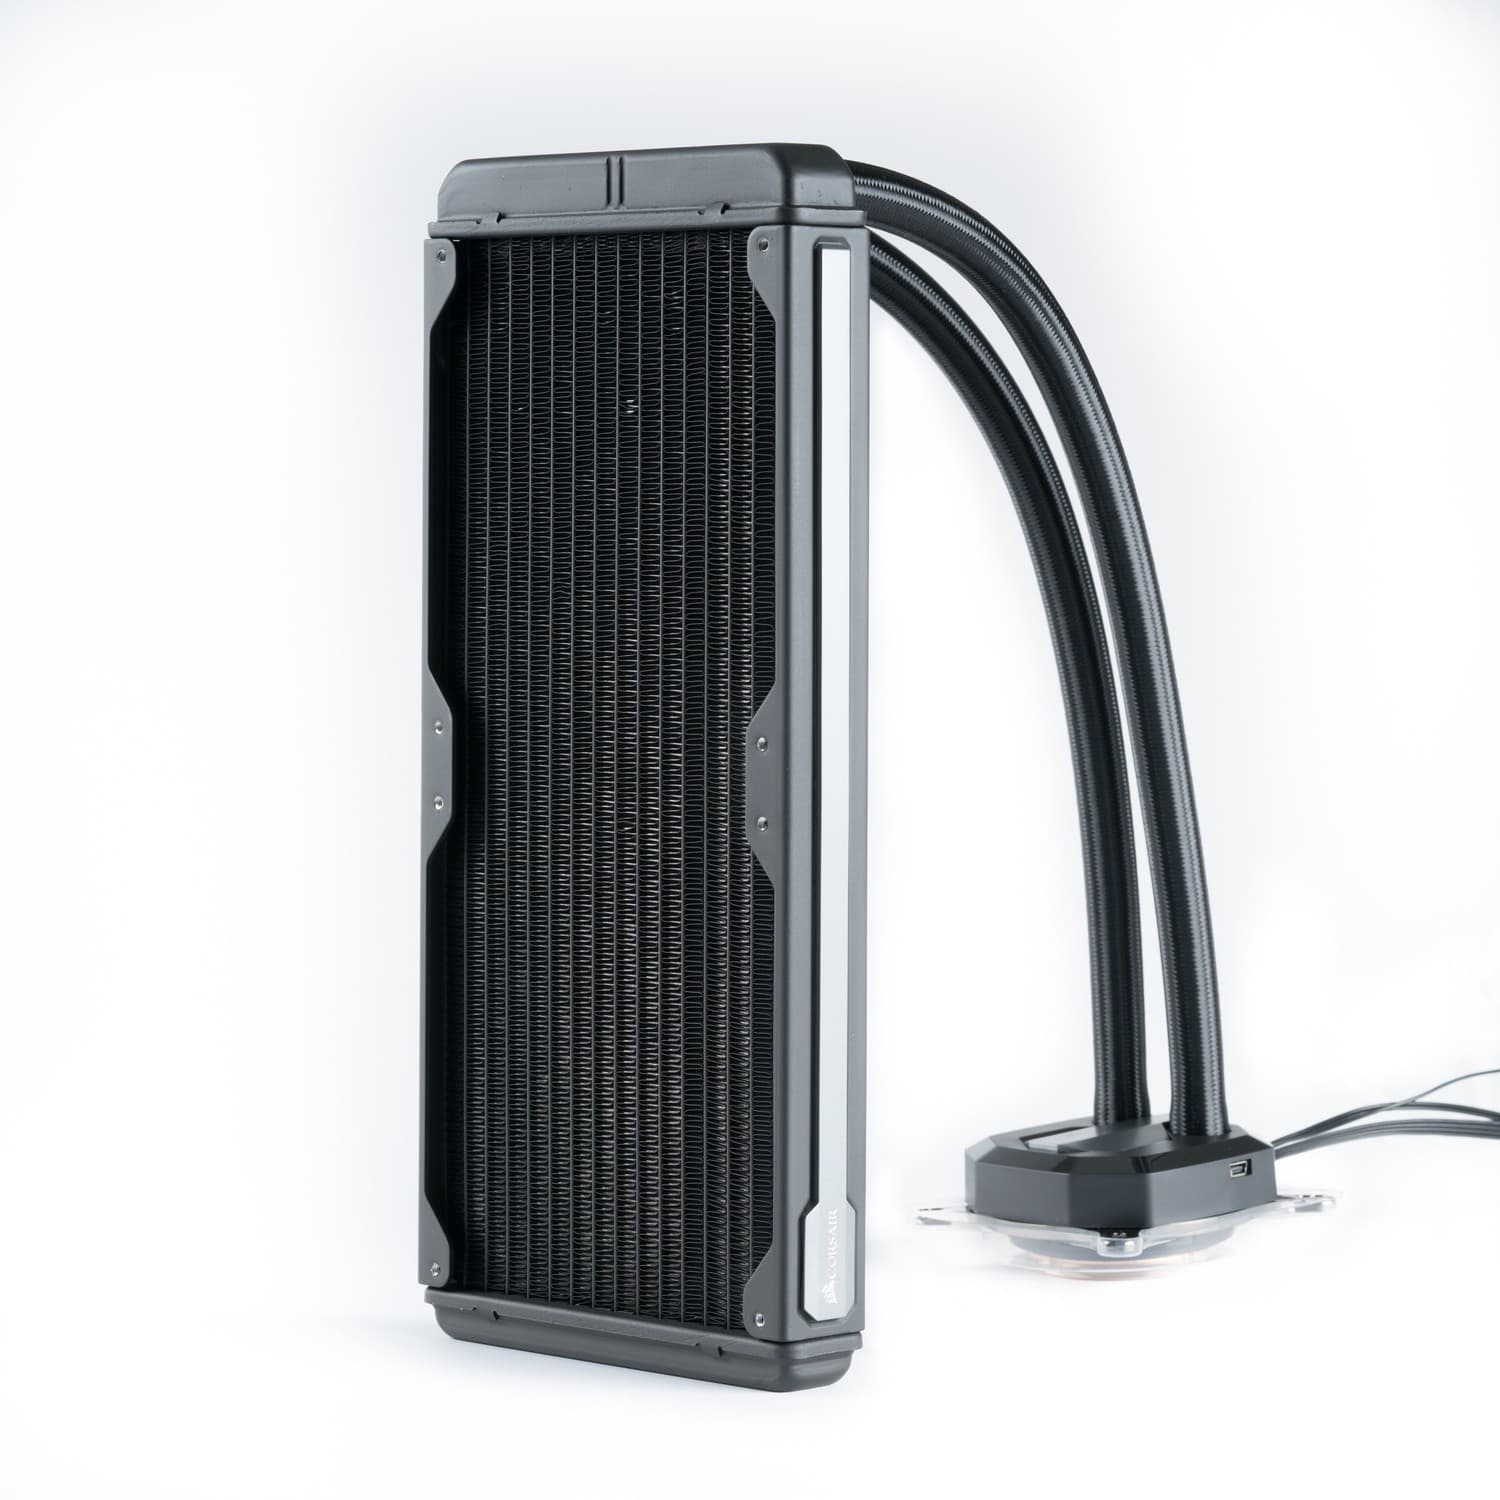
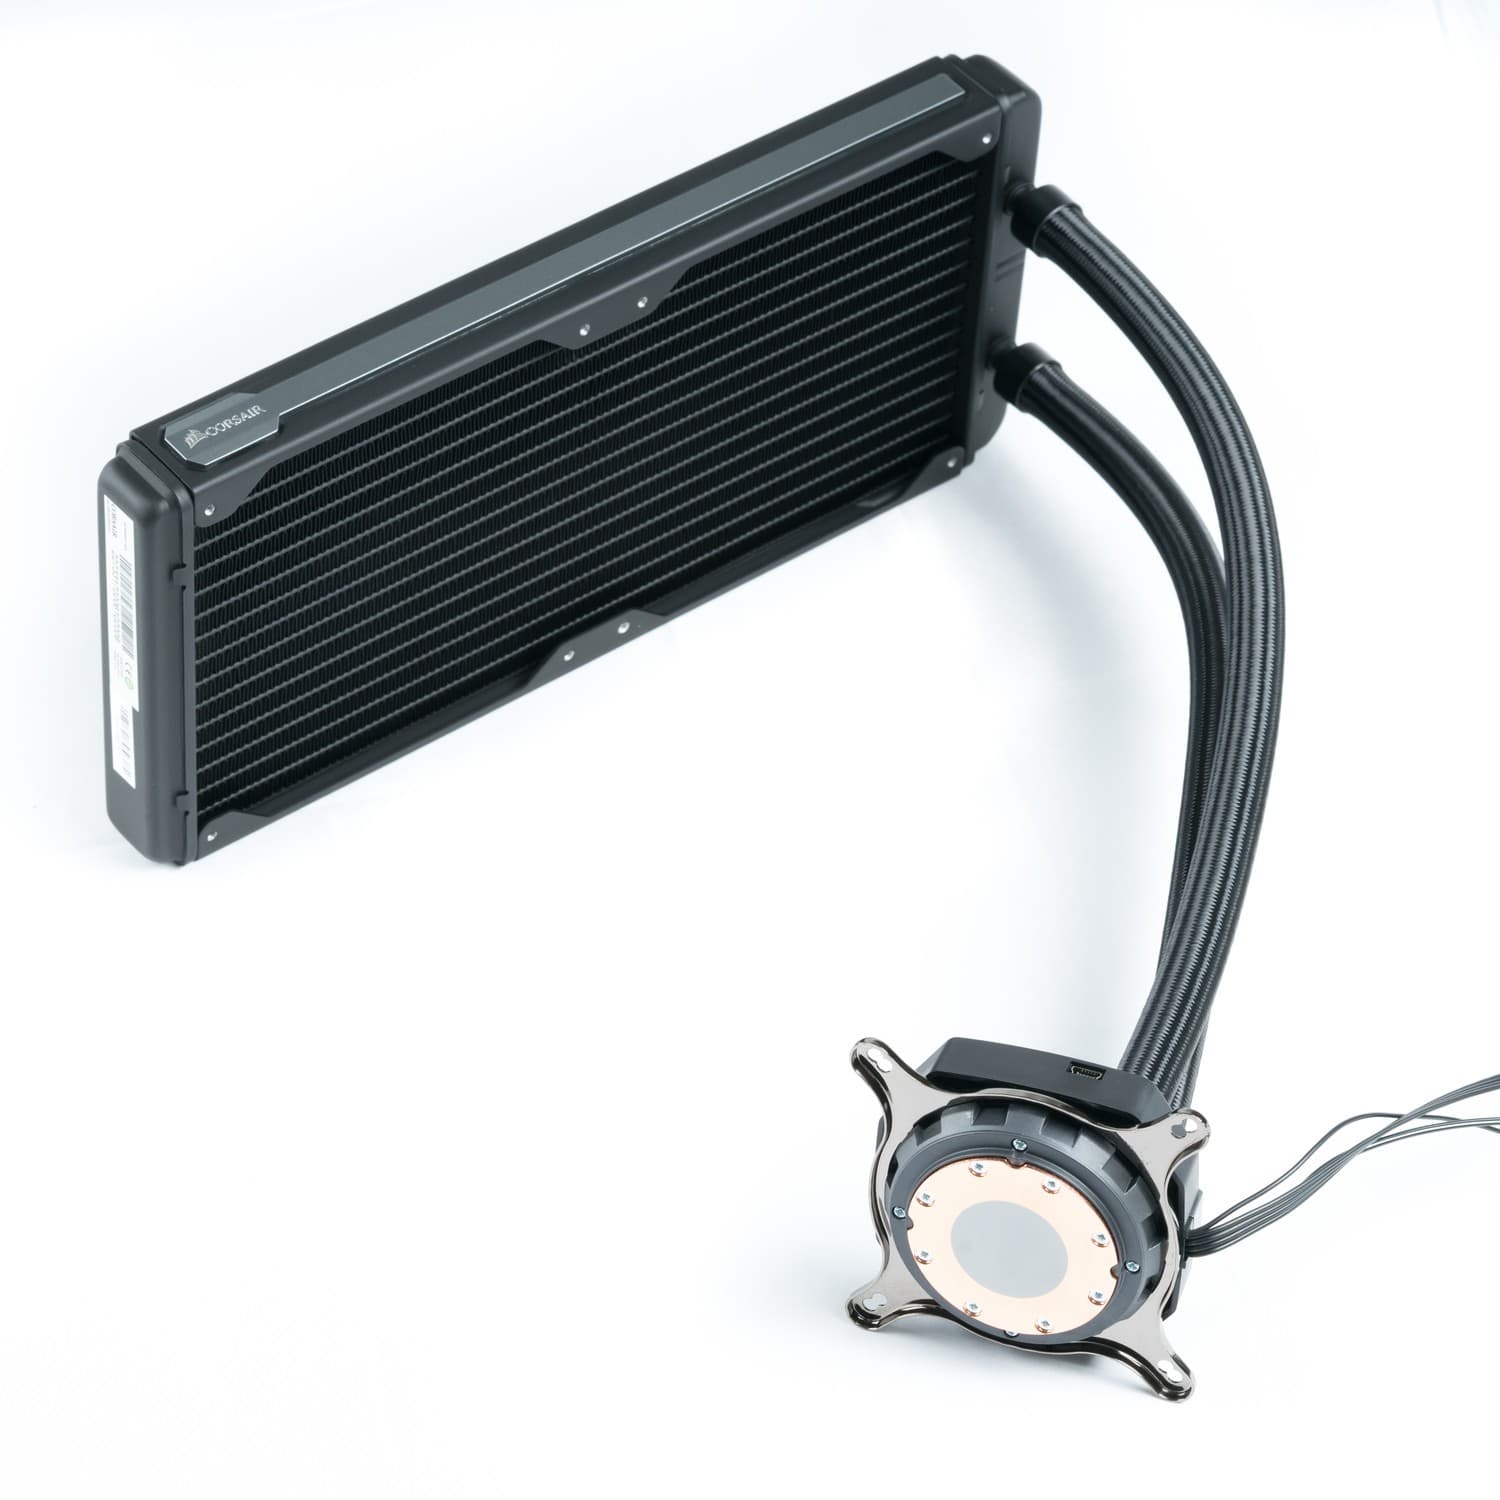
I picked for one of the larger ones: the Corsair H115i has dual 140mm fans for its 280mm radiator. Corsair recently released a newer version called the H115i PRO RGB but the main differences seem to be a pump head with RGB LED lights and mag lev fans that aim to be quieter (which I will probably order separately and swap out my current fans).
While I got the largest and easiest to use Corsair 280mm AIO system, there are a few other options if you're feeling more adventurous and wish to build a custom loop or have a larger case and want something more performant. If you plan to watercool your graphics card and don't want to have to deal with placing a second radiator from an AIO kit, a custom loop is a good way to go.
-
EKWB S280 kit Higher-end custom kit
-
NZXT Kraken X62 AIO 280mm Great Corsair H115i alternative
-
Corsair H150i PRO RGB Larger 360mm kit
Motherboard
ASUS ROG Maximus X Hero
Aside from the basic need that it support LGA1151 processors and used the Intel Z370 chipset, I had a few requirements when I began searching for the motherboard:
-
Onboard 802.11ac Wi-Fi: Because I really don't want to have to get an additional card to add Wi-Fi capability.
-
Two M.2 slots: I didn't want to go the route of a traditional SATA SSD with this build and wanted to go with a tiny and speedy M.2 card slot SSD. As for why I wanted two — more on that in the section below.
-
First-class overclocking support: There are a few things I like to see in a board I plan to overclock with, even a bit:
- Large built-in heatsinks over vital parts of the chipset, especially the power management components above and to the left of the CPU socket.
- An easy way to reset or diagnose why the computer doesn't boot (external rear restart buttons are nice, as well as an onboard display to indicate error codes).
- A solid UEFI BIOS that lets me control everything related to overclocking. While modern motherboards also have companion Windows software to let you control this on the fly, it's nice to have more control in the UEFI BIOS itself.
-
Aesthetics: Definitely further down on the list of wants, but I'd like something fairly discrete without a ton of bright red RAM and PCIe slots. Nowadays everything (motherboards, graphics cards...) has a ton of LEDs on it but fortunately they are all customizable so I can turn them off.
-
Full ATX form factor: Adequately spaced PCIe slots to accommodate large graphics cards with non-standard height coolers and future expansion cards I may plug in.
-
Strong, reinforced PCIe slot: Graphics cards are so heavy these days with massive coolers that I'm always worried I'm going to damage the PCIe slot with all the weight. While I plan on getting a graphics card brace to help with this, it would definitely be nice to have if the motherboard had a stronger PCIe "SafeSlot" as Asus calls theirs.
This may sound like a laundry list but if we're talking about fairly high-end boards, there are a lot that meet these needs. I ended up going with one of Asus' many Z370 options. In fact, the one I went with was the lowest end model of this high-end ASUS ROG Maximus line that caters to the gaming and overclocking crowd.12
If you're looking for something with similar functionality but a few less boxes checked, any Z370 motherboard from the enthusiast Asus ROG Strix line below this Maximus line would be a solid choice.
Graphics
ASUS ROG STRIX Nvidia GeForce GTX 1080 Ti
For the graphics card, there was really no beating the just-released (at the time) Nvidia GTX 1080 Ti. The much more expensive $1,200 Titan Xp came out shortly after but had marginally better performance (around 5-7%) — gains that could mostly be achieved by mildly overclocking the GTX 1080 Ti. And as I had mentioned earlier, Lightroom and other Adobe applications I use frequently are more optimized for Nvidia cards at this time.13
You might be thinking.. holy crap, $750+ for a graphics card!?! That's almost double the price of the CPU.
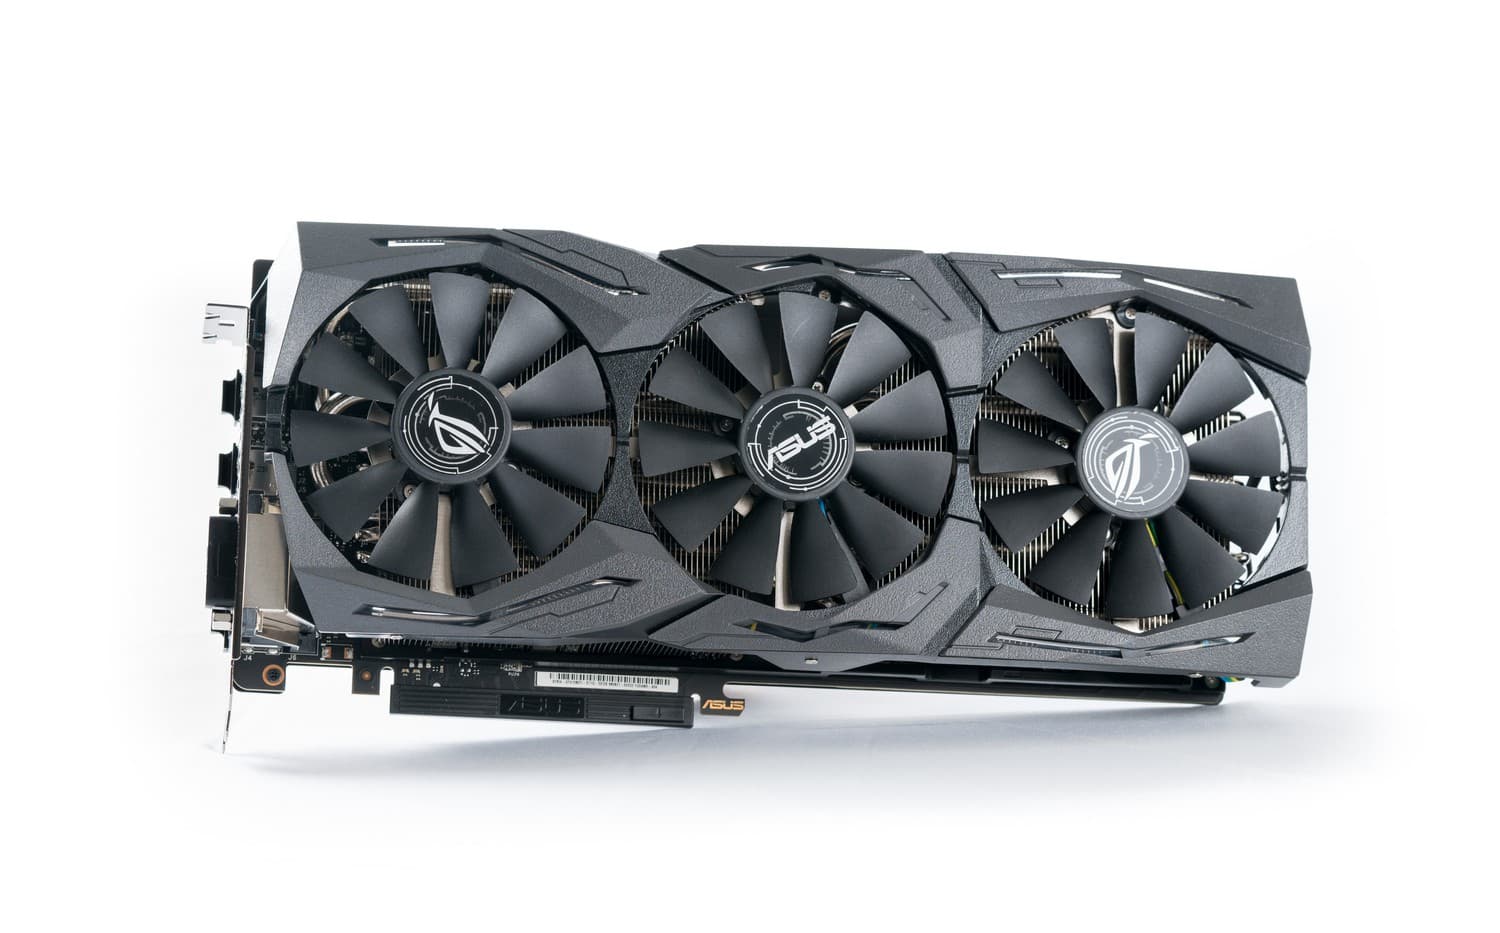
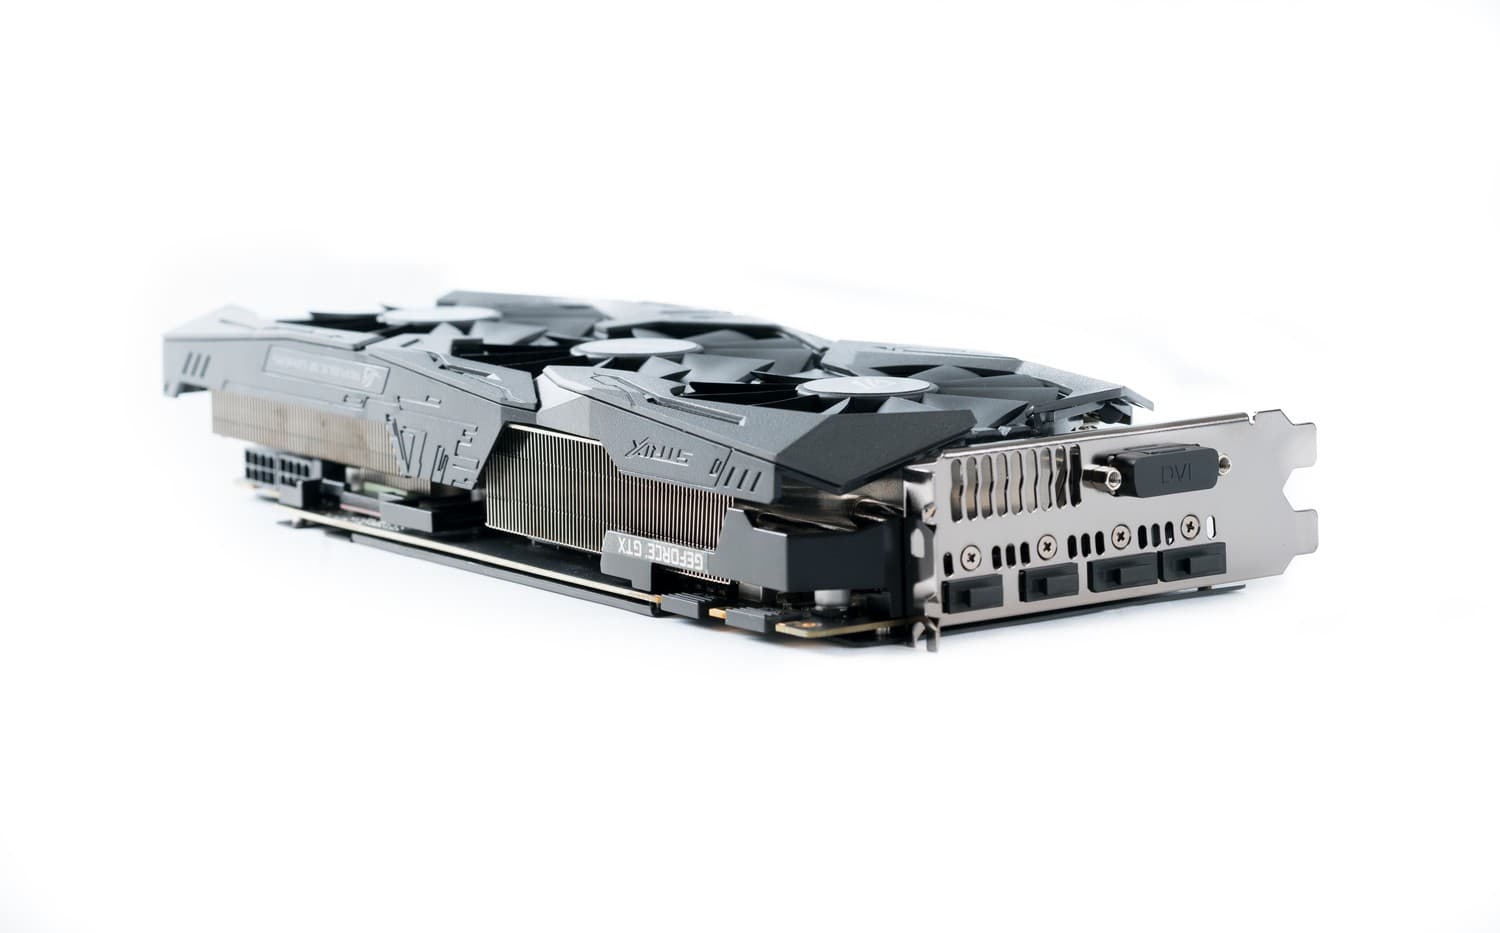
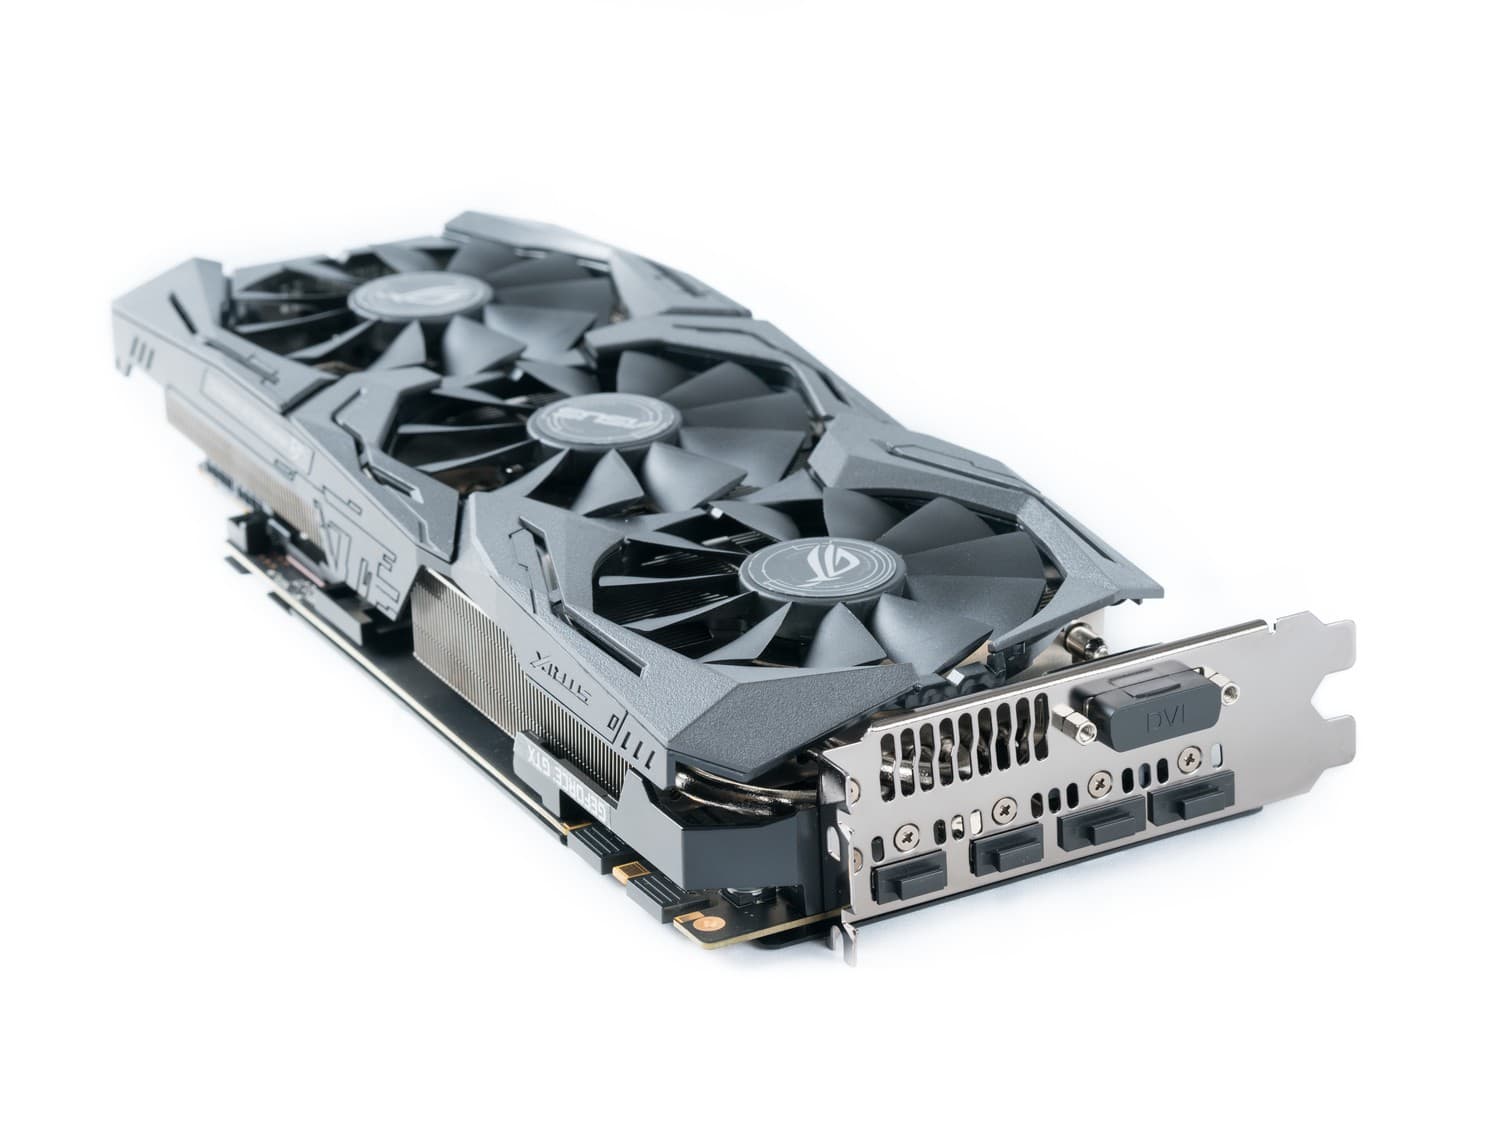
First off, this card gets you solid VR and 4K-and-beyond gaming, and should continue doing its job well into the next generation of VR gear. With a clock speed nearing 1.6GHz, 11GB of GDDR5X VRAM, 3,584 CUDA cores, 11.3 teraflops and a whopping thermal dissipation of around 250W (more than double the i7 8700K CPU's TDP), the GTX 1080 Ti is a beast. If you care more about the details, this Anandtech review should be more than enough.14
High-end graphics cards have matured significantly since the last time I purchased one for a build. With their ridiculous number of cores excelling at highly parallelizable tasks, modern graphics cards have also found a life beyong gaming with the rise of general-purpose computing tasks on GPUs (GPGPU) like cryptocurrency mining.15
However, knowing I wanted the GTX 1080 Ti wasn't enough. I had to pick out which of the many different models I wanted. I knew I wanted to avoid the standard "blower" type reference design cards. The single-fan blower style cards tend to be fairly loud and lack some ideal thermal characteristics that I'd want for such a card, especially one I will overclock. I ended up with this triple fan ASUS model that also featured a huge heatsink requiring a 2.5-slot height. There are way more options for GTX 1080 Ti cards at the time of publishing compared to when I started building this PC; for the most part look for anything with a huge cooler and you should be good.
There's one caveat though. The GeForce line of graphics cards don't output 10-bit color graphics (40-bit RGBA) to a 10-bit monitor unless you're in a DirectX 11 fullscreen mode, which is basically only for gaming. It seems that Nvidia blocks their consumer line of cards from outputting 10-bit color for professional applications and prefers that you buy a card from their much more expensive Quadro line (the top Quadro cards range in price from $2,000 to $7,500!).
Why get only one card?
I initially considered going for a dual-card SLI setup. After some research I discovered two things:
- Lightroom has no support for a dual card SLI setup.
- Not many PC games even have SLI support now.
As such, it doesn't seem worth pursuing a dual-card setup. I can already game at 4K 60fps no problem with this single GTX 1080 Ti. However, I expect the need for and adoption of SLI support from developers to change as the need for even more performance grows with future high-resolution, 240Hz DisplayPort 1.X+ monitors and VR HMDs.
-
ASUS NVIDIA GTX 1060 Budget Performance
-
EVGA NVIDIA GTX 1080 Ti Hydro Copper Waterblock Tuner's choice
-
NVIDIA TITAN Xp Higher end
-
NVIDIA TITAN V Highest end
Storage
Dual 1TB Samsung 960 EVO M.2 SSDs
I had heard so much about the crazy performance of these tiny new PCIe NVMe M.2 SSDs that I had to try one. Some of the latest high-end M.2 SSDs boast speeds more than 3-5x faster compared to their SATA counterparts.
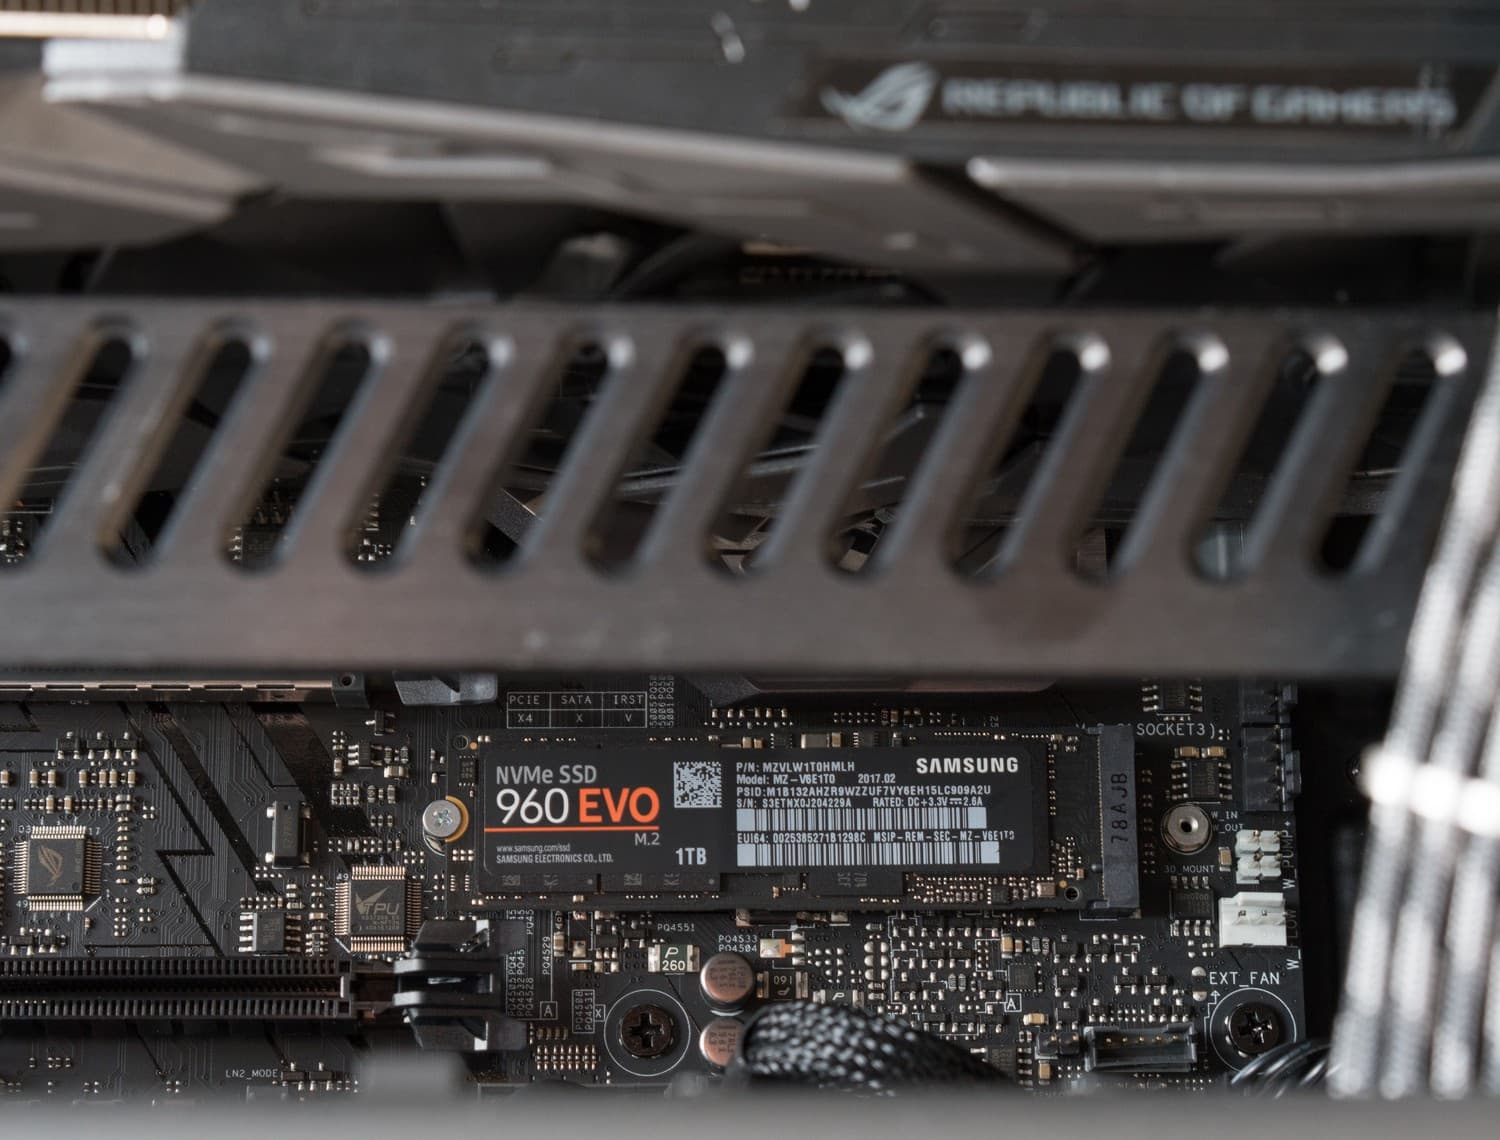
960 EVO at home in its M.2 card slot.
But first.. what the heck does PCIe NVMe M.2 mean?
-
PCIe: The high-speed serial expansion bus that connects to a bunch of peripherals like graphics cards and some types of storage (not SATA). You might have heard about a CPU/chipset supporting a particular number of PCIe lanes. That roughly refers to how much bandwidth (each lane equates to 4 physical wires — two to send, two to receive) a particular device may require. For example, a modern graphics card usually wants a PCIe x16 slot to get 16 lanes for more bandwidth while current M.2 SSDs only require 4 lanes.
-
NVMe: Short for NVM Express (which is short for something even longer), NVMe is just a specification for interfacing with non-volatile storage attached via PCIe. It's like an API for these new SSDs. Previously, PCIe-attached SSDs had their own custom way to talk to the chipset and that lead to requiring custom drivers. NVMe is now the standard and was designed with SSDs in mind, compared to the precursor protocol AHCI that was made with spinning disks in mind.
-
M.2: And this is simply the name of the connector for the expansion card itself. You might see them called M.2 2242 or 2280. That refers to the length of the card: 22mm wide and either 42mm or 80mm long.
When I began researching M.2 SSDs for this build, there seemed to be only two options when it came to no-holds-barred performance: the Samsung 960 EVO and the Samsung 960 PRO. The EVO model uses TLC V-NAND with some smart uses of two kinds of SLC caches to increase performance. The PRO model on the other hand uses superior MLC V-NAND flash memory.16
Despite the difference in NAND types used between the 960 PRO and 960 EVO, the performance isn't too dissimilar (likely thanks to the EVO's great use of SLC caching):
- 960 PRO — 3,500 MB/s seq. read, 2,100 MB/s seq. write
- 960 EVO — 3,200 MB/s seq. read, 1,900 MB/s seq. write
I went with the 960 EVO to save a bit of money given that I probably would not be able to tell the difference between those two in terms of speed. I was not concerned with lifespan as I would likely upgrade long before I saw any diminishing performance.
I got two 1TB EVO 960's. I started this build thinking I would have a dual-boot Windows 10 and macOS hackintosh machine. I ended up deciding against that for a variety of reasons, including having to limit my initial hardware choices to only things that would be friendly for a hackintosh setup. Then I thought maybe I would just RAID 0 the two SSDs but decided against that (more on that later). I just ended up making one a dedicated scratch disk for Lightroom to store photos I'm currently working on. It feels safer that way in case I do something that somehow nukes my main OS drive (though I always have the photos backed up to the NAS and Backblaze so it wouldn't matter much).
A note about 3D XPoint: Intel has a promising new type of memory technology called 3D XPoint memory that they have started selling under their new Optane SSD brand. It's really expensive for the time being but very fast and something to keep an eye on in the future.
Uh, this is a Lightroom PC and you only have 2TB of storage??
If I didn't have my 12TB Synology NAS to archive photos I was done editing, I would have opted to also get large internal mechanical hard drive like this Western Digital Black series drive if I was only going to use it alone. If I was going to use it in a RAID array, I'd get several of the WD Red Pro or Seagate IronWolf Pro drives (they have NAS/RAID specific features like TLER).
-
Samsung 850 PRO Great SATA SSD
-
Corsair Neutron XTi Fastest SATA SSD
-
Intel SSD 600p Series Cheaper M.2 SSD
-
Intel Optane SSD 900P Highest end 3D XPoint SSD
-
WD Black 6TB HD Performance Hard Drive
RAM
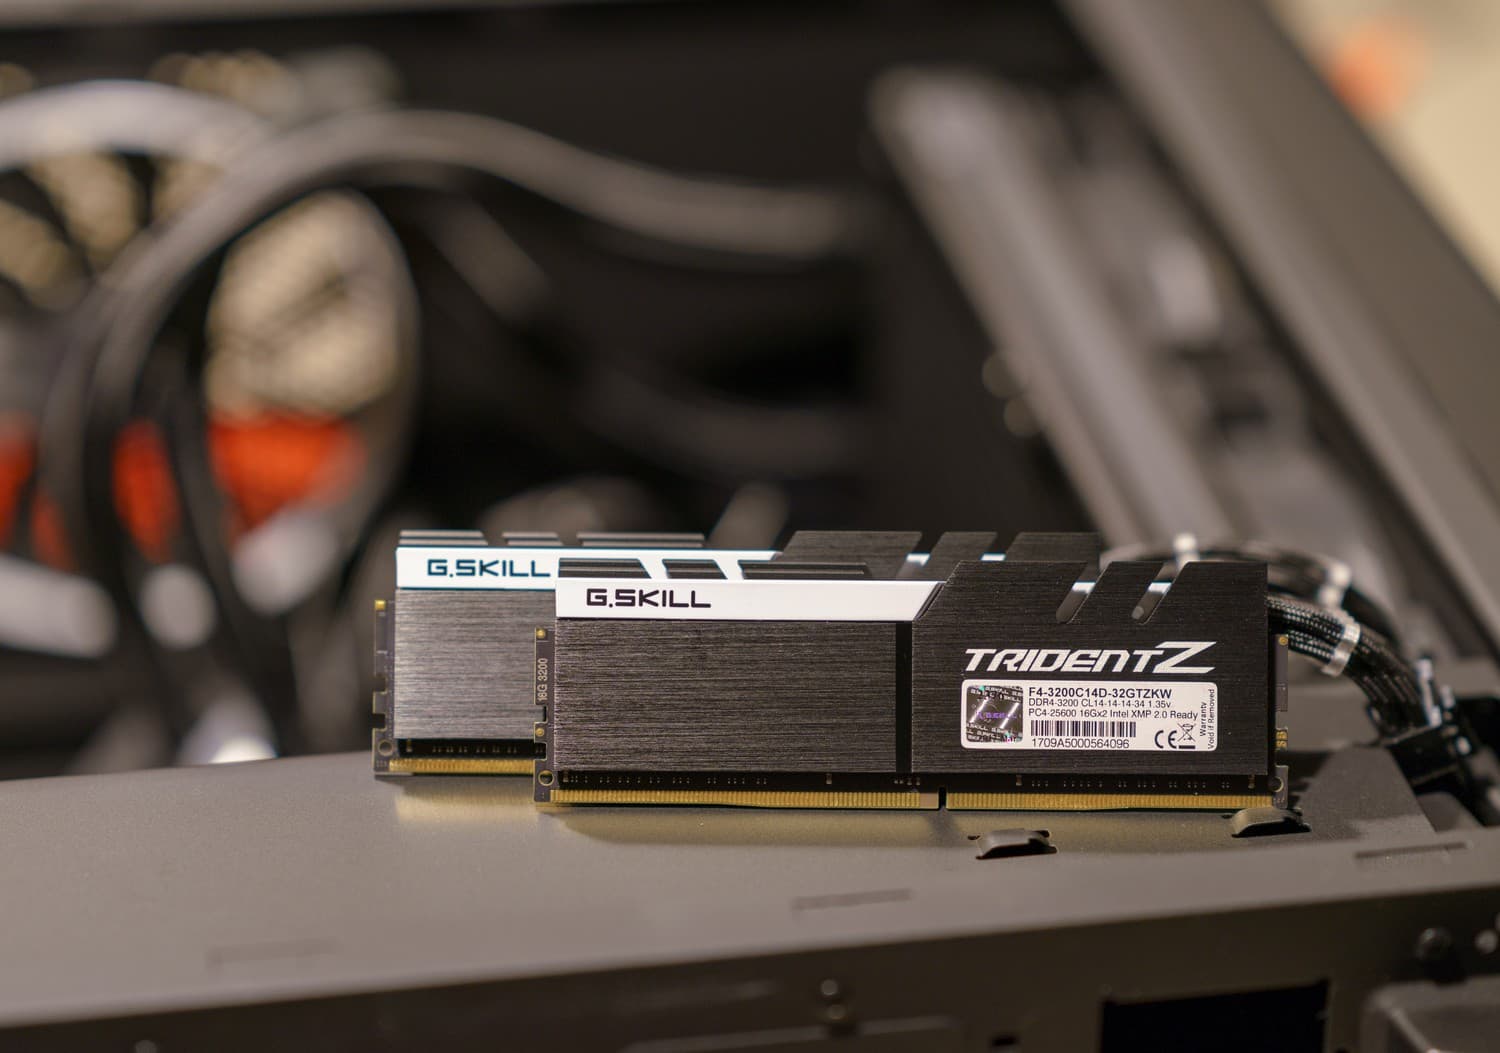
2 x 16GB G.SKILL Trident Z DDR4-3200 CL14
I feel like RAM is an often overlooked piece of vital computer hardware for all but the more experienced computer enthusiasts. When it comes to RAM it's not just about picking enough so that your applications have enough room to play and don't need to unncessarily keep paging to your SSD.
You at least need good enough RAM so you don't have stability issues. Bad RAM can lead to a myriad of stability issues and odd computer behavior. I will just reiterate that this is not an area you want to cheap out on. Unfortunately, RAM prices are so high these days17 it's actually pretty hard to "cheap out" in this space.
I began by looking for only 2 sticks of RAM instead of 4 for a few reasons. First, I plan to overclock a bit so I wanted to only use 2 sticks to reduce strain on the integrated memory controller. Second, the Z370 chipset on this motherboard only supports dual channel so there would be no performance benefit going with 4 sticks. Not to mention the extra heat created with 4 sticks crammed right next to each other.
I wanted two low latency matched 16GB ram sticks for for a total of 32GB. While I definitely wouldn't mind having more RAM, 32GB is more than sufficient for my needs and performance is a higher concern for me. And well, it's really not possible to find really fast, low latency RAM in anything larger than 16GB sticks; even that is a challenge. The very high speed RAM kits tend to only come in 8GB sticks.
When it comes to RAM, there's a lot more to look at beyond just the number of gigabytes. Speed and latency play a very large and interconnected role.
Overclocked RAM can have a sizable performance improvement when it comes to frames per second while playing some CPU-bound games. The performance variance for general system tasks seems to be much less pronounced on an Intel machine: Intel machines are much less picky with RAM than AMD Ryzen machines.18
The Intel Core i7 8700K with a Z370 motherboard supports a Coffee Lake DDR4 reference speed of 2666MHz. However, even if you have DDR4-2666 or faster installed, you won't get this speed out of the box without any configuration. It will run at 2133MHz due to the base JEDEC DDR4 specification. Fortunately, all you have to do is enable a memory setting in the UEFI settings called XMP (Extreme Memory Profile) — this will automatically bring your memory up to their rated speed and memory timings, adding a bit more voltage if necessary.19
It's rather easy these days to overclock RAM on its own, separate from any CPU overclock. While the performance benefits on an Intel system outside of gaming probably don't make it worth your while to go overboard with extremely pricey RAM, just setting your RAM to its rated XMP settings can get you on your way quickly.
When I was overclocking long ago, the memory controller resided in the northbridge chip of the chipset and overclocking was frequently done by just increasing the front-side bus speed (in addition to the CPU multiplier if it was unlocked for the CPU) that links the processor and RAM, usually with a 1:1 memory divider if it would work. With modern Intel machines the memory controller resides inside the processor itself and it's much less common to overclock the base clock (BCLK) when RAM speed can be manipulated entirely on its own easily. Well that and because BCLK overclocking is tricky and can easily cause system-wide instability from RAM to devices on the PCIe bus.
Nerdy bits about RAM frequency and latency
When you shop for RAM, you typically see 3 things: size in GB, speed in MHz (like DDR4-3200 for 3200MHz) and finally latency or timings, typically shown with four numbers like 14-14-14-34. You may also see the latency listed as a CAS latency or CL value, that simply refers to the first and most important number for us of those four timing numbers.
In general, faster speeds and lower latencies are always better. But they are interconnected when it comes time to measure the absolute latency. Lets talk about what that means.
CAS latency (CL) does not represent a time value. Rather, it refers to the number of clock cycles it takes from the time the CPU (well, integrated memory controller inside the CPU to be more accurate) requests some data from the RAM to the time the RAM can supply that data back. For example, RAM with a CAS latency of 14 will take 14 clock cycles to return that data and CL16 RAM at the same speed would take 2 more cycles to get the same number of operations done.
So what is this clock cycle? The frequency at which the RAM operates is the number of operations per second the RAM can achieve. In the case of 3200MHz DDR4 RAM this is 3.2 billion cycles per second. A single cycle is the smallest unit of time a computer can recognize. There's one more wrinkle in this: we're talking about DDR, which stands for Double Data Rate. This kind of modern RAM processes 2 piece of data per cycle, so the DDR4-3200 we've been talking about is actually only clocked at 1600MHz but effectively operates at 3200MHz.
Now that we know how latency and frequency are related, we can begin to calculate absolute latency and see how it varies as RAM frequency increases.
Let's say we have DDR4-2666 RAM with a CAS latency of 14. First, we need to use the true data rate, which is half of 2666MHz. To get the absolute latency we plug it into this: 1/(data rate/2) * CAS latency. That would be 1/(1333MHz) * 14 = 10.5 nanoseconds to complete an operation requested by the CPU.
If you run a few different types of RAM through that equation, you can see the difference in absolute latencies. I only plotted a few RAM speeds and latencies in there, but it's possible to buy RAM at frequencies as high as DDR4-4266 CL17 (as far as I've seen).20
| 2400 | 2666 | 3000 | 3200 | 3333 | 3400 | 3600 | |
|---|---|---|---|---|---|---|---|
| CL12 | 10ns | No such RAM exists* | |||||
| CL13 | 10.83ns | 9.75ns | No such RAM exists* | ||||
| CL14 | 11.66ns | 10.5ns | 9.33ns | 8.75ns | No such RAM exists* | ||
| CL15 | 12.5ns | 11.25ns | 10ns | 9.38ns | 9ns | 8.82ns | 8.33ns |
| CL16 | 13.33ns | 12ns | 10.67ns | 10ns | 9.6ns | 9.41ns | 8.88ns |
| CL17 | 14.17ns | 12.75ns | 11.33ns | 10.63ns | 10.2ns | 10ns | 9.44ns |
(*While I wasn't able to find RAM for sale at those CAS latencies, it might be possible to increase voltage and overclock the RAM to achieve some of those lower latencies. For example, I ended up running my DDR4-3200 CL14 at 3333 CL14.)
As you can see here, having the lowest latency doesn't mean much when it's not referring to absolute latency, which takes into account the number of cycles happening per second. Makes sense — the faster it's going, the less time each individual cycle takes, so at some point much faster RAM can make up for slightly higher CL timings. Here's another example: DDR4-2400 CL12 has the same 10ns absolute latency as DDR4-3200 CL16.
Does this mean you're better off getting cheaper RAM and overclocking it to the desired speed? Well, not quite. First off, there is no guarantee that your cheaper 2400MHz RAM could actually reach an overclock like 3200MHz. It might 1) not be possible, 2) require extra voltage, or 3) only be possible with significantly loosened higher CL timings, which defeats the purpose. As such, it's a good idea to always get the lowest latency RAM you can find, even if you plan to run it overclocked with higher timings. Better to get CL14 RAM and run it at CL15 or CL16 when overclocked much higher, than get CL16 RAM at the same speed but only be able to get it to work overclocked at CL18 or higher.
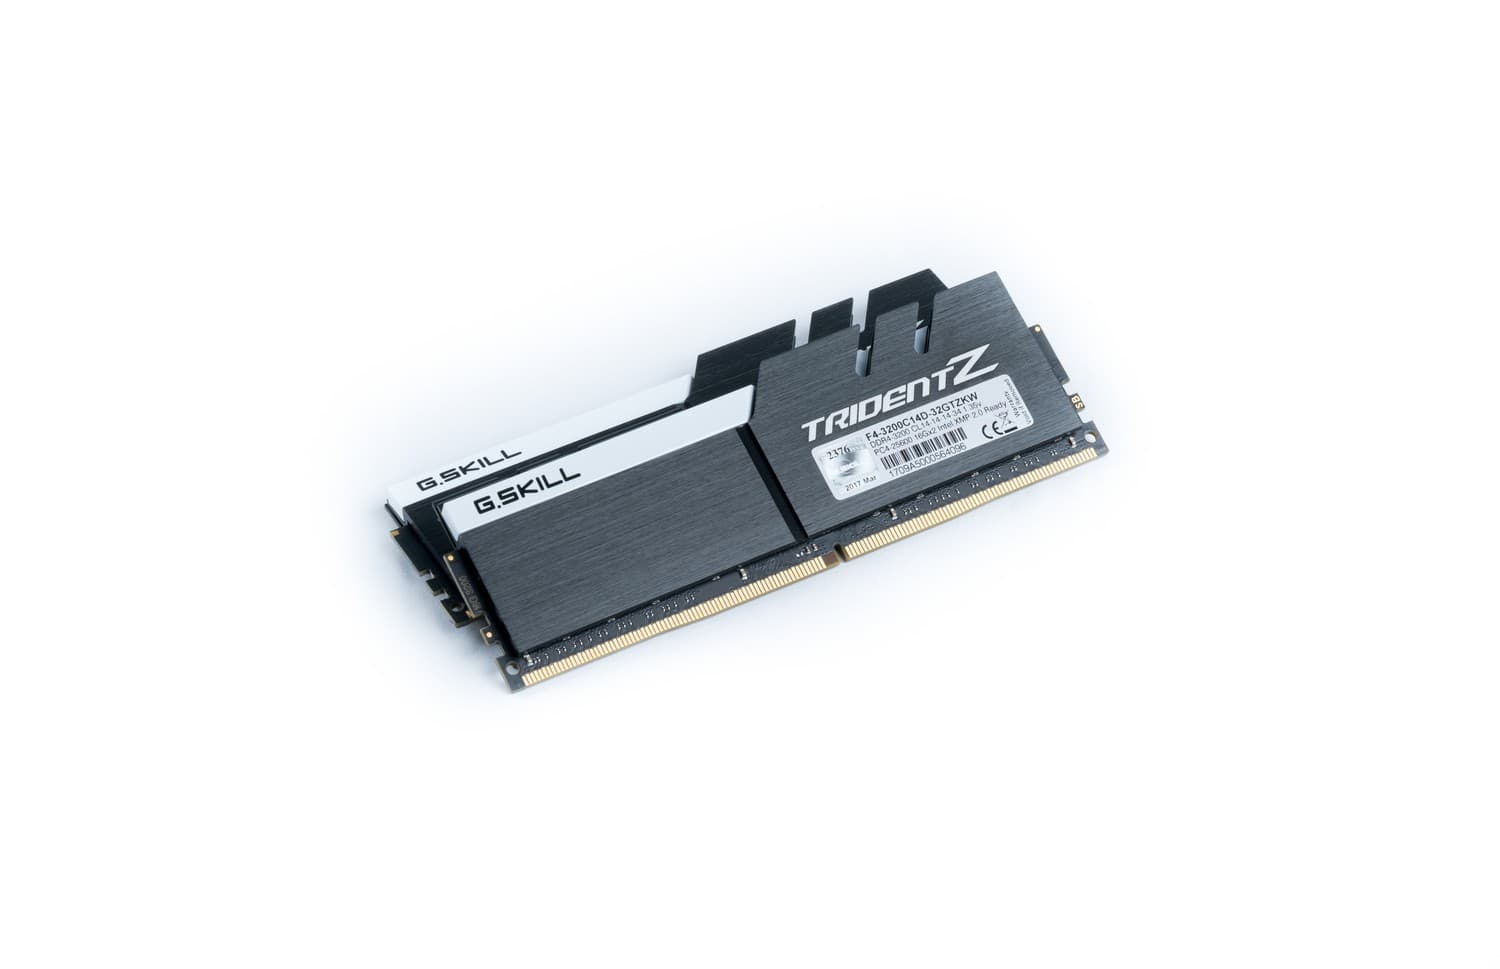
For all those reasons above, I ended up going with 2x16GB DDR4-3200 CL14 RAM. It's among the highest frequency and lowest latency RAM you can find.21 This should give me solid headroom to overclock the RAM past 3200MHz and still have a low CL even if I have to loosen it up a bit. In addition, this G.SKILL RAM uses Samsung's B-die chips which are reputable for their performance and overclocking ability.
And as a minor point, I was looking for RAM that would feel more at home in my mostly black PC and wasn't some obnoxious bright color.
PSU
Corsair AX860
Back when I was just getting into building computers some 15+ years ago, power supplies felt like they were largely overlooked by the DIY computer building community. The thinking was something like: just get something that's 300 watts or so with a big, heavy heatsink and a fan that isn't too loud and you were probably good to go.
In reality, the power supply is one of the most important parts of a stable and performant rig. Cheaping out on the power supply can result in random computer stability issues and restarts. In a worst case scenario a bad PSU could damage or even kill some of your components. The criteria for picking a good power supply has become a bit more stringent with power hungry graphics cards (modern graphics cards can use much more power than the CPU) in the last few years.
In addition, overclocking is no longer some mystical dark art — motherboard manufacturers cater exclusively to this crowd with high quality capacitors, PWMs and VRMS along with UEFIs featuring comprehensive voltage and control settings for just about everything.
When it came time to pick my power supply, I looked at a few things in particular:
-
Quiet: These days it's easier to find a PSU with a larger single fan (120 to 140mm in size) instead of the louder dual 80mm fans you used to find in power supplies. However, some more advanced power supplies have what they call a zero RPM mode — they don't even need to spin the PSU fan(s) until the load reaches some percentage of total output. Even then the fan only speeds up incrementally as needed. As such, it might be worth getting a more powerful PSU than you need, just so you can stay closer to that zero RPM mode with your regular idle/light use load.
-
Efficient: Again, fairly common these days to find PSUs with the 80 Plus efficiency designation, of which there are now a bunch of tiers: bronze, silver, gold, platinum and titanium. The higher the efficiency of the PSU, the less power that turns into heat instead of becoming DC current for your computer. This usually also means less heat that the PSU needs to deal with and pump out of your case. For example, if you have a 1000W PSU with 80% efficiency, then your PSU will likely pull around 1250W from the wall outlet to generate the 1000W peak output. That'll cost you extra on your electricity bill compared to a PSU with a higher efficiency rating.
-
Fully modular: A fully modular PSU has fully detachable cables. So if you have only a few interal drives and peripherals, you just plug in the cables you need and don't have to worry about where to hide the unused cables inside your case. This makes cable management much, much easier. And also improves airflow from having fewer cables obstructing it. Just make sure you're getting a PSU with enough connections (and wattage) to support the number of devices you need to power inside your case.22
-
Sufficient wattage with a bit of headroom: The best way to figure out how much wattage your build will need is with a power supply calculator. You select your exact parts and it'll estimate max load wattage and provide a recommendation (about 10% more wattage). The nice thing about this calculator in particular is that it lets you estimate usage if you overclock your CPU and GPU as well. In my case, it said my rig would use close to 600W when overclocked a bit.
There's also the whole single vs multiple 12V rail discussion to be had if you're really curious.
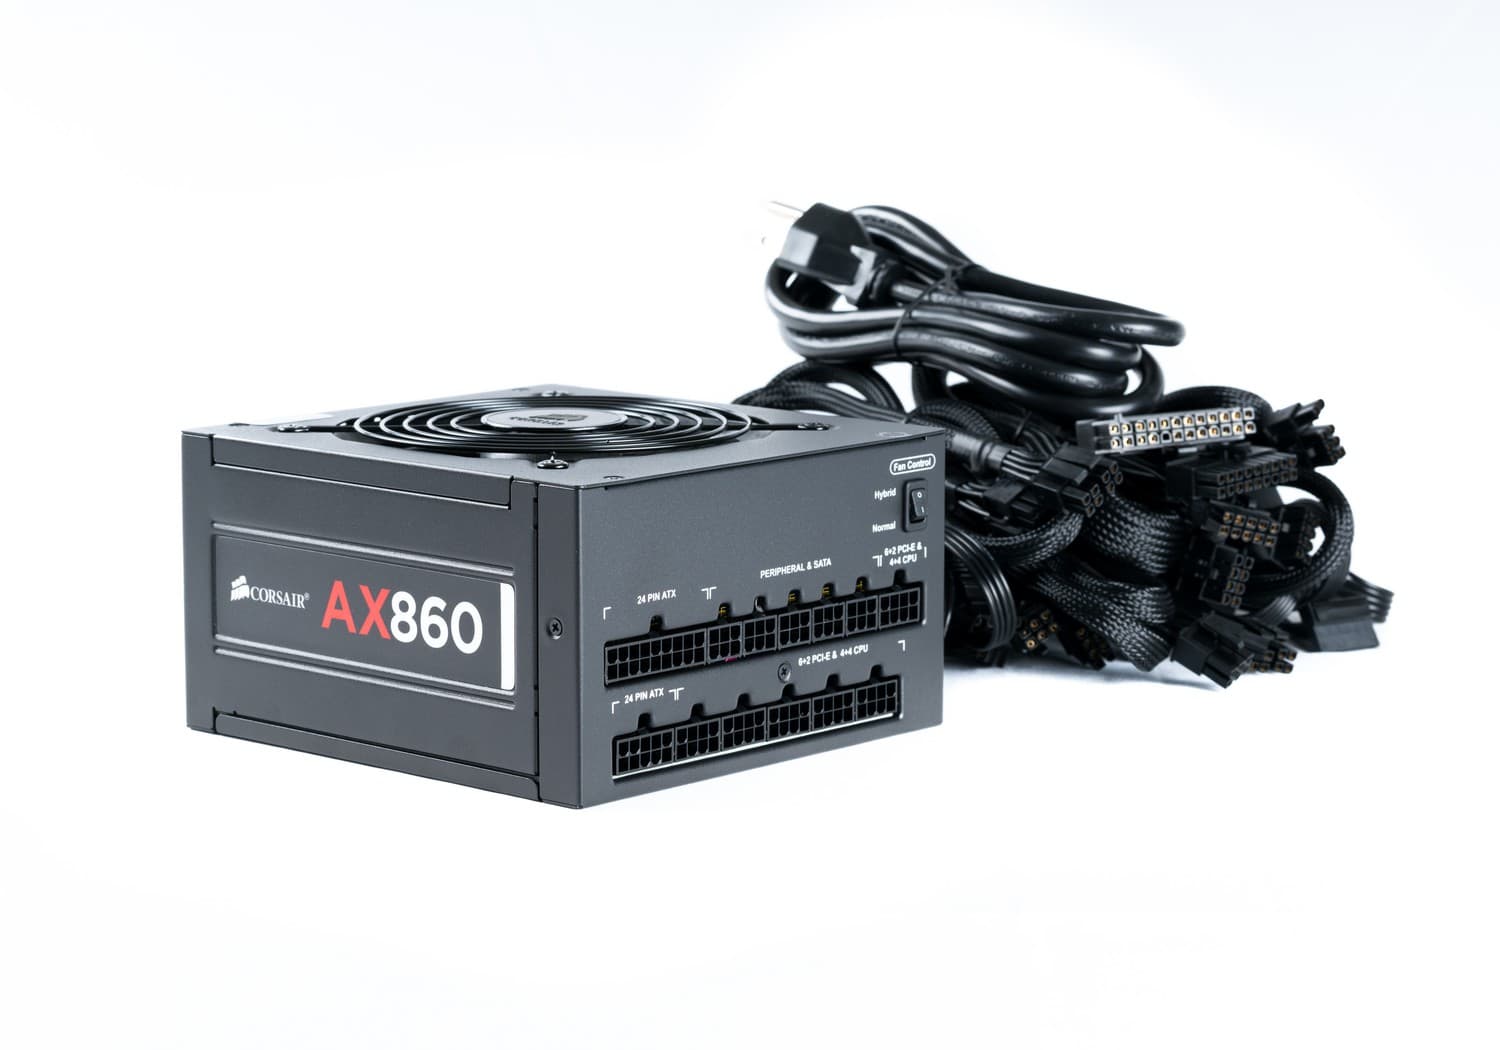
After a bit of research I ended up going with the Corsair AX860. It has the zero RPM fan mode I was talking about, is fully modular and has an 80 Plus Platinum rating. Corsair also has AX860i model that has more functionality (there's a desktop app to control it) but there are some mixed reviews about fan issues and buggy software so I decided to avoid it.
At 860W this PSU is considerably more powerful PSU than I need right now. I opted for something like this to provide enough headroom for high CPU and GPU overclocks and to future proof myself a bit in case I ever decide to add a second graphics card or do something crazy like upgrade to an overclocked 10+ core processor with a much higher TDP. Had that not been the case I could have gone with a power supply in the 650-750W range.
-
Corsair RM750x Affordable Lower Wattage Modular PSU
-
Corsair AX760 High-end lower wattage Modular PSU
-
Corsair AX1500i 1500W OVERKILL
Keyboard & mouse
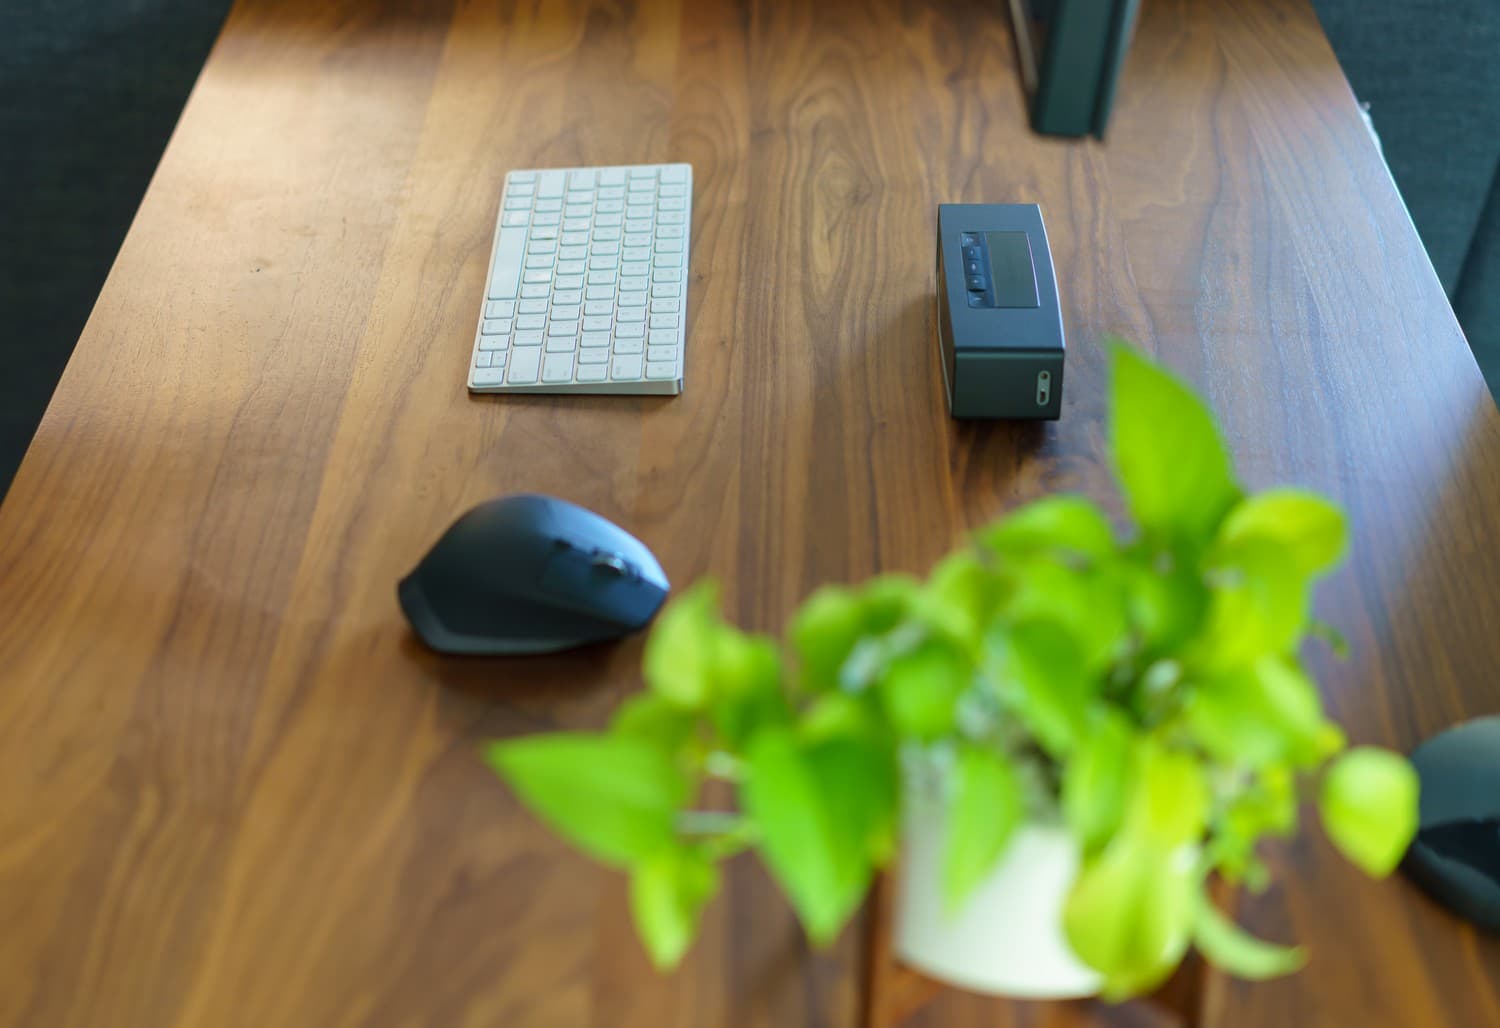
Apple Magic Keyboard, Logitech MX Master 2S & Evoluent VerticalMouse 4
I've more or less always used and loved Apple keyboards and the slim new Magic Keyboard is no exception. It's bluetooth and it's possible to configure it to work as expected with Windows 10. The new Magic Keyboard has keys with limited travel and some folks may not feel comfortable typing on it. You'll have to try it for yourself. One thing is for certain though: I absolutely hate loud clicky-style mechanical keyboards with long key travel. So no keyboards with Cherry MX mechanical switches for me.
As for the two mice, I often switch between a regular mouse and a vertical mouse to allay some RSI wrist pain from time to time. More detail on my Stuff I use page.
-
Logitech G603 LIGHTSPEED Affordable wireless gaming mouse
-
Razer Lancehead High-end wireless gaming mouse
-
Microsoft Modern Keyboard with Fingerprint ID Microsoft Keyboard
Speakers
Bose SoundLink Mini II
This one probably seems the most out of place compared to everything else on this list. Yes, it's a tiny portable speaker that I'm using for my desktop computer. I just didn't want a large multiple speaker setup taking up space on my desk, especially one requiring some bulky power adapter and multiple cables.
It's only for light use like watching videos on the web, basic Spotify background music or casual gaming. — I have a much larger and powerful Sonos system for when I really want to play music. And as for sound while gaming, that's not a priority for me. I make due with just this or plugging in headphones.
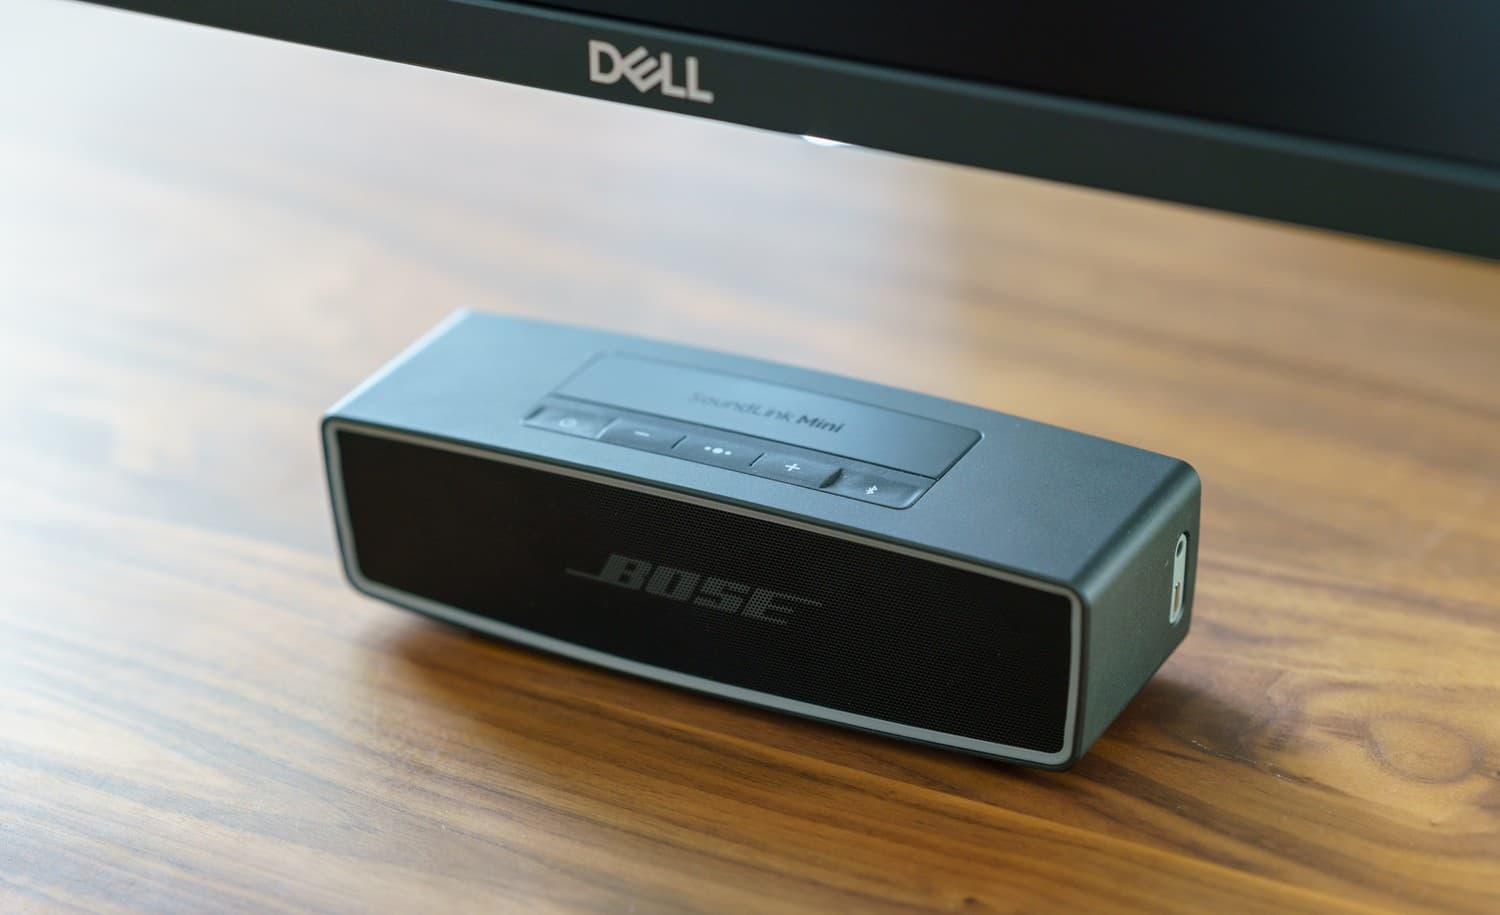
There's a newer model of the SoundLink but it's not directional and didn't seem like what I wanted. The SoundLink Mini II is tiny but packs a good punch and can be powered via micro-USB and connect via bluetooth or a standard 3.5mm audio aux cable. I have a micro-USB cable hidden under a cable management shelf under my desk that I can pull out whenever I need to charge this or my Logitech MX Master 2S mouse.
-
Mackie CR3 reference monitors Affordable desktop monitors
-
Audioengine HD3 High-end bluetooth desktop monitors
-
Audioengine A5+ Larger bookshelfs
-
Razer Nommo Pro THX certified Gamer's choice
Operating System
Microsoft Windows 10 Home, USB flash drive
Nothing much to say here, Windows 10 Home. I have little use for any of the features included in Windows 10 Pro.
Parts list
-
Intel Core i7 8700K — $399
CPU -
Corsair Hydro H115i AIO liquid CPU cooler — $139
CPU cooler -
Asus ROG STRIX GTX 1080 Ti — $779
Graphics card -
ASUS ROG Maximus X Hero (w/ Wi-Fi) — $279
Motherboard -
2x16GB G.SKILL Trident Z DDR4-3200 CL14 — $322
RAM -
2x1TB Samsung 960 EVO M.2 SSDs — 2x $479
Storage -
Corsair AX860 — $169
PSU -
NZXT S340VR Elite (matte black) — $117
Case -
Dell Ultrasharp 27" UP2718Q — $1499
Display
Miscellaneous
-
Humanscale M8 — $399
VESA arm -
Bose SoundLink Mini II — $179
Speaker -
Logitech MX Master 2S — $90
Mouse -
Apple Magic Keyboard — $99
Keyboard -
Arctic Silver 5 — $14
Thermal compound -
NZXT Internal USB Hub — $25
Case USB hub -
Corsair AF120 Quiet Edition fan — $15
Case fans -
Corsair AF140 Quiet Edition fan — $18
Case fans -
MnpcTech GTX 1080 Ti support bracket — $49
Graphics card brace -
Custom Corsair paracord sleeved cables — $144
Custom PSU cables -
Windows 10 Home USB stick — $119
Operating system -
Humanscale NeatTech Mini — $99
Cable management tray -
1/2-inch self-closing sleeving — $12
External cable sleeving -
25 velcro cable ties — $8
Cable ties -
SUBTOTAL — $5,931
The display
Dell UP2718Q 27" 4K display
I was definitely spoiled coming from a 5K iMac. It has a stellar display with great color accuracy and incredible brightness. They even tossed out the industry's way of advertising monitors based on sRGB or Adobe RGB color space accuracy and have instead slightly adapted the DCI-P3 color space, originally meant for projectors, to be used for device displays and called it Display P3. Apple is seemingly ahead of the game here (well, it's debated if P3 is good move for consumers).
I had a daunting challenge ahead of me if I was to find a quality replacement for that display.
I'm not a professional photographer. I'm merely a hobbyist.
That means I don't get paid to take photos or do anything where color accuracy is mission critical, such as shooting and post-processing portraits with accurate skin tones or working with print. That means I don't care quite enough to use a pricey 10-bit Nvidia Quadro graphics card paired to a 10-bit professional monitor with internal LUTs for calibration with great homogeneity and extremely high color accuracy across the board like some of the NEC PA MultiSync models or Eizo ColorEdge displays.
It also means I don't plan to buy and meticulously use a color calibration device. That means I don't typically share my images with others in large lossless formats. That means I don't care to limit myself to a 1920x1080 or 2560x1440 resolution display for increased Lightroom performance.
I, on the other hand, spend my time publishing my photos online. I will knowingly compress and sacrifice a good bit of image quality to make it easier for people to load my shots in a photoset. I know people view my compressed shots on a myriad of displays and devices where photos could look slightly different than how I might have intended. I also don't quite care enough to embed file-size-increasing ICC color profiles and save different versions of my files and serve up an sRGB version or a wide-gamut version depending on the device.23 Whatever, I'm fine with that. (Okay, I do want to spend some time to research serving up wide-gamut images on my site at some point..)
So what am I looking for?
What matters for my hobbyist photography use
- 4K or 5K resolution: Yes, I know this comes at the expense of Lightroom speed but I just love having more space.
- Good color accuracy: There's a lot of ways you can define good, but for me this just means something exceeding the sRGB color space and ideally covering a solid portion of either the the DCI-P3 or Adobe RGB color spaces.24
- Sub-10ms response time for occasional gaming
- Ability to use the display with both Macs and PCs easily
What this meant was that right off the bat I was not looking for fast 144Hz gaming monitors that were not 4K, had a questionable physical appearance geared towards gamers and subpar color accuracy. Which is great because I won't have to describe Nvidia G-Sync and AMD FreeSync adaptive sync technologies meant to reduce screen tearing while gaming.
At first I did a lot of searching for a 5K display (did you know Dell has an 8K monitor out now too?). I was going to breakdown a list of all the current 5K monitors on the market and what was not good about each of them but I'll spare you the details.. I just don't think there are any exceptional 5K displays on the market at this moment that satisfy my above criteria. I talk about this in more detail below, but this is changing and it may be a good time to wait a bit longer. For example, LG has some 21:9 5K Nano IPS displays with great color space coverage coming out this year.
We're in this weird time of a transition away from DisplayPort 1.2 to 1.3/1.4 so if you want to run 5K at 60Hz on a PC now, you're likely going to need to use two cables. And then there's the mixed bag of trying to output video via Thunderbolt on a PC for certain displays. For example, if you want to run the LG Ultrafine 5K monitor (the one made for Macs) at 5K 60Hz as intended, you have to use a very particular motherboard and PCIe combination to passthrough the graphics to a valid Thunderbolt 3 signal. It's all just a hassle right now. I'll wait.
I got a cheap Dell 4K.. and I didn't like it.
Given the current state of 5K monitors and my primary use of just publishing sRGB photos on the web, I thought I would be fine with a placeholder 4K display for now. Just something to hold me over for a year or two until a great 5K display came out. I got the 27-inch 4K Dell P2715Q display for about $500 (the slightly updated Dell U2718Q is its successor).
It wasn't the most attractive monitor, didn't have the best brightness or even color space coverage. It only did about 79% accuracy for Adobe RGB. There did not seem to be many 4K displays with Adobe RGB coverage in the 90% range without going over the $1,000.25
Even though it seemed fine at first and definitely did exceed the sRGB color space, I began to want more control over my photos and be more future-proofed. In short: even if I end up converting and publishing to sRGB, I still want to see my photos as close to how they were captured as possible and have control over the proofing.
More importantly: I think this notion that sRGB is the color space of the web is quickly changing for the folks that visit my website and tend to have Macs with wider gamuts than most or recent phones with OLED displays and so on. If I'm going to keep my display for 3-5 years, I should be ready to publish my photos with larger color profiles in short order.
I put the Dell P2715Q to the side and replaced it with the Dell UltraSharp UP2718Q.
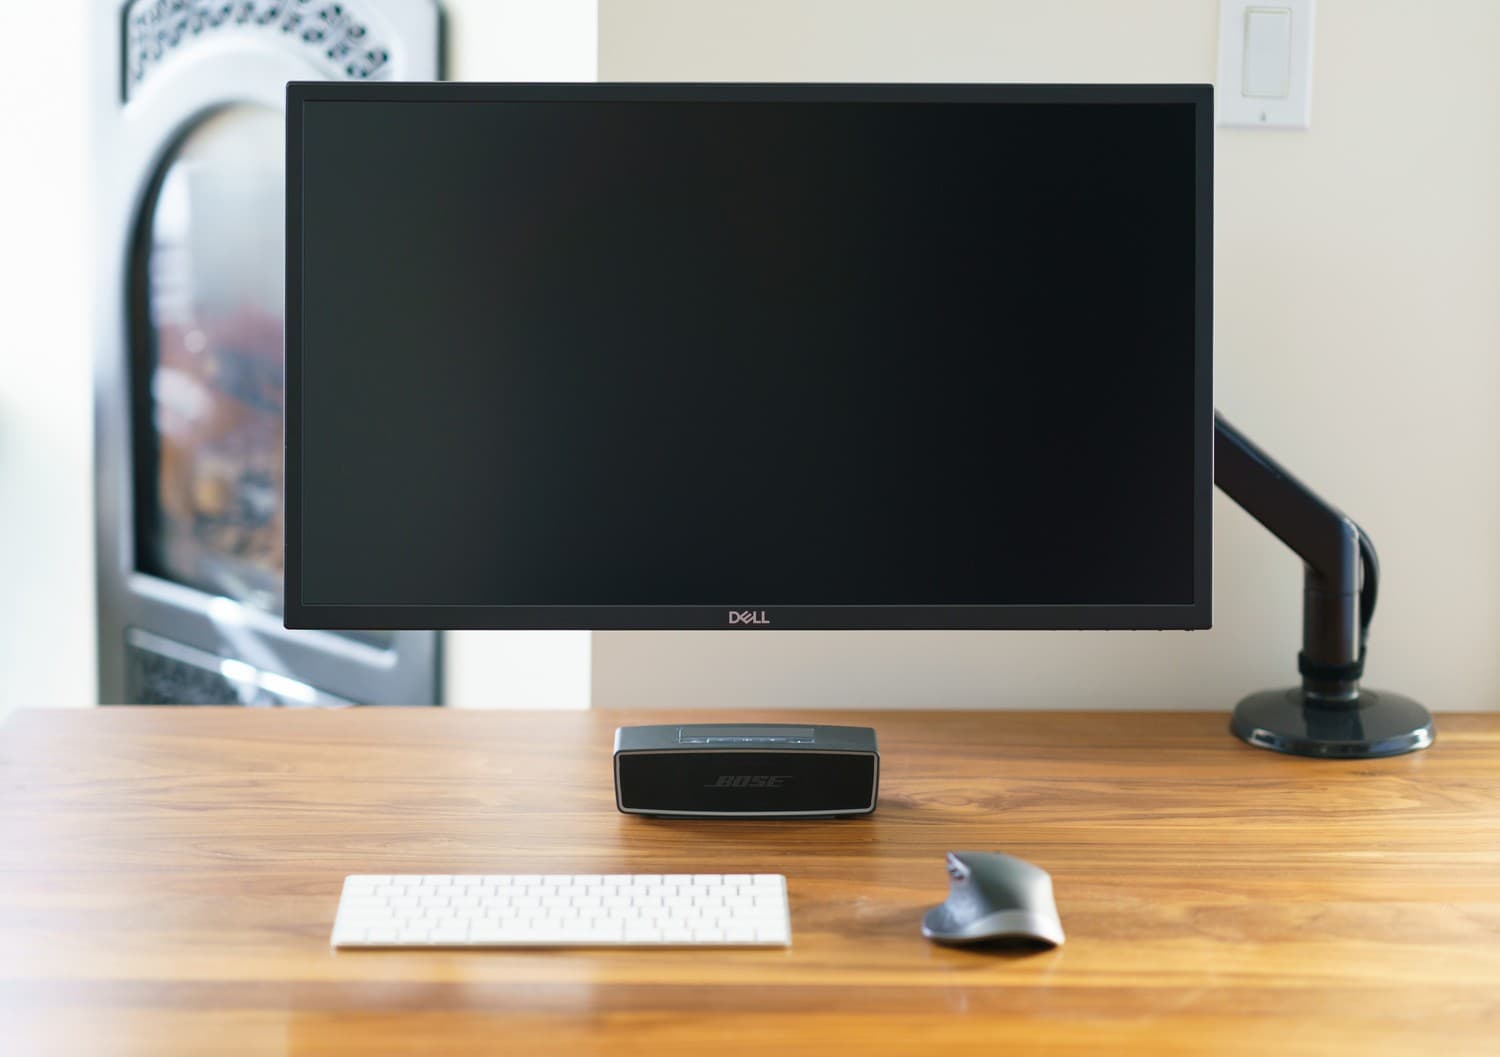
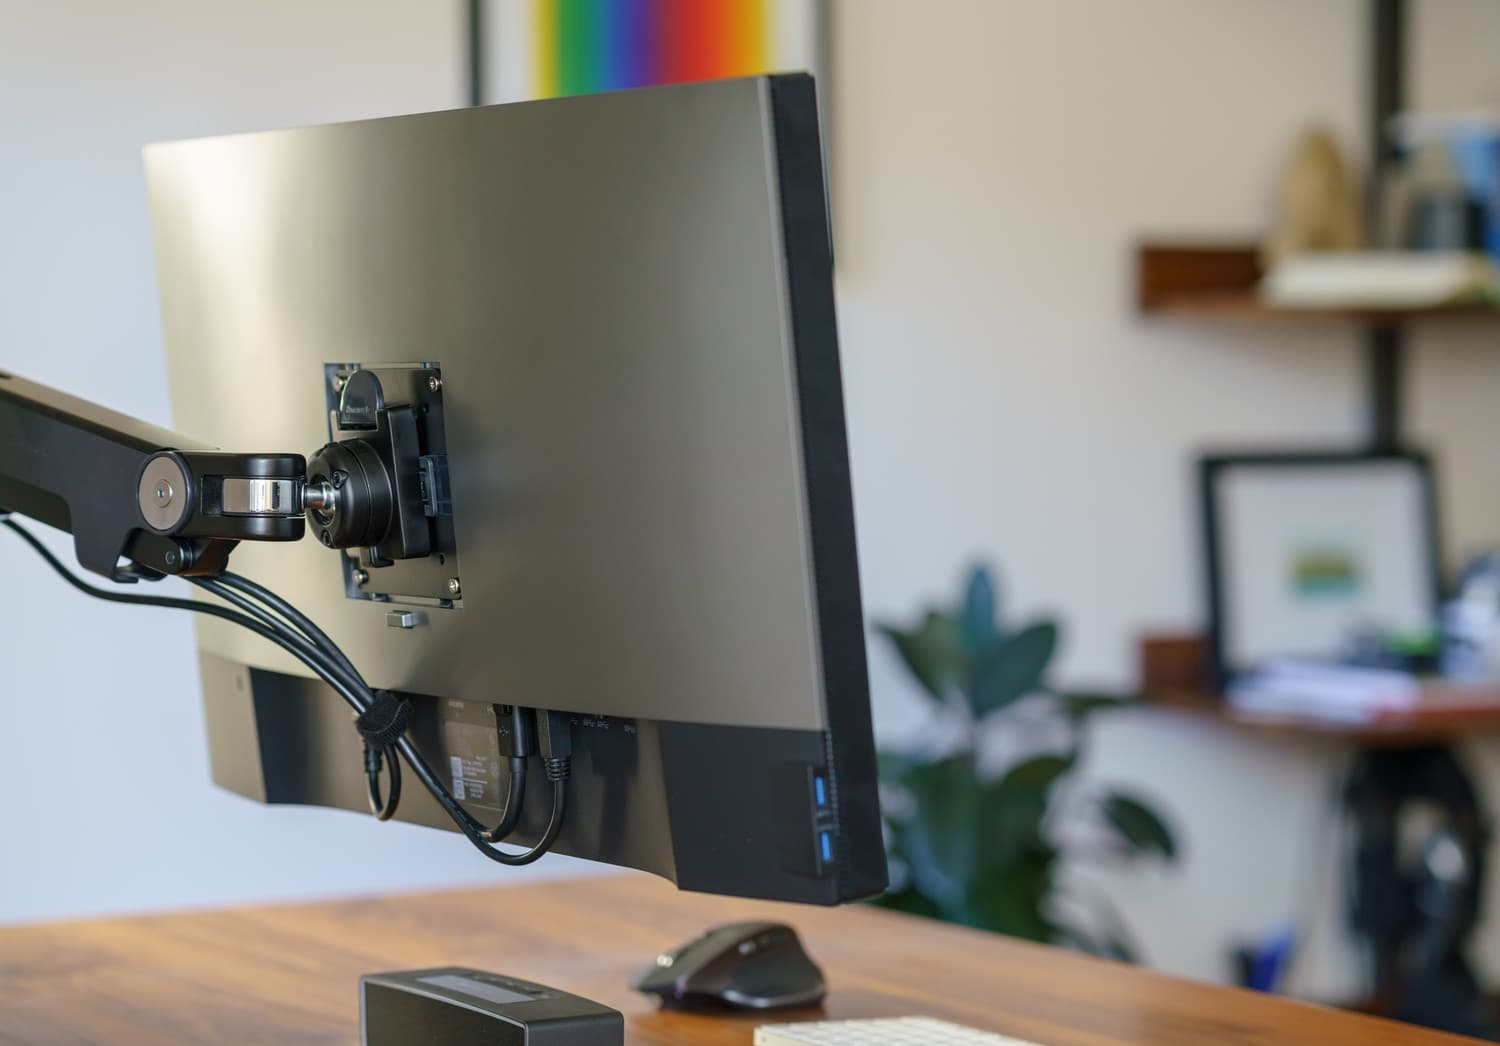
I ended up with the $1500 Dell UP2718Q that I mounted on a Humanscale M8 VESA arm.
At $1,500 this display is not cheap but as part of Dell's UltraSharp line, it has some great color accuracy: 100% sRGB, Adobe RGB and Rec 709, along with 97.7% DCI-P3. In addition it is a 10-bit panel, has HDR10 support and a ridiculous peak brightness of up to 1000 nits. And as a supremely nice benefit, it supports DDC/CI which means its settings can be controlled via the OS. Long story short, I was able to script it so that I could control the monitor brightness with my keyboard.26
You don't need 10-bit right now
While this display does have a 10-bit (per color) panel, I'm not using it with a 10-bit graphics card. Yes, you can get way more colors with a 10-bit setup: 1.07B compared to 16.7M for 8-bit. But it's going to cost you, a lot.
If you want to take advantage of 10-bit in applications like Lightroom in Windows, you have to use a different graphics card such as one from the Nvidia Quadro line. They're pricey workstation cards, not gaming graphics cards. And once you have that, you need an even more pricey 10-bit display. If you find an affordable 10-bit display, it's probably not real 10-bit but something called 8-bit + FRC (Frame Rate Control) that fakes 10-bit output by flashing two colors very quickly to mimic another color it can't natively reproduce.27
Don't buy into the HDR hype yet
Do not buy into the current HDR hype with computer monitors. It's just a huge bunch of gotchas. Some displays like the cheaper Dell U2718Q (not the UP2718Q) that boast HDR functionality only have it work on the HDMI port and not the DisplayPort port.
In Windows 10, HDR support has to be manually turned on and then all the colors go dull as colors get remapped to the Rec. 2020 color space and the display lowers the brightness. As such, it's not something you will use for your daily computing and only for a select few games and supported applications.
The state of HDR for your desktop is horrible right now. But at least now there is a new "DisplayHDR" standard to help you identify what kind of display you're working with. Currently there are a few levels: DisplayHDR 400, 600 and 1000. The numbers refer to the minimum required nits for brightness and each level requires a minimum color space accuracy and global display dimming functionality. Next, we'll just need operating systems to allow for HDR to be automatic depending on the application.
What about OLED?
OLED displays in particular are very intriguing. Dell released their first 4K OLED display last year, albeit for $3,500. OLED displays bring a lot to the table: a ridiculously fast response rate, an insanely high contrast ratio and impressive color accuracy including very dark blacks. This seems to make OLED displays ideal running the gamut from gamers to creative professionals.
That's the hope at least. OLED displays currently have issues with color shift over time as well as image burn-in (remember old plasma TVs? I definitely had got some burn-in on mine). There are some new technologies that aim to address those issues so we can only hope the tech matures in a few years. At the moment, there are not many affordable 4K or 5K displays on the market.
At the same time, nascent Micro LED displays are an area to watch. Like OLED displays they require no separate backlight and have great brightness and contrast (Micro LED can be even brighter) with the benefit of no burn-in or decreased performance over time.
On color spaces
A primer on sRGB, Adobe RGB, P3 and more...
I've mentioned color spaces a few times now so let me provide a somewhat brief description of what they are and what to look for in a monitor. The best way to describe it is probably to start off by showing you this chart. The colorful horseshoe shape behind everything represents the range of colors visible to humans. This is one of the more popular chromaticity diagrams called the CIE 1931 color space. There are a few of these that calculate things differently based on things like the light source, but the purpose is the same.
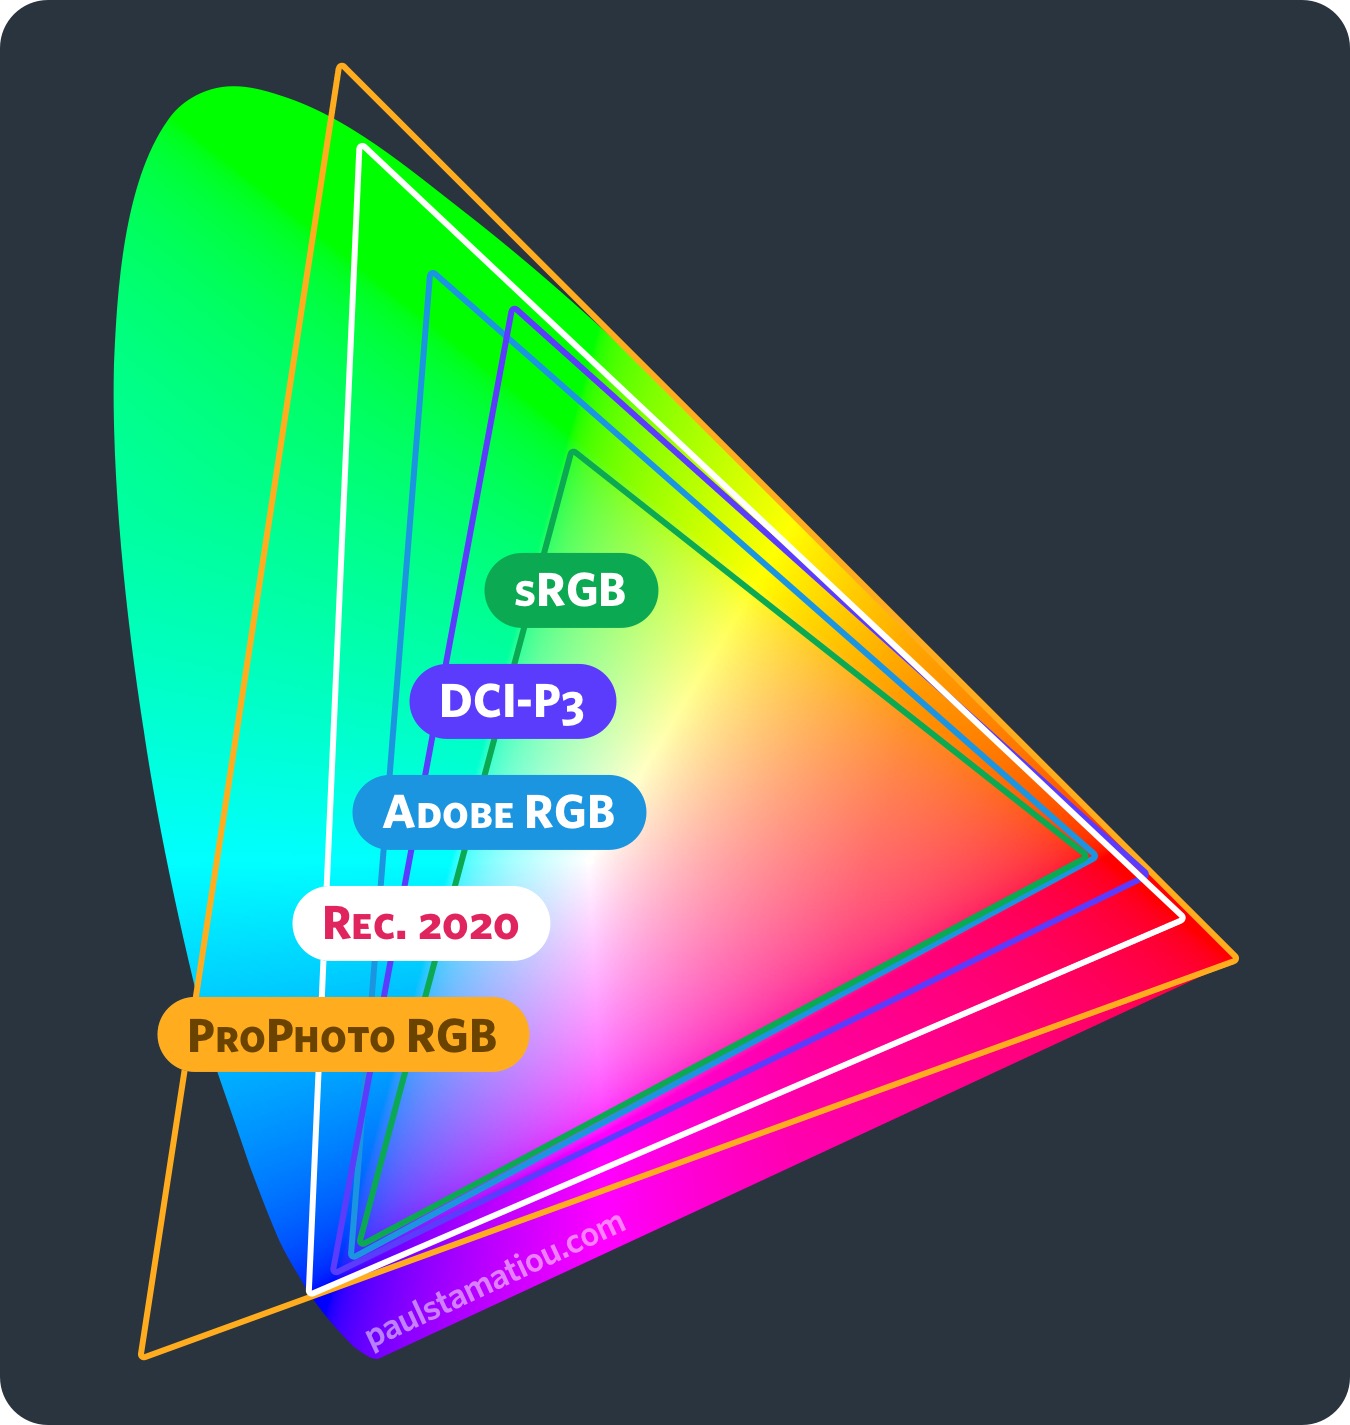
The triangles shown on top of this visible spectrum represent other color spaces. When it comes to talking about a display or photo-editing workflow, gamut is the range of a certain color space that can be reproduced. There is no display in the world that can reproduce every color humans can see. Gamut refers to the range of colors that can be displayed, not that can be observed. So as much as I would like to plot a high-end camera on this diagram, it doesn't work like that. But to give you a general idea: yes, your camera can capture colors you can't see.
Let's start with the smallest and most restrictive color space shown here, sRGB. The sRGB color space has for a long time been the "default color space of the web" because while it's fairly limited compared to other color spaces, it more or less represents the lowest common denominator with respect to what various computer and device displays out there can reproduce. That's why historically SVG defaults to sRGB, and CSS only supports sRGB (that's just changing now). That means that if you edited and converted your photo to sRGB, it should look close to how you intended on the vast majority of devices.
Compared to another color space shown here, Adobe RGB, you can say sRGB has a smaller or narrower gamut. Adobe RGB provides a much larger color space—more than 50% of the visible spectrum—and was originally designed for people working with RGB on computers to be able to match the colors capable by CYMK printers. Most monitors do not display anything near 100% Adobe RGB. It's getting better as the years go on, but it doesn't have the best coverage like sRGB. Displays that can reproduce or exceed Adobe RGB (P3 as well) are considered wide-gamut.28
Next up we've got DCI-P3. While it has roughly the same gamut size as Adobe RGB, P3 gladly sacrifices a few saturated blues and greens in favor of some reds and yellows. That's because the P3 color space was made in 2007 for high-end digital cinema projectors. Only recently has this been applied towards computer displays, not projectors.29
But if DCI-P3 was originally intended for the cinema, why should we care about it and why did Apple even push forward with it for their hardware? Perhaps they wanted to hop on the digital video bandwagon as P3 might be the next standard gamut for movies as we transition beyond the current Rec. 709 color space on the way to Rec. 2020 for UltraHD content.30 Maybe they wanted to cater even more to digital video content creators? Or maybe they just wanted to go with a color space that more uniformly augments the sRGB color space compared to Adobe RGB.
Then we have Rec. 2020. This one aims to represent the gamut for upcoming display technologies — both HDR10 displays (also Rec. 2100) and UHDTV 8K televisions. If this is the new standard gamut for such high-end televisions, one can only hope it will make its way to some kinds of professional computer displays meant for creatives. There is also a use for this gamut outside of the context of a display and more for video workflows (almost like ProPhoto RGB below) but there's not much point to diving even deeper into that now.
Finally, I wanted to point out a color space called ProPhoto RGB. This is not like the other color spaces mentioned here. It goes way outside the visible spectrum. And for a reason; ProPhoto RGB is a massive 16 bit per channel color space used in Adobe Lightroom. It's not meant to be a display gamut. It's just a safe working space that won't clip or compress of the colors captured by your camera when shooting in RAW, providing ample headroom while post-processing your shots.31
You might have seen ProPhoto RGB listed in Lightroom if you go to edit a file you're working on in another app or plugin. There's a little dialog asking what color space and bit depth to send the file as. However, it gets a bit more complex behind the scenes. RAW camera files have a gamma of 1.0, so Lightroom has decided to do all of its calculations at this gamma in the ProPhoto RGB color space. What you end up seeing as a preview in the Develop module (not the Library module or filmstrip — those use Adobe RGB) actually uses a gamma close to that of sRGB at 2.2. I believe this modified color space is internally called Melissa RGB at Adobe, named after one of their engineers. Confused yet? Great, so am I.
While you work in this large ProPhoto RGB space while manipulating your photos in Lightroom, you later export your files and have them converted to your desired color space. This process remaps the colors to fit within your desired destination color space. If you've ever saved an image to another color space and seen terms like "perceptual" and "relative", they often define how to map colors and how to deal with colors that are outside the gamut of your destination color space.
And when it comes to doing this in Lightroom you can always preview what this may look like by soft-proofing your images in Lightroom:
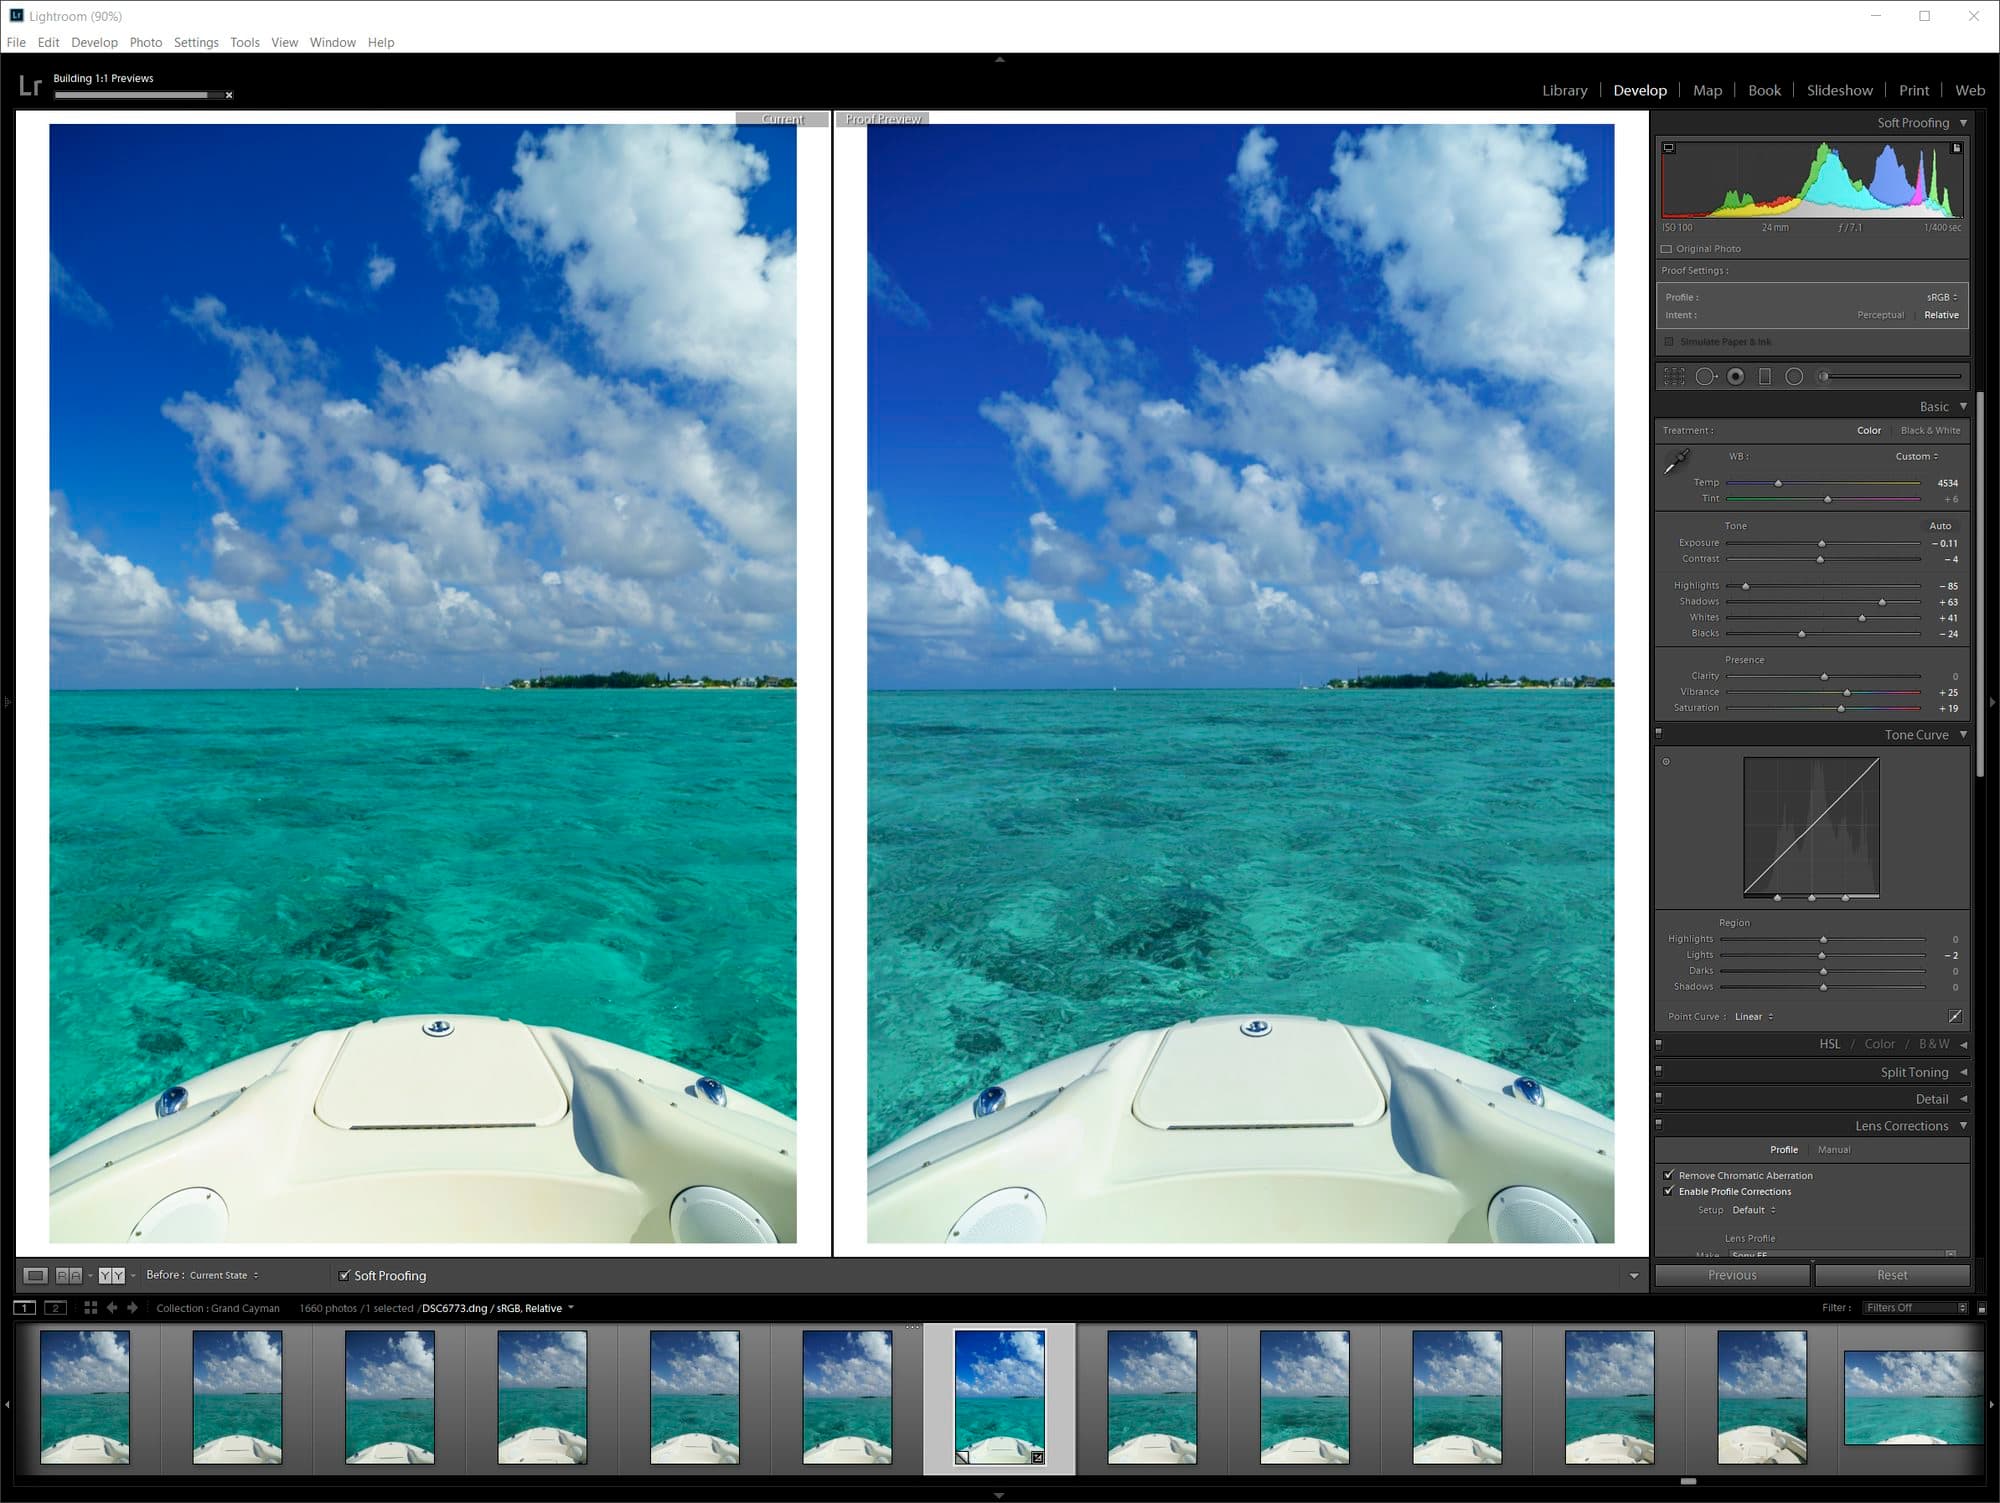
An extreme example of soft proofing in Lightroom. These photos may look the same if your display can't show more than sRGB. The right photo (limited to sRGB) lacks certain saturated colors.
Photo: Off the coast of Grand Cayman Island near Rum Point
What it all means
That was a ton of detail to get one point across — when selecting a monitor, you should at least be aware of what coverage the monitor has in the color space you care about: likely Adobe RGB or P3 if you're doing a lot of photography. Since it's hard to find regular prosumer monitors right now that even list their P3 accuracy, you'll probably just want to find something as close to 100% Adobe RGB as possible. At the end of the day, having more coverage means for the most part you'll be able to reproduce more saturated colors, assuming you're working with color managed software.32
Alternatives
I will refrain from recommending any particular display options aside from the one I purchased right now. There are a ton of new ones coming out this year, but I don't think you can go wrong with displays from Dell's UltraSharp line. There are also some interesting "Nano IPS" displays coming out from LG this year that also have Nvidia G-Sync and a great 98% P3 color space coverage.
The build
Putting it all together
And now the fun begins. I started ordering parts here and there, slowly accumulating everything over a week or two. I didn't quite jump right into building the PC as soon as everything arrived. I actually ordered a studio lighting setup to try my hand at taking some shots of the parts and computer against a white backdrop as you saw in some of the parts list earlier.
Case
I began by unboxing the NZXT S340 Elite case and removing its side panels, which was uneventful with its avid use of thumbscrews that remain attached even when unscrewed. I found the case internals to be laid out well, providing for some great channels to hide the PSU and various cables. The case also had some 2.5" drive cages pre-installed. I removed those as I won't be using any SATA devices.
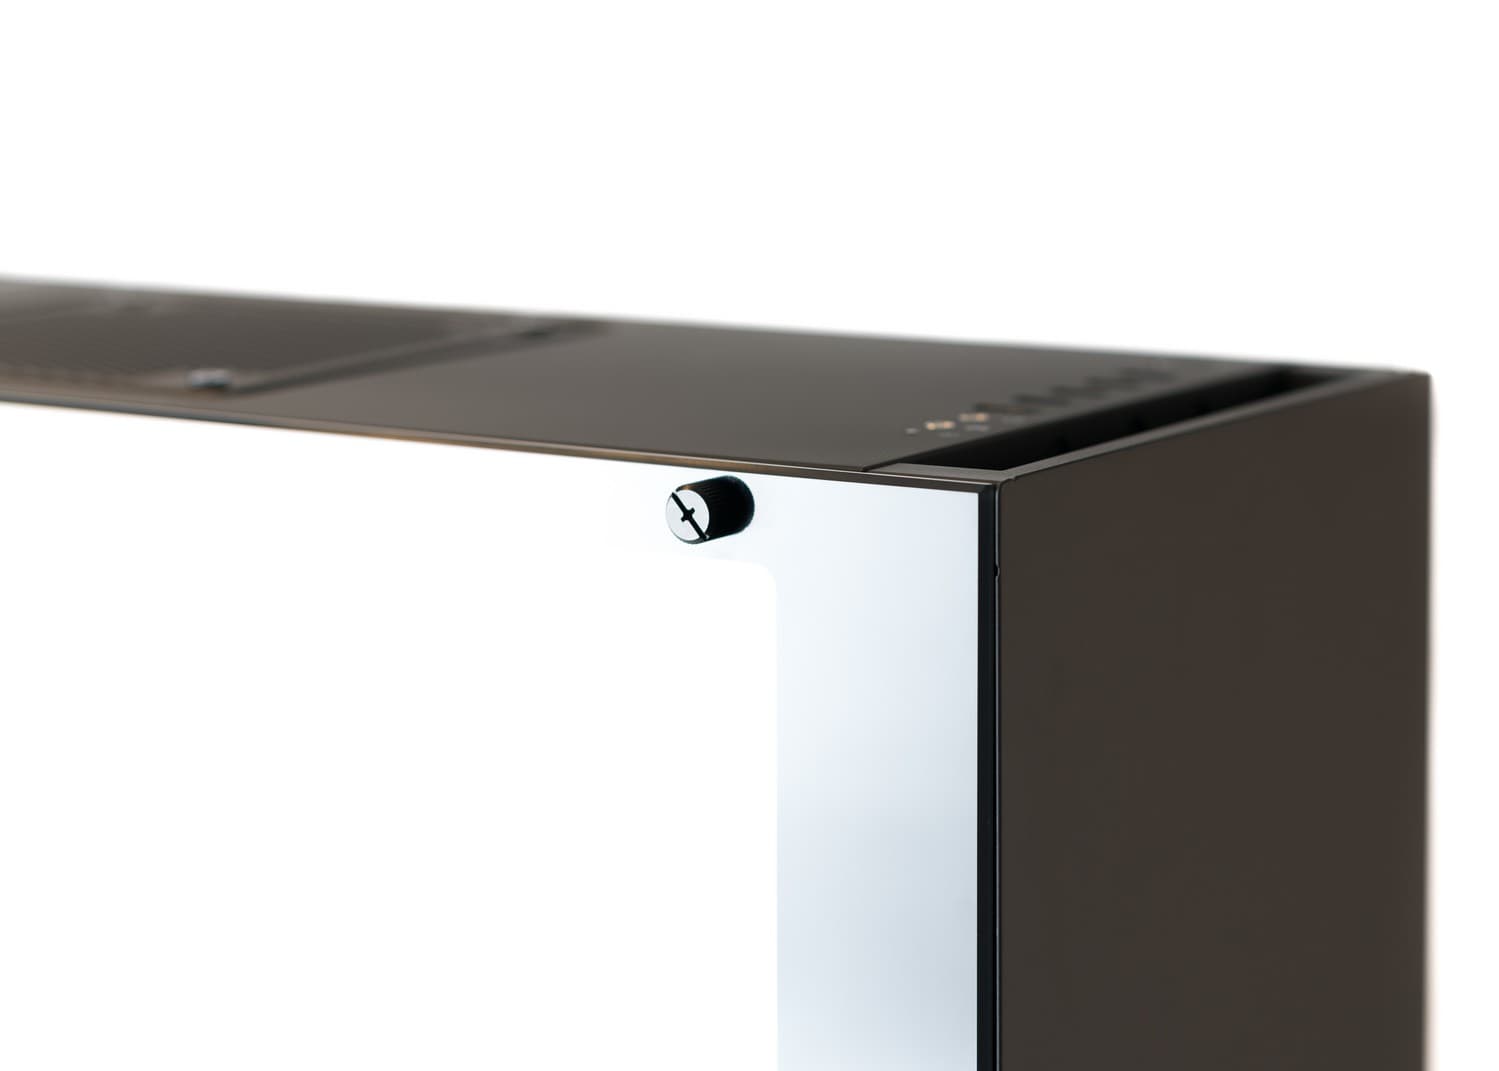
PSU & custom cables
I installed the Corsair AX860 power supply and connected a few of the cables I knew I would need soon: 24-pin ATX motherboard power cable, 8-pin CPU power cable and two 8-pin PCIe power cables for the graphics card.
I did not use the standard cables that came with the PSU though. I wanted something a bit more aesthetically pleasing and went with individually wrapped custom cables from Ensourced. They let you pick exactly what color paracord is used for each pin on the cable, but I opted for the same gray pattern on all of them. Since the cables are entirely custom I was able to specify the exact length of each one. I went with 50cm for the PCIe cables, 70cm for the CPU power cable and 60cm for the motherboard power cable.
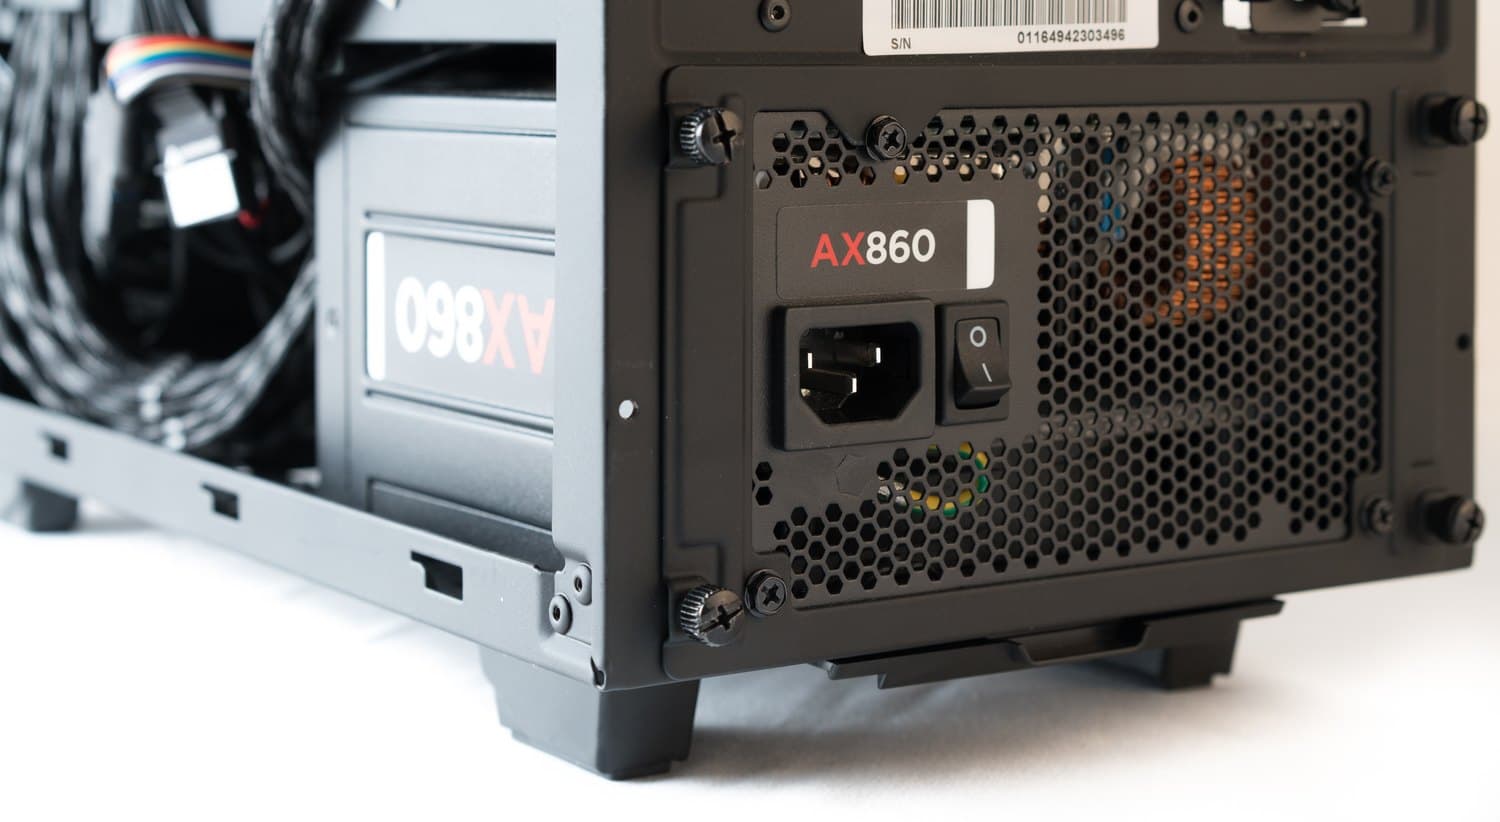
Water-cooling
Then I installed the Corsair h115i AIO liquid cooler. I removed the front plate of the S340 and removed the handy dust filter that was magnetically affixed to the front intake. One of the main reasons I got this case was because it supports a 2x140mm radiator. It was a bit of a close fit but ended up working out. I screwed the fans and radiator in, then snaked the power cables for the fans and pump to the back.
Motherboard
The motherboard came next, but first I had to install the supplied motherboard backplate for the CPU. The h115i has some pretty stiff tubes coming off the waterblock and it takes a good amount of force to fasten it down, so the backplate helps spread that force across the motherboard. Compare that to my old days of PC building where a large and heavy heatsink-fan would bend the back of the motherboard.
RAM
Then I installed the two sticks of G.SKILL DDR4-3200 RAM. And now this is the point where I remind you to make sure to make sure they are installed in slots of the same color. This ensures that dual-channel mode will be activated. Apart from that there is one thing new about DDR4 that took me a second to realize: only one side of the RAM slot opens up. I'm not sure if this is a DDR4 spec thing, or just a motherboard-specific feature.
The last time I built a desktop PC when you inserted ram, you would nudge the two locking tab levers to their position away from the RAM, then place the ram straight down to lock both tabs on place. But now with DDR4 the bottom lever does not move and is locked in place so you have to put that side in first, cantilever the RAM down to the other side and then lock the lever in place. Sounds more complex than it is, it's just different from how I was accustomed. Also, if you look closely at the bottom of DDR4 RAM you'll notice it has a slightly curved edge to reduce required insertion force with all the extra pins compared to previous generations of RAM.
CPU
With the brace installed and motherboard screwed in to the case, it was time for the delicate act of installing the CPU, applying thermal paste and then fastening the h115i's pump head.
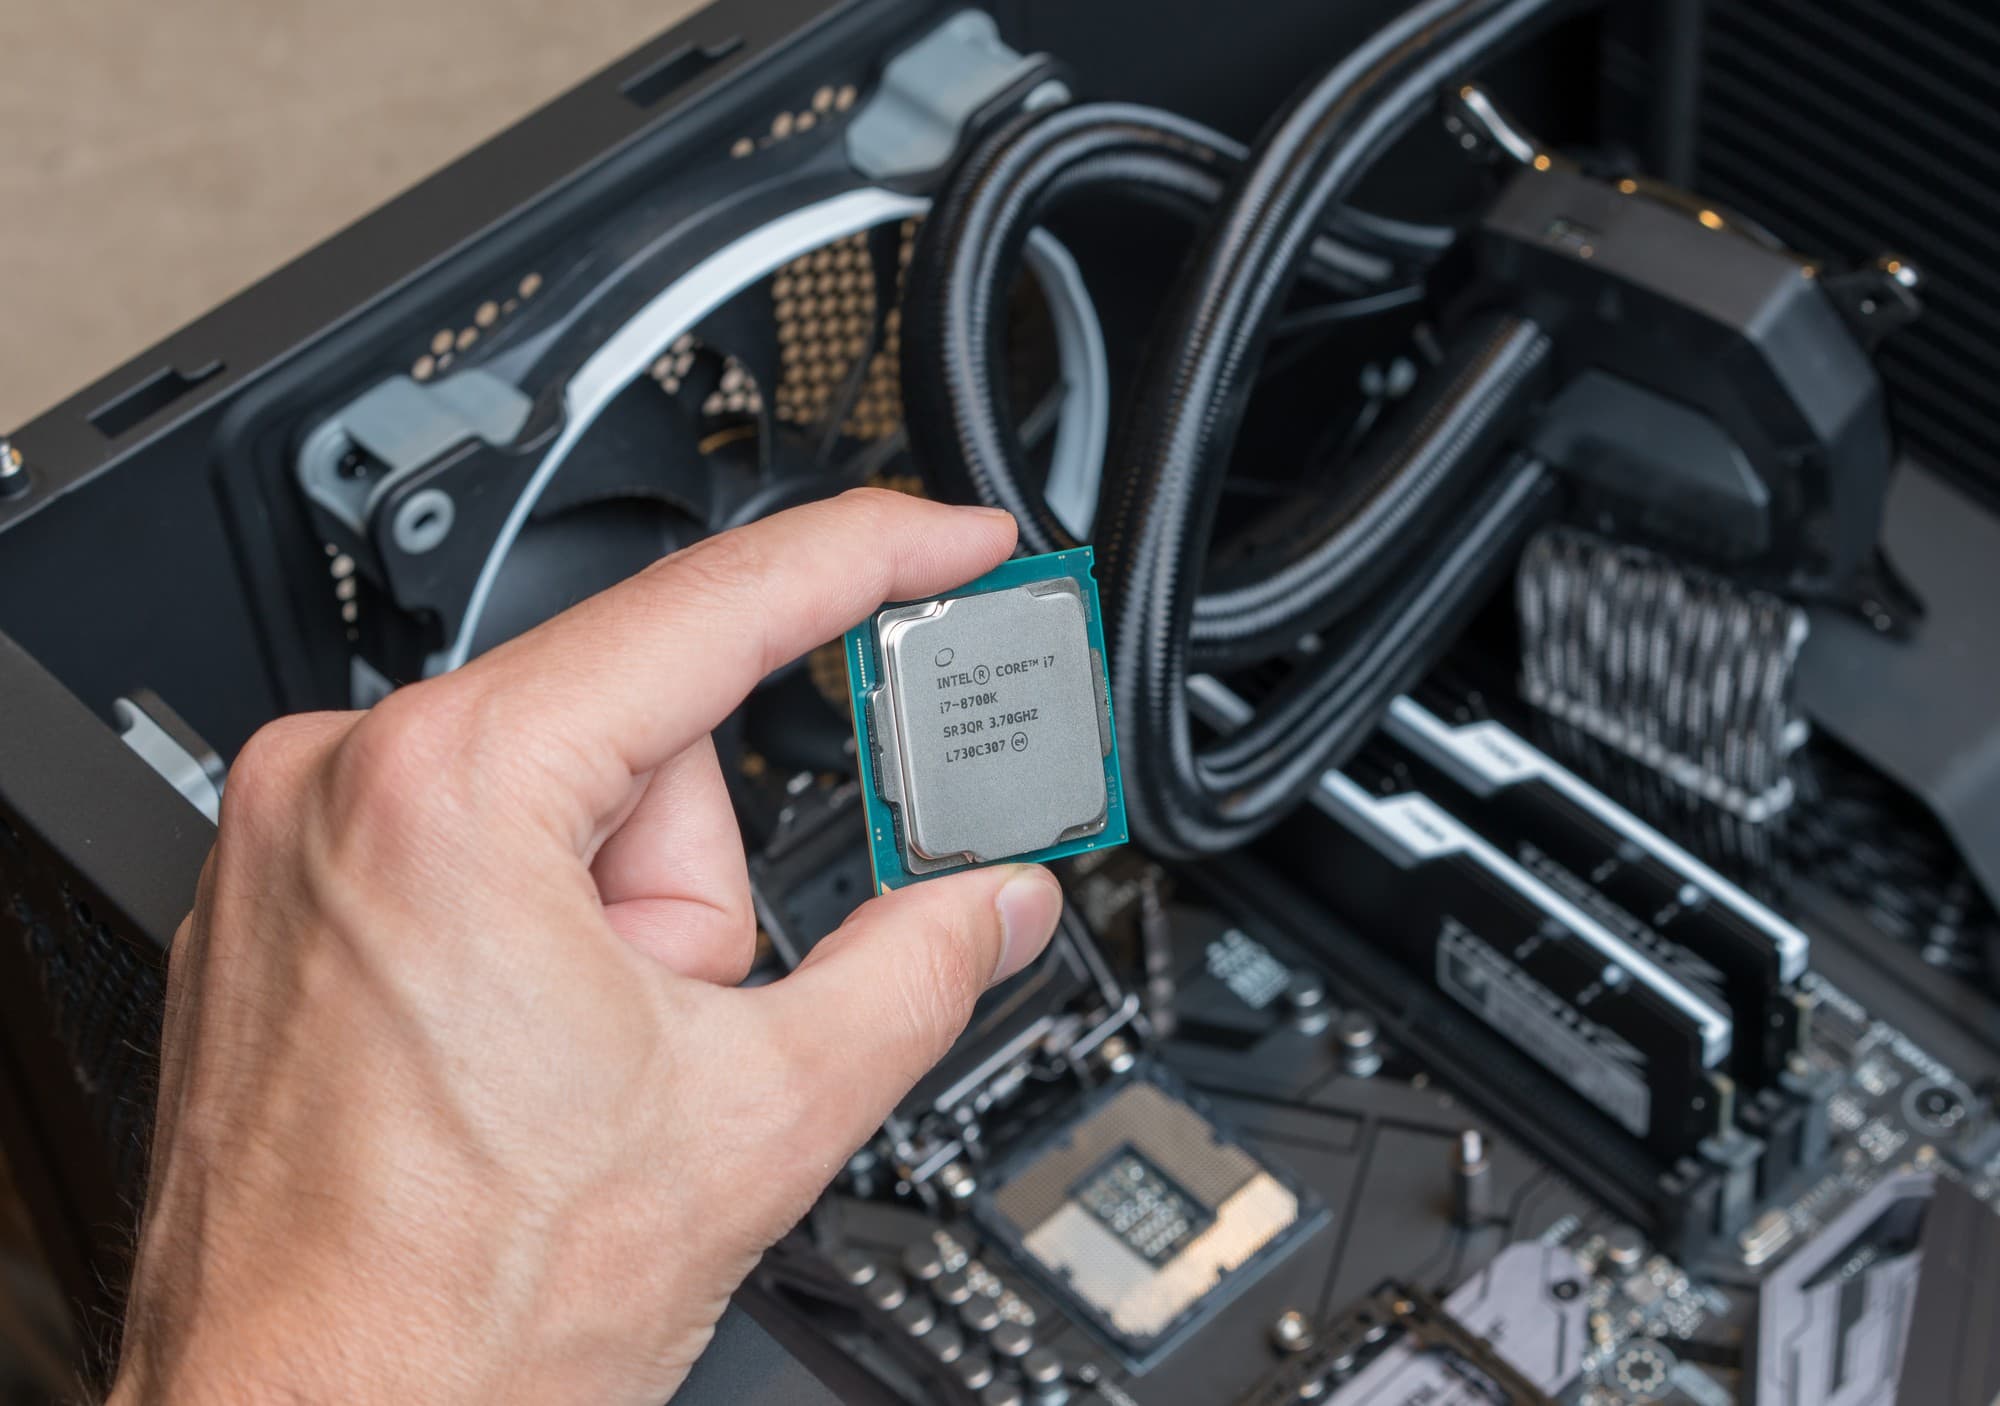
But this isn't any regular i7 8700K CPU. I had it delidded.
The big metal thing you see attached to the green PCB on a processor is not the processor itself; it's a heatspreader or just IHS for Integrated Heat Spreader. Desktop processors have this IHS to take the grunt of the force that comes from attaching a large heatsink and helps prevent amateur PC builders from inadvertently cracking the die. For years the CPU die under there had solder attaching the die to the IHS, thus providing for highly effective heat transfer.
At some point, desktop processors began shipping with thermal paste instead of solder to connect the CPU die to the IHS. And with that change came a larger distance between the die and the IHS, due to a thick application of glue on the sides of the IHS. This means more distance for the heat to travel and through a less effective heat transfer agent. Depending on the particular CPU, that means higher CPU temperatures and likely worse overclocking potential.
Delidding fixes that. Delidding is the process of forcibly removing the IHS by applying so much lateral pressure that the IHS glue breaks and the IHS can be removed. Then meticulously cleaning the die and surrounding area, carefully applying a better and much thinner layer of "liquid metal" thermal compound then gluing the IHS back on, but this time with less compound to ensure the die sits closer to the IHS.33
Delidding can be done with a specialized tool that holds the CPU in place while pushing the IHS off. Given that it would be my first time doing this, I opted to have a professional do the job for me. Especially at a time when the 8700K was impossible to find in stock and I got lucky even getting one shortly after launch. I didn't have time to try to find a replacement if I ended up cracking this one.
After some research on various forums, I found Silicon Lottery. These folks provide CPU delidding and binning services. I had them do both and I shipped them my 8700K and they sent it back out in a day or two.34
CPU has returned after getting lost by UPS for a bit. Won the silicon lottery so to speak, turns out this chip is among the top ~15% of i7 8700Ks and can overclock to 5.2GHz stable now that it has been delidded (assuming my other hardware is up to the challenge) 🤓 pic.twitter.com/l9hvzKUSAa
— Paul Stamatiou 📷 (@Stammy) December 6, 2017
The CPU and binning results came back in a great state: this particular 8700K can sustain a very admirable 5.2GHz overclock with a healthy dose of extra voltage: 1.425V. There's a small caveat in that it runs with an AVX offset, which downclocks for certain workloads that make use of Intel Advanced Vector Extensions instructions which can be brutal on a machine. A bit of a note on AVX from Intel:
Because Intel AVX instructions generally consume more power, frequency reductions can occur to keep the processor operating within TDP limits. Intel is including additional AVX base and turbo frequency specifcations to provide more clarity for these Intel AVX instructions. Performance of workloads optimized for Intel AVX instructions can be signifcantly greater than workloads that do not use Intel AVX instructions even when the processor is operating at a slightly lower frequency.
CPU in hand, I put it in the LGA 1151 socket on the motherboard and slowly closed the socket. I didn't expect closing the socket lever to require so much force but my concerns were quickly allayed after some frantic Googling. The next step was the apply a thin layer of thermal paste to the CPU. The h115i ships with a questionable thermal pad affixed to it, so I cleaned that off first.
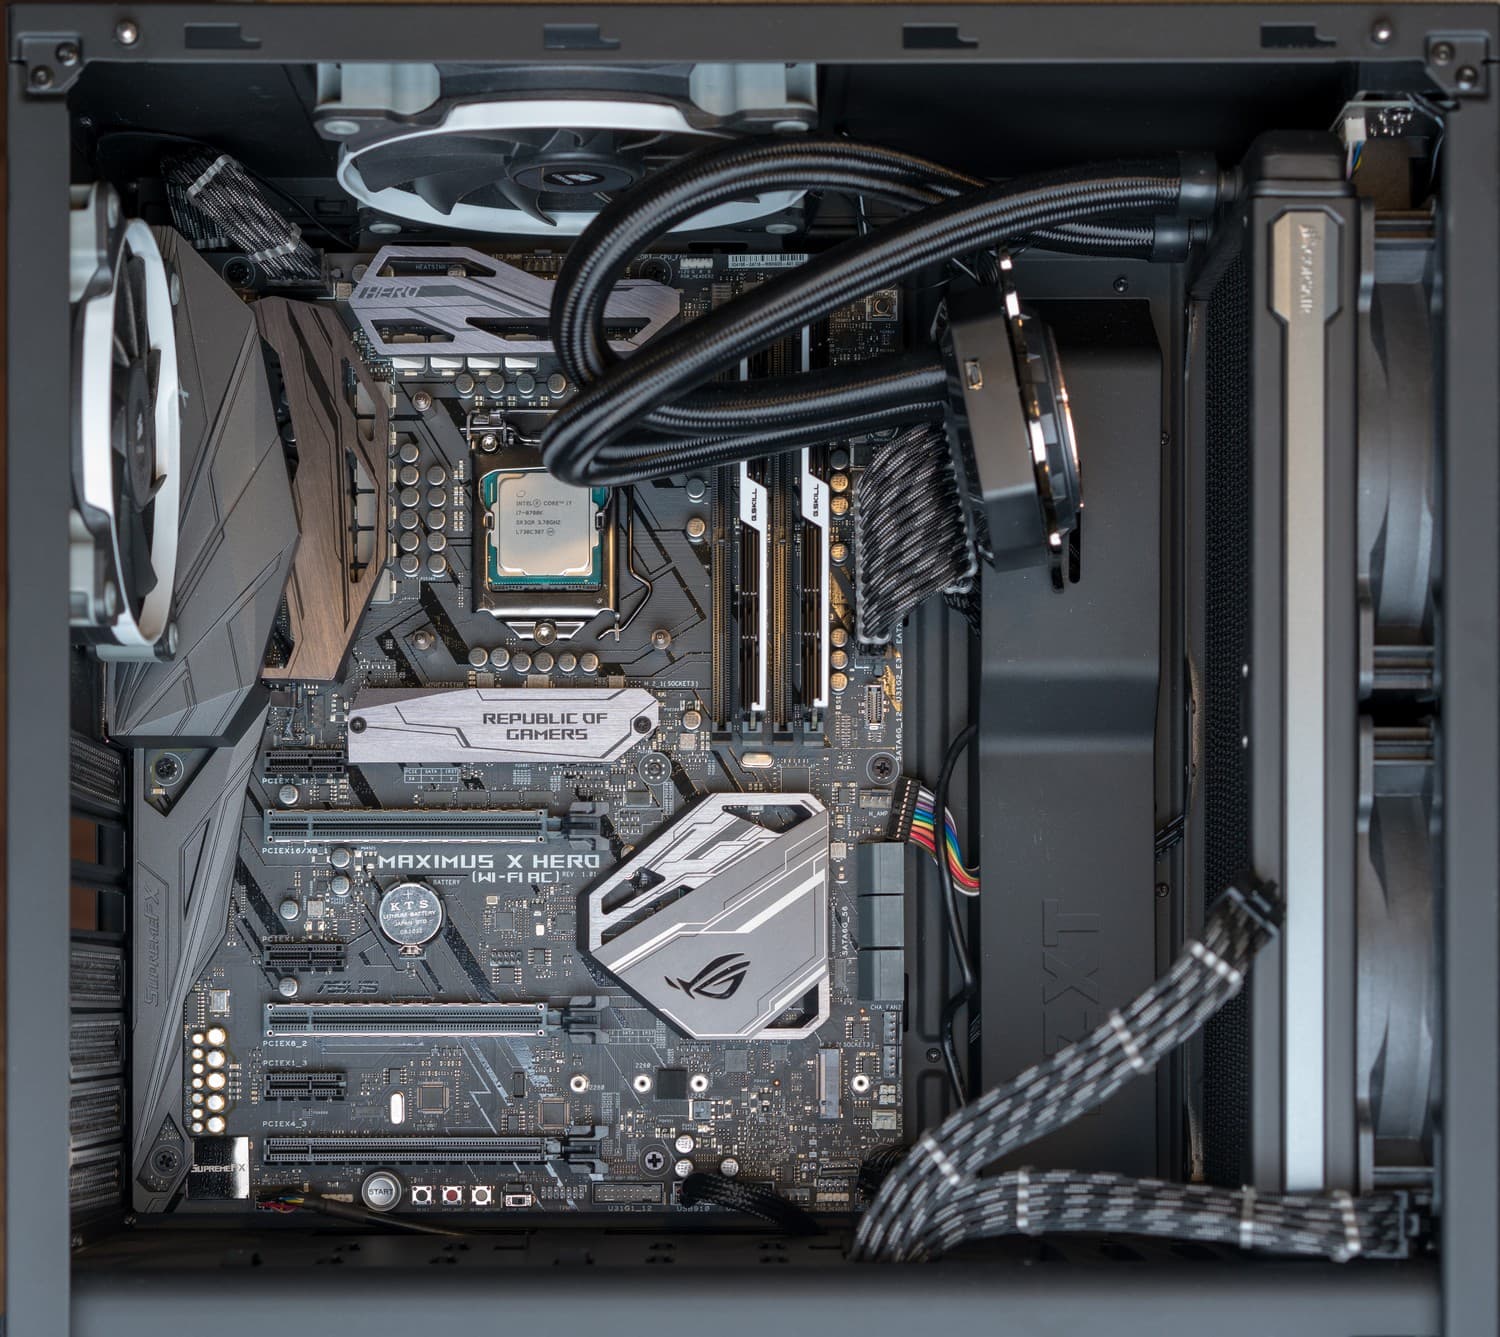
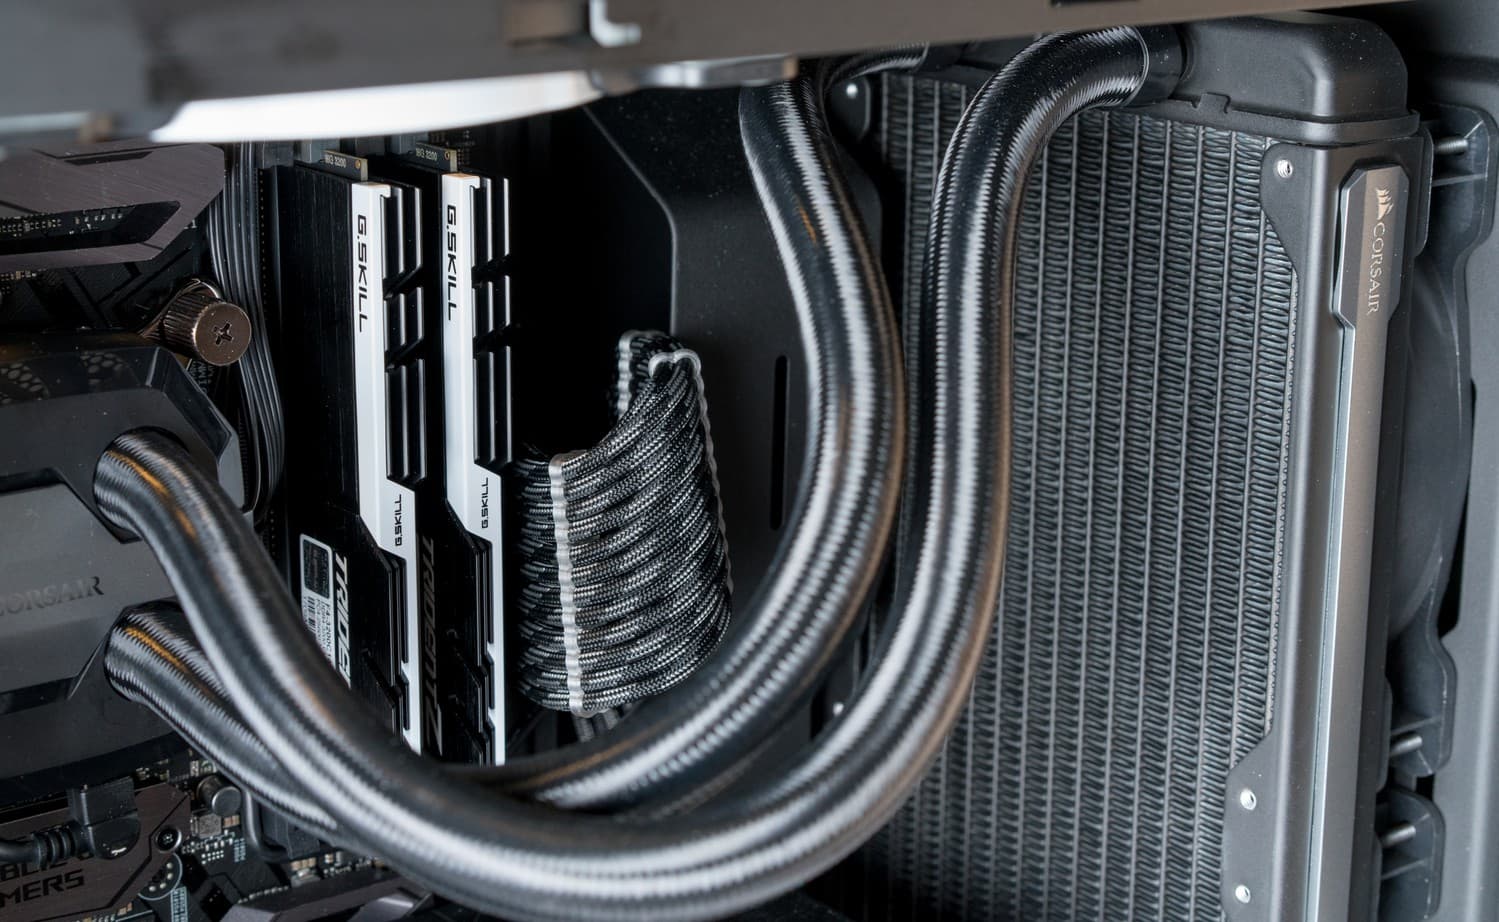
The most stressful part of the build was now out of the way. Installing the M.2 SSDs was up next. This motherboard has two M.2 slots but only one has its own heatsink. I wanted to place the more active drive that I would install the OS on there, and leave the less active Lightroom scratch drive in the standalone M.2 slot.
I couldn't quickly ascertain how each slot was identified in the UEFI and I didn't want to mistake installing Windows on the wrong drive. To solve this I only installed the SSD under the heatsink first and would install the other one after I had Windows up and running.
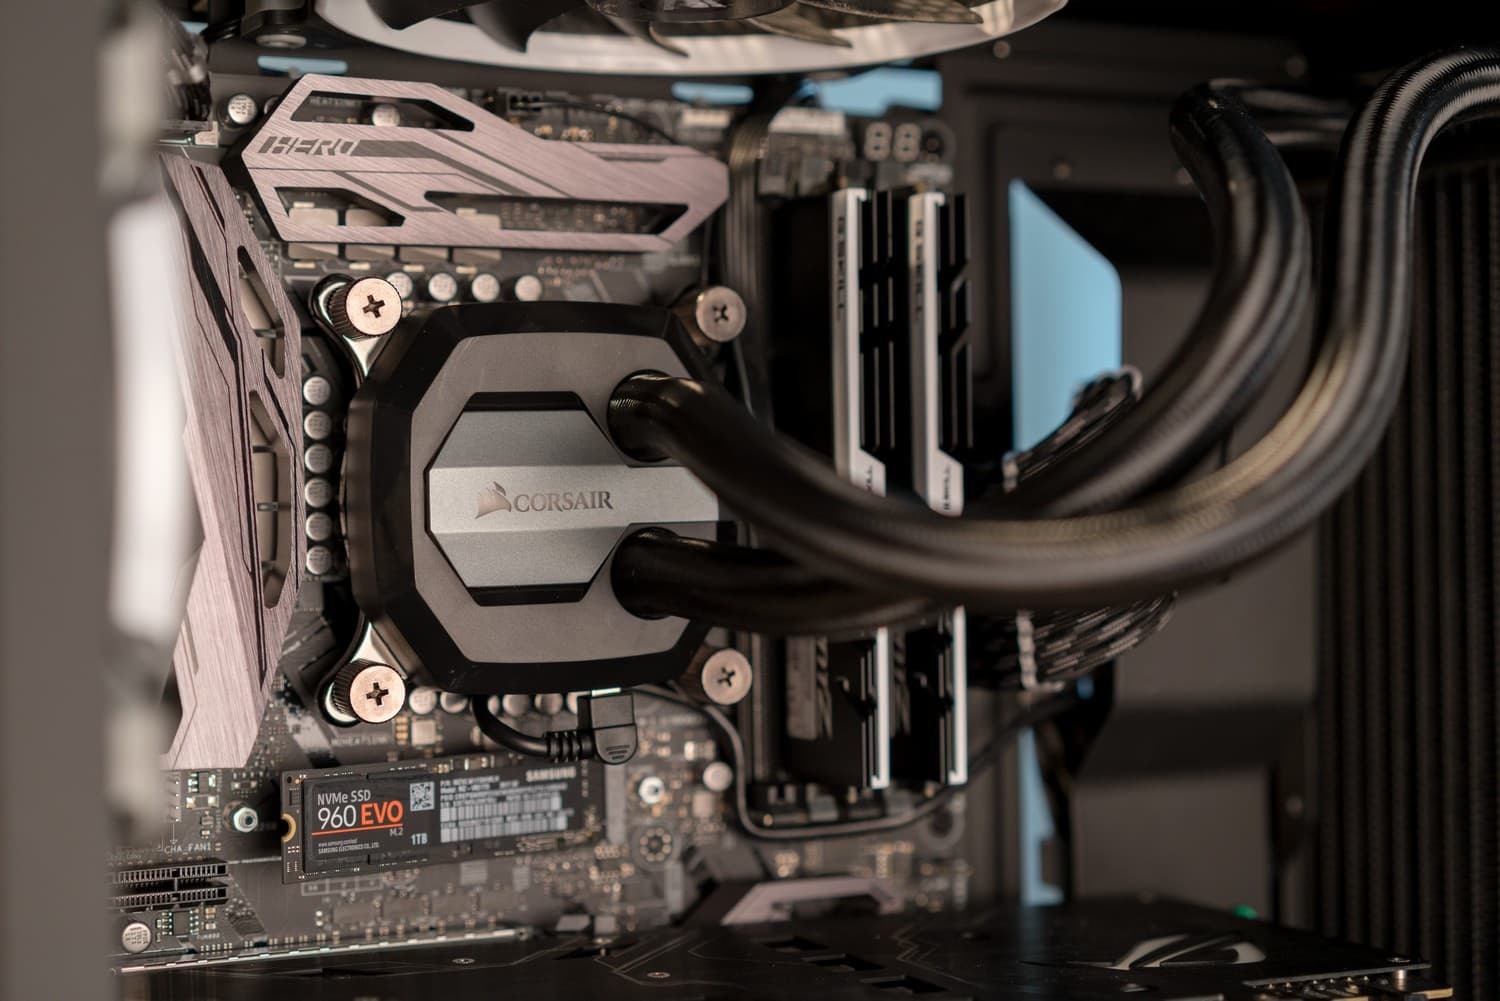
Samsung 960 EVO M.2 SSD in place but before heatsink installation. That USB cable on the Corsair pump head annoys the crap out of me. I need to find a slimmer cable I can hide more easily.
Graphics card
The massive GTX 1080 Ti was next up to bat. When I picked the case and graphics card I had to make sure that I would have enough room in the front for the radiator. Fortunately, that was not an issue here. But the one thing I knew would be an issue: so-called GPU sag. Graphics cards like this one are very heavy — especially this one with a larger than average heatsink — and have two bulky 8-pin power cables adding even more weight. As such, when mounted in a vertical case like this the card tends to sag down, applying a ton of stress on the PCIe slot with it.
While it's probably nothing to be terribly worried about as this motherboard has a reinforced PCIe slot, I also installed a GPU support bracket to be safe. Though I had one unexpected snag: this card has fans along the length of the card so there weren't any great bracing points for the support bracket to push against. I managed to place it at the very end which doesn't provide the best support.
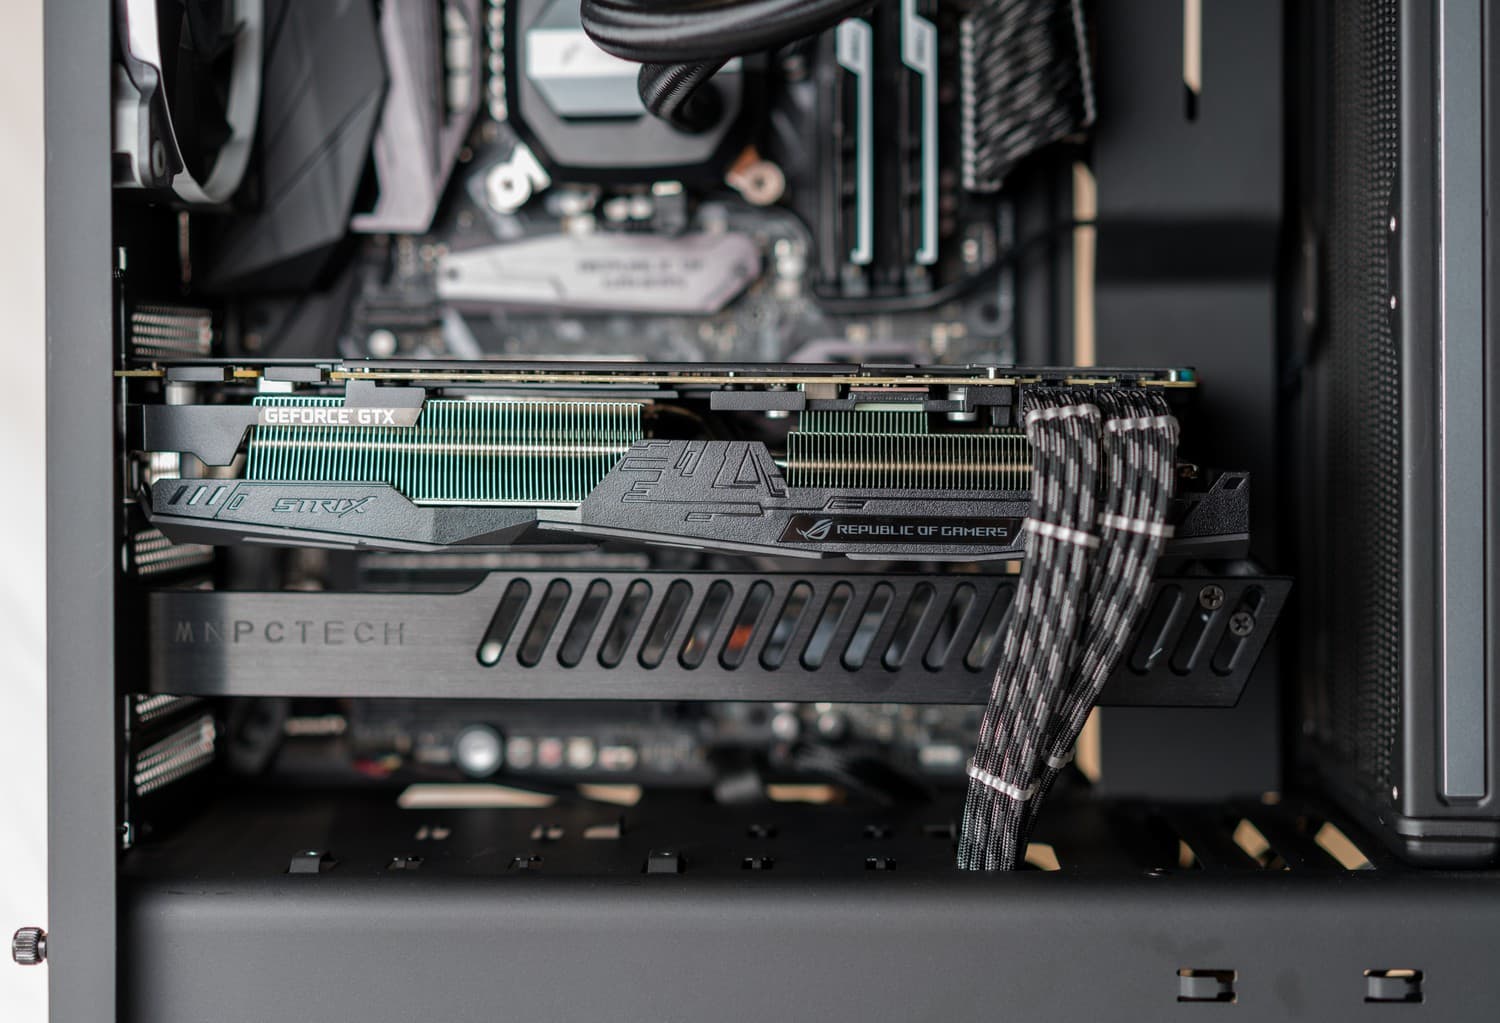
Cable management
With the main components installed it was time to connect the remaining power cables, attach the front panel LED and power switch cables, the front panel USB cable as well as a micro-USB cable for the Corsair AIO pump.35 I wanted to hide some of these USB cables and give me another port so I installed an internal NZXT USB hub and hid it in the back.
With that out of the way I meticulously zip tied just about everything on the back. Not that it mattered much; they wouldn't be visible with the side panel on. Then I put the glass side panel back on. This took some work as the Corsair h115i tubes are very rigid and didn't want to stay inside the case at first.
The finished product
A closer look
Finally, here's the finished computer and desk setup! While I was initially concerned this case might be a bit larger than I wanted, I ended up being rather pleased with it, especially the mostly black/gray theme with the internals. The S340 Elite has enough room to make hiding cables easy and allow for just about any component I want without size or thermal restrictions.
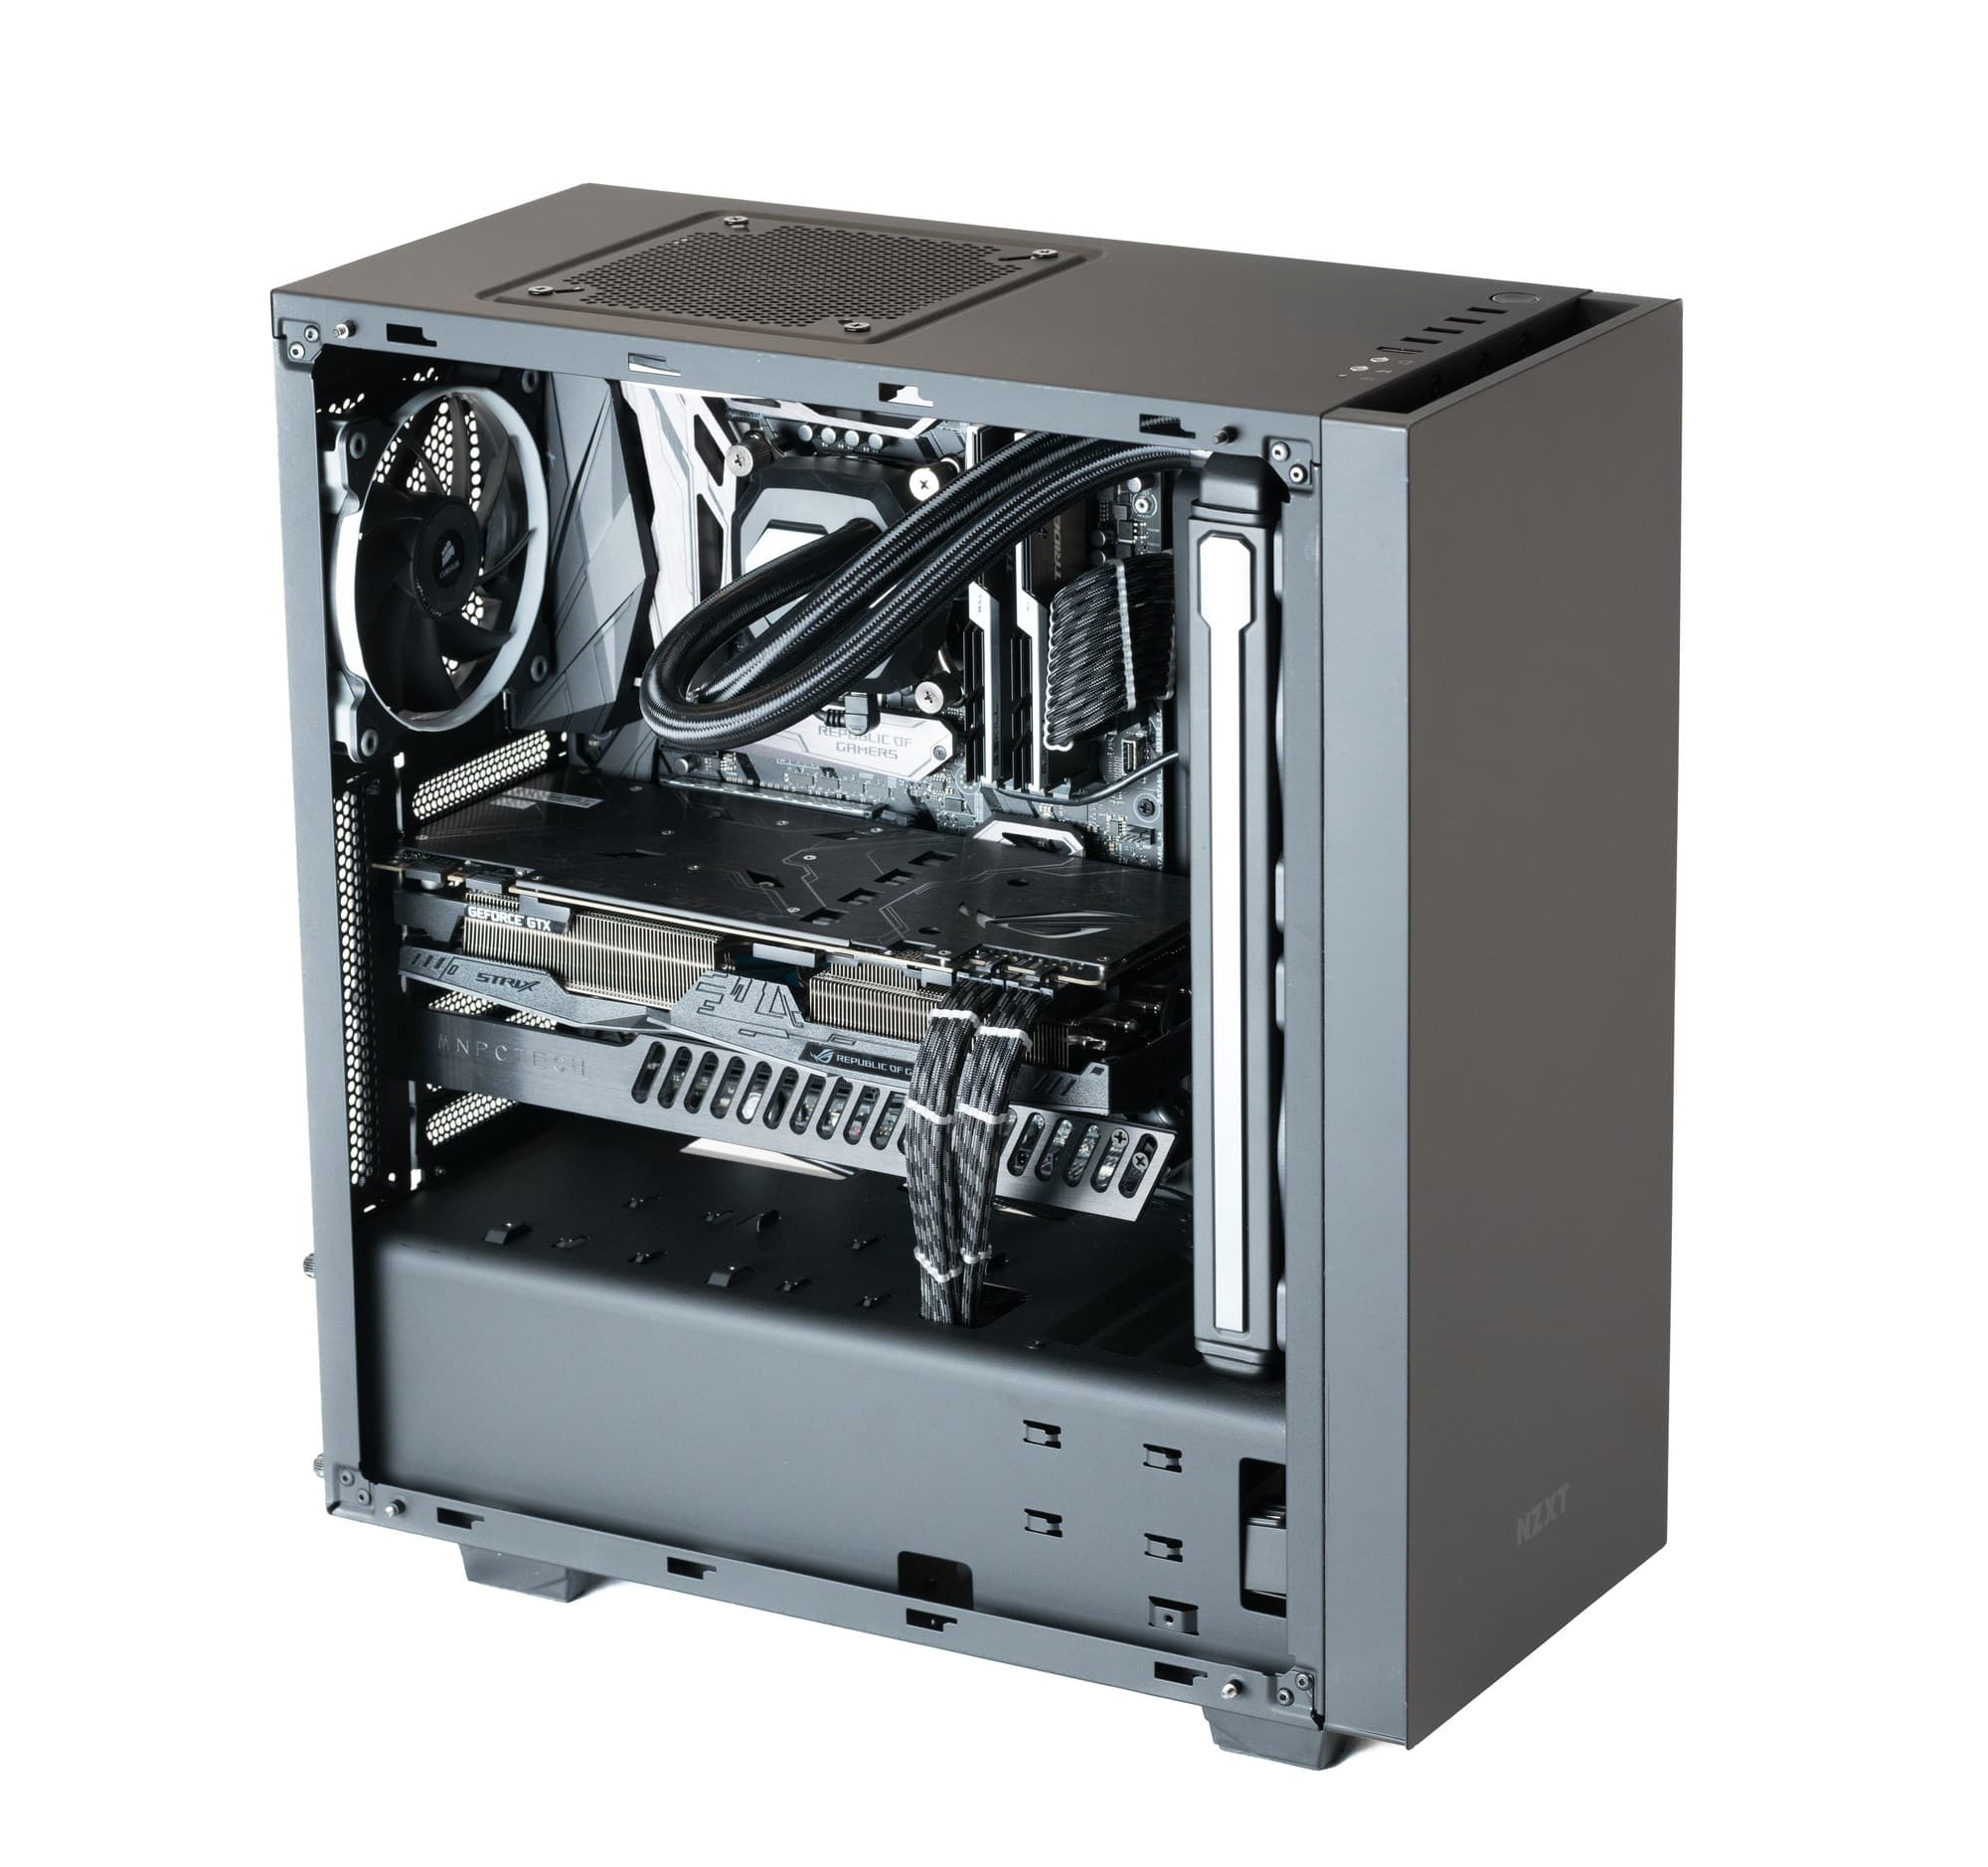
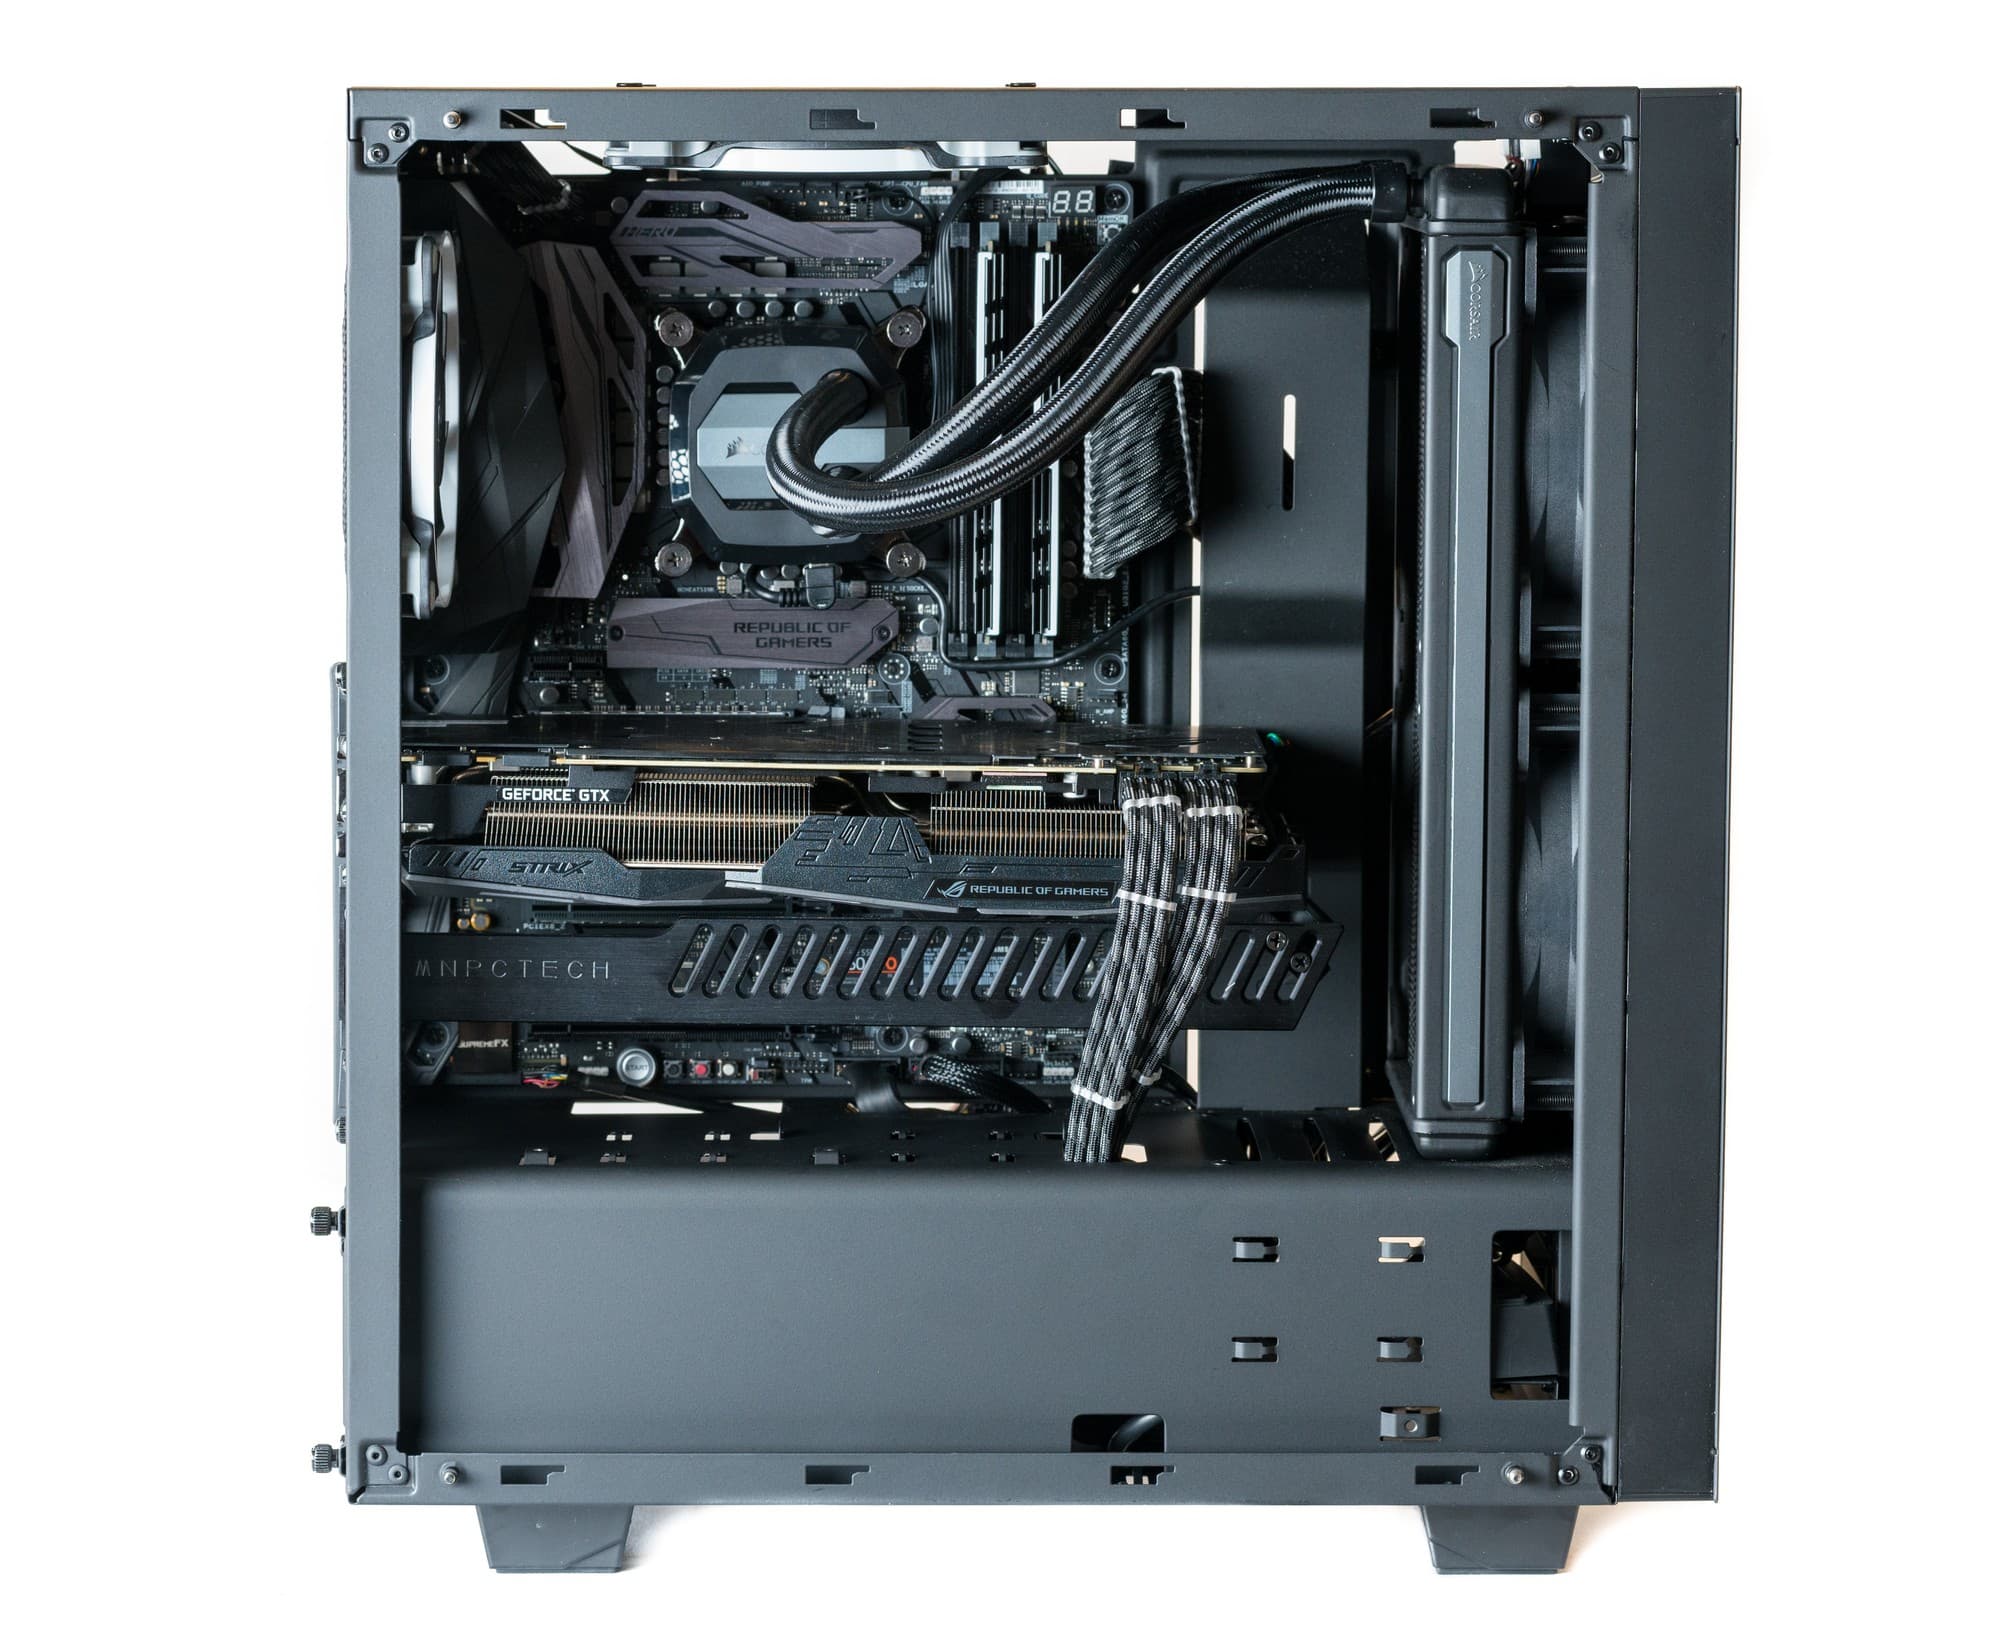
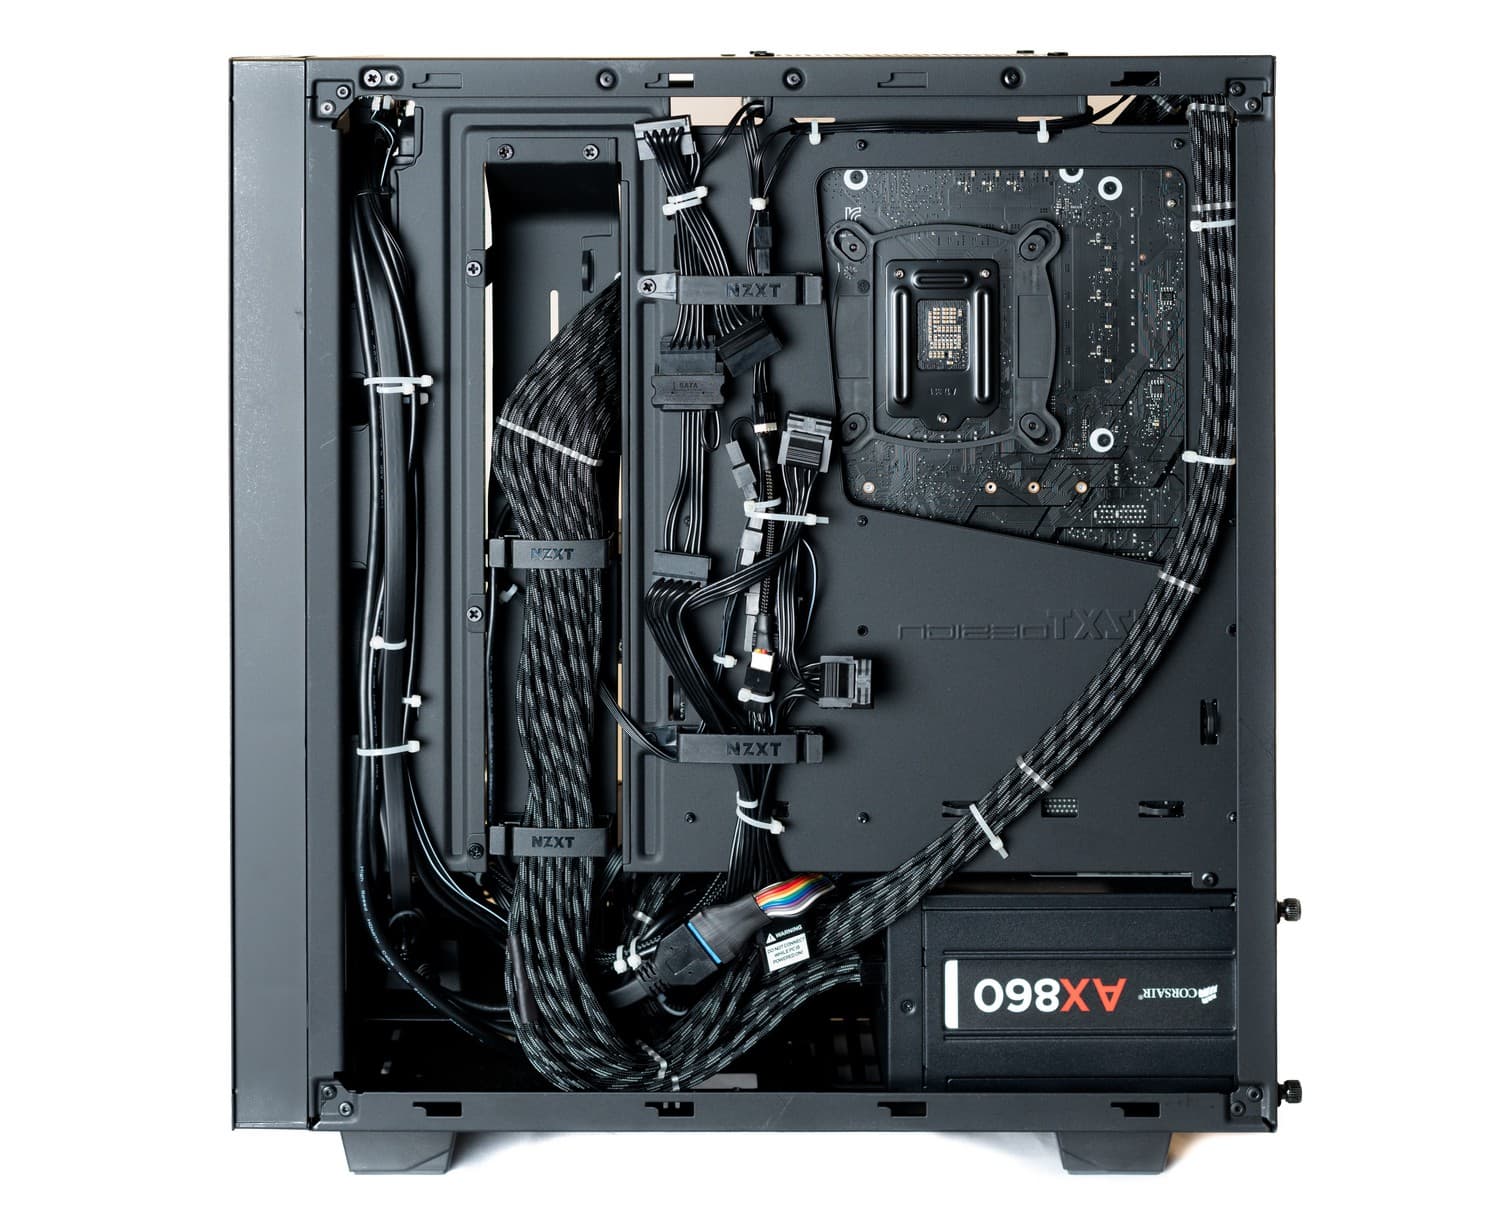
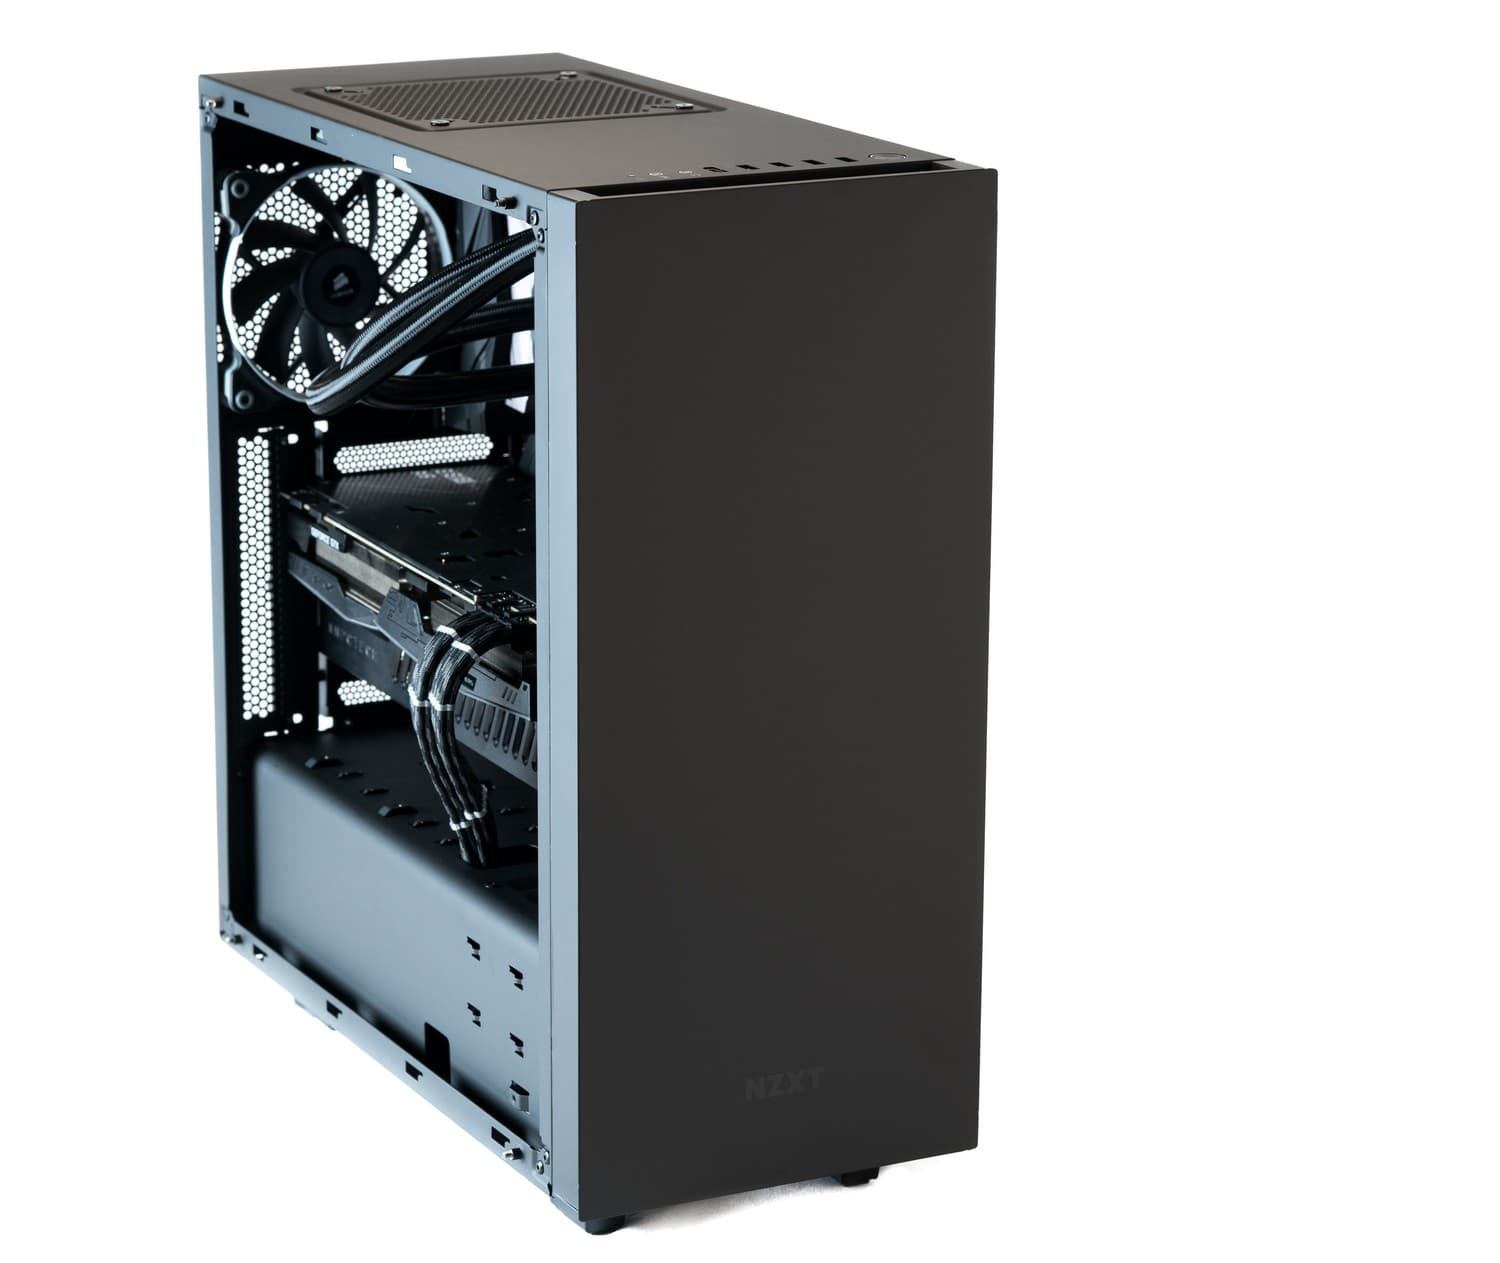
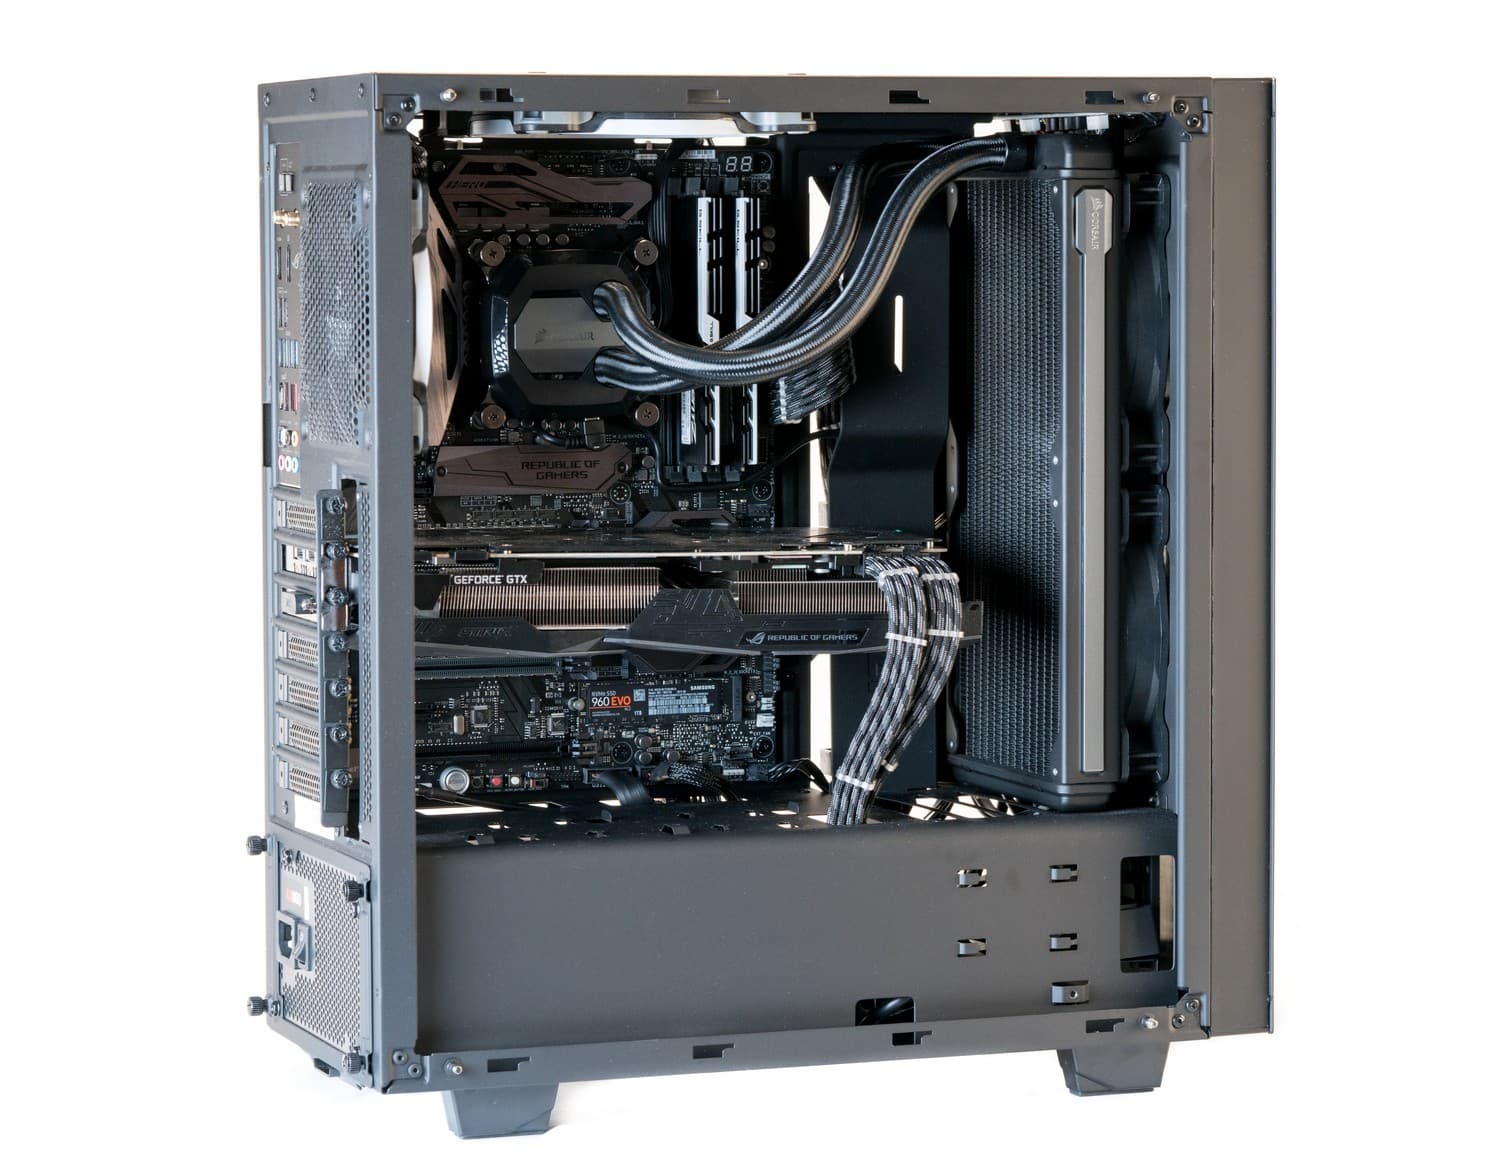
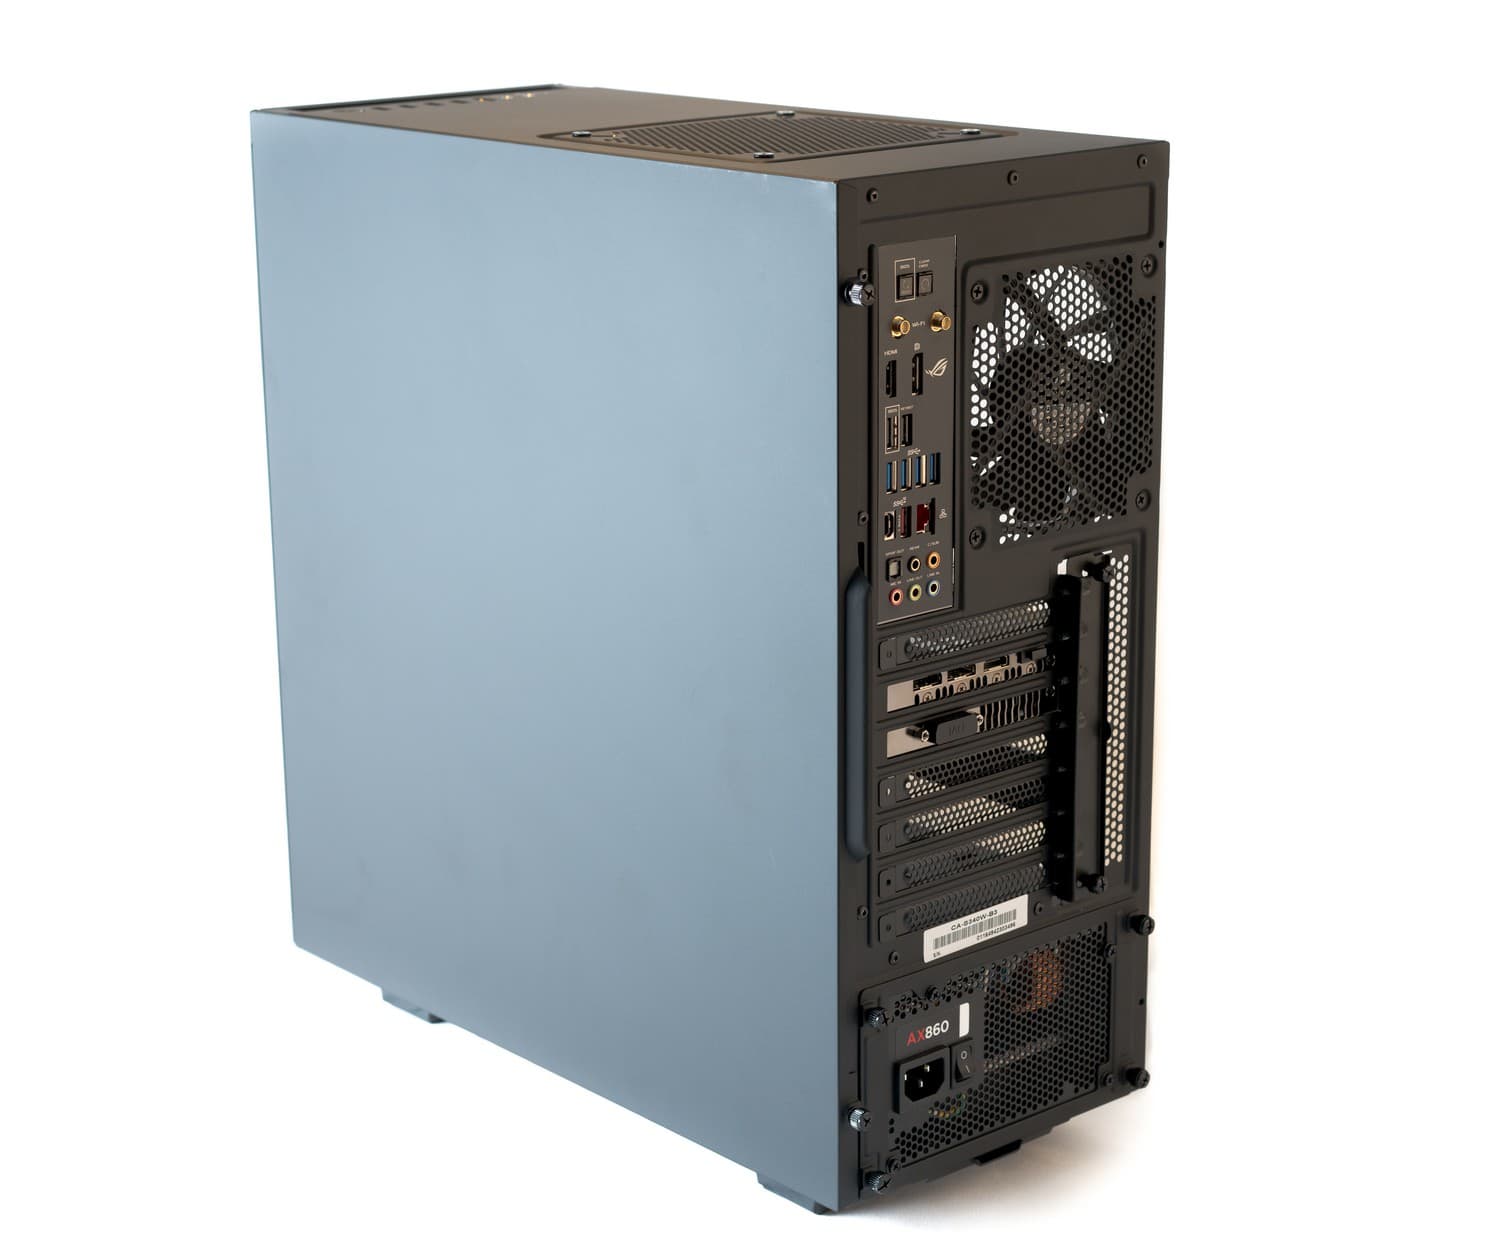
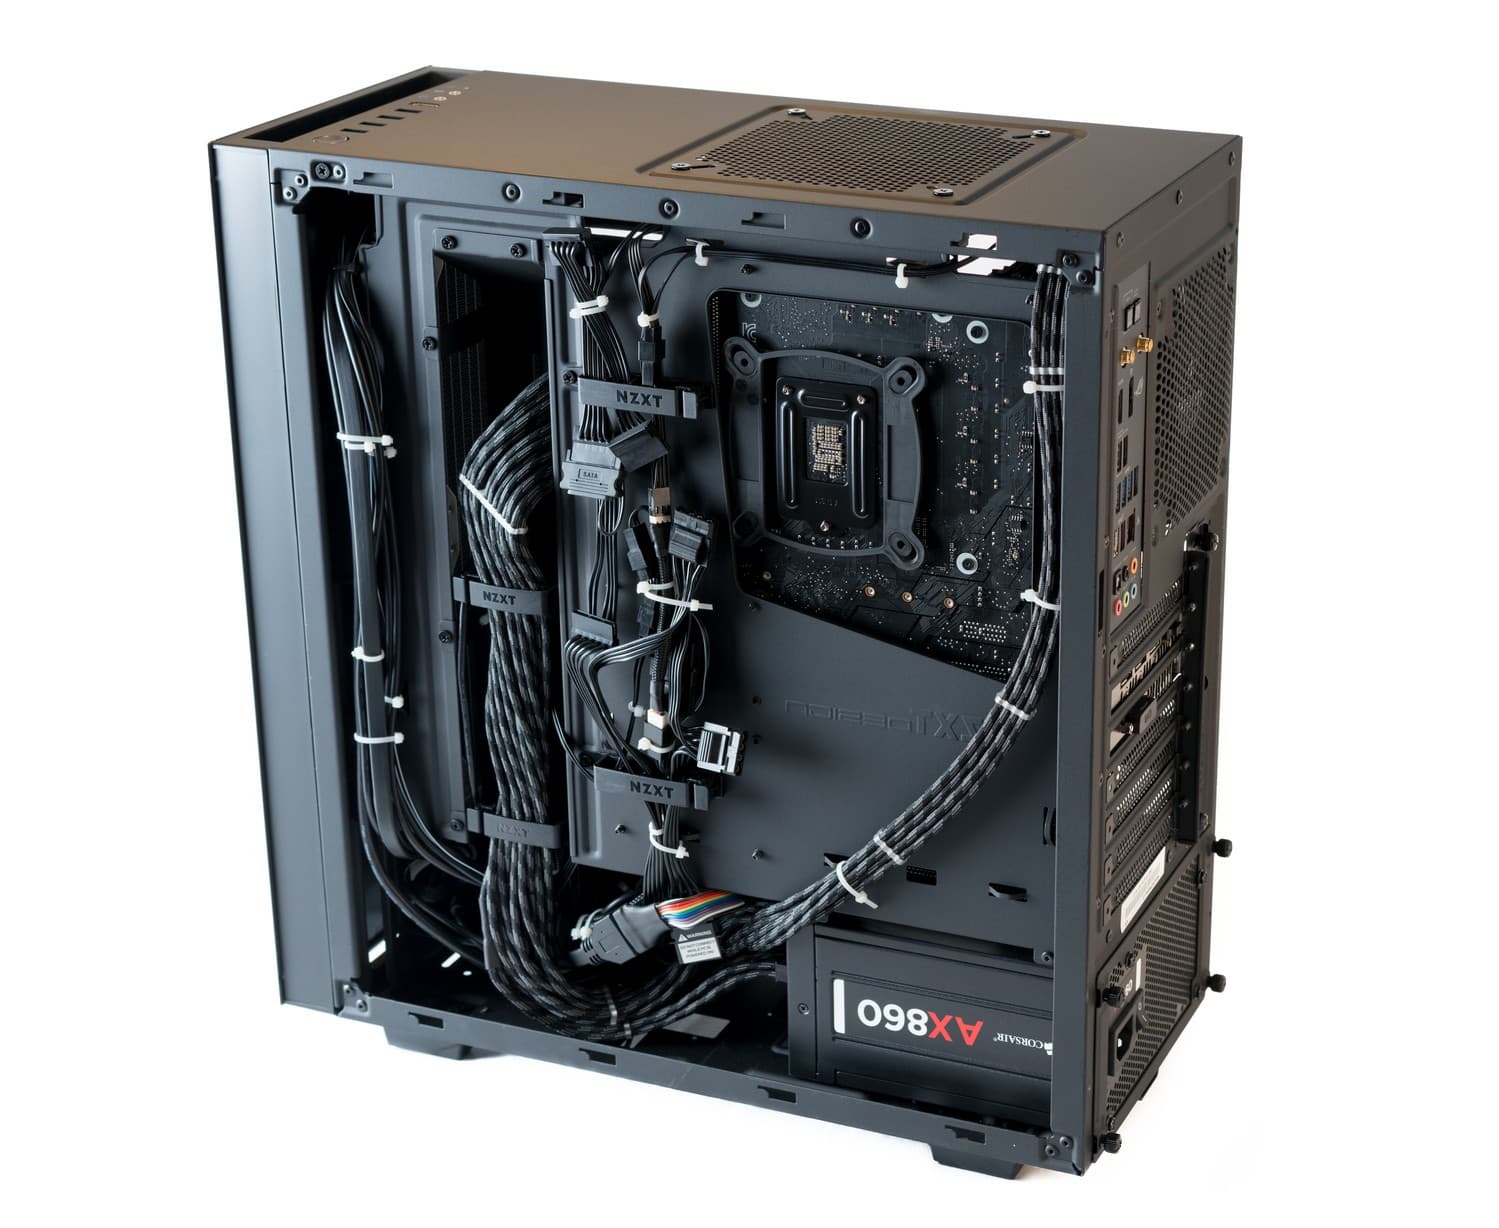
The case does attract fingerprints though not nearly as much as a glossy surface would. The side panels do scuff easily as well, but on the plus side I've been surprised at how well the front dust filter does at keeping dust out.
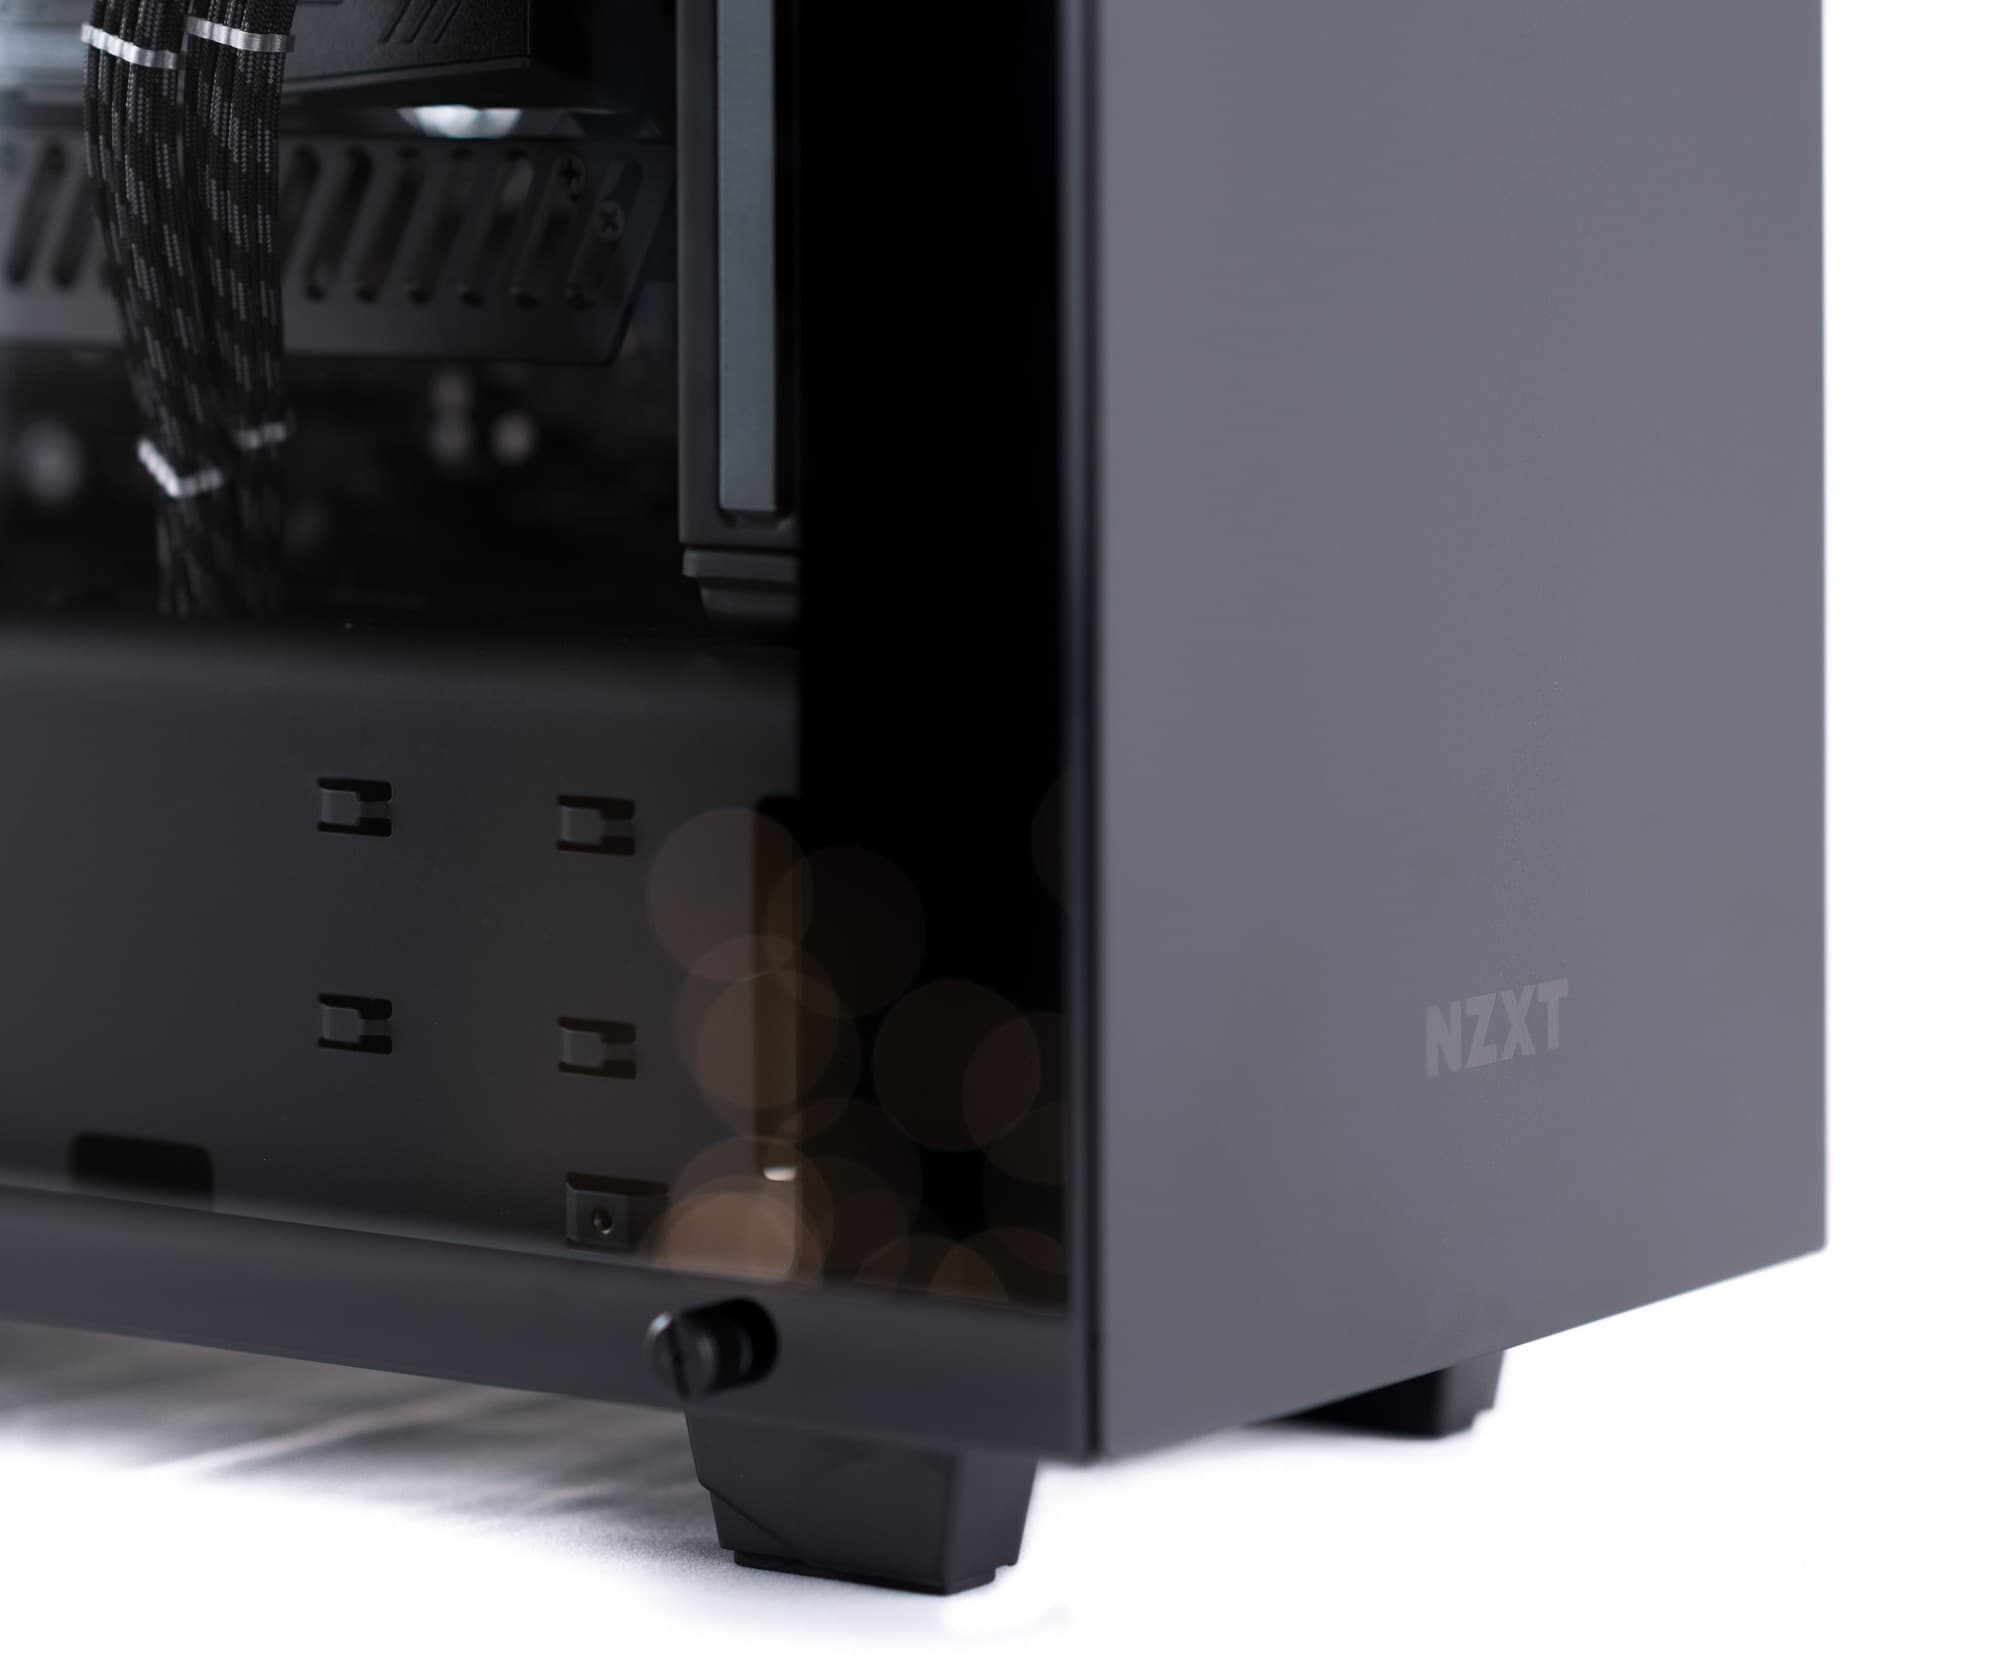
The next challenge was ensuring my desk cable management situation was at least decent to complement the tidy internals of the PC. I went with a three fold approach:
- Humanscale M8 adjustable monitor arm
- Humanscale NeatTech cable tray that screws under the desk to hide chargers and miscellaneous cables. I always hide micro-USB, USB-C and Lightning cables under there as well as MacBook Pro charger for when I connect my work laptop to the display when working from home.
- Cable sleeving and velcro ties for taming PC cables under the desk
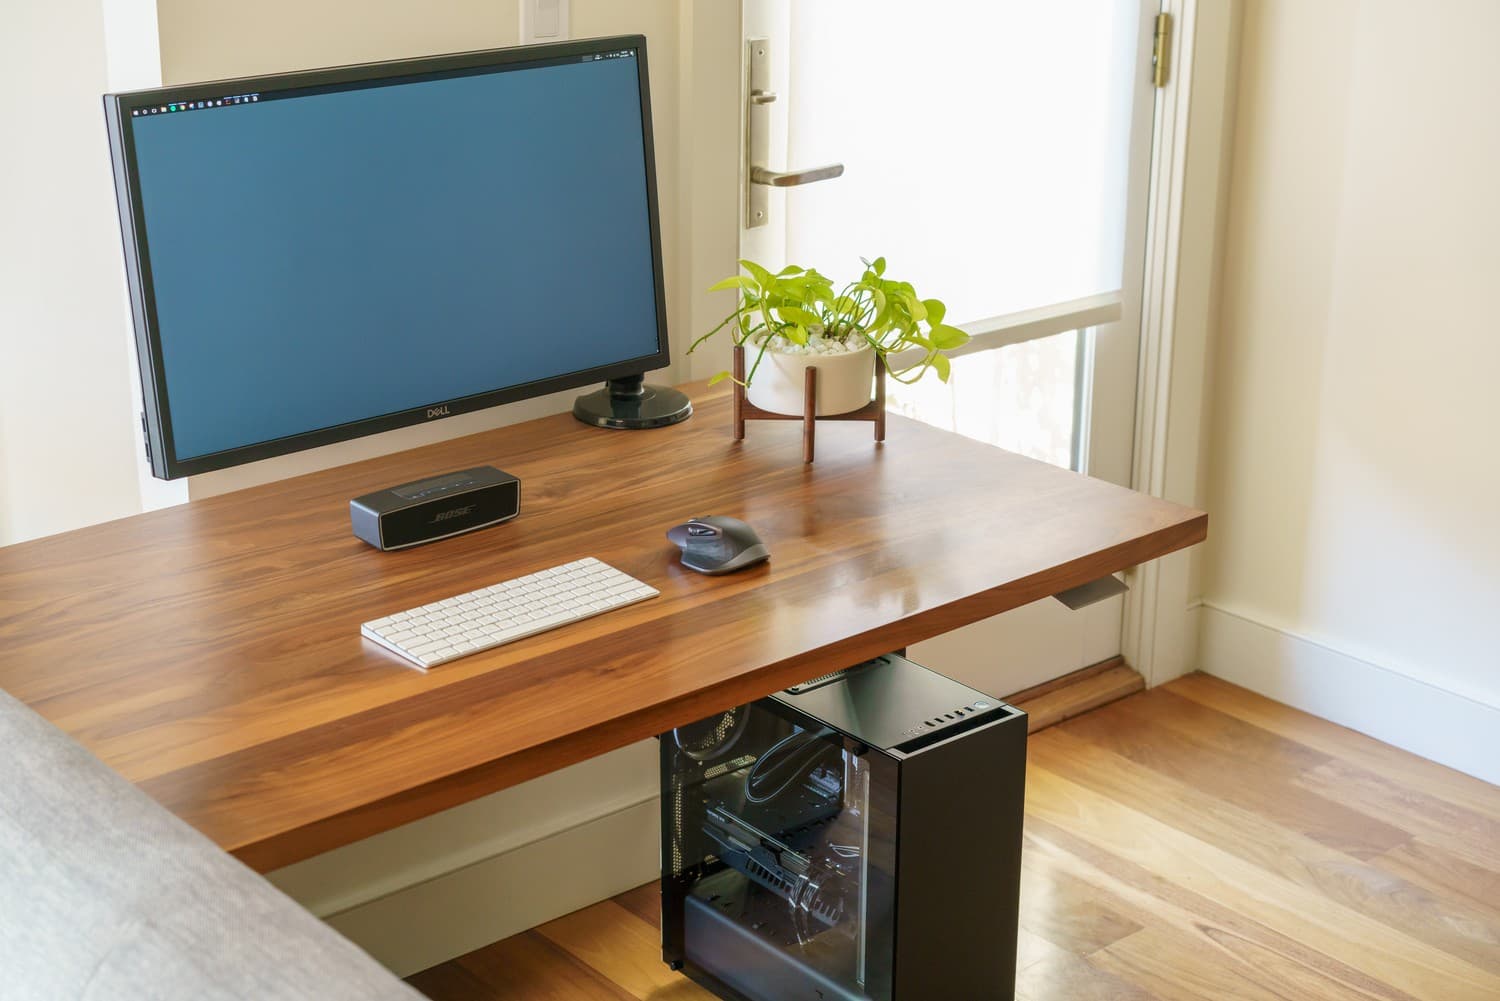
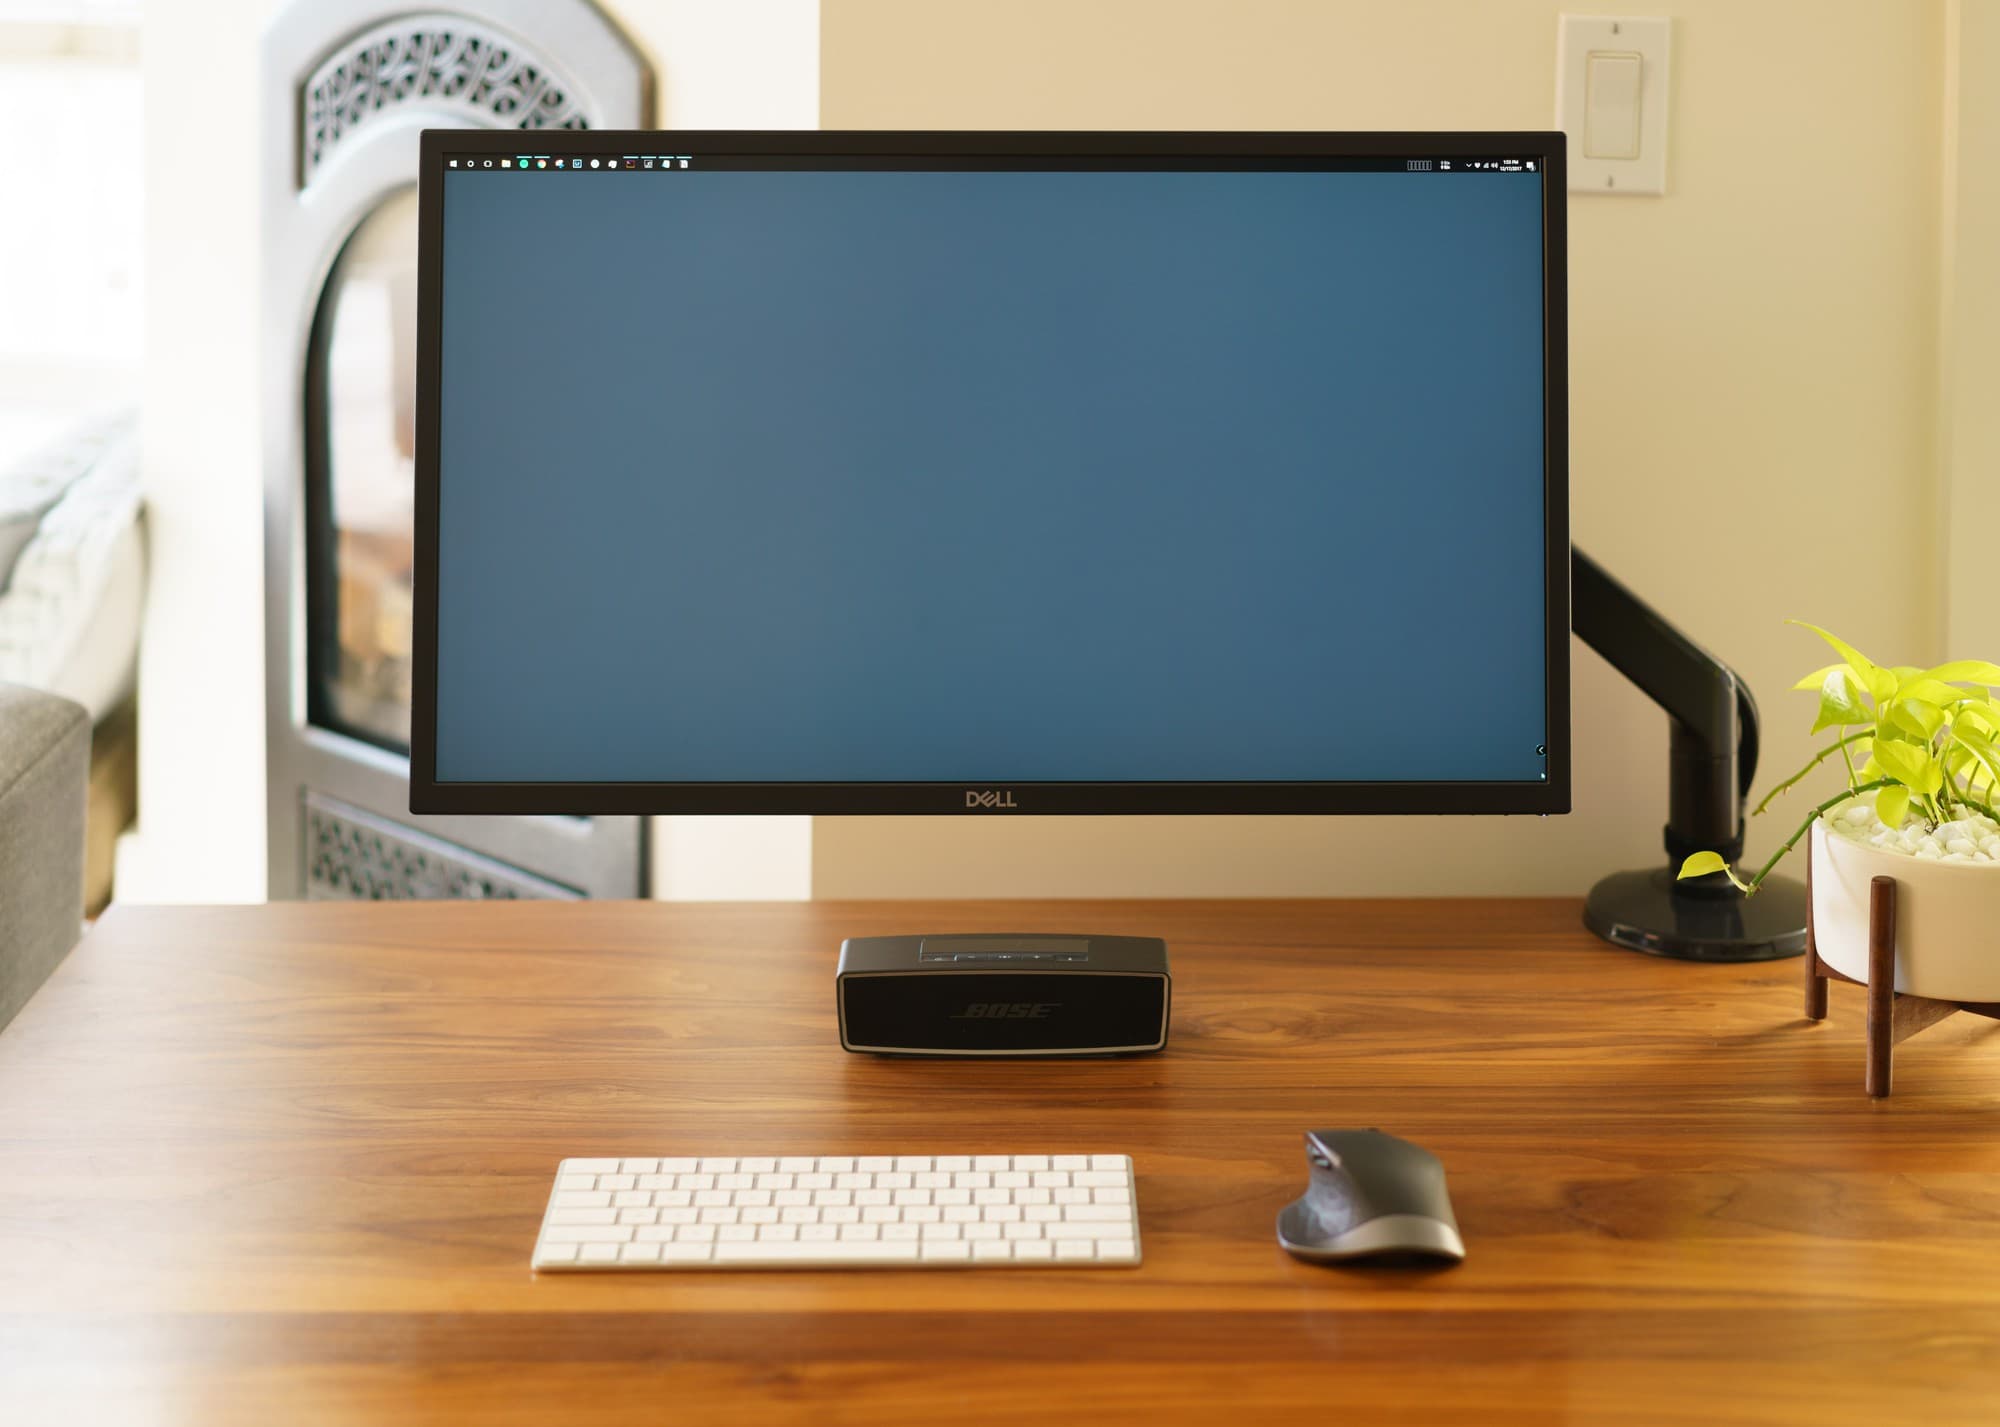

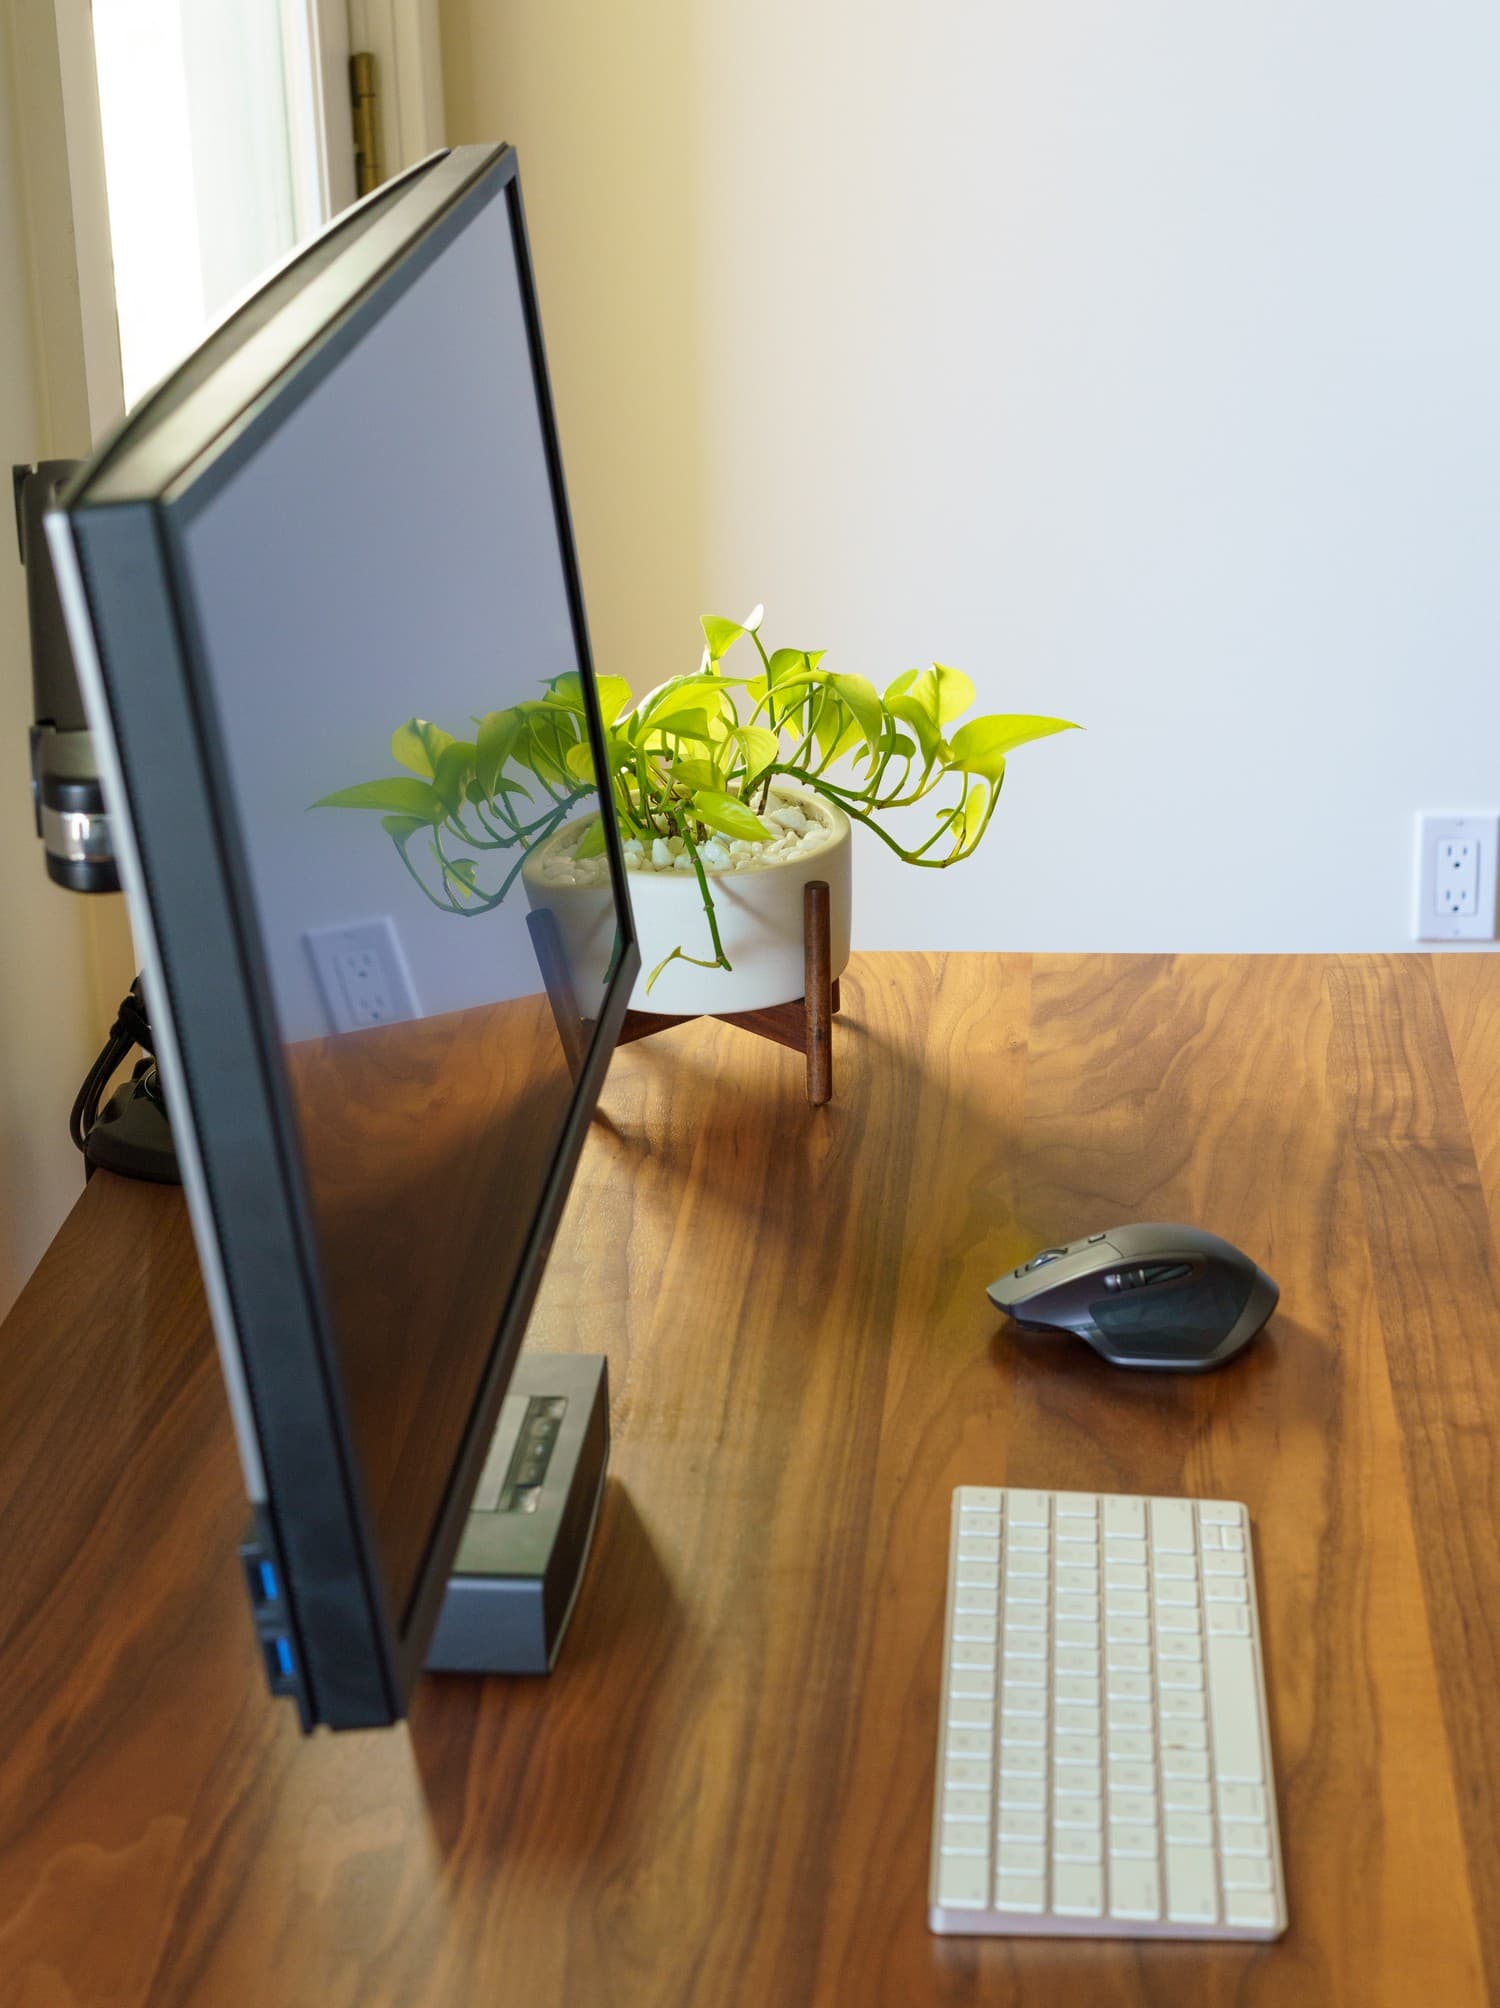
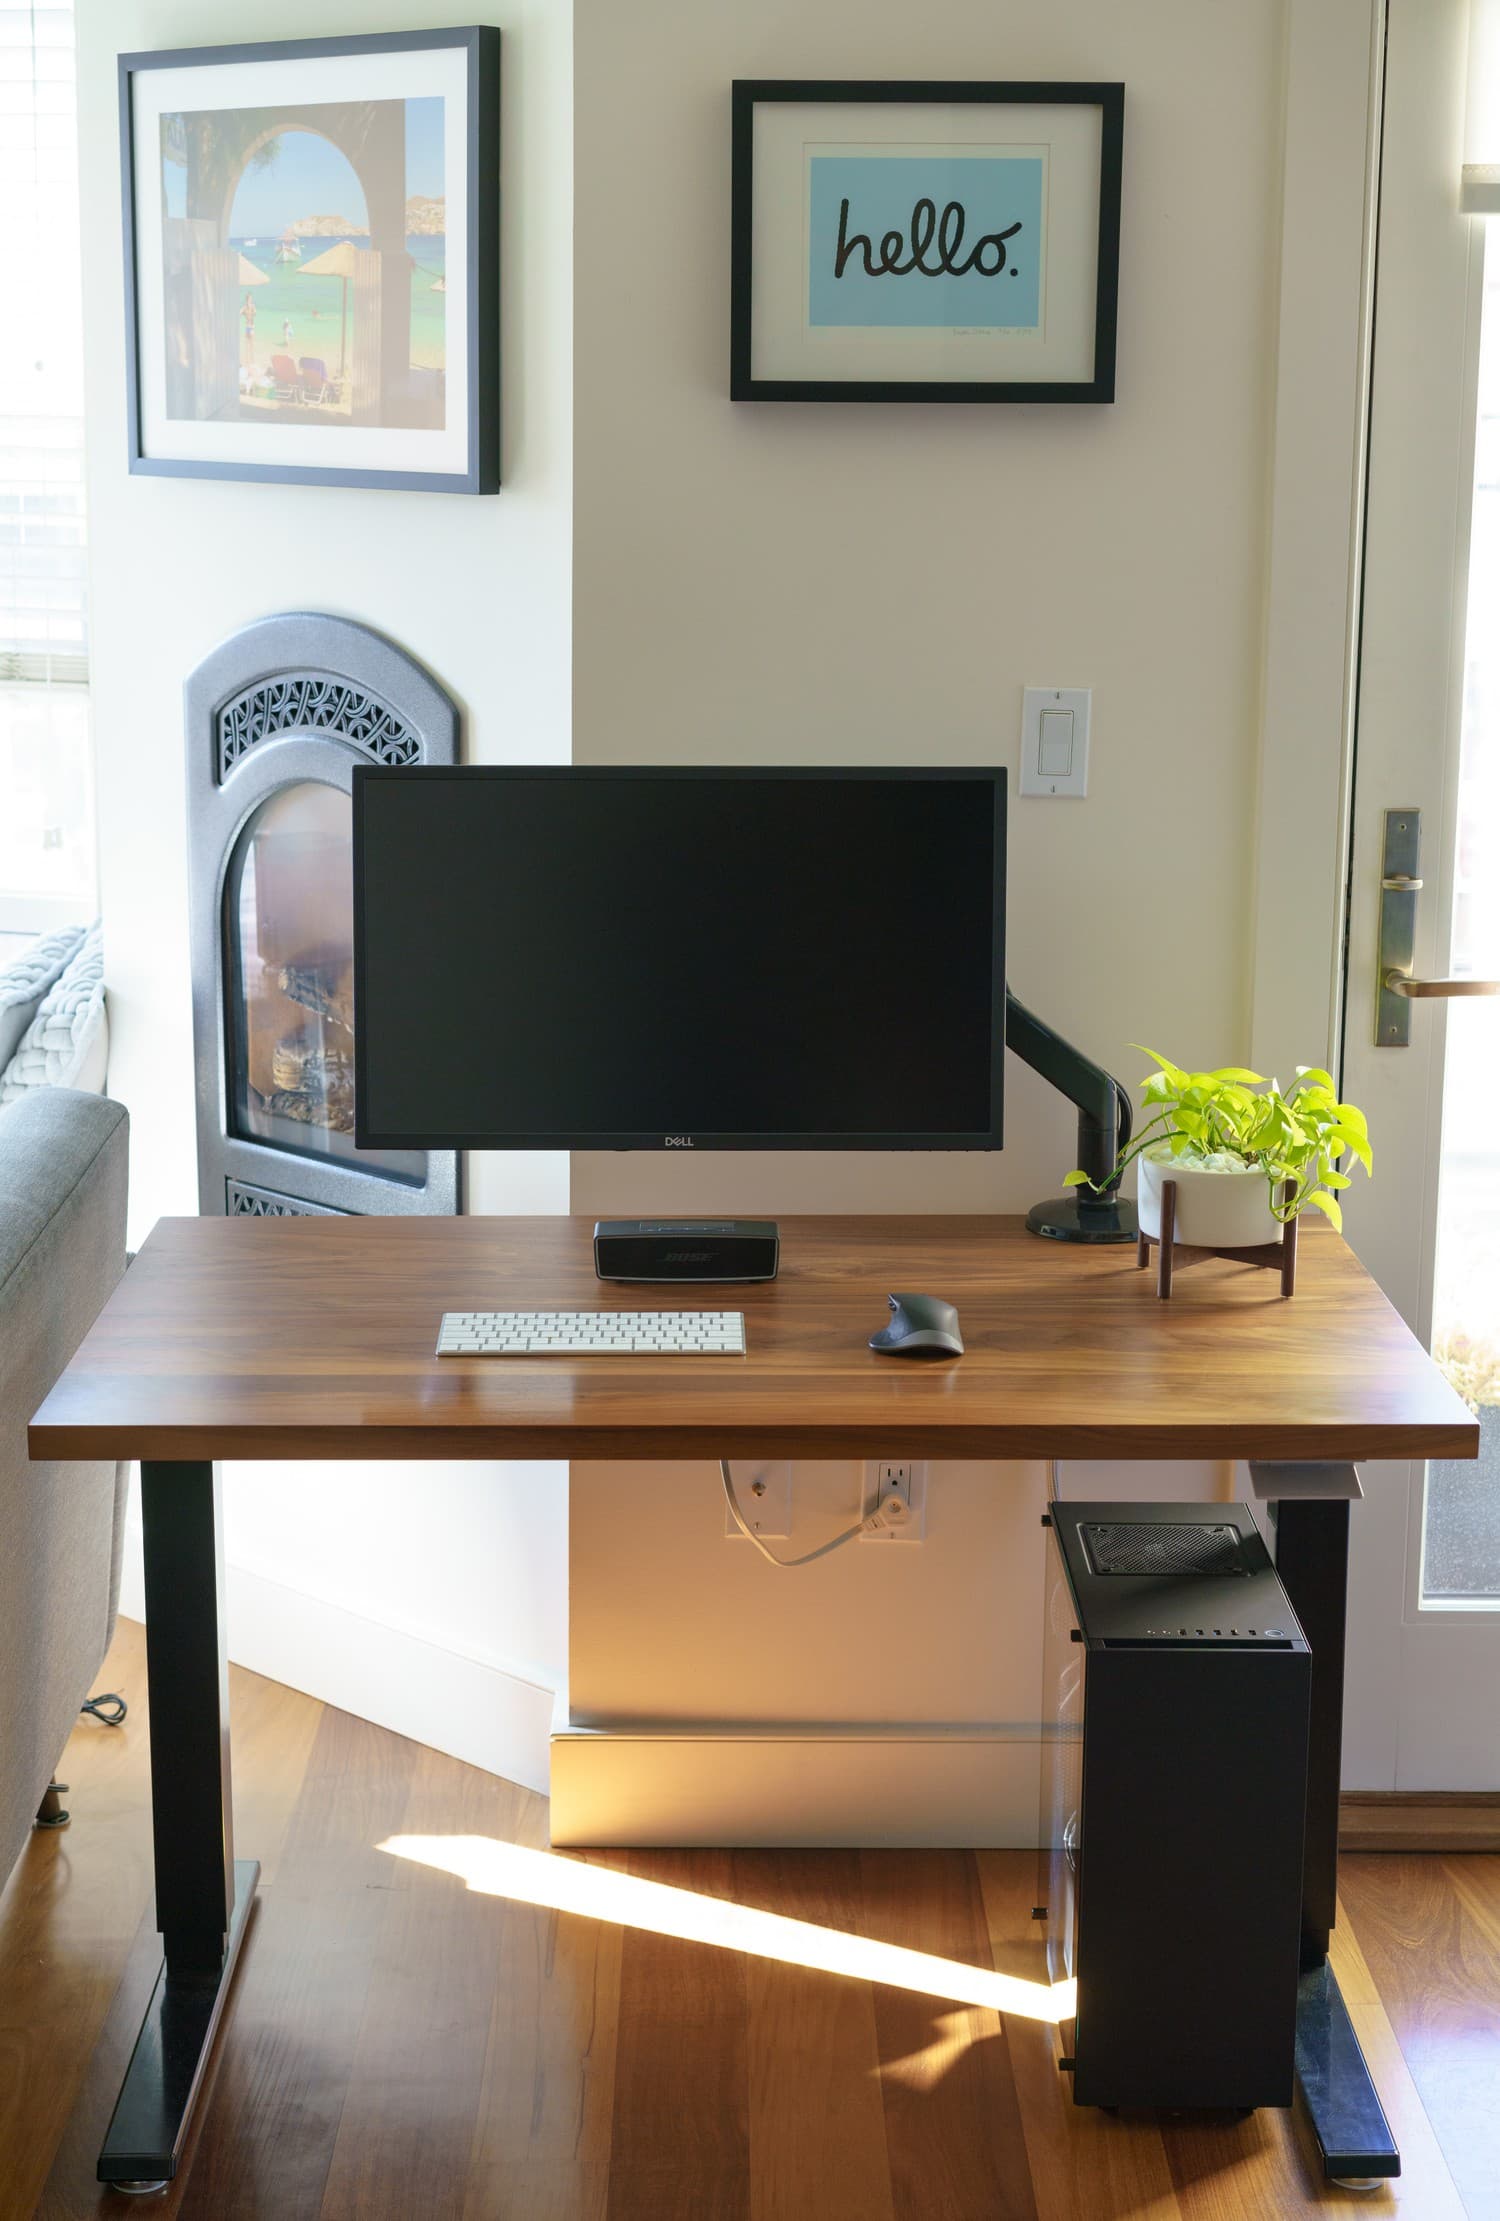
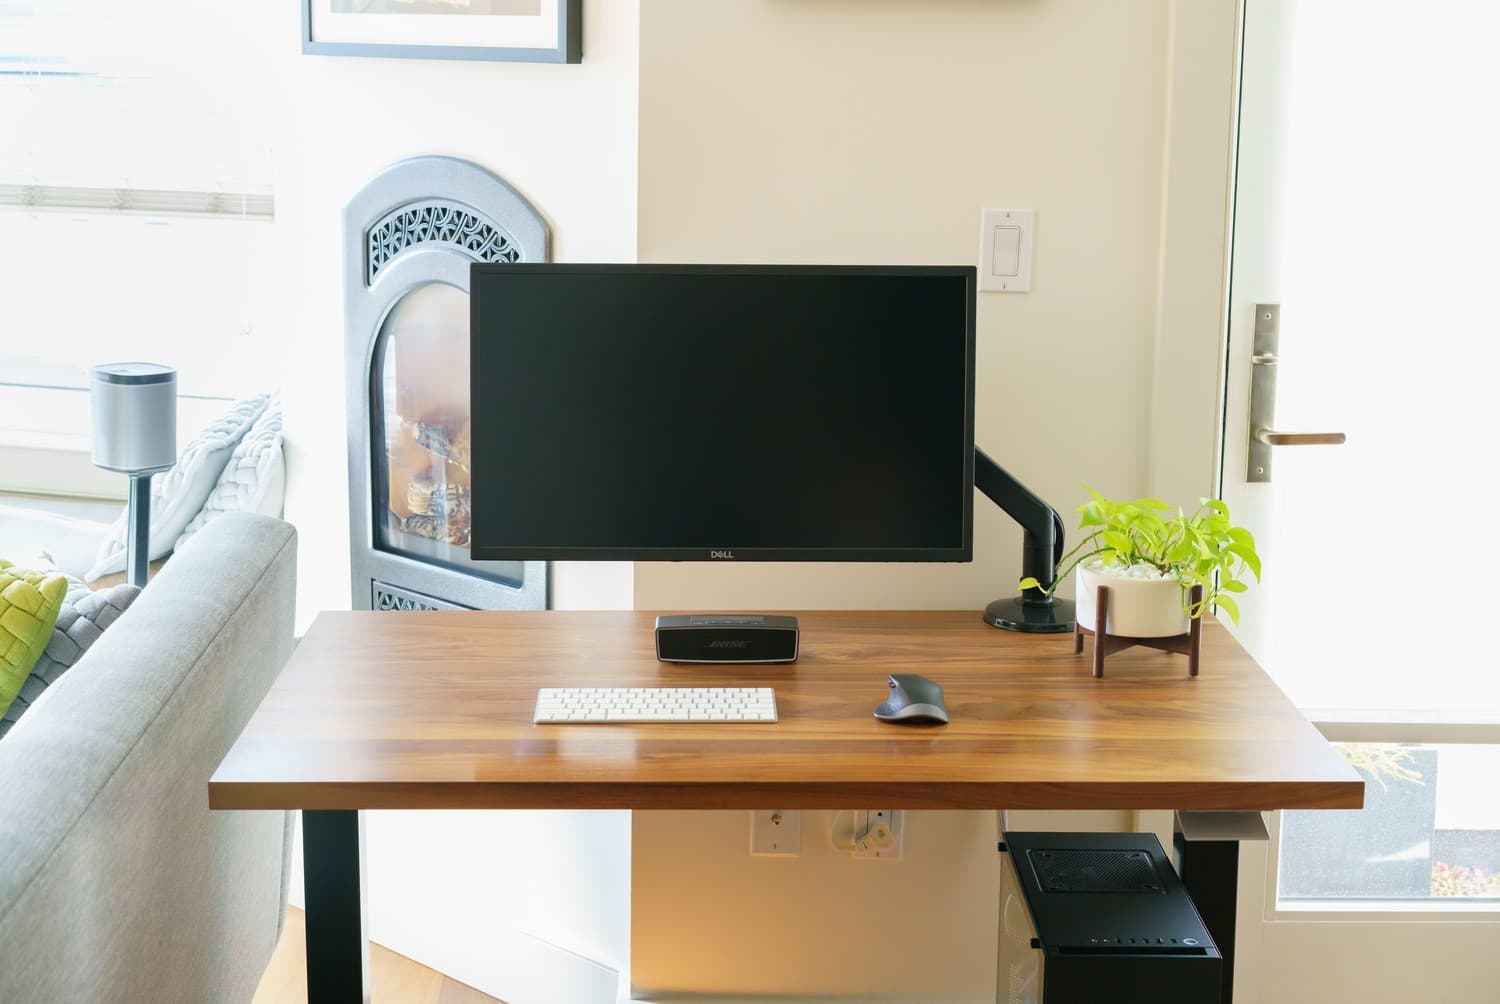
First boot
I plugged everything in — including a different keyboard directly into the USB socket labeled BIOS on the motherboard — and nervously pressed the power button for the first time. The computer quietly whirred to life, the motherboard and graphics card lit up their numerous animated LEDs and the motherboard's two digit Q-code display showed various codes before successfully POSTing.
As for the sound of the machine, it's nowhere near as completely silent as an idle iMac but not too much louder with the dual 140mm fans of the Corsair AIO liquid cooler in the default silent mode. However, the top 140mm and rear 120mm case fans could be quieter. I ended up undervolting the top fan to 7 volts with an adapter to spin a bit slower. Though I do want to look into either quieter Noctua fans, "be quiet!" brand fans or the new maglev Corsair ML line of fans.
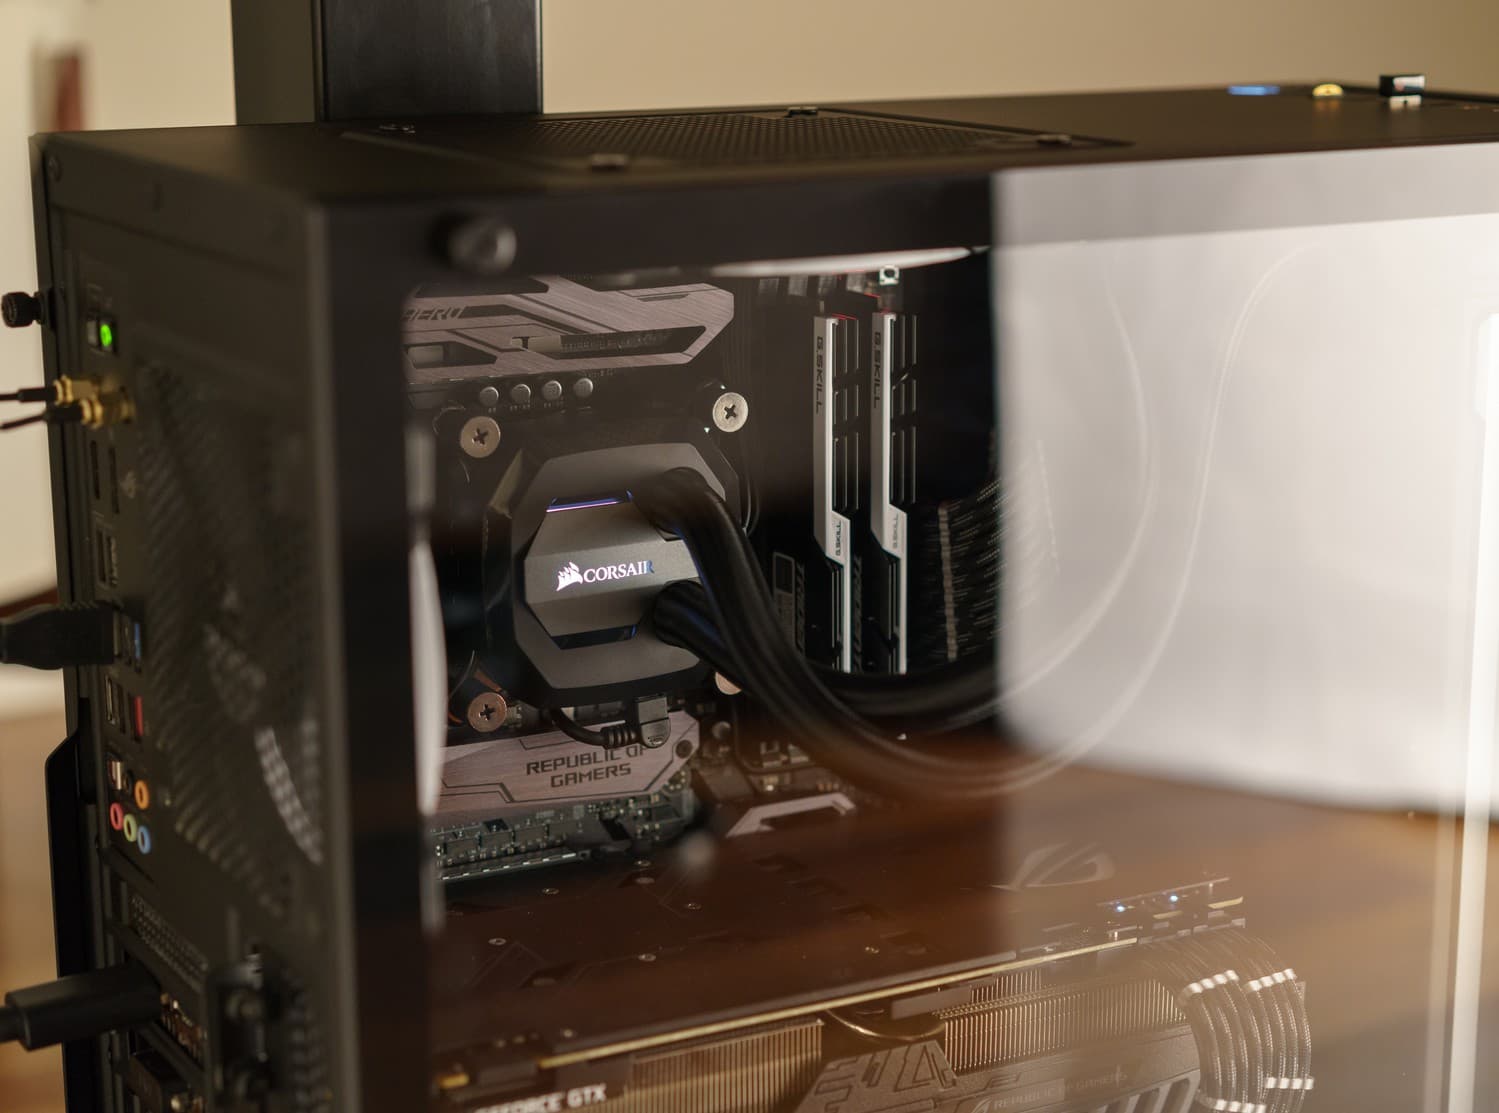
PC on (after I disabled all the bright animating LEDs)
The first thing I did was enter the BIOS36 to do a quick runthrough of the settings. I wasn't concerned with overclocking just yet but did setup the boot drive order and disable SATA as I didn't have any SATA devices connected. I also enabled the XMP memory settings so the RAM would run at its rated 3200MHz. After Windows finished installing I went back to install the second M.2 SSD and then go back into the BIOS to ensure it was running at PCIe x4 speed (the default was x2).
The BIOS on this Asus Maximus X Hero is insanely detailed and overclocker oriented. You can tweak just about every voltage or timing you'd ever dream of fiddling with. After saving the settings I changed, I put in the Windows 10 USB stick and rebooted to the installer.
There was nothing particularly noteworthy about the Windows 10 installation process, it did it's thing and went by pretty quickly.
Windows 10
Setup & first impressions

Windows 10 after installation. 4K display means screenshots will be rather tiny, even with 125% scaling
The first thing you notice about Windows 10 is the dark theme. It's a rather bold choice for Microsoft to set as the default for everyone, but something about it does feel modern, sleek and precise. However, as I quickly noticed throughout my entire Windows 10 setup experience, everything is customizable. You can change the accent color, adjust how you want it to appear in the title bar and so on.
I have some mixed feelings about the Start Menu though.37 Right after having installed Windows and opening the Start Menu for the first time, it’s a more than a bit daunting in its default incarnation — there's a ton of stuff pinned to it making it this rather large monstrosity that only draws attention to all the unwanted, preinstalled applications and games.

Ahhhh what is all this junk??
I had to spend a few minutes going through and uninstalling a bunch of stuff. It's only then that the Start Menu began to feel more humble and minimal. Some folks may like the live tiles for glanceable weather updates but I prefer something more basic.
Coming from macOS there were definitely a few things that feel familiar. There's the expandable sidebar for notifications and Action Center on the right side of the screen. Similarly some Windows 10 has some pop-up notifications in the bottom right corner when apps or the OS need to tell me something. Then there's macOS Expose/Spaces-like TaskView that supports multiple virtual desktops (in addition to the expected Alt+Tab switcher).38

Windows has had a neat window snapping functionality to allow quick resizing and snapping of windows to either full-screen, half-screen or corner quarter-screen sizes for a while now. While I appreciate its existence, it's largely only useful for devices with smaller displays — with a 4K display I really don't need my windows to be as large as 50% of the screen as it wants to do for me.
Unlike macOS, typography on Windows leaves a lot to be desired, even after fiddling with Microsoft ClearType settings. Many typefaces throughout the OS just feel like they are lacking weight and commonly used ones like in the Chrome address bar seem hairline thin. There is a third party font rasterizer called MacType but I haven't had much luck with it and uninstalled it.39
Another area this manifests itself is high-DPI display support. Some applications can display blurry text when mixed with UI scaling — I run my 4K display with the 125% scaling set, which seems to keep the native resolution but only scale certain parts of application chrome and text as necessary, which I do like.40 However, this particular issue may just be a transition period thing until more Windows 10 applications are served as UWP (Universal Windows Platform) apps that can run on any Windows 10 device.
This push for UWP apps makes sense for the grander vision for Windows 10. There are so many kinds of devices running Windows 10, especially convertible 2-in-1 tablet/laptop hybrids like the Surface Pro and Surface Book 2, that Windows has invested quite a bit in making the experience on any device smooth. For example, there's a tablet mode you can enter to make it easier to use with a touchscreen notebook.
Cortana is Microsoft's "truly personal digital assistant." It has lofty goals of being able to do stuff like Alexa and Siri—things it can only do by knowing more about your online habits, contacts, location, calendar, emails, et cetera. Instead of being a relatively hidden and streamlined-when-you-need-it part of the OS, Cortana seems to be more like an overbearing parasite grabbing every surface area it can. For now, that means there's a few more items in your Start Menu: Cortana Notebook, Cortana speaker (even if you don't have one there's a reserved menu item for it), Cortana Reminders and Collections.
Hopefully, the rumors will come to fruition and Cortana will find a new home in the Action Center where it can be safely ignored. I know that's a bit harsh, but I don't see the value from Cortana yet and I'm not sure how I could—I use Google Chrome, I use G Suite Gmail and Calendar instead of native clients and so on. There's not too many ways for Cortana to learn about me aside from just what I use Cortana for: finding files and launching applications.
Even if you only use the regular Cortana search the default screen for that is always trying to get you to do something else and trying to show you what else it can search for. I get it, Microsoft wants to be aggressive with this and find ways for Cortana to grab a hold of your daily needs to fit into your life somehow. It just comes off as adding complexity to everything. I disabled it as much as I could. Maybe I'll find a use for it one day, but for now I need Cortana to recede.
Other significant additions to the Windows 10 experience include the fast new Edge browser, the renamed and revamped Microsoft Store as well as less popular but noteworthy functionality like automatic facial recognition login with Windows Hello (though nowhere near as advanced as Face ID) and Dynamic Lock to log you out when you're not near the computer with a Bluetooth-paired phone.

The Windows store became the Microsoft Store and now features media for purchase.
As for the overall design of Windows 10, there's a definite feeling of inconsistency. Some parts feel more refined and modern while others seems like a relic of the past. For example, take a look at the entirely different aesthetic of these two settings-related windows:

But that is changing — and quickly. Microsoft is beginning to incorporate their Fluent design system to replace the older Metro style that exists in parts of Windows 10.
Fluent design has a few areas of focus for how they're thinking about the system: light, depth, motion, material and scale. Material was the first aspect of Fluent design that I noticed in parts of the current Windows 10 release. There's this acrylic material in certain menus and panes that is like frosted glass with translucency and a strong background blur.
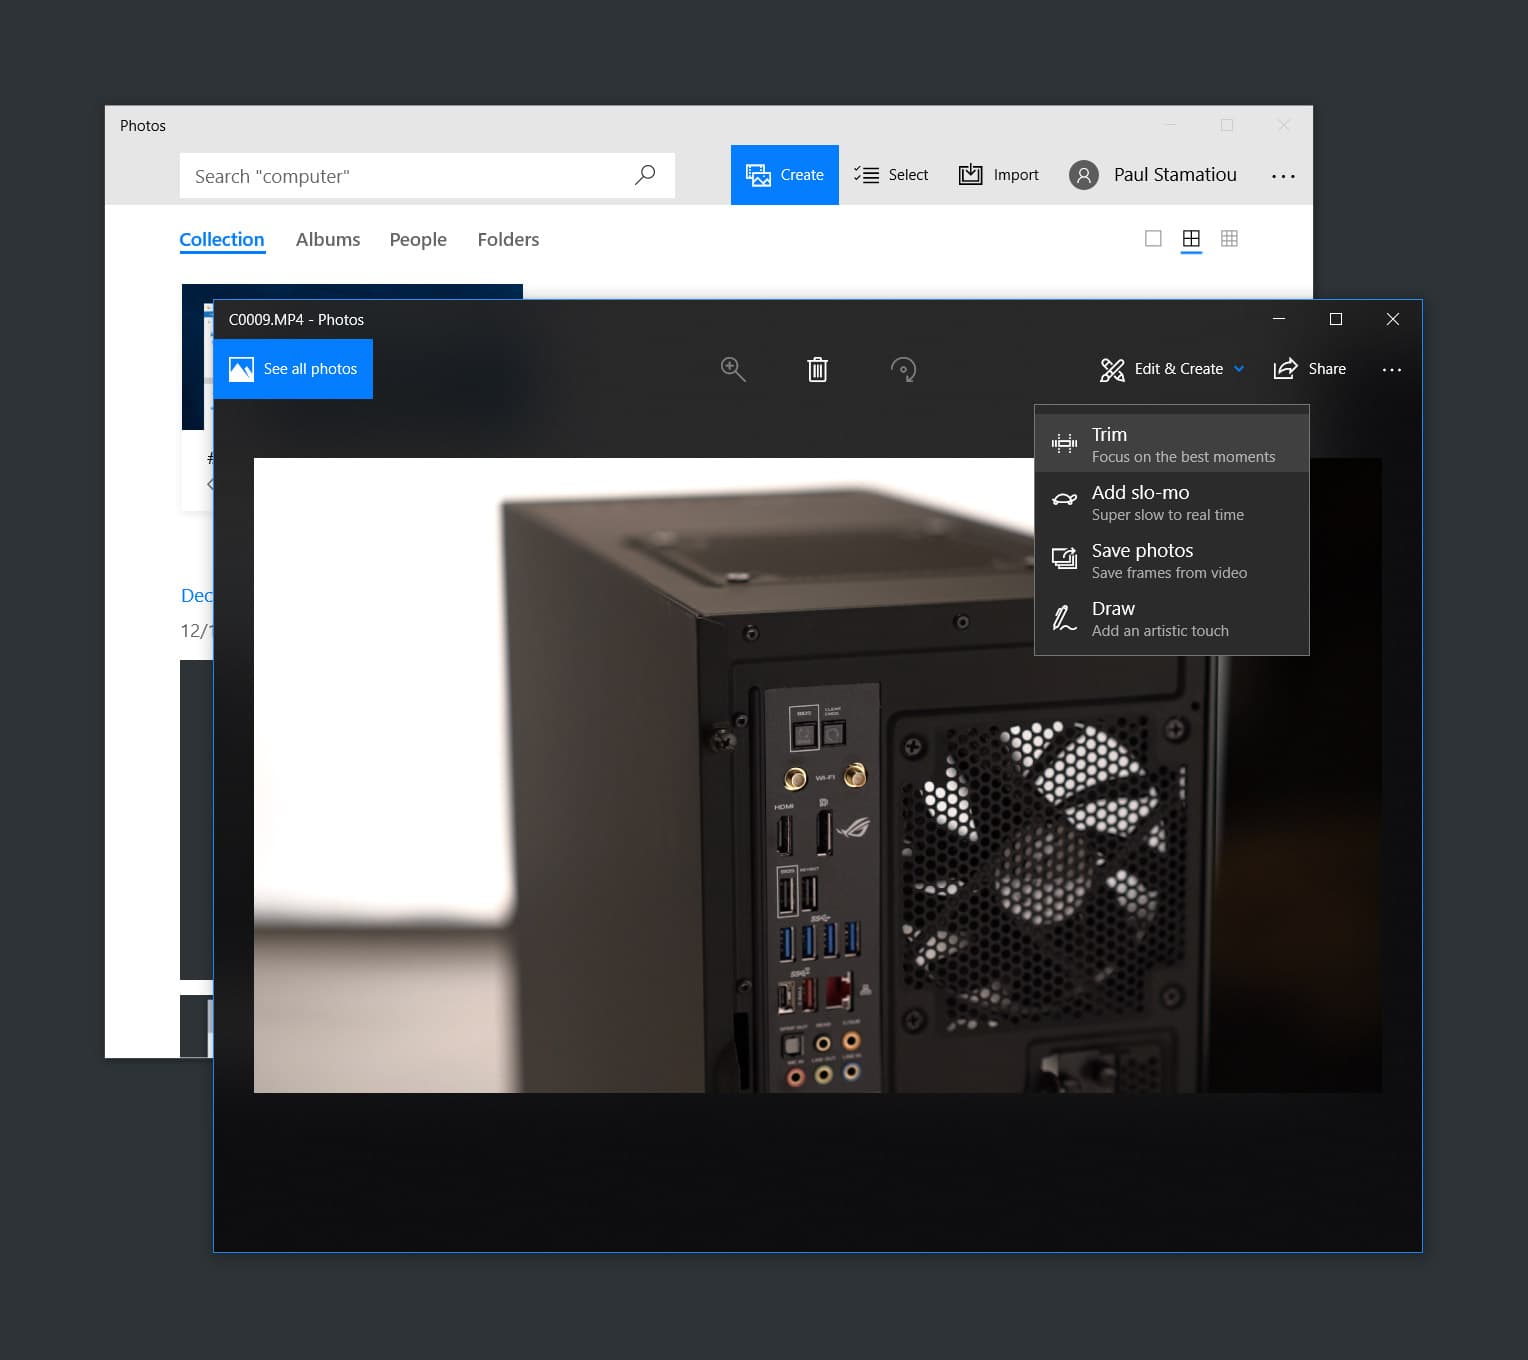
Probably not the best example of Fluent design.. but you get the idea :)
Facets of light can also already be seen, mostly in the hover states for various elements with reveal highlight. They now dynamically adjust the lighting of the container based on where your cursor is over the element. It's like what happens when you move your cursor above an inactive Google Chrome tab.
However, until Fluent design permeates more of those legacy surface areas, we'll have to deal with some repulsive stuff like this:
I have no idea how to use this menu.
While my first impressions of Windows 10 might have come off rather negative, I do really like the OS. Sure I'm dismayed that various parts of Windows have some clutter (I'm looking at you Cortana, OneDrive and Quick Access) but that's just the default. Similar to how many parts of Windows can be personalized, other items can often be changed and simplified to your liking with enough motivation. For every minor annoyance I've had, it only took a few minutes to find out how to customize it enough to make it more acceptable.

First step: uninstalling many preinstalled programs I don't want.
After a few customization and cleanup tasks that I'll dive into later, Windows itself felt like it began to recede and let me focus on my tasks at hand. It's a faster and more capable beast than the Windows versions I remember.41
Fluent design sounds exciting but it'll take some time to see what the fully realized vision will do for Windows 10. The good news is that Windows feels like it's constantly being updated. Instead of waiting for larger annual tentpole releases, there are more frequent large updates like the recent Fall "Creators Update" that brings entirely new functionality, not just bug fixes. The Windows "Service Pack" updates are long gone.
And if you want to see new features being tested, you can easily sign up for Windows 10 Insider Preview builds. For example, the last big release in December 2017 featured two new workflow and window management features: Timeline and Sets.
There's one more thing. You can run now Linux on Windows! And not in some slow VM. This is absolutely huge news.
Windows 10
Installing apps & drivers
After the Windows 10 installation completed, I had to first install some basic motherboard drivers to get online. Only the Ethernet port was working out of the box so I had to connect that to my router first. I'll spare you the exact details, but I went to the Asus site and had to download a ton of drivers from Wi-Fi to Bluetooth, and then some motherboard specific programs like AI Suite 3 from Asus to manage overclocking and advanced energy use settings. Then I downloaded the Asus Aura Sync program to be able to disable the animating LEDs on the motherboard and graphics card.
I then installed all Windows updates, a motherboard BIOS update, Nvidia GeForce drivers, Dell Display Manager software, Logitech Options for the MX Master 2S mouse, Corsair Link software for the AIO cooler and Samsung Magician for the 960 EVO SSDs. A reboot or two later and I had all required software installed. Definitely not as easy as turning on a Mac for the first time, but not difficult.
The vast majority of programs I wanted to use had Windows versions too.. which is a really funny thing to say because 15 years ago I would have been complaining that my favorite apps from Windows weren't on OS X. The largest exception was my preferred note-taking app Bear; its iOS/macOS apps are iCloud-based and they don't have a web version. However, I'm currently testing out Notion which has a web support and a Windows 10 app.
Then I installed my essentials:
- Adobe Creative Cloud: Lightroom Classic CC, Premiere Pro CC, Photoshop CC
- Atom text editor
- Backblaze
- Dropbox
- Spotify
- Steam (CS:GO, Call of Duty: WWII, PUBG)
- Origin (Battlefield 1)
- Blizzard (Destiny 2, Overwatch)
- Oculus (Robo Recall and misc VR games)
The Corsair Link software controls the settings of the CPU liquid cooler. You can create and set different profiles that determine what speed the radiator fans and pump should be running at for each temperature range. It also lets you glance at temperatures for the motherboard, CPU, graphics card and drives.

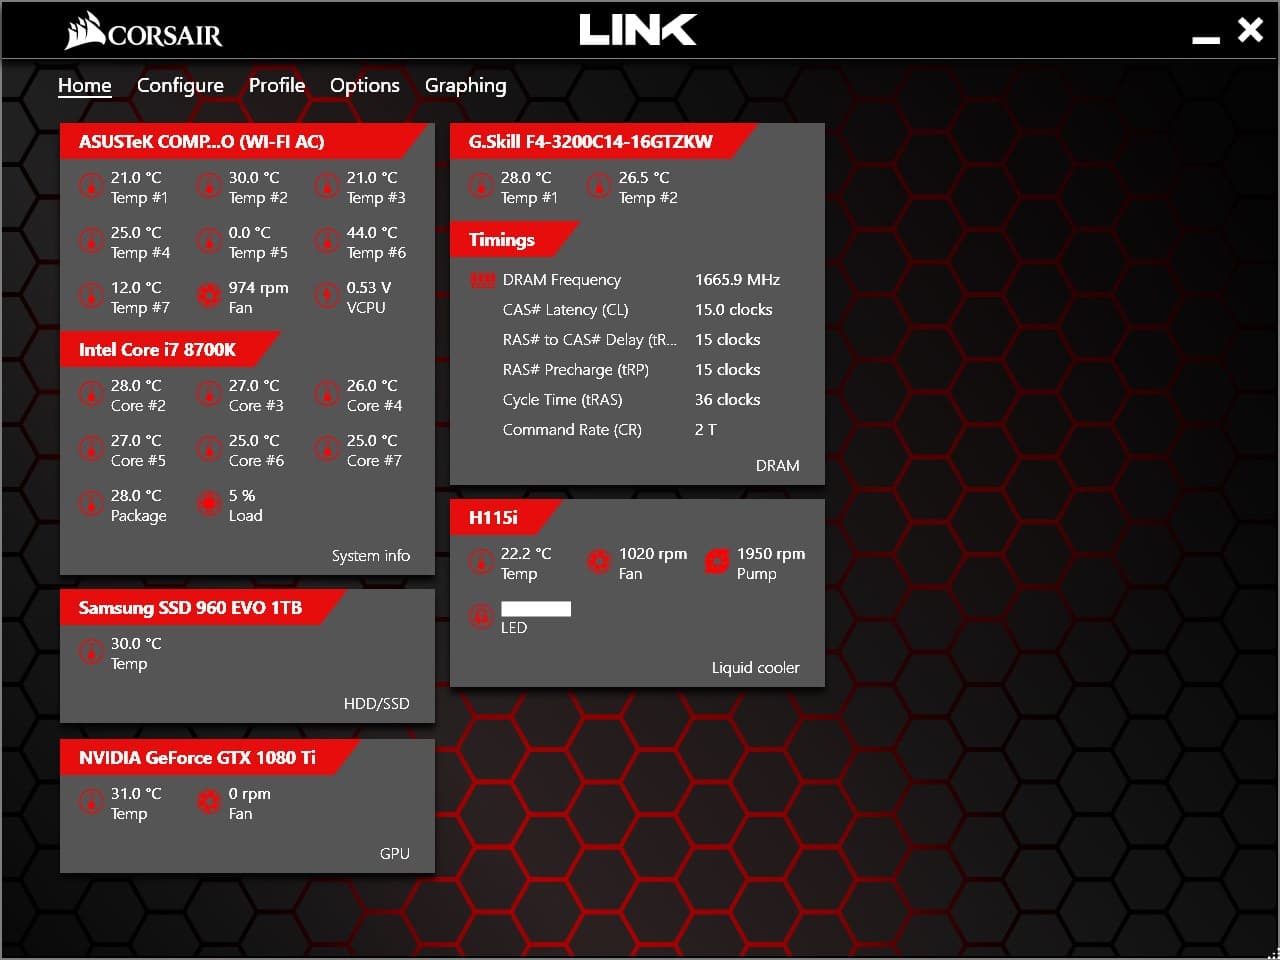
I find the Samsung Magician software much more interesting. Aside from letting you run firmware updates and performance benchmarks, it also gives you an easy way to enable over provisioning.
As mentioned during the SSD selection process earlier, there are different kinds of NAND memory from QLC to SLC. They all have some kind of maximum number of read/write cycles. For the average consumer like myself, I don't really need to worry at all about this, especially with TRIM and modern SSDs. Last I checked you'd have to write on the order of a few hundred TB of data to the SSD before you experience any kind of errors; though you'd get some performance degradation along the way. I've been running these two SSDs half a year so far and have only put about 8TB of writes between both drives. But there are some technologies at play to help extend the SSD lifespan.
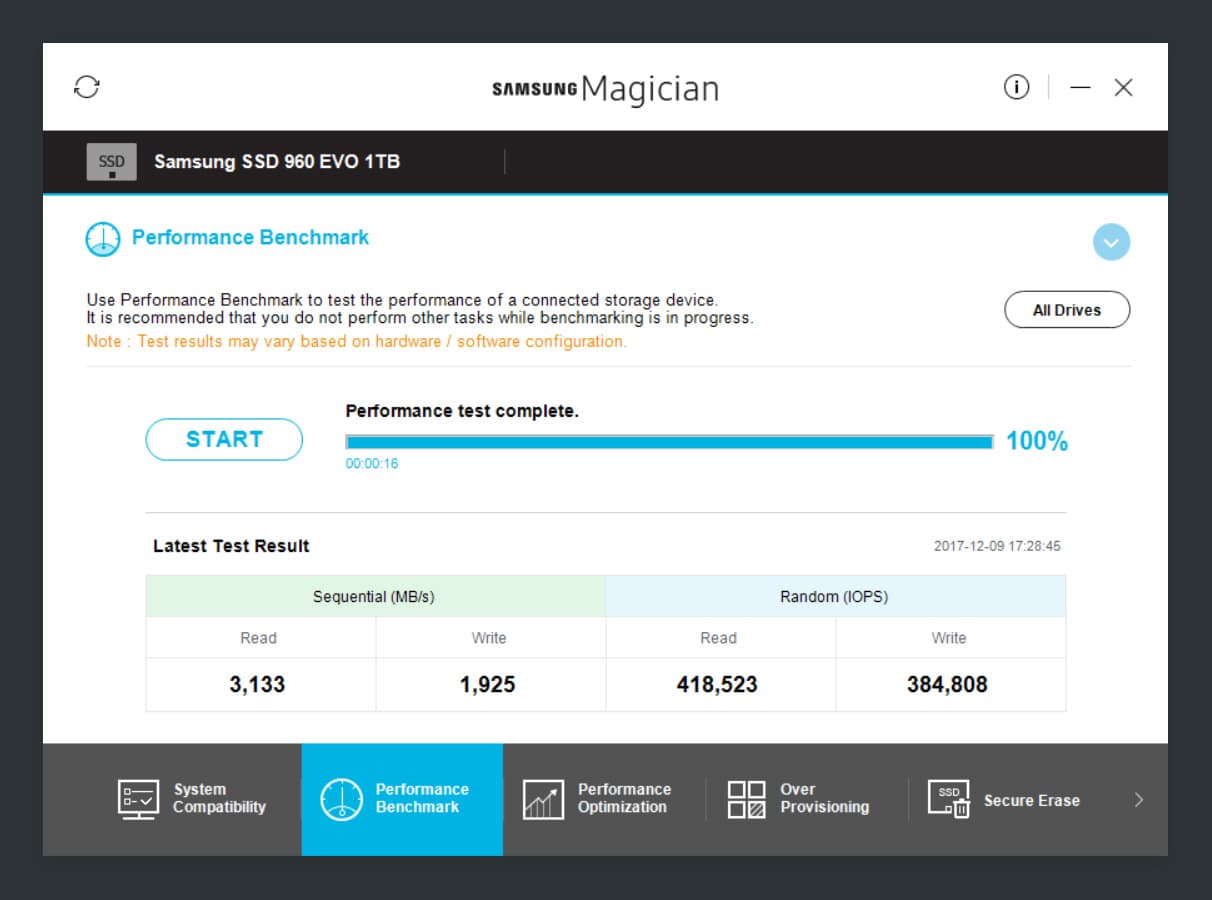
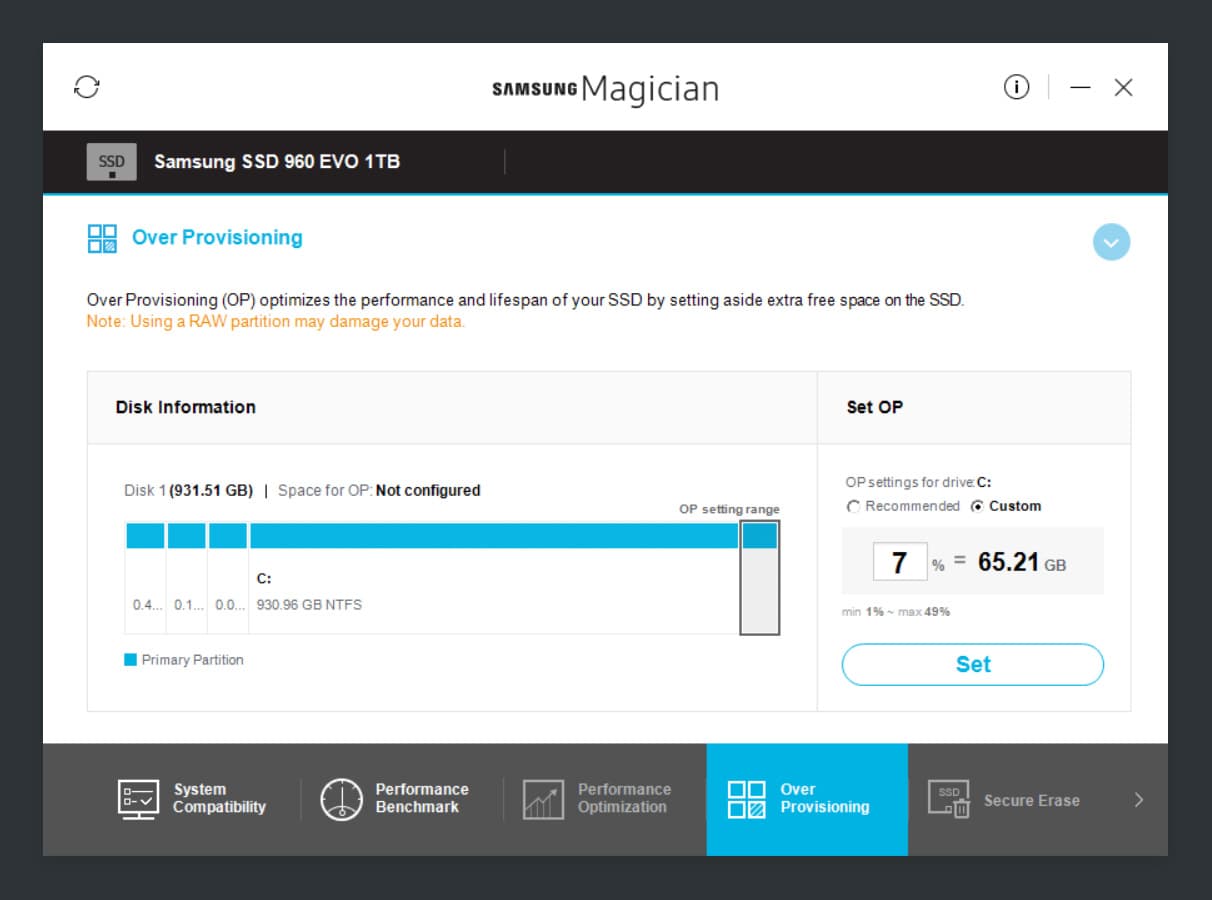

The Samsung Magician app links you to the Windows drive optimization dialog but this is largely unnecessary. For one, it's already done on a schedule by default and second, Windows 10 has great TRIM command support. When TRIM is enabled, every time you delete a file Windows tells your SSD that a particular set of LBA data blocks are no longer being used by the OS and can be erased immediately.42
Without TRIM, the SSD will retain the contents of those LBAs until they are overwritten by another action. In actuality it's a bit more complex than this with the SSD firmware doing some automated wear leveling and garbage collection in association with TRIM, but long story short TRIM is good and helps reduce write amplification and increase write speed overall.
As for over provisioning, this lets you specify a percentage of the drive to go unused by the OS and give to the SSD to help maintain the performance and extend the lifespan of the drive. Seagate has a good primer on SSD over provisioning if you'd like to learn more:
Note that in this case, as the amount of over-provisioning increases, the gain in performance is quite significant. Just moving from 0% over-provisioning (OP) to 7% OP improves performance by nearly 30%.
It's for these reasons—easy firmware updates, ability to set over-provisioning and TRIM support—that I opted to not use my two 1TB 960 EVO SSDs in a RAID array. While TRIM in a RAID array is technically possible (I've heard Intel RST can do it), I didn't want to have another potential thing to debug for a new build. Also, if I were to upgrade my processor and motherboard down the line, the new motherboard may not recognize the array. And these things are so fast already, I'm not sure I'd see a huge real world performance gain for the added risk.
Tweaking Windows
Making it feel like home
With the computer now up and running with all required drivers, it was time to tweak a few things that I wanted to feel more natural to me coming from macOS or just fix things that annoyed me:
- Disable User Account Control: Every time I install a new program in Windows 10, I get this really annoying confirmation dialog that takes over the full screen. While this is great for less tech savvy Windows users, it's annoying for me.43

-
Install 7-Zip: I'm just really not a fan of how Windows 10's native compressed folders work for unzipping things. I also find it way slower than 7-Zip. 7-Zip lets me right-click on any compressed archive and extract right in place.
-
Use KeyTweak to remap keys to feel more like the Mac keyboard layout: While I was able to easily pair the new wireless Apple Magic Keyboard to Windows 10, I did not have any functioning media keys. In addition, I wanted to remap the Windows key to use the current Control key instead. That way I could still use the same Cmd (Mac)/Ctrl (Win) placement. That means that things like opening a new tab in Chrome would use the same finger position for me if I was on my MacBook Pro or my Windows machine. It would make going between the two machines much less annoying.
KeyTweak is a rather complicated piece of software that took some time to get used to, but I was able to remap those keys after some poking around. I have not had any issues after setting it up the one time.
-
Install Apple BootCamp keyboard software: I wanted the Apple-style volume HUD and related features so I installed the Apple Boot Camp software. But since Boot Camp is intended for Macs that have Windows installed, by default it will want to install a bunch of other hardware drivers that I don't need. I followed these steps to only install the keyboard-specific software.
-
Install Xmeters: For years I have gotten used to seeing CPU and network activity at a glance in my macOS menubar with iStat Menus. It's just some nice peace of mind to know if my machine is doing something (or isn't doing something) that I'm expecting. Xmeters is the closest equivalent I could find for Windows. It lets you put a myriad of system stats in your taskbar.
- Install Seer for macOS-like "Quick Look" spacebar file previews: Because I've gotten way too used to selecting a photo and hitting the spacebar in macOS to preview it. There are two versions of Seer, a free one and a more advanced paid one. I went with the older free one for now.

-
Remove clutter from File Explorer:
-
Disable Quick Access: Just a matter of personal choice. I don't like Quick Access taking up space in the File Explorer sidepane. View the last reply from a Microsoft employee in that thread for the registry tweak.
-
Completely uninstall OneDrive: I'm a Dropbox user, I don't want OneDrive everywhere. After uninstalling the program regularly it still remains in File Explorer so you need to do this registry tweak.
-
Remove Adobe Creative Cloud from the File Explorer side pane: Even after completely disabling Adobe Creative Cloud's file sync functionality, the related folder still exists and can't be deleted and just keeps coming back. Another registry tweak is in order.
-
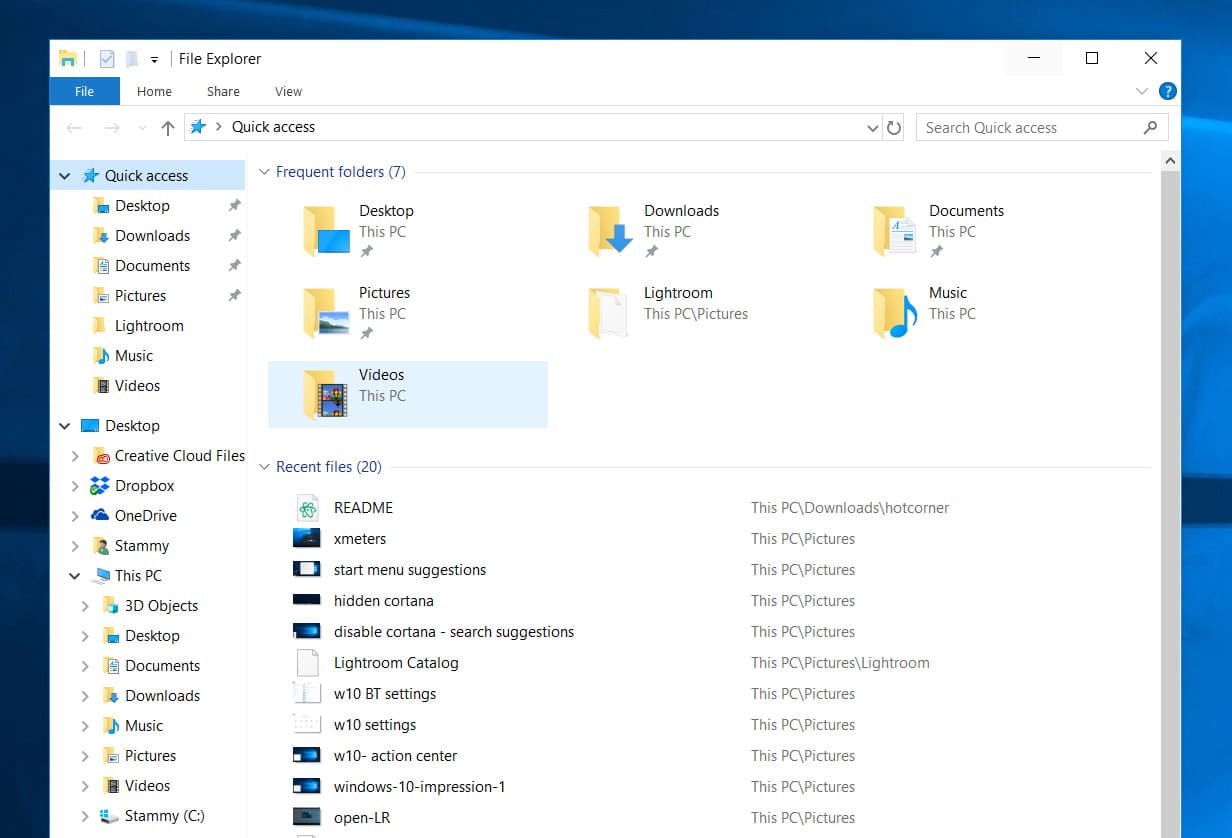
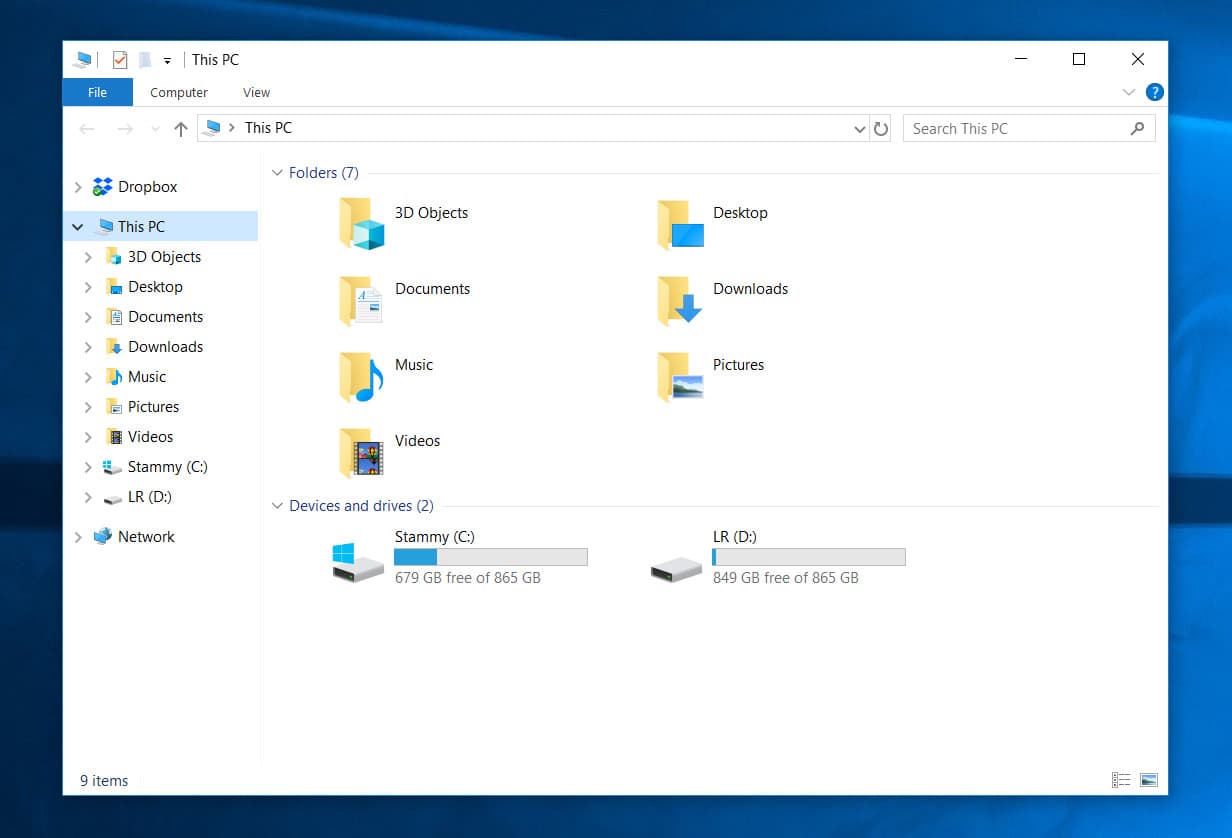
-
Remove the Recycle Bin from the desktop: I prefer to have a clean desktop. Instructions on how to do that here.
-
Rename the PC: So that I don't keep seeing some random PC name on the network or announced by my Bluetooth speaker when I connect. This setting can be found in Settings → System → About
-
Move the task bar to the top: I'm just used to having it up on top.
-
Install Virtual Desktop Manager: The good news is that Windows 10 has native virtual desktops. I often use two with one dedicated to full-screen Adobe Lightroom. While doing this a few times I kept running into issues with the standard windows hotkey to switch desktops sometimes not working while I was editing a photo. I also didn't like that the native animation to switch desktops felt a bit slow. I installed the lightweight app Virtual Desktop Manager to change the hotkey and eliminate the slow switching animation. If you need a bit more control there's also Virtual Desktop Enhancer and Peach.
-
Install Tiny Hot Corners to enable basic hotcorner functionality like macOS: After years of using Exposé/Mission Control, I wanted to bring some of that behavior to Windows to allow me to easily throw my mouse in a corner of the screen to show all windows to quickly find something I'm looking for (I also used it to quickly sleep the computer or show the desktop). Windows 8 had hot corners but apparently the implementation was more annoying and it was removed with Windows 10.
After a lot of searching I found some really bad apps that offered this kind of functionality. Then I stumbled on Tiny Hot Corners. It's an impressively minimal, no frills executable. You can only specify the coordinates of the hot corner zone, the action to be done on activation, the delay before it triggers and so on. But it does the job of opening up Task View for me when I toss my mouse to the corner and it uses very little system resources.
-
Configure keyboard to control monitor brightness using AutoHotkey: I got the monitor brightness buttons on my Mac keyboard working. One benefit to running the Dell UP2718Q is that it can be controlled via the Dell Display Manager app to adjust settings instead of fiddling with the hardware buttons on the display. This is thanks to it supporting DDC/CI.
I also realized the Dell Display Manager executable accepts command line arguments, letting me easily script something basic using AutoHotkey.44
/* AutoHotkey .ahk script compiled to .exe then autorun by Windows Task Scheduler */ #NoEnv SetWorkingDir, C:\Program Files (x86)\Dell\Dell Display Manager NumpadSub::run ddm.exe /DecControl 10 10 NumpadAdd::run ddm.exe /IncControl 10 10 -
Install Wox as a better launcher over Cortana:
As a general app launcher Cortana is fine. I can quickly click the search box in the taskbar or hit the Windows key and start typing searching. But it's not great. By default the search results are cluttered with suggestions from the Microsoft Store or the web. There are some rudimentary search filters but it doesn't appear that they can be set as the default. There is a way to permanently disable those suggestions in Cortana settings. When that's done the search field placeholder text says "Type here to search" instead of "Ask me anything" and results look like this:
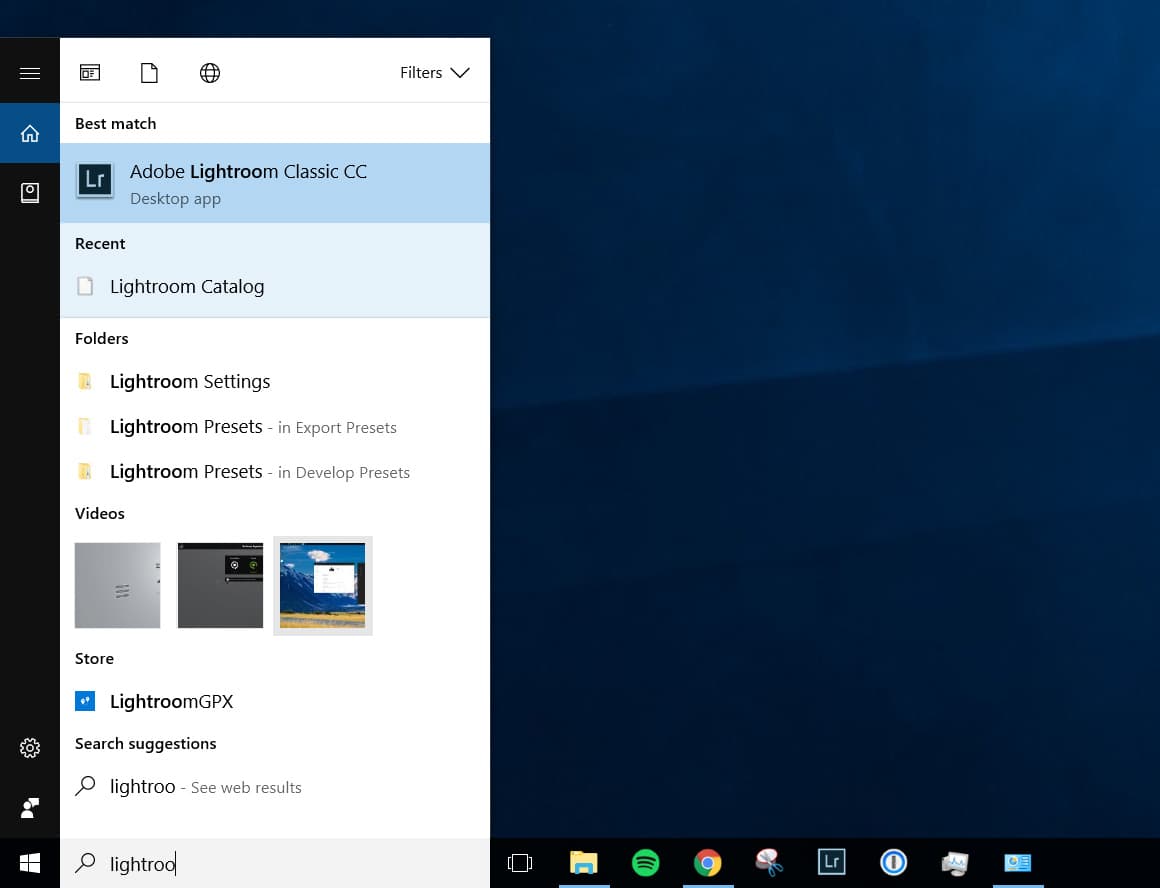
While the results are filled with fewer suggestions now, I don't like having the expanded search box taking up space in the taskbar and if I hide it, I'll still be pressing a hotkey to open up search. If I'm doing that, I might as well look for a better alternative. One that's even a bit simpler.
Enter Wox. It's a basic Spotlight/Alfred equivalent for Windows. I use it to launch applications and search for local files easily. To do the latter I have to install a separate indexing service called Everything. It can do a bit more than that with various plugins you can configure. But this may be temporary — it seems like search on Windows is gearing up for a nice upgrade.
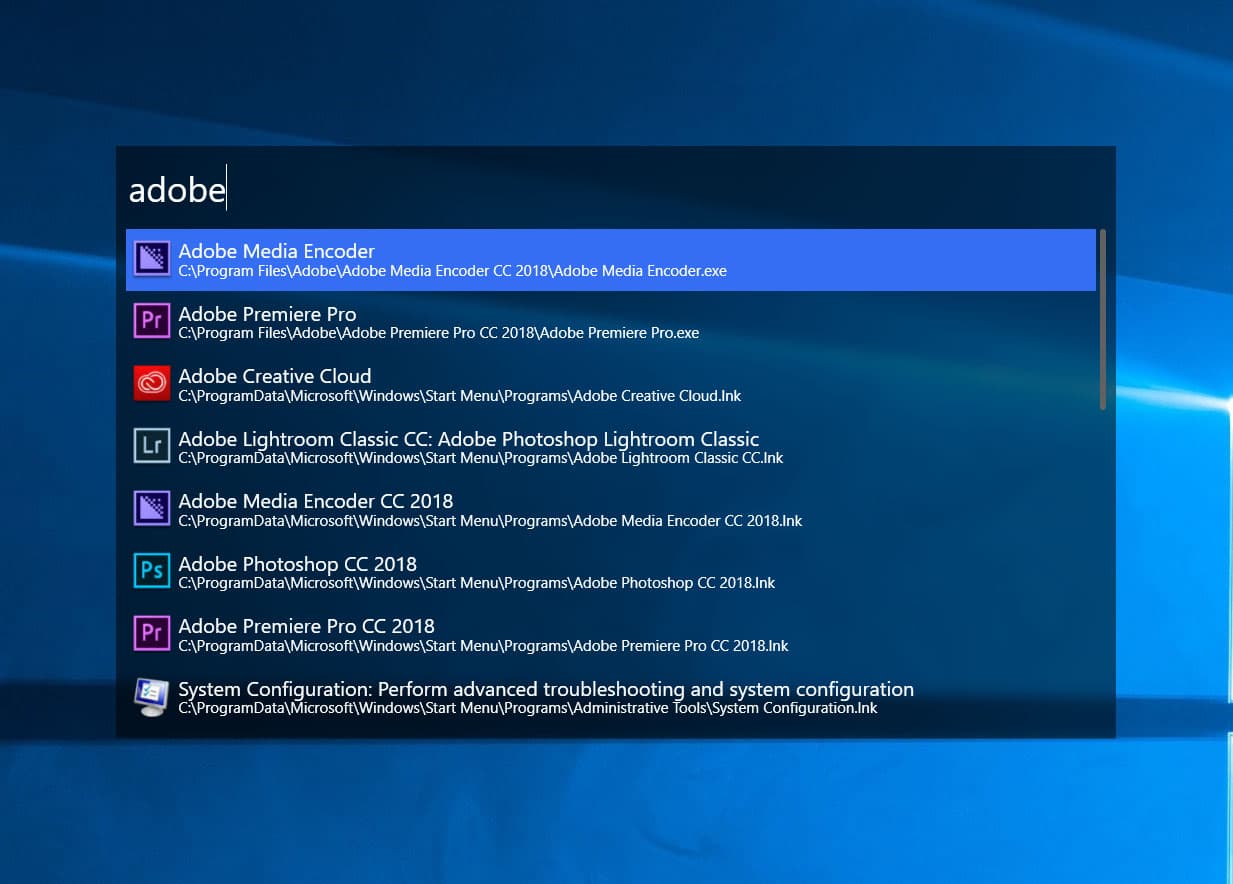
Developer mode + Linux!
Enabling the Windows Subsystem for Linux
It is now possible to run a full Linux environment right inside Windows. This means you can install Ubuntu or another distro and get access to the same bash prompt you'd expect inside Ubuntu. It was this new Linux functionality (that I read about on Owen's blog several times) that was partially responsible for my initial curiosity in Windows 10 and building a new PC. It meant I could also easily carry out my basic web developement tasks to maintain and publish to this site. For me that means a simple Ruby and Node development environment.
The Windows Subsystem for Linux lets developers run Linux environments -- including most command-line tools, utilities, and applications -- directly on Windows, unmodified, without the overhead of a virtual machine.
I really can't understate the magnitude of this. There are some quirks and not everything is smooth sailing but I've been able to adapt my workflow to it just fine. Your mileage may vary.
First I needed to enable Developer Mode and the WSL feature. I also found some nifty settings on the "For developers" page to change several File Explorer settings like showing the full path in the title bar by default as well as displaying file extensions and hidden files. The entire setup process is pretty straightforward and documented on Microsoft's site: pick and install a Linux distro then create a UNIX user account.
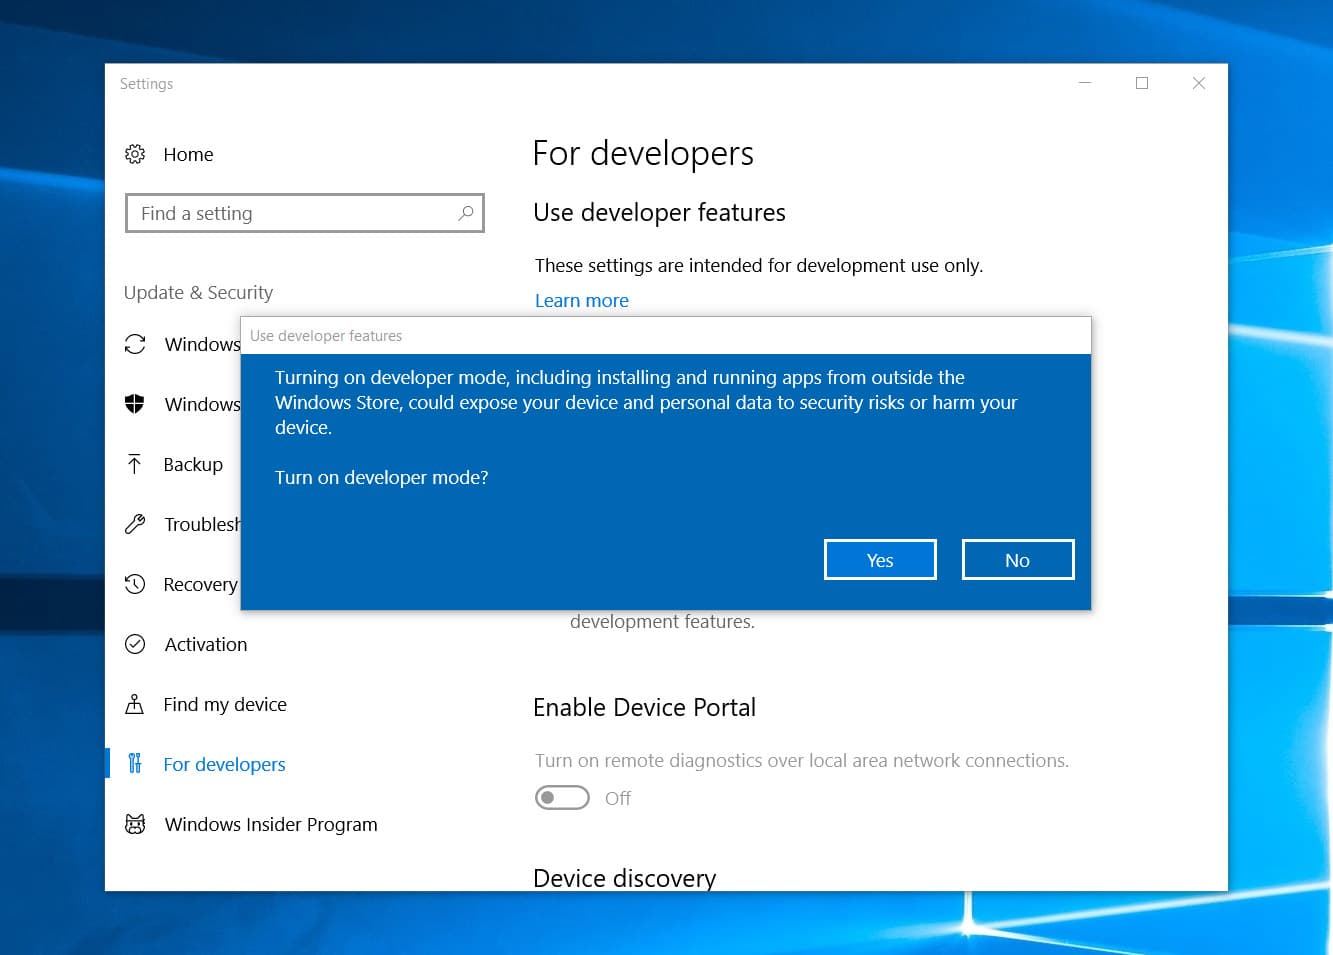
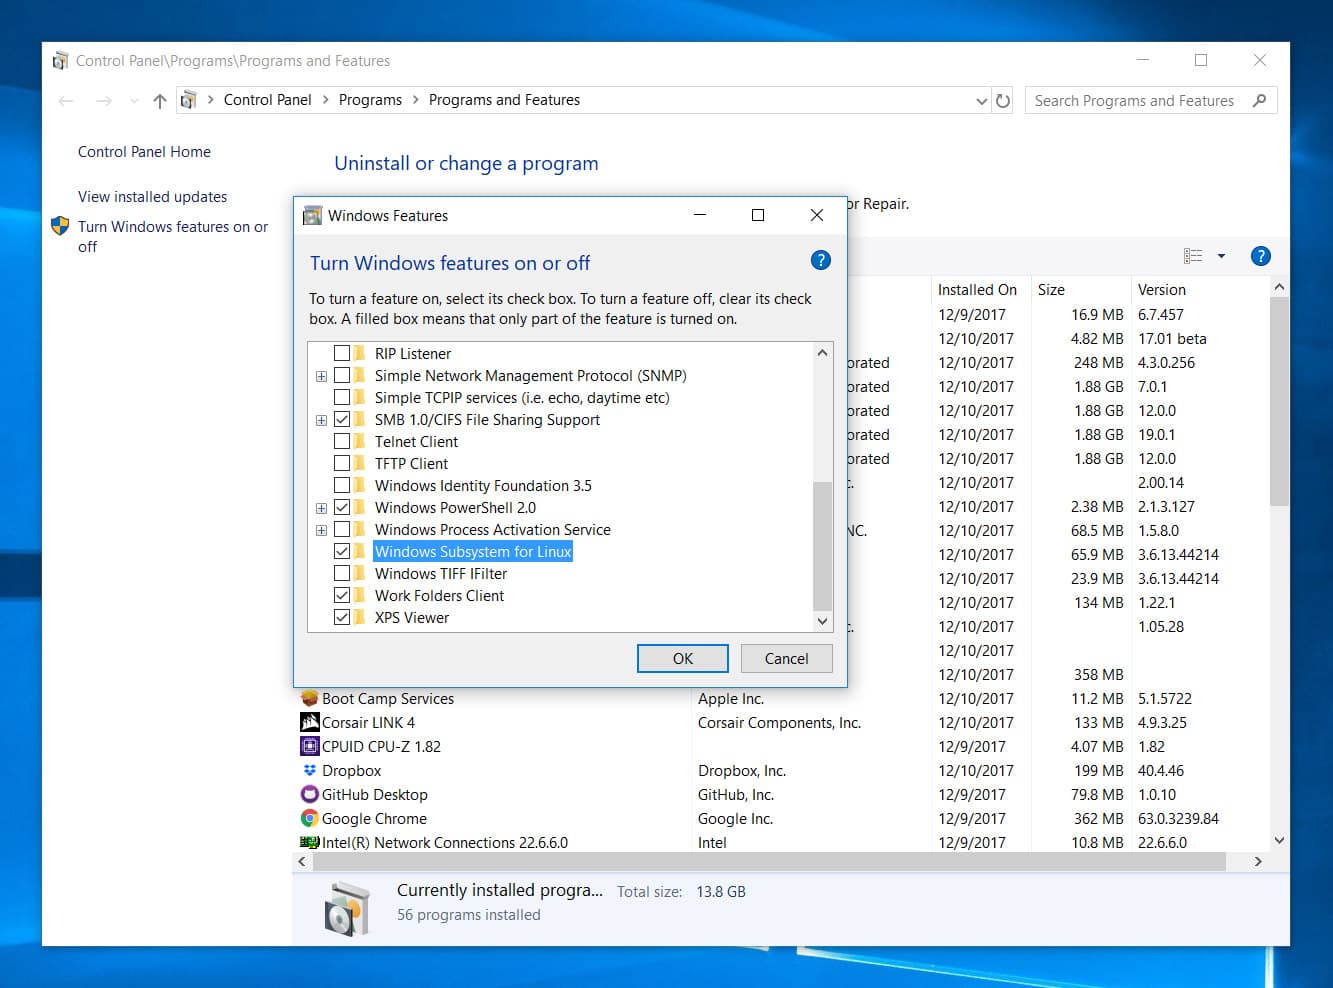
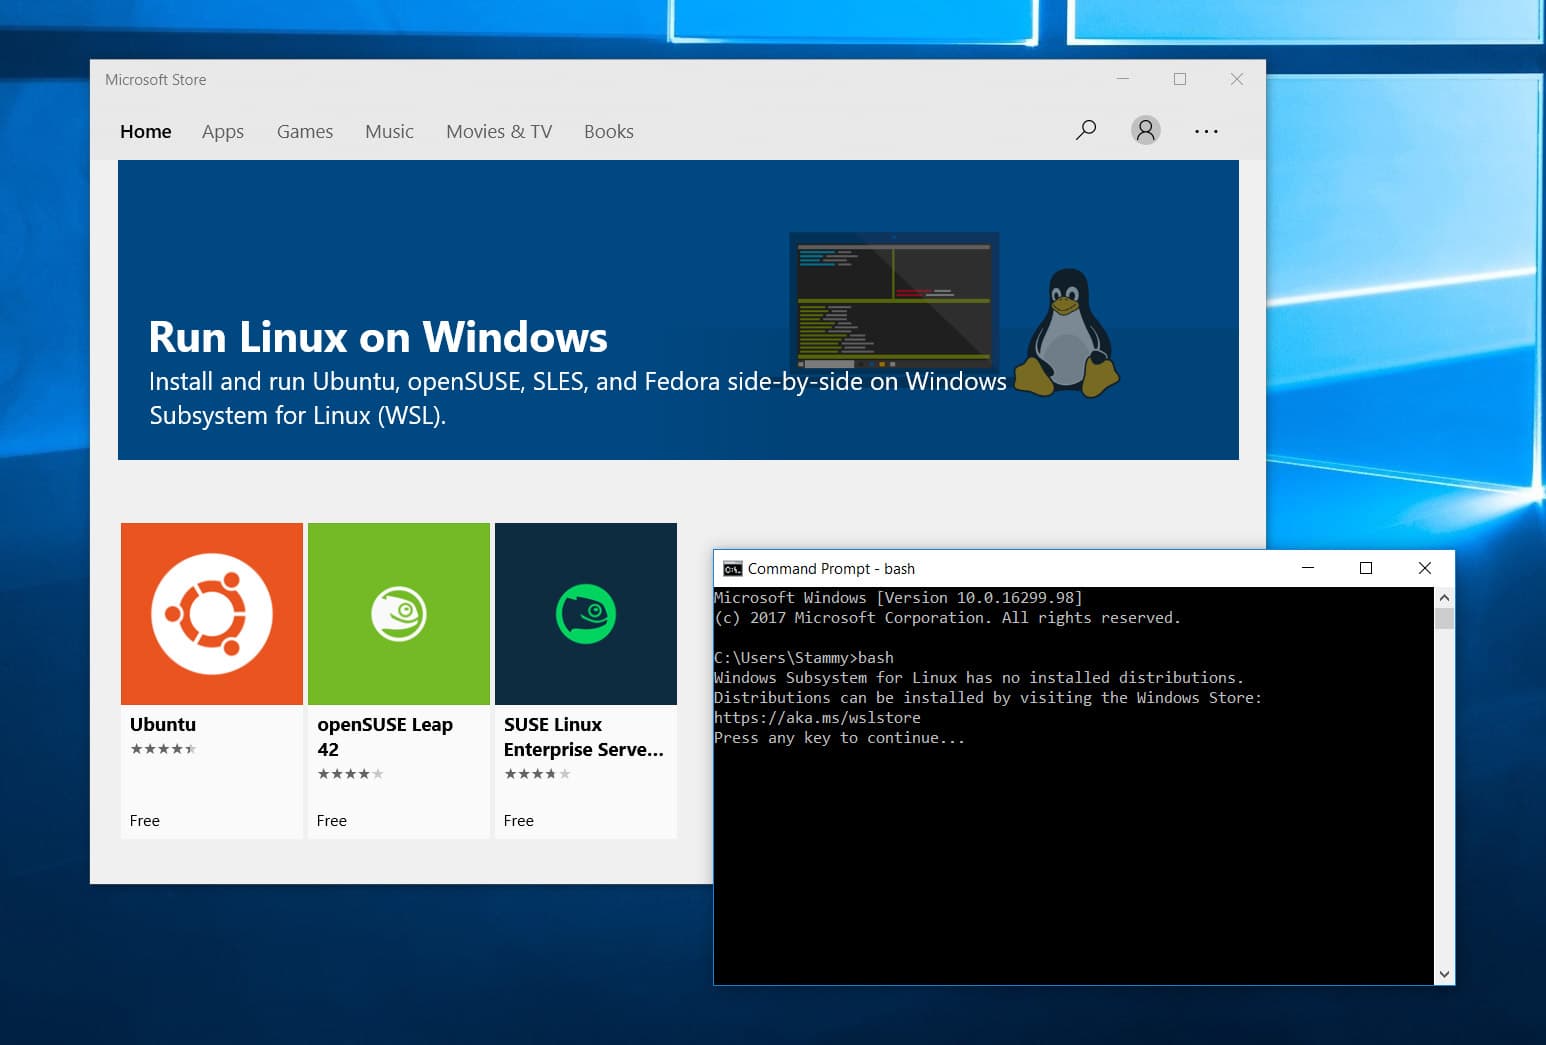
After that's done you can now just type bash inside any command prompt to get access to your Linux distro's shell.
Install Hyper terminal
It didn't take long for me to dislike the included Command Prompt and PowerShell command-line shells in Windows 10. I wanted something more customizable. I went with Hyper.
There are a few ways to install Hyper but I used Chocolatey to quickly install it for me. Chocolately is like the Homebrew package manager on macOS or apt on Ubuntu. Chocolately also has a GUI you can install if that's more your style. A few moments later I had the lovely Hyper terminal up and running.
It's rather novel compared to other terminals I have used in that it's built with web technologies.. you can even open up a web inspector for the terminal itself! When you want to add a plugin, you just type in the name in the .hyper.js preferences file and when you save the plugin is automatically downloaded and installed behind the scenes with npm. It's super easy to get started and there are a ton of plugins and themes. Unfortunately, despite all my tinkering, it seems like it's not possible to get a transparent or translucent terminal background for the Windows version of Hyper.
After spending too much time checking out various Hyper plugins and copying over some of my .bash_profile alias and tweaks, I was ready to get back to work.
By default Hyper uses the Windows system prompt. This means that whenever you want to access your Ubuntu bash prompt you need to type bash at the prompt. This got annoying pretty quickly so I configured Hyper to make that my default prompt. There's just a line you can uncomment in the preferences file:
shell: 'C:\\Windows\\System32\\bash.exe',
I also installed my preferred terminal font "M+ 1m" and set it as the typeface for Hyper.

Hyper after a few tweaks. I like a fairly simple and dark style. Used one of these wallpapers for the background.
Setting up my dev environment
My site is all static flat files and based on the static site generator Jekyll so I needed to set up a ruby environment. I also work with my site on my laptop here and there so I prefer to install the exact same ruby version on both machines. I find it easiest to manage ruby versions with rbenv. I installed rbenv and ruby by following along with parts of this guide (or any basic Ubuntu ruby setup guide) and then running a bundle install in my Jekyll directory to install the gems I use.
That was pretty much it! I also installed ImageMagick and grunt, which I use for a few things. I also resize my photos a few times, compress them and convert some to WebP. I have always done the former with a grunt script but I had a Mac app I used for WebP conversion. I started looking around for a Windows equivalent to let me batch convert photos to WebP and found the lovely XnConvert. Caesium Image Compressor is also a solid runner-up but I found XnConvert to be more capable.
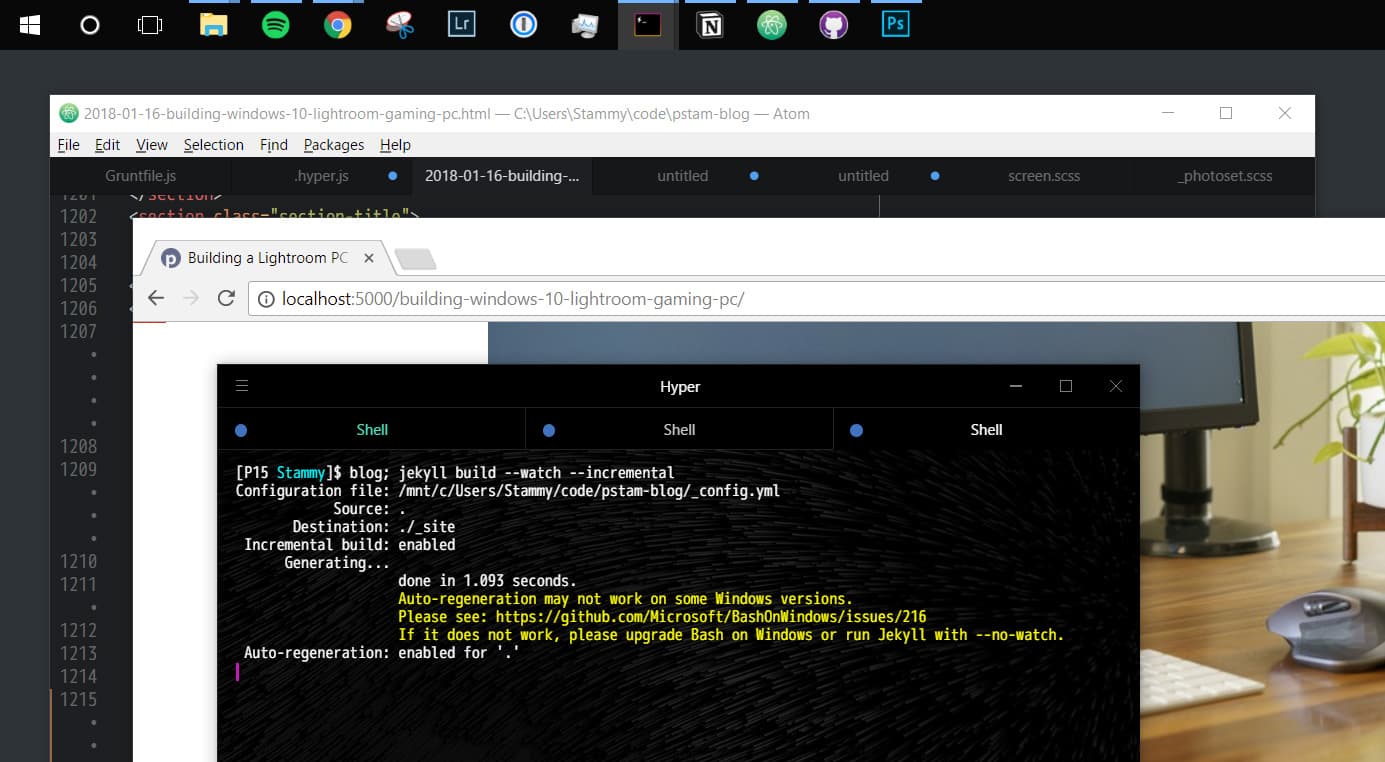
There are a few gotchas associated with this WSL setup. The main one is this: you can't edit a file that originates from the Linux userland inside Windows. My workaround was to pull down a git repo in Windows, edit it in Atom on Windows and have Jekyll in Linux work with the files. The catch was that I had to ensure I had git force convert line endings for me:
git config --global core.autocrlf true
But you won't run into that issue as long as you do all your Linux stuff inside Linux and all your Windows stuff inside Windows.
Configuring Lightroom
What I do after a clean install
The first thing I do with any new Lightroom installation is move the catalog to my Dropbox folder. I have done this for years, initially to sync catalogs when I used them interchangeably between my Macs as I mentioned in Storage for Photographers (Part 2). But with this new PC, I pretty much only do my editing here so syncing is less of a requirement now.45 But I digress, I like having the catalog backed up in case I mess something up I can quickly revert.
Since I move the RAWs I'm no longer actively editing to my NAS, I went to File Explorer and mapped the NAS as a network drive. I set it as Z:\ and went into Lightroom and updated the locations of archived sets to the new drive path. When I'm done editing a photoset I just drag the local folder to the NAS network drive inside the Lightroom Library module.
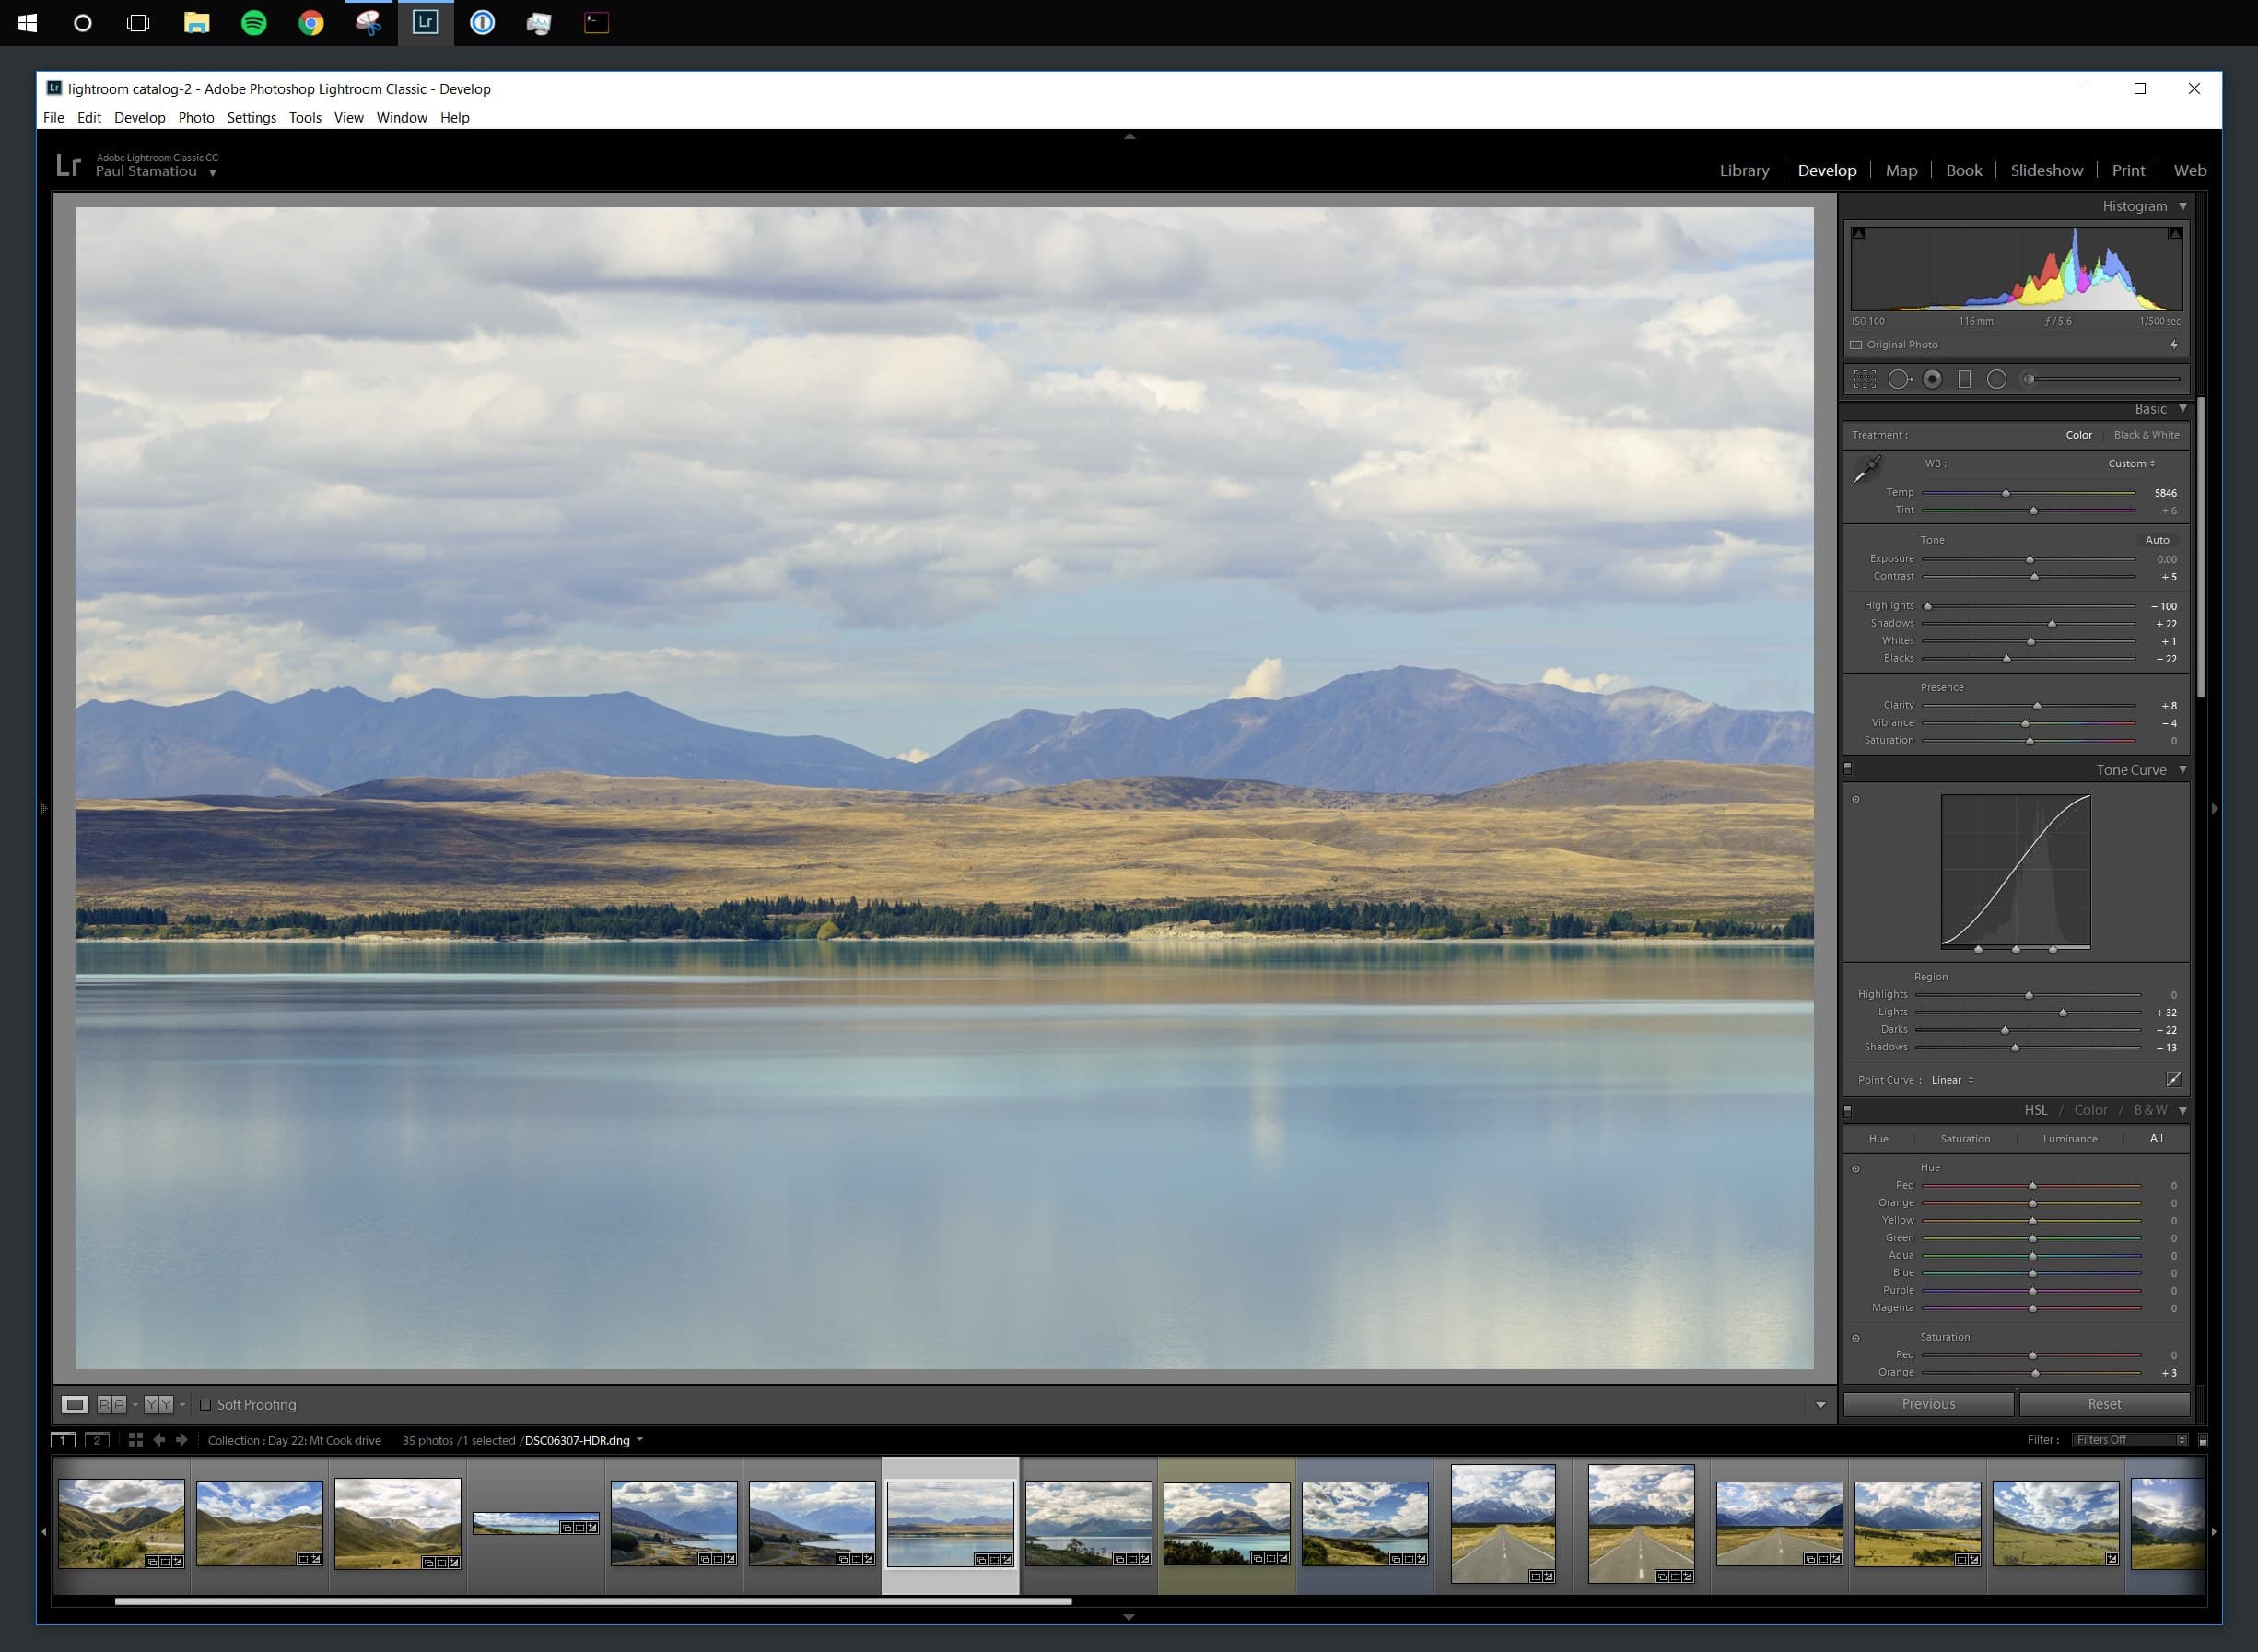
Lake Pukaki, Mount Cook, New Zealand
There's not much I need to do aside from tweak a few settings and install one thing to get Lightroom to my liking. I don't really use presets or plugins.46
- Install VSCO Keys: Once a paid app, VSCO Keys is now free and open source (though not updated anymore) shortcut tool I use to speed up my editing workflow. I mainly use it to copy and paste develop settings across photos quickly: I just tap
,to copy develop settings on a photo and.to paste. It can also map keys to some other functions. It has been said that VSCO Keys was broken with Adobe Lightroom Classic CC but I was able to get it to work, so maybe that was only for the Mac version. If you happen to be reading this and use a Mac, I much prefer PFixer CORE.
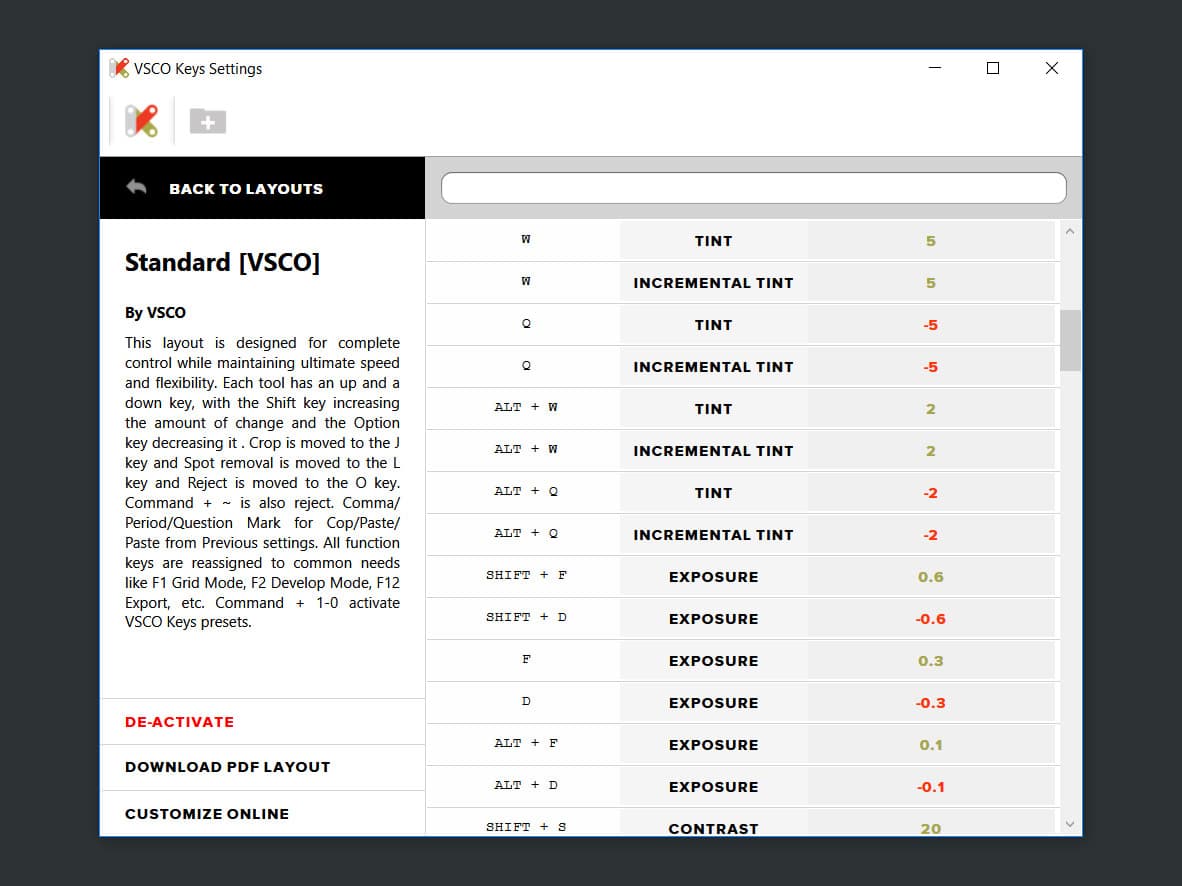
Some of the many customizable hotkeys.
-
Keep NVIDIA drivers up to date and ensure GPU acceleration is enabled: While Lightroom doesn't put the GPU to the best use, it is particularly helpful if you're on 4K display. It was enabled for me by default, but good to double-check.
-
Save presets inside catalog: While I don't use many presets, I like having them stored inside the catalog and backed up. Handy if you have any synced catalogs across computers.
-
Increase Camera Raw cache to 20GB or more: As instructed by Adobe in their optimization guide. I went to 50GB given that I'm working with much larger 42MP RAW files so I might hit 20GB more readily.
-
Set JPEG preview to full size for DNG creation I don't convert my RAWs to DNG too much. There is said to be some performance gain but I can't really tell the difference for it to be worth the lengthy upfront conversion time. But if I end up changing my workflow in the future to use more third-party culling apps, I would want larger JPEG previews baked into the DNG. I might dabble with this more this year.
-
Set Default Develop Settings: [See example.](https://turbo.paulstamatiou.com/uploads/2018/01/copyright-paulstamatiou_com-lightroom-classic-cc-set-default-dev-profile.jpg "Lightroom Classic CC - Set the default camera profile for Develop module") Whenever I import new photos from my camera, I'd like to have my default develop settings applied automatically. I don't have many default settings — just Remove Chromatic Aberration, Enable Profile Corrections47 and set a camera profile other than the default Adobe Standard. As I mentioned above, the list you see in the Camera Calibration » Profile dropdown will vary depending on your camera manufacturer. For my Sony A7R III with Version 4 processing, the profiles feel a bit different from my A7R II so I'm still trying to see what I want to set as my default. Likely Camera Standard or Camera Neutral.
To change these defaults, go to the Develop module and change any settings on a particular photo that you would like to have as the new default for every photo from that camera. When you're doing tweaking, hold down the
Altkey on Windows then click "Set Default..." in the bottom right and accept the dialog that comes up:

And now I just fullscreen Lightroom and get to work:
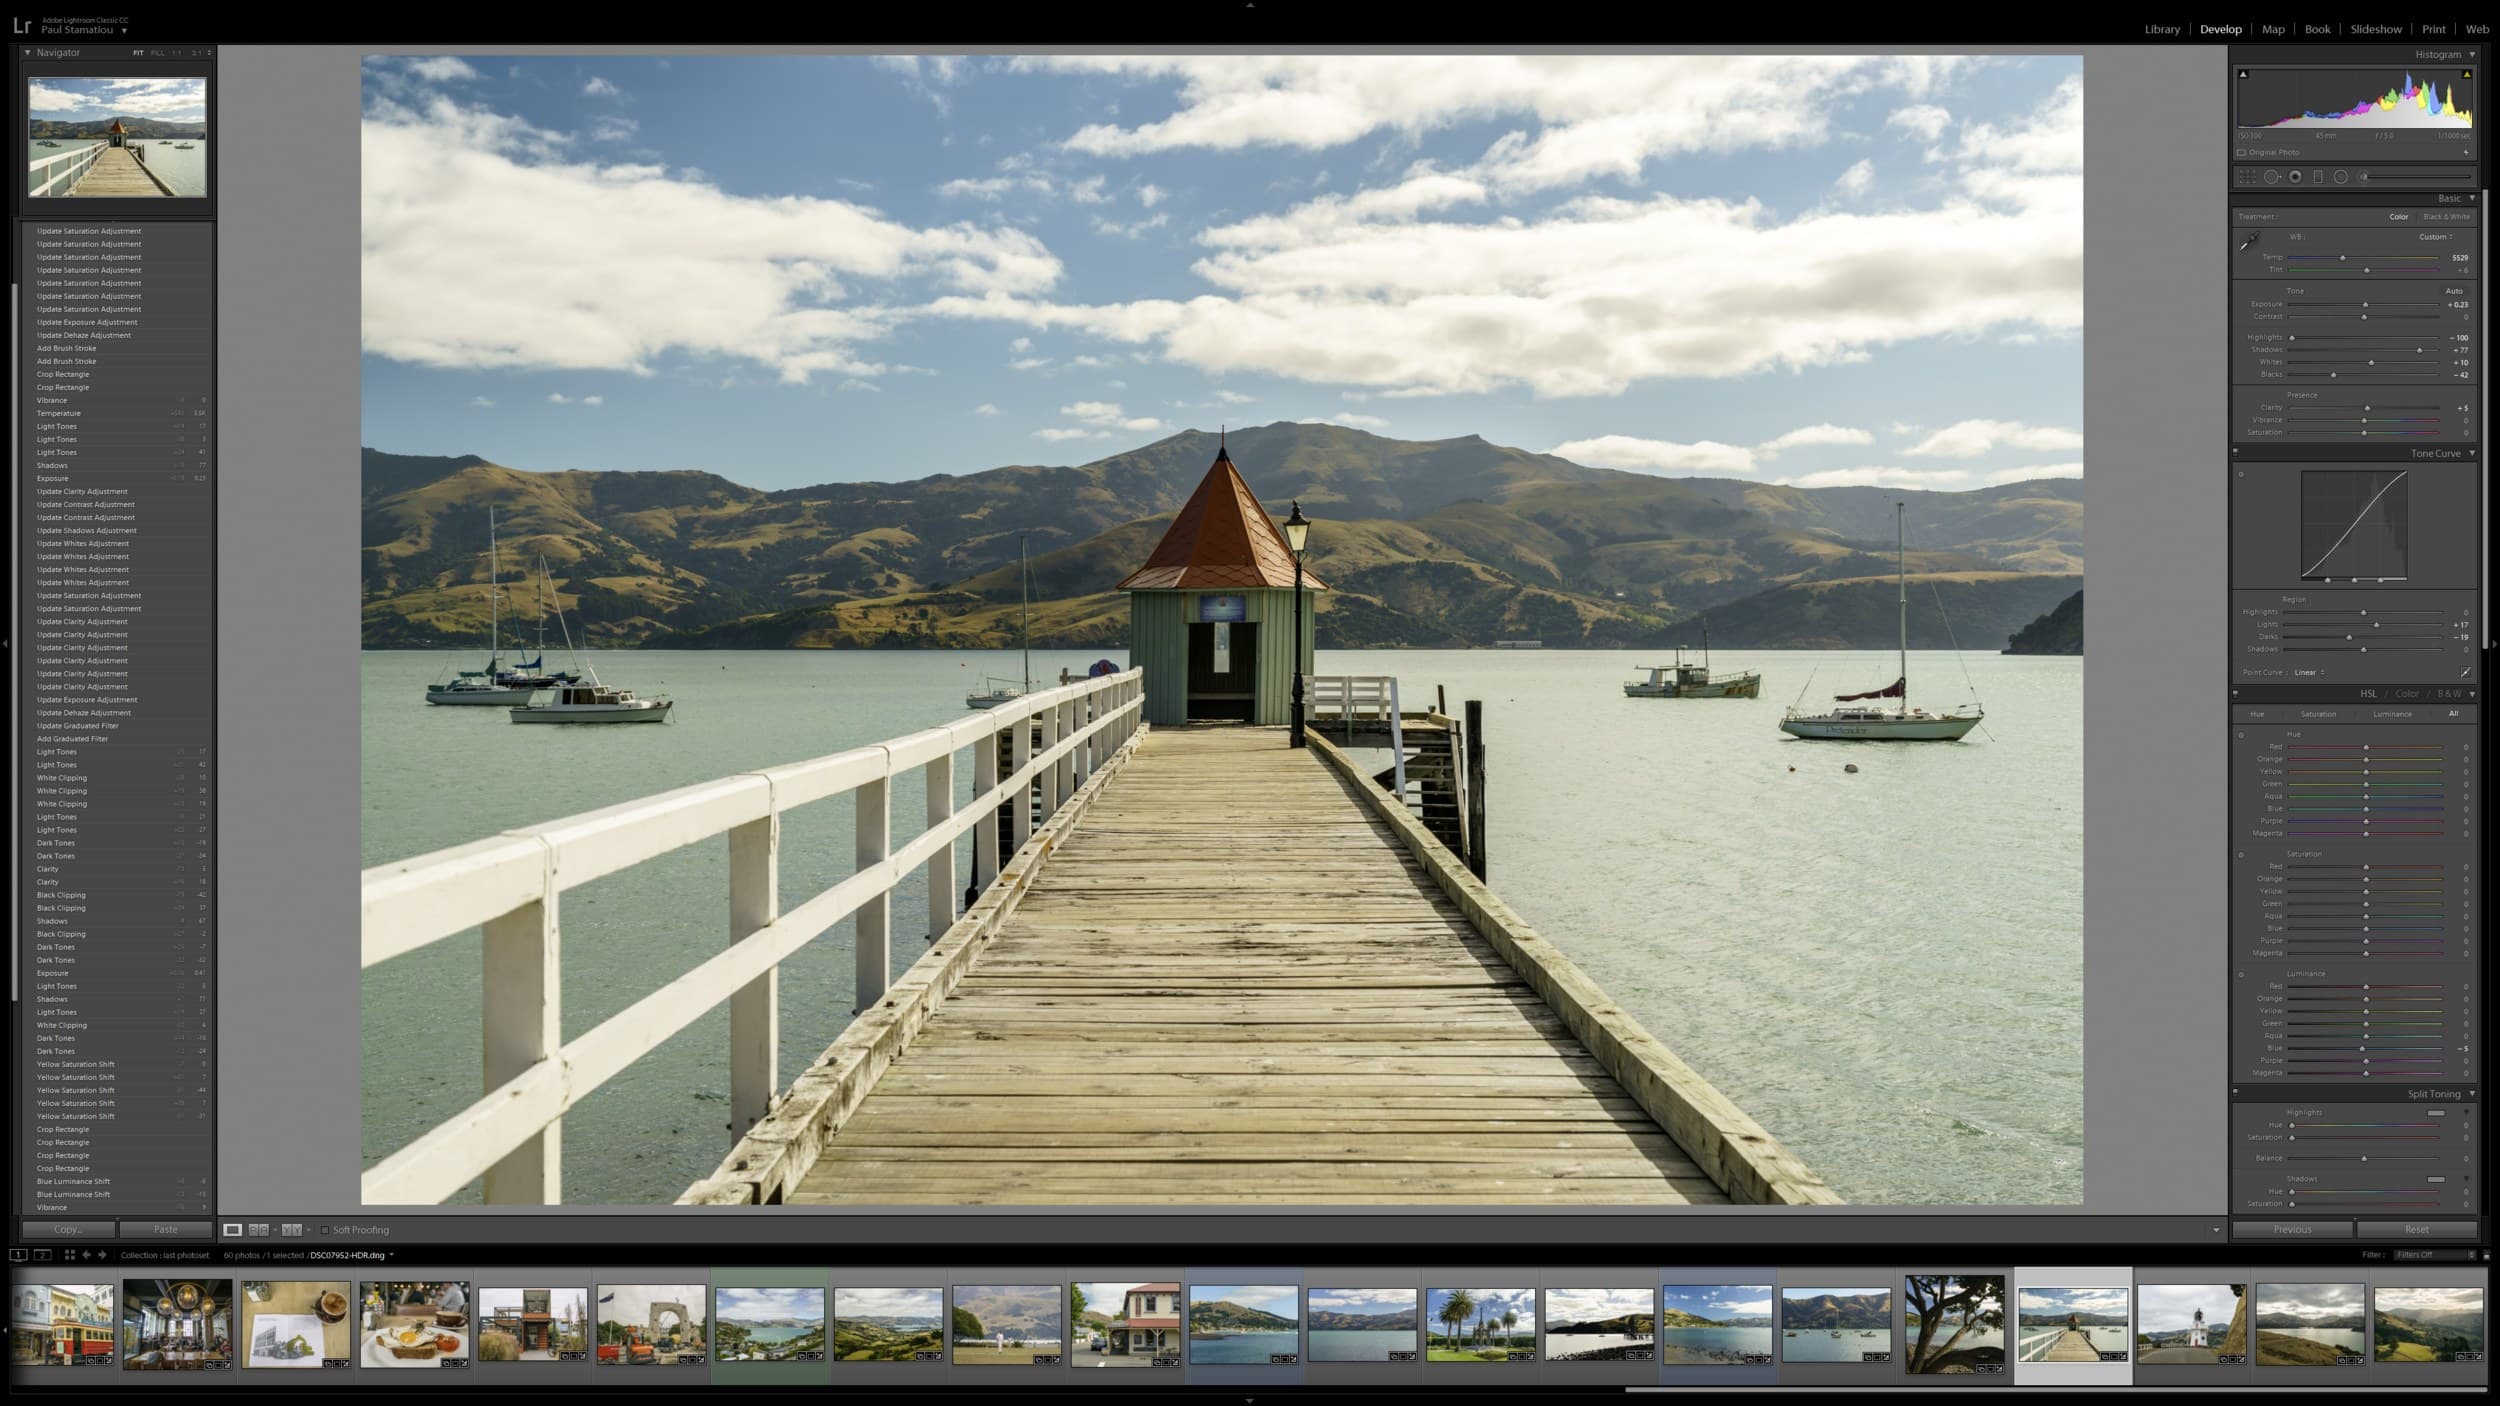
I usually have Lightroom fullscreened in its own virtual desktop. Akaroa, New Zealand
Performance
Overclocking & putting the new build to work
I set out to build a speedy Windows 10 PC mainly for my Lightroom photo editing work. One that would be easily upgradeable. How did I do on that goal?
Well there's still one more thing to do — overclock! I built this computer with the intention of getting some extra performance by overclocking the CPU, RAM and GPU a bit. Especially with many of the parts I purchased being geared towards the overclocker enthusiast. With a delidded processor and liquid cooling system with a large dual-140mm radiator, I should be able to achieve a high and stable overclock to run 24/7 for this processor.
I spend the majority of my time in the Develop module, a part of Lightroom that does not really put extra processors cores to work efficiently. As such, I opted for relatively fewer CPU cores (compared to going with 8, 10 or more), but with a very high clock speed compared to tons of cores with a lower clock speed.
But why did I opt for 6 cores instead of 4 cores? It seems like I would be able to achieve a better overclock with the 6-core i7 8700K than I would with the 4-core 7700K, meaning I could have my cake (extra cores) and eat it too (overclocked for a high clock speed). This wouldn't be the case for an 8-core chip where I wouldn't be able to reach 5GHz+ on all CPU cores and where the extra cores wouldn't be put to use well with inefficient Lightroom.
And I got lucky. The Intel i7 8700K I have happens to be made from better silicon than other 8700Ks and I can get away with a stable 5.2GHz overclock on all cores. Compare that to the stock setup which would only ever run all cores at a Turbo Boost of 4.3GHz (the advertised 4.7GHz Turbo Boost is just for one core). As a secondary benefit, the two extra cores markedly improve my Premiere Pro video editing performance; that was not my goal as I use Premiere Pro much less, but it's nice to have. Going with 6 cores seemed like the right choice given the current Lightroom implementation. If Lightroom keeps getting better at multi-core performance for Develop actions, then that would not be the case.
Overclocking
How and what did I overclock?
There are two main ways to overclock the CPU: in the UEFI or using a Windows program like the one provided by the motherboard manufacturer. While you can tweak the overclocking basics quickly with the Asus AI Suite 3 in Windows, it doesn't contain every piece of functionality. The controls exposed by the UEFI for this Asus Maximus X Hero motherboard can be very daunting at first. There are pages and pages of discrete settings, voltages, frequencies and more that you can adjust and test.

As much as I would like to provide a guide to overclocking here, that would add many pages to an already long post, and more important: I'm not an overclocking expert. In a nutshell, it is lots of trial and error: increase the CPU Vcore voltage a tiny bit, increase the CPU multipier a few steps, see if it boots and is stable, repeat until unstable, then back down until stable and lower voltage as necessary.
Fortunately, overclocking is much easier than it was in the past.
Many enthusiast motherboards have simple two-digit error code displays directly on them to help you understand why your machine is not booting. And if you attempt some crazy settings, the motherboard will most likely catch the error and simply reboot for you with safe settings. There are other related motherboard safeguards too, like if you somehow corrupt your BIOS and you can't POST at all, you can use BIOS (again, it's UEFI but half the stuff is still labeled BIOS) flashback feature to plug in a USB port with a firmware file to flash or update your BIOS. Back in the day a corrupt BIOS flash would have just meant a dead board.
Even with those new debugging tools and safeguards, your first time overclocking can still be a nerve-racking experience. Intel now lets you purchase a performance tuning protection plan. I think it's a bit gimmicky but it's insurance: Intel will replace your CPU once if you kill it. I've only killed a processor from overclocking once — a 3.06GHz Northwood Intel Pentium 4 that I sent too much voltage to — and that was in 2002 and Intel sent me a free replacement anyway. I do applaud Intel for being so overclocker-friendly these days though. Of course, I already voided my warranty by delidding the CPU so that protection plan is not an option for me.
Fortunately, it's easy to find great overclocking guides for your exact hardware as well as general rules of thumb:
- GTX 1080 Ti graphics card overclocking: A good starter guide on using the ASUS GPU Tweak II software to eke out some extra performance from their ROG Strix GTX 1080 Ti.
- GTX 1080 Ti Overclocking Tutorial: An easy to follow video guide on overclocking the GTX 1080 Ti but this time using the MSI Afterburner software which I tend to prefer as well.
- GTX 1080 Ti extreme overclocking guide: For those that that are comfortable flashing their card to an XOC BIOS for more voltage controls, or even extreme liquid nitrogen cooling and hardware voltage mod tweaking.
- The Kaby Lake overclocking guide: Yea I know this is not a Coffee Lake guide for an 8700K but it's a thorough guide written by ASUS themselves that is a fantastic primer for navigating around the UEFI BIOS on ASUS Maximus boards and more.
- 8700K + Maximus X Hero overclocking guide: And a great video tutorial walking through the UEFI BIOS and explaining what things do as it's being overclocked using my exact hardware.
- RAM overclocking: While memory overclocking is covered sufficiently in other guides, here's a much deeper dive on the topic for those interested.
Results
I'm still finalizing my exact settings but it's looking like this is a stable overclock (CPU-Z validated) for me:
- CPU: 5.2GHz (52 CPU multiplier, 47 uncore multiplier) on all cores at 1.42V with -2 AVX offset
- GPU: 2012MHz GPU clock, 5602MHz memory clock (11,204MHz DDR effective clock) at 1.06V with 120% power limit
- RAM: DDR4-3333 at CL14 at 1.4V (using Maximus Mode 2)48
The graphics card overclock isn't terribly necessary given that Lightroom doesn't use the GPU too much and it's already such a fast card and I won't see any real gain in games as I'm already exceeding 60fps with 4K gaming.
Given that this is quite an overclock, I should probably mention the idle and load temperatures. With the Corsair liquid cooler set to silent mode, the idle temperature runs somewhere between 29-32°C depending on the ambient temperature in my room. Under Lightroom loads with the fans kicked up, it will approach 55°C. Under complete 100% load like with a benchmark or Premiere Pro rendering a video, loads it could reach up to 72°C.
If I keep the fans in silent mode, I hit around 79°C at load. Given that this is with a delidded CPU running higher voltage than normal and on water, it seems unlikely that such a high overclock could be sustained without a good liquid cooling system. Compare to the max load temperature of around 52-56°C that I saw at stock clock (4.3GHz Turbo Boost on all cores).
Benchmarking
What do six 5.2GHz CPU cores mean for Lightroom?
Now that everything is finally and up running as I had intended, it's time to see how this new PC stands up to my typical Lightroom workflow. First off, Lightroom Classic CC opens up quickly in about 5 seconds thanks to the 960 EVO M.2 SSD.
The actions I care about are all in the Develop module: things like the responsiveness of dragging around the spot removal tool or adjustment brush, as well as simply scrolling through the filmstrip with Lightroom fullscreened on my 4K display. Unfortunately, I do not know of an easy way to benchmark actions in the Develop module.
Anecdotally, I can say everything in the Develop module is faster. I wouldn't say it's instantaneous or snappy — I mean we're still dealing with massive RAWs using relatively unoptimized software. But it's a marked improvement. I'd like to think this is the best performance I'd be able to achieve in the Develop module with any number of cores; only a higher clock would help more.
Then there's the items that are easier to benchmark: import, export, DNG creation and HDR merging. They are mostly ones that can benefit from more cores and to varying degrees.49 While I did benchmark these tasks, they're not really the type of task I was aiming to optimize with this build, so showing these results is a bit moot.
I selected a set of 350 42MP RAWs (~15GB) from my recent visit to the Cayman Islands and ran them though importing (with the copy option), 1:1 preview generation, DNG conversion and exporting. I ran these all multiple times and averaged everything. Since I initially built this machine with a quad-core Intel 7700K and Asus Maximus IX Code motherboard before upgrading to the 8700K, I also ran the benchmarks on that rig. In addition, I benchmarked each without an overclock and with. For the 7700K I was able to get to 5GHz stable and with the 8700K I'm at 5.2GHz on all six cores.
I'm not a professional benchmarker so I wouldn't say these results are totally accurate, but directionally accurate. For example, I think on my earliest 7700K benchmarks, I didn't wait long enough after import to start building previews and Lightroom was automatically applying my default camera profile corrections at the same time. That probably would have made that time a tad faster.
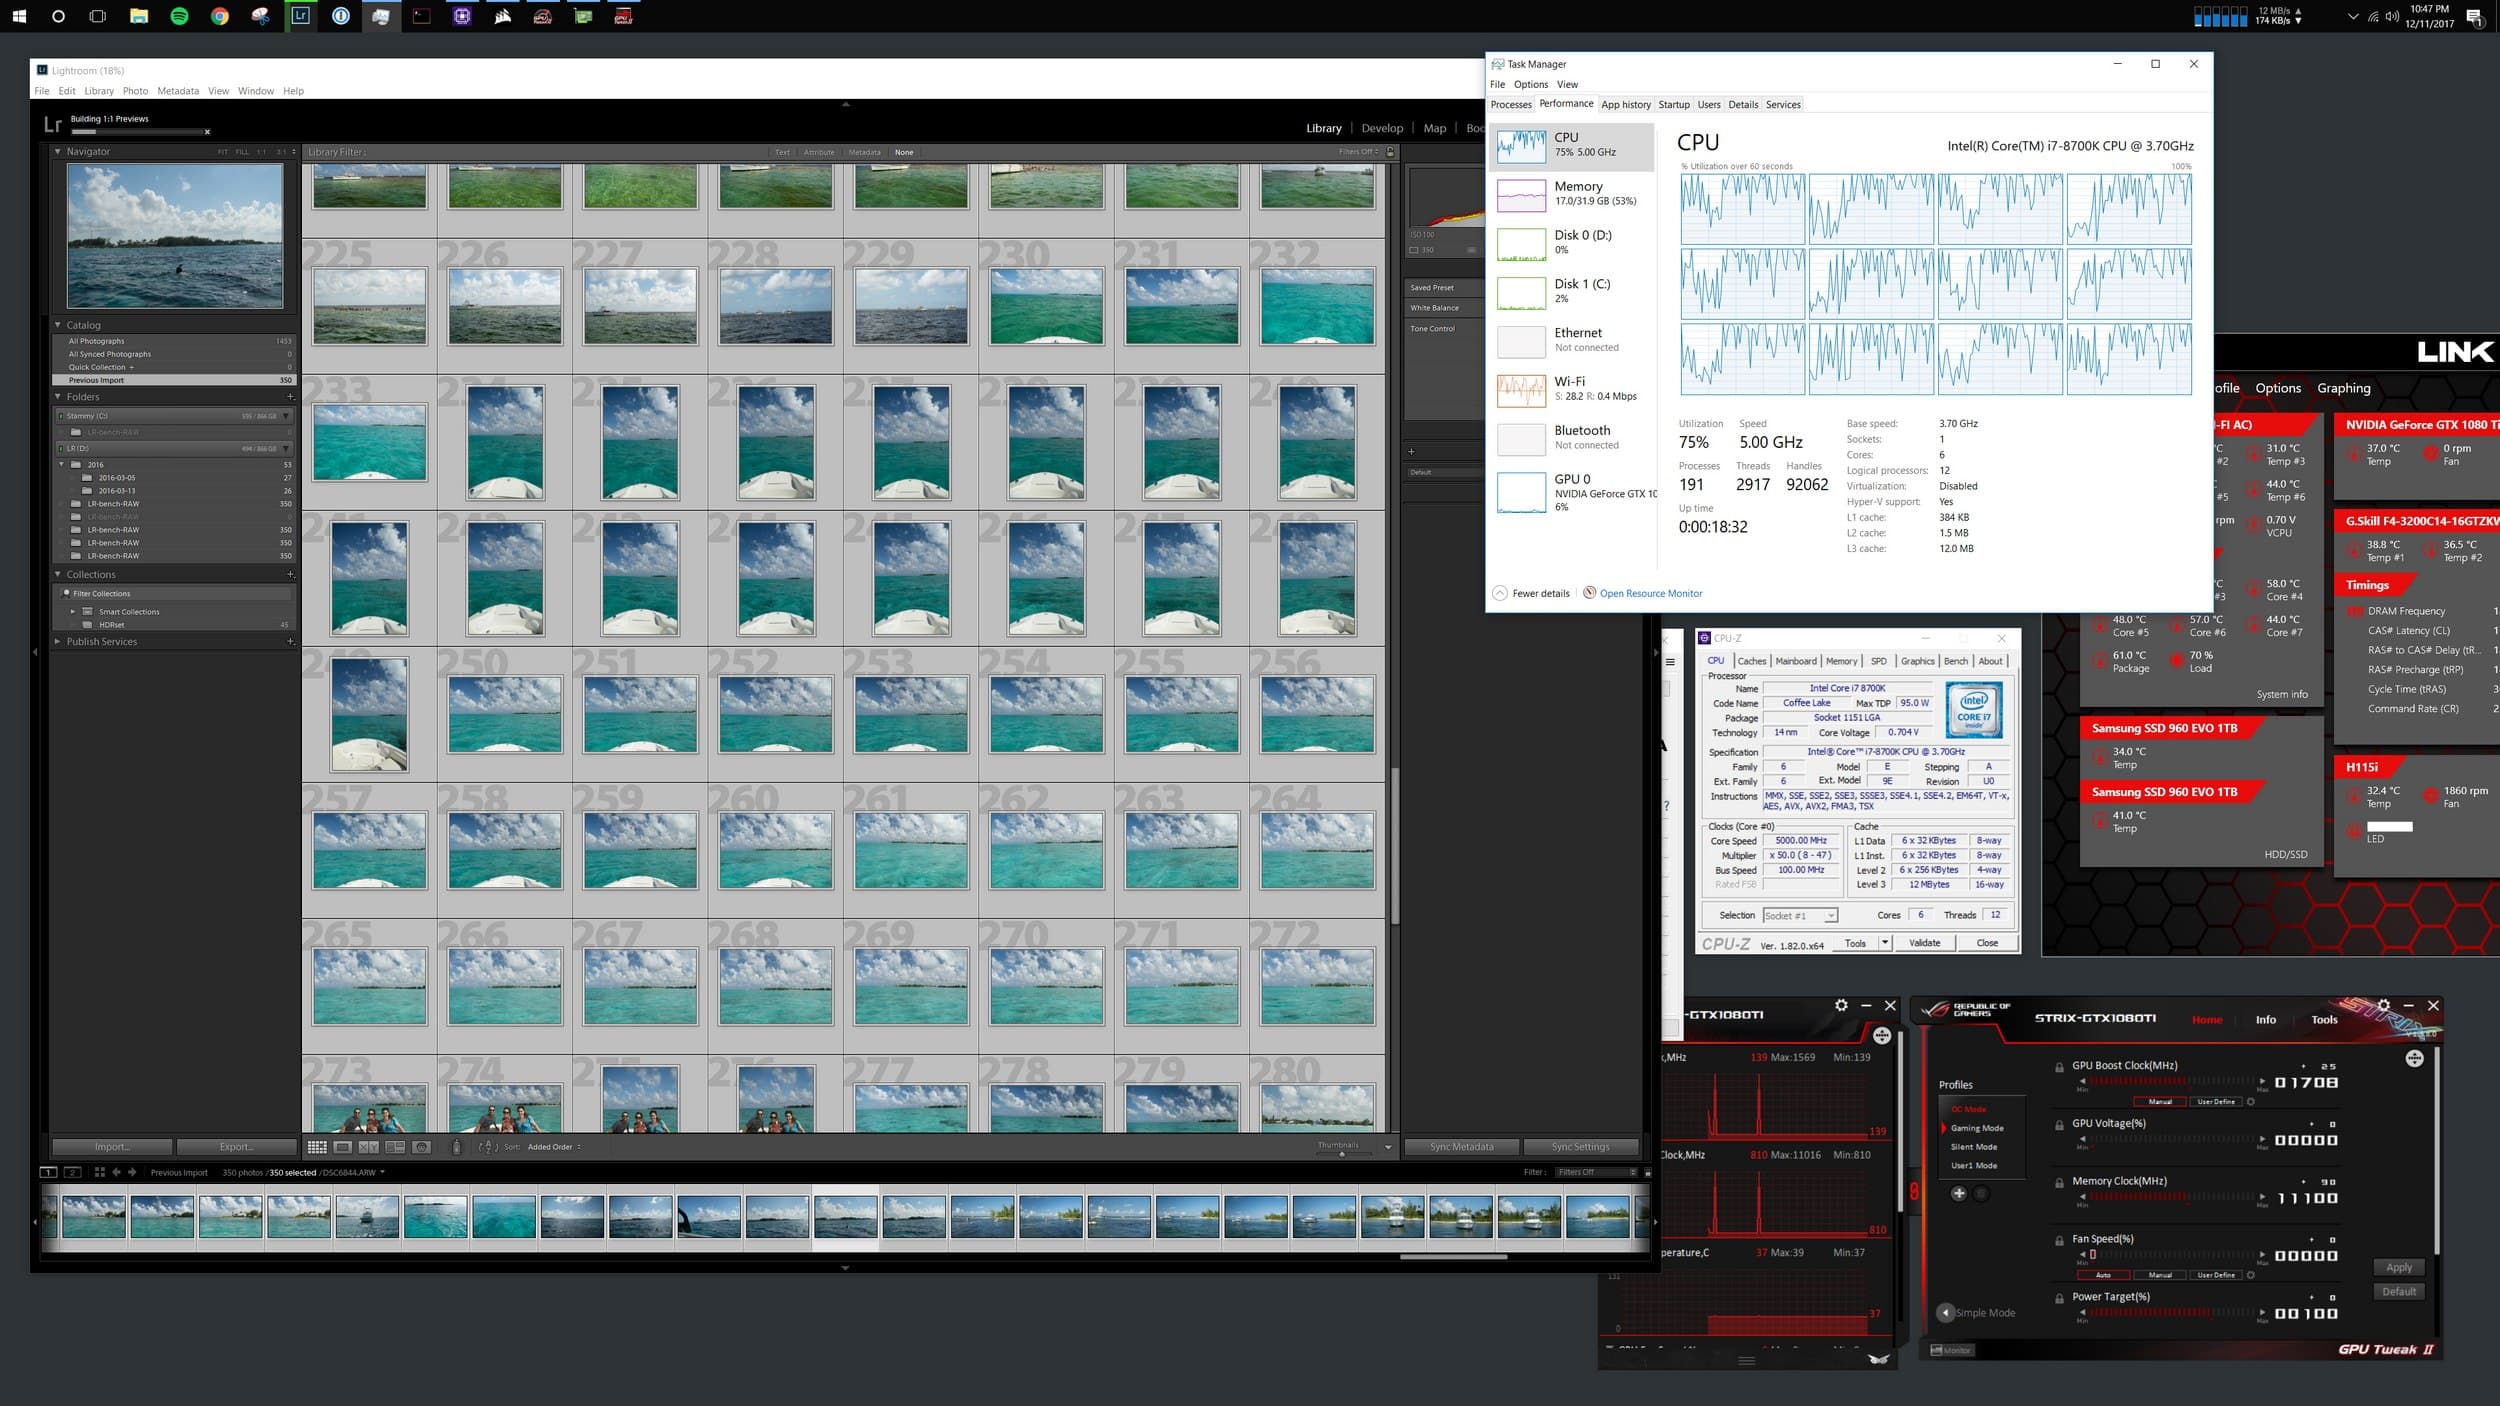
Building 1:1 previews on 8700K @ 5GHz (set to 5.2Ghz but Lightroom counts as an AVX process so it's at a -2 offset)
Below you'll see two screenshots of the 8700K at work building 1:1 previews (left) and exporting photos (right). When I talk about Lightroom being efficent or not efficient with multiple cores, you can see the difference in the CPU usage in task manager between the two tasks. While neither are perfectly using all of the CPU, exporting images is much more efficient. Building previews on the other hand is comparatively all over the place.
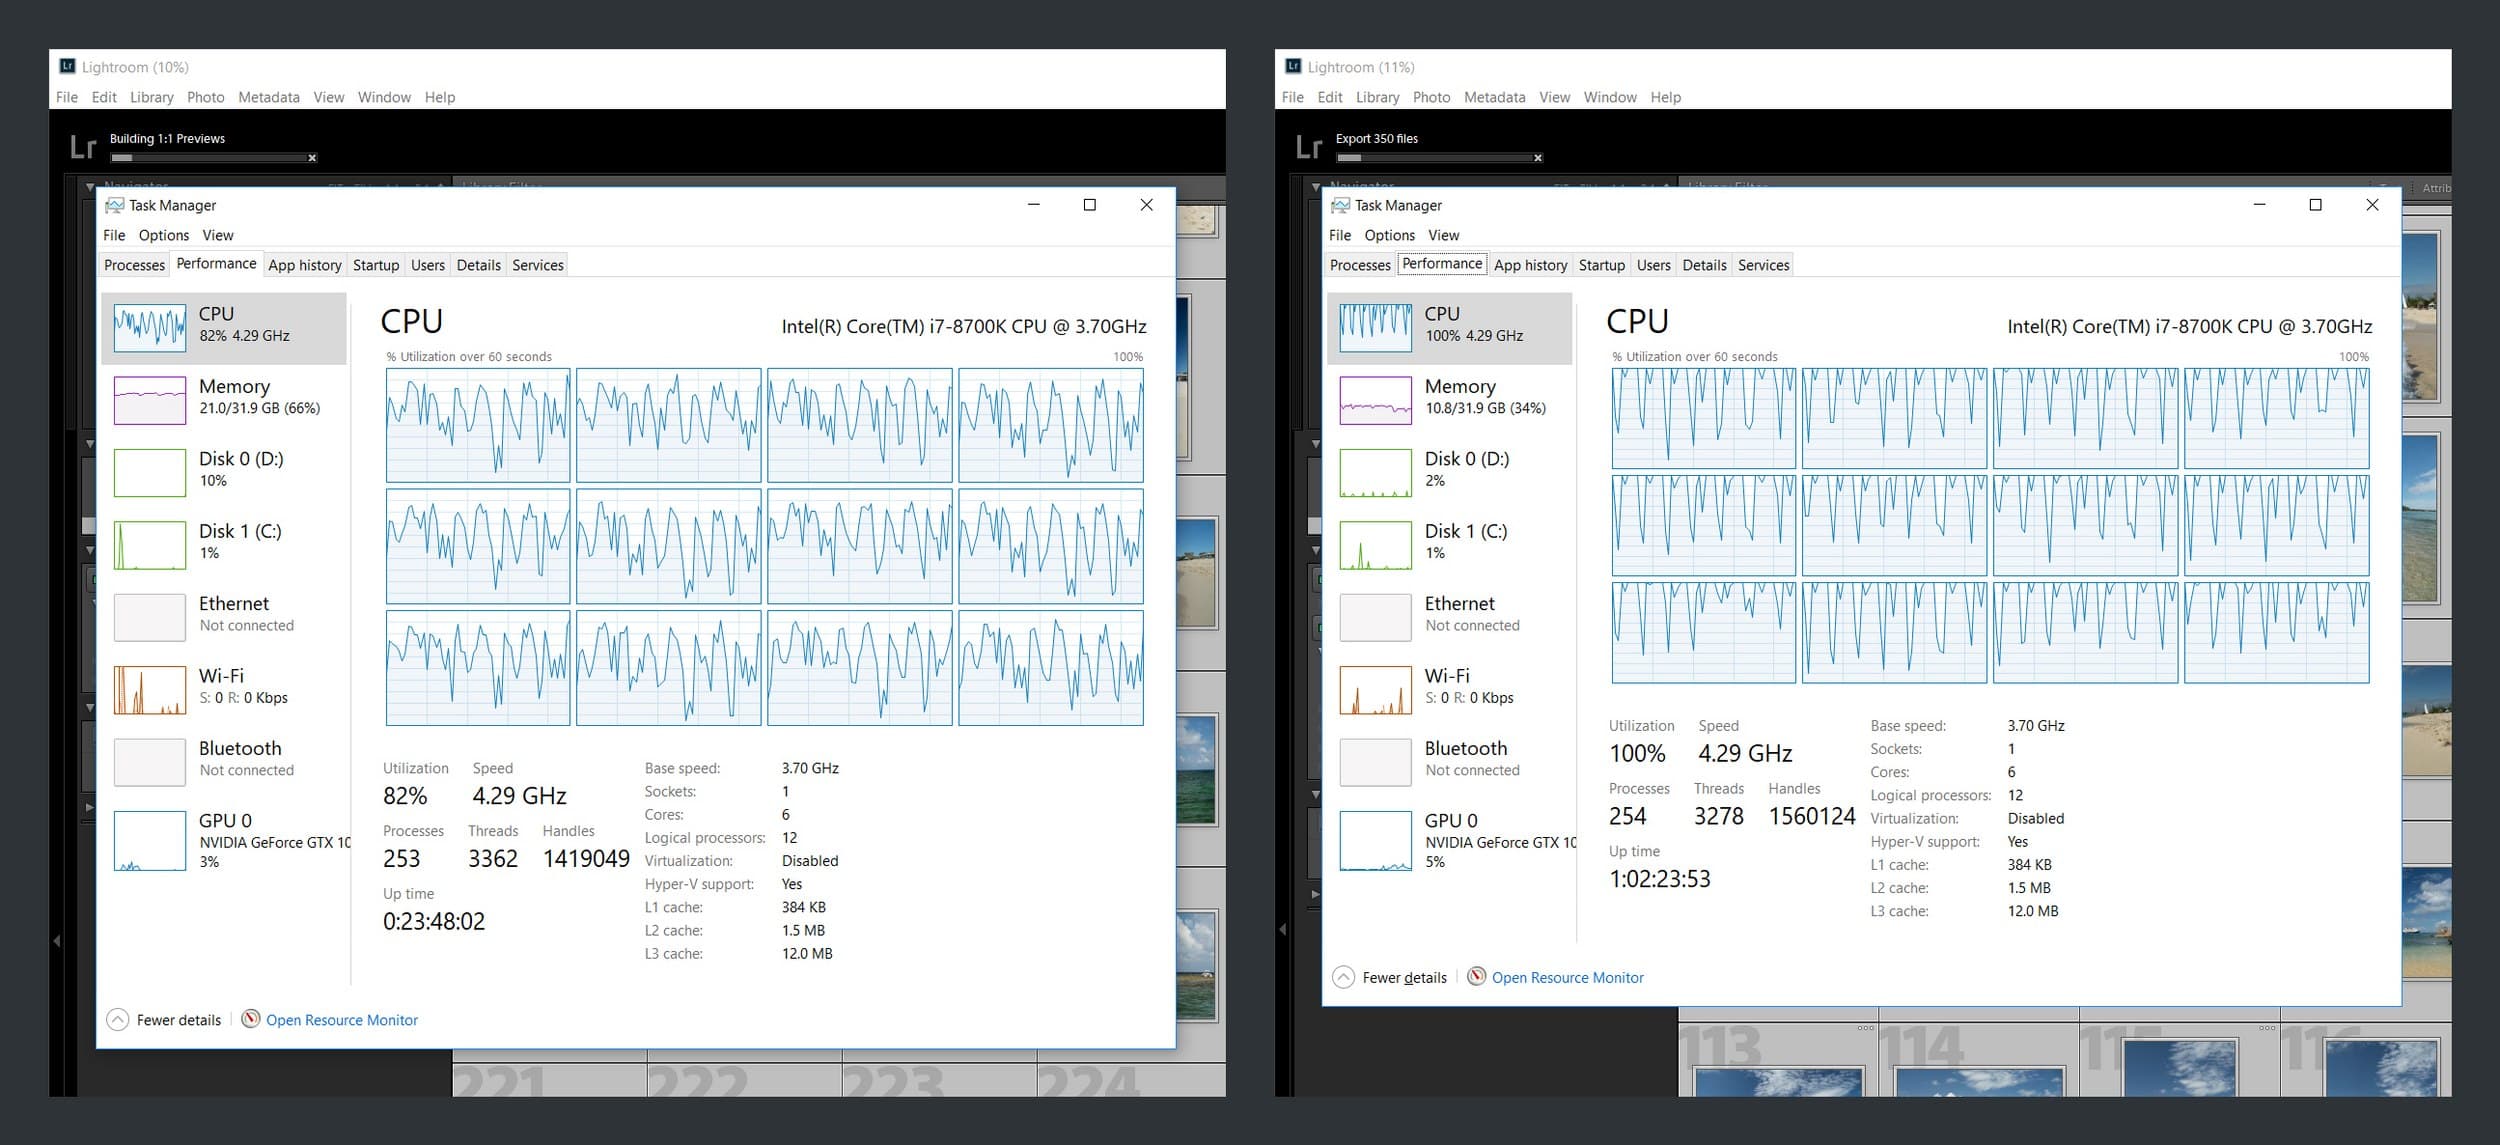
Building 1:1 previews (left) and exporting images (right). Notice the difference in CPU usage.
For the merge to HDR benchmarks, I selected 15 RAWs (5 3-bracket photos) and timed merging a single 3-bracket stack to an HDR in headless HDR mode. I did this many times for each shot to find consistent times, then averaged all the times together. I have less faith in the HDR numbers as I could see dramatically different times by doing things like simply closing Lightroom then reopening and running the HDR again, despite clearing cache and so on.
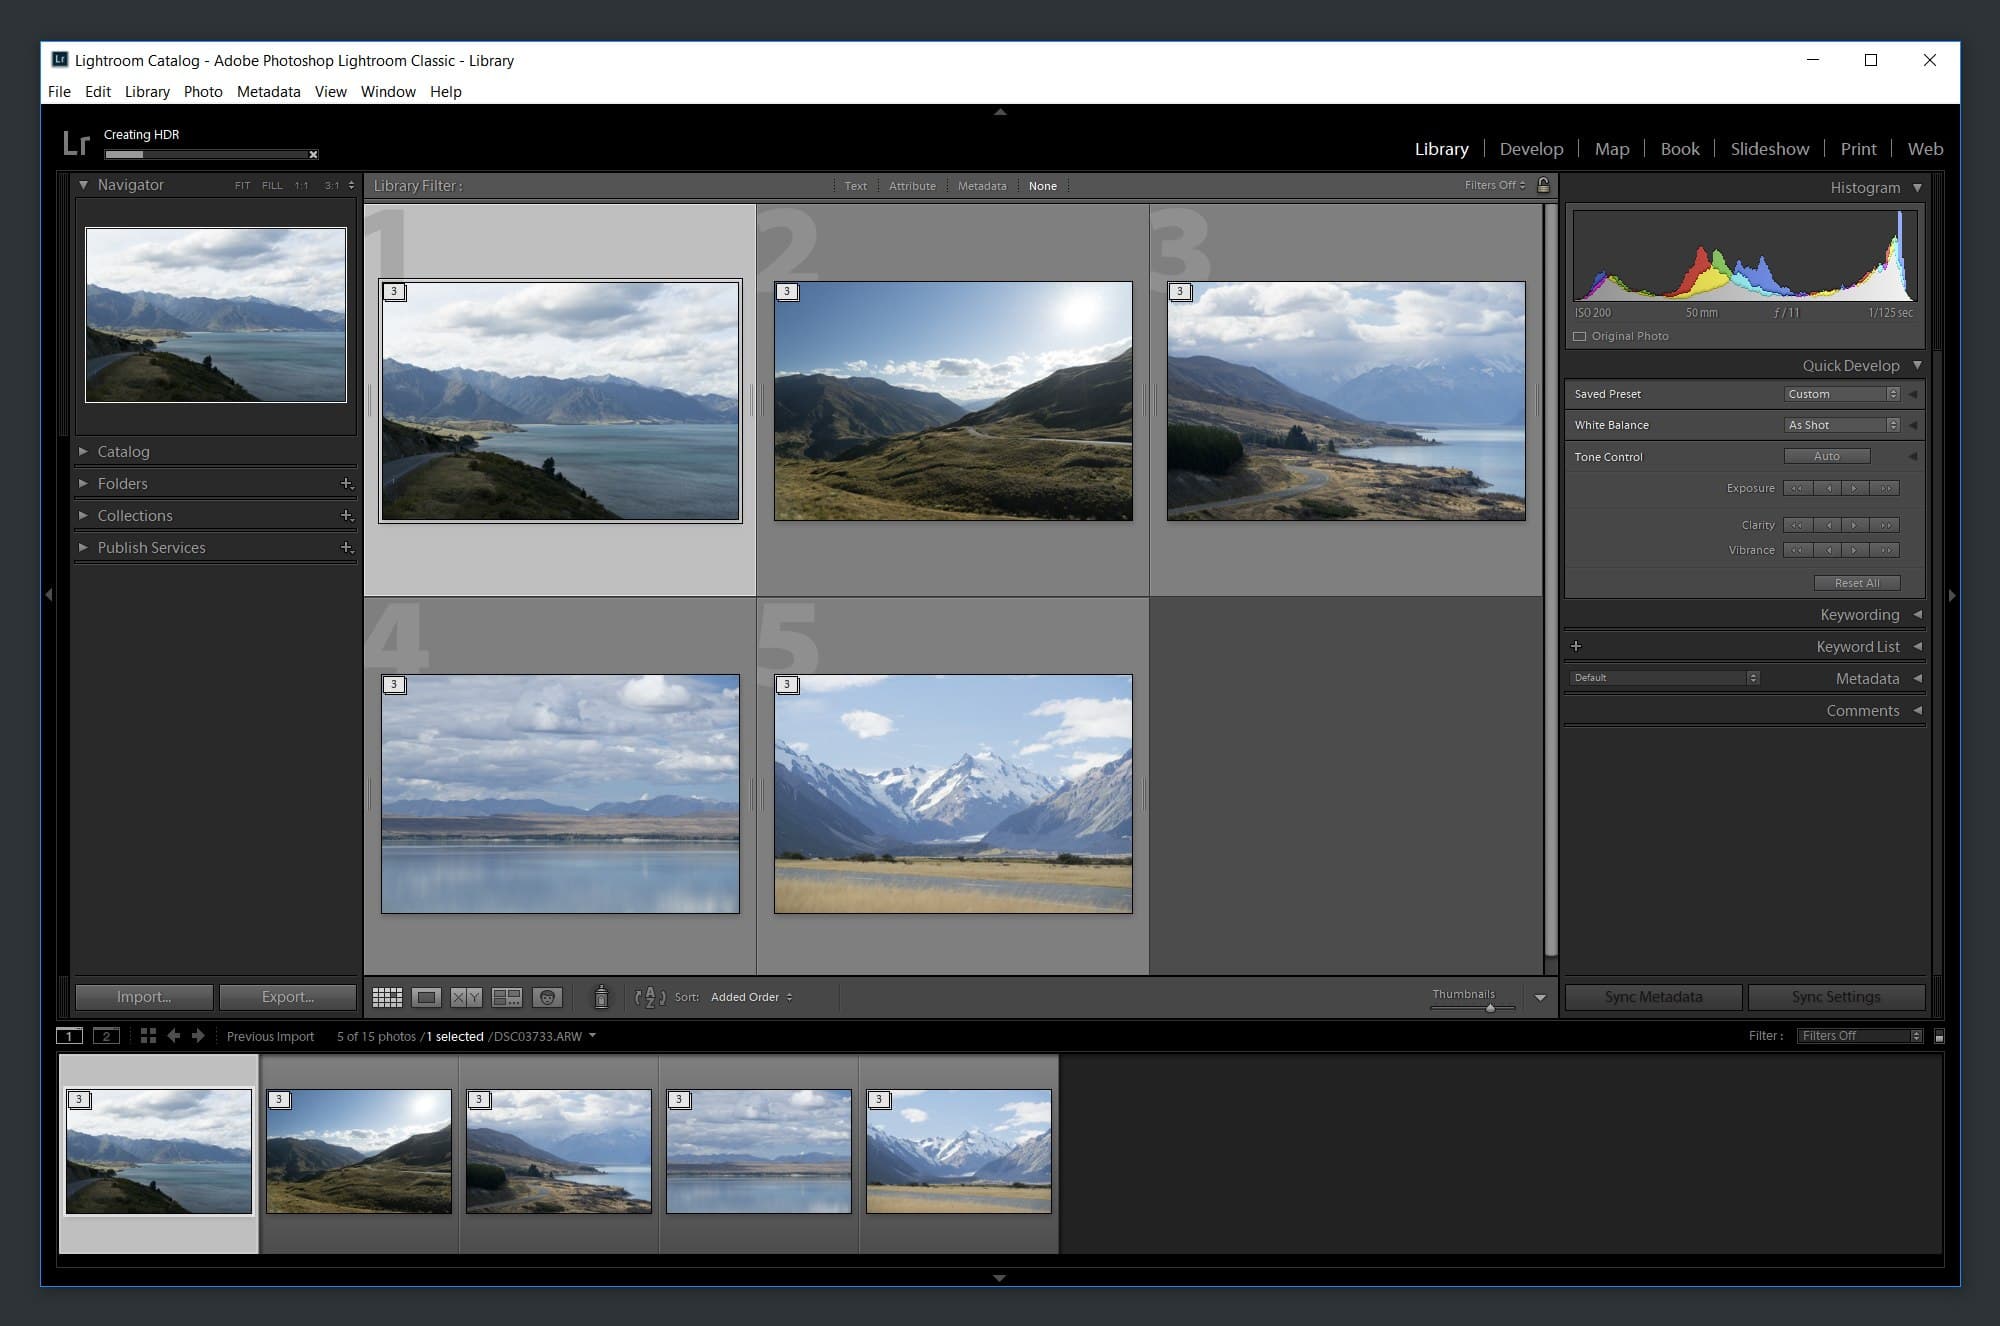
5 stacks of 3 bracketed shots during headless HDR benchmarking.
| Lightroom 7.1 | iMac 4790K | MBP 6267U | 7700K | 7700K OC | 8700K | 8700K OC |
|---|---|---|---|---|---|---|
| Import | 1m 31s | 1m 21s | 14.6s | 14.3s | 17.9s | 17.5s |
| 1:1 previews | 19m 56s | 26m 11s | 33m 42s | 28m 53s | 23m 52s | 15m 51s |
| Convert to DNG | 18m 11s | 28m 17s | 35m 47s | 32m 50s | 17m 5s | 15m 46s |
| Export | 18m 40s | 26m 18s | 33m 59s | 21m 45s | 16m 55s | 12m 51s |
| Merge to HDR | 18.2s | 23.3s | 19.6s | 17.4s | 17.3s | 14.7s |
Some thoughts on these numbers: first off, the import numbers are kind of cheating. The iMac and MacBook Pro were copying from and to the same SSD whereas the PC had two SSDs that I was copying between as I was moving the files to the dedicated SSD I use for Lightroom.
Second, maybe I'm doing something wrong but the times on the Macs were faster than I was expecting. My hypothesis is that Lightroom Classic CC for macOS is more efficient at certain tasks compared to the Windows version. It definitely wasn't the case for me with Develop actions and felt sluggish there.
And third, I was expecting a more significant gain with HDR merging between the machines but they were fairly minimal.
Update 2/4/2018
Adobe updated Lightroom Classic CC right after this post came out and the new release has some very significant performance upgrades. It seems I was correct in saying that the macOS version of Lightroom had felt comparatively faster at certain tasks. Adobe added me to the prerelease versions for Lightroom Classic CC and I got to take the new performance improvements in 7.2 R5 for a spin:
| 8700K OC [LR 7.1] | 8700K OC [LR 7.2 R5] | |
|---|---|---|
| 1:1 previews | 15m 51s | 6m 12s |
| Convert to DNG | 15m 46s | 8m 8s |
| Export | 12m 51s | 5m 55s |
| Merge to HDR | 14.7s | 10.6s |
In short, this update brings the largest increase in Lightroom performance compared to any past Lightroom update I can recall. Beyond these benchmarks I found a massive responsiveness increase in filmstrip browsing and navigating from photo to photo in the Library module (the same increased in Develop module a bit as well) and a noticeable performance bump when using the adjustment brush in the Develop module.
I also ran the Premiere Pro PPBM H.264 encoding benchmark. Obviously this is a benchmark that puts the graphics card and every core to very efficient use. Again, not something I was optimizing for with this build but a nice secondary benefit from my move to 6 cores. What I'm showing here is different kinds of GPU acceleration: CUDA (Nvidia GPU), Software (no GPU acceleration) as well as OpenCL and Metal acceleration for the Macs.
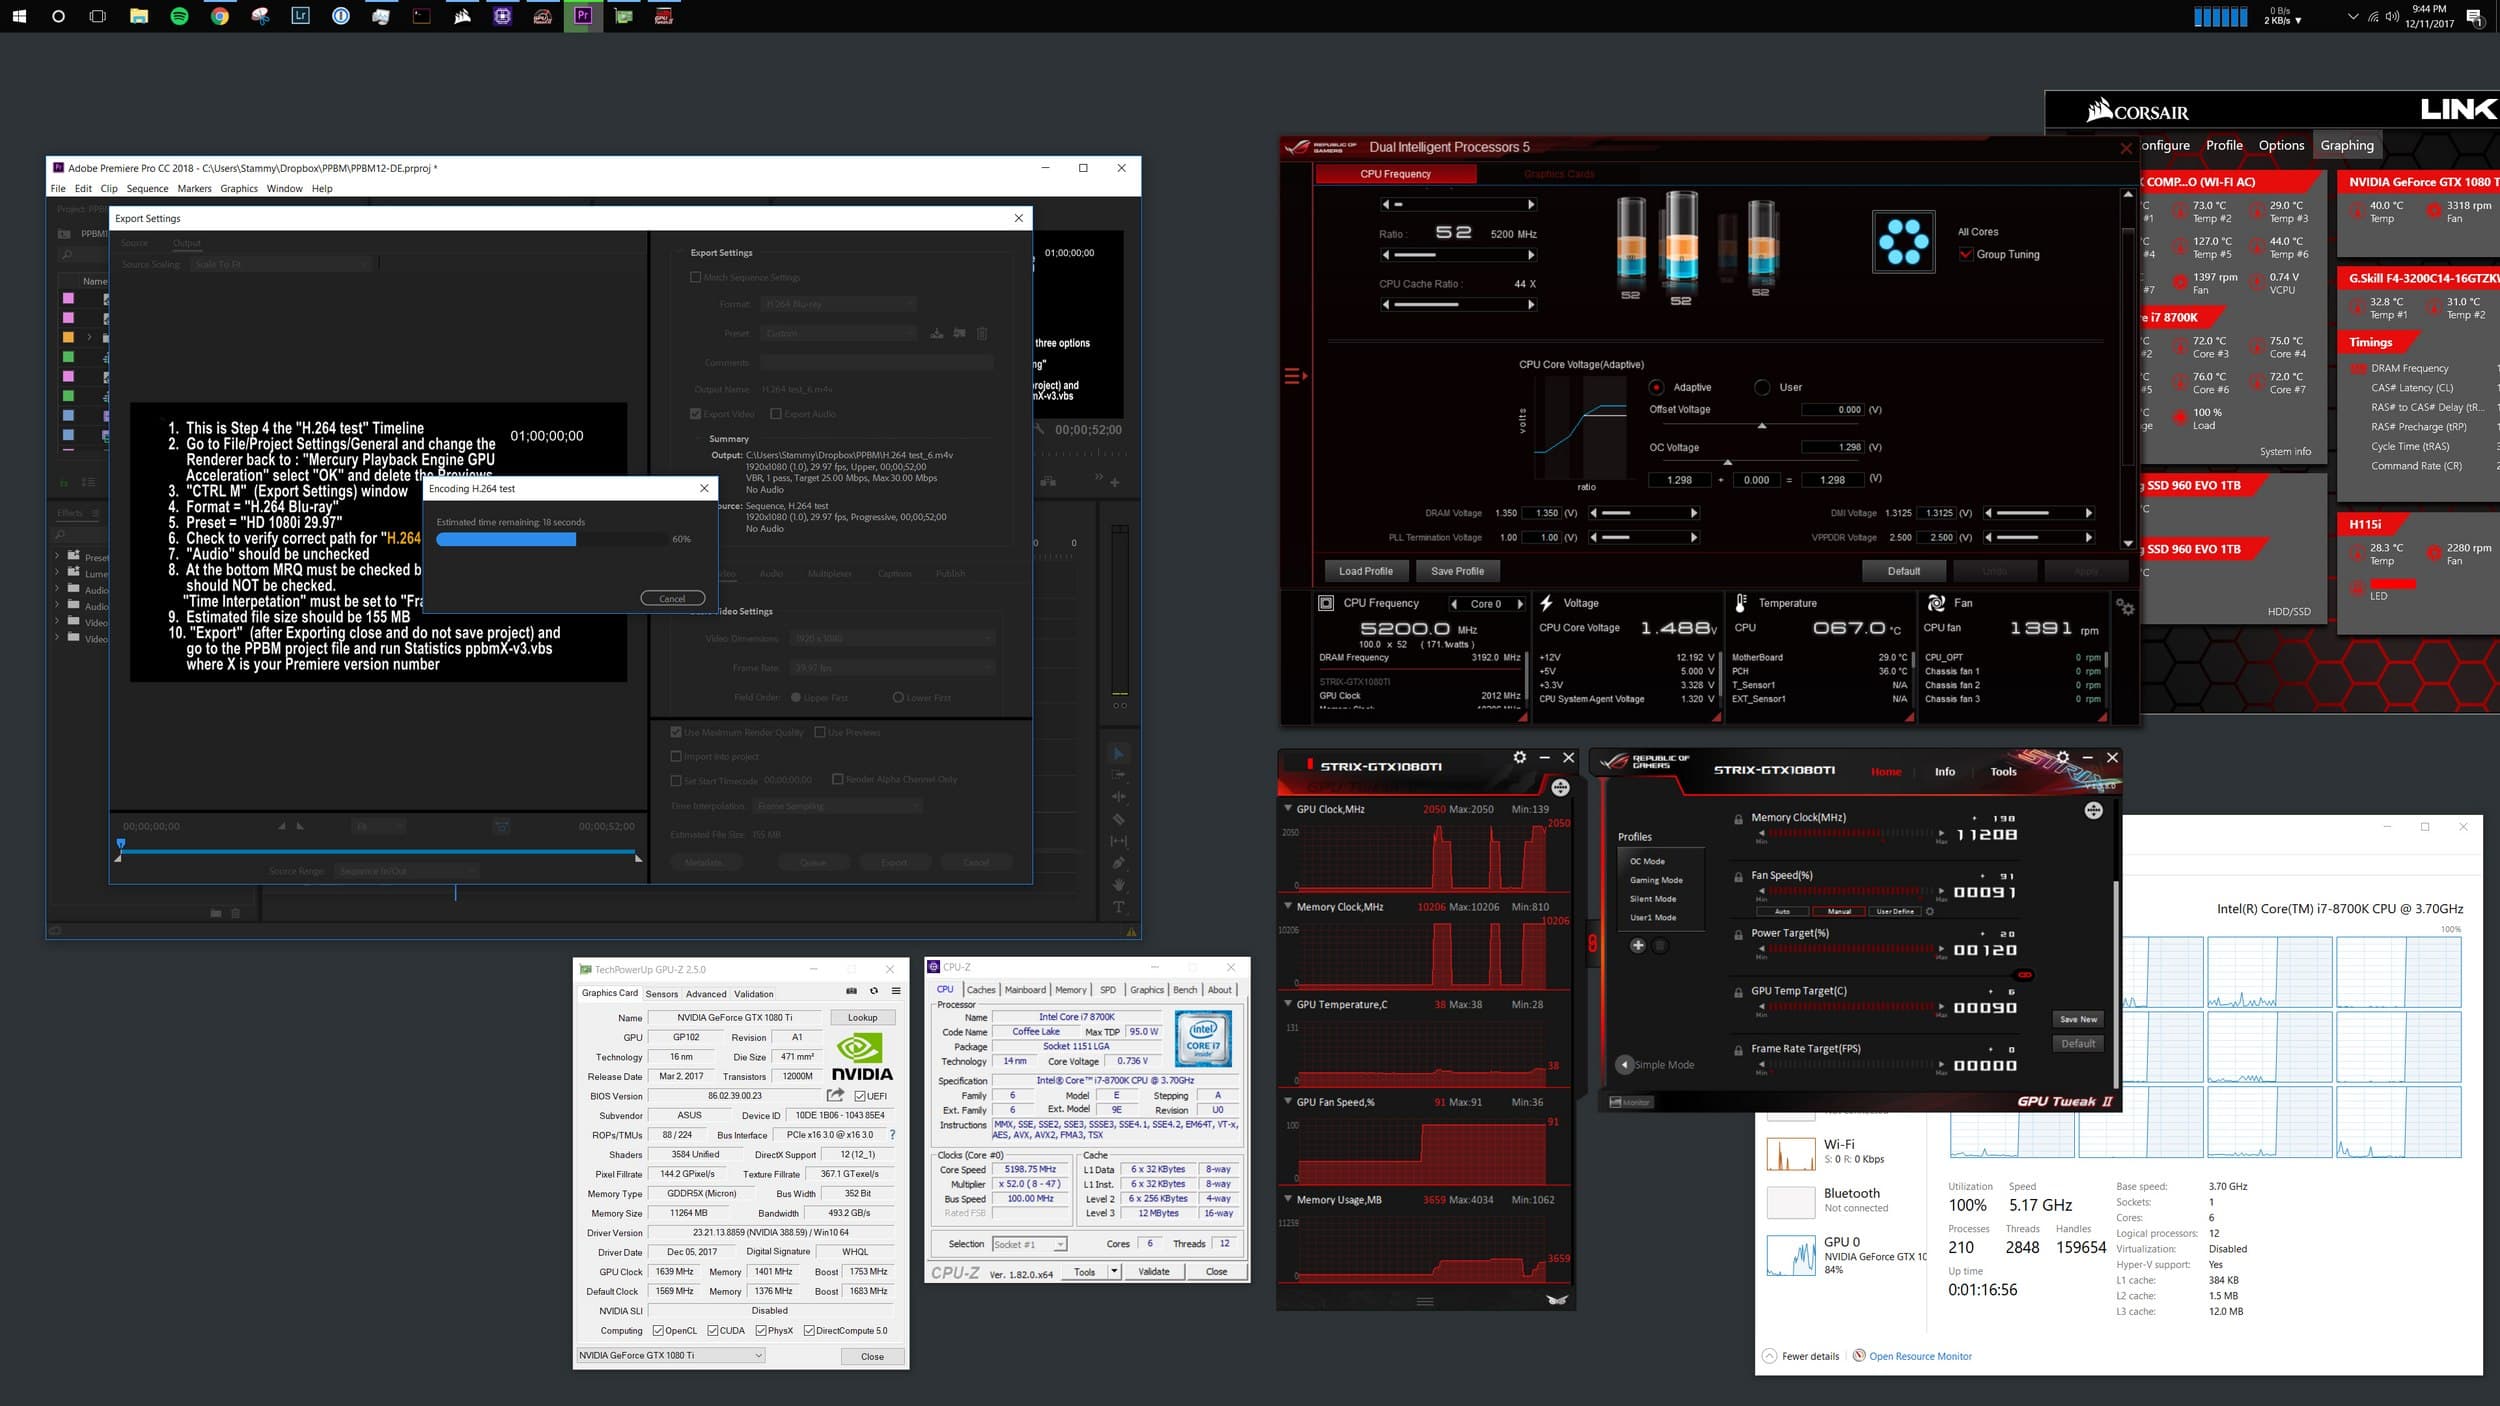
An early 5.2GHz Premiere Pro benchmark while I was still finding my ideal stable overclock. This was without AVX and set using the Asus AI Suite overclocking app. I was using extreme voltage here. I absolutely do not recommend going anywhere past 1.4V Vcore. I went a bit overboard here.
| Premiere Pro | iMac 4790K | MBP 6267U | 7700K | 7700K OC | 8700K | 8700K OC |
|---|---|---|---|---|---|---|
| CUDA | 1m 29s | 1m 18s | 1m 6s | 48s | ||
| Software | 16m 30s | 39m 42s | 14m 36s | 12m 32s | 8m 39s | 7m 4s |
| Metal | 3m 13s | 9m 20s | ||||
| OpenCL | 3m 32s | 7m 26s |
As expected, the Premiere Pro encoding times went down considerably with the addition of more cores and faster cores, and was monumentally faster with GPU acceleration enabled.
What's next?
Nothing's ever really finished.
I've been really happy with this machine so far. First off, I just love the aesthetics and the dark theme inside the case. While my goal was not to make a gaudy PC with a window to show off everything, I think this build was tastefully done. I do kind of wish the case was a tad smaller, but I wouldn't compromise for a smaller radiator or limit my motherboard options to get that.
This PC also does exceedingly well at 4K and VR gaming which I was going to talk about in this post but decided to leave out. I also got an Oculus Rift and an extra sensor for 360° play and was thoroughly amazed the first time I used it and went through the First Contact demo. And I got that same feeling when I played Robo Recall for the first time. When I played The Climb for the first time. And again when I used Google Earth VR for the first time. And when I fired up a massive virtual computer display in front of me in VR with BigScreenVR. But many hours spent in VR over several months, I started to become annoyed at the low resolution of the Rift (nothing ever feels sharp, especially text) and the so-called god rays. Maybe I'll give it another shot with the next generation of higher-resolution HMD hardware.
After a lot of tweaking Windows 10 to get it to my liking, I've really come to like it — though to be frank I'm not sure it will ever feel as natural as macOS to me. It can do everything I need no problem, but some of the Metro/Fluent design inconsistencies and very involved ways of getting certain tasks done (try using Task Scheduler) make it clear that there are definitely parts of Windows 10 that were swept under the rug.
The big surprise for me was how good the current state of the Windows Subsystem for Linux is and how well it can take care of my web development needs.
But for how fast the PC is, it only makes me realize how much I'm being held back by Adobe's subpar Lightroom optimization.
It's like I have a fast hypercar but I can only to use bald tires and a worn clutch that can't put all the power to use. I have been editing photos in Lightroom for years. I even remember when the beta of the first version came out in 2006! At that time photographers had Photoshop, Camera Raw and Bridge to do all their RAW photo editing. It wasn't the best workflow and Photoshop had become an unwieldy behemoth to photographers wanting to focus on more bulk, basic image edits.
I don't see myself entirely leaving Lightroom for one of the many competitors: notably Capture One but there's also DxO PhotoLab, Affinity Photo, Luminar and ON1 Photo RAW. I've given other applications a shot but always come back to Lightroom.
While I'm really tied to the Develop module in Lightroom, maybe there are other parts of my workflow I can optimize. The best candidate would be trying to do my photo culling outside of Lightroom. That would mean fewer photos imported, fewer photos that need to have previews generated and so on. Even with 1:1 previews generated in Lightroom, navigating around photos in the Library module fullscreen view is not lightning quick.
There are two programs that come to mind for quick RAW viewing and culling: Photo Mechanic and Fast Raw Viewer. Photo Mechanic has a pretty powerful culling workflow and related file management functionality. However, if I shoot RAWs alone it only views the small embedded JPEG inside the RAW file, which in the case of my Sony A7r III seems to be 1616x1080. 50
Fast Raw Viewer lacks some of the advanced culling features and is more focused on being a RAW viewer. It views the embedded JPEG inside the RAW file, but you can also set it to process the RAW and render that original image instead of the small embedded JPEG. The latter is not quite as fast as just displaying the JPEG but is handy when you want to zoom all the way in.
With Photo Mechanic you open your folder of RAW files then browse through them and tap a key to tag (select) any shot you want to end up importing into Lightroom. You can also assign a rating or color value during this process. When you're done culling, you can have Photo Mechanic only show the selected items, then you can simply drag them into Lightroom. Lightroom will pop open an import dialog and only the photos you culled will get added to Lightroom. And as long as you specified to have the photos added and not copied, any rating or other metadata you added in Photo Mechanic is visible in Lightroom as well.
If your Lightroom catalog allows for changes to automatically be written into XMP, any rating and metadata updated in Lightroom will be reflected in Photo Mechanic instantly. Unfortunately, it does not appear to work the other way around automatically: you'd have to go to the Metadata menu and select "Read metadata from file" to have it update in Lightroom.
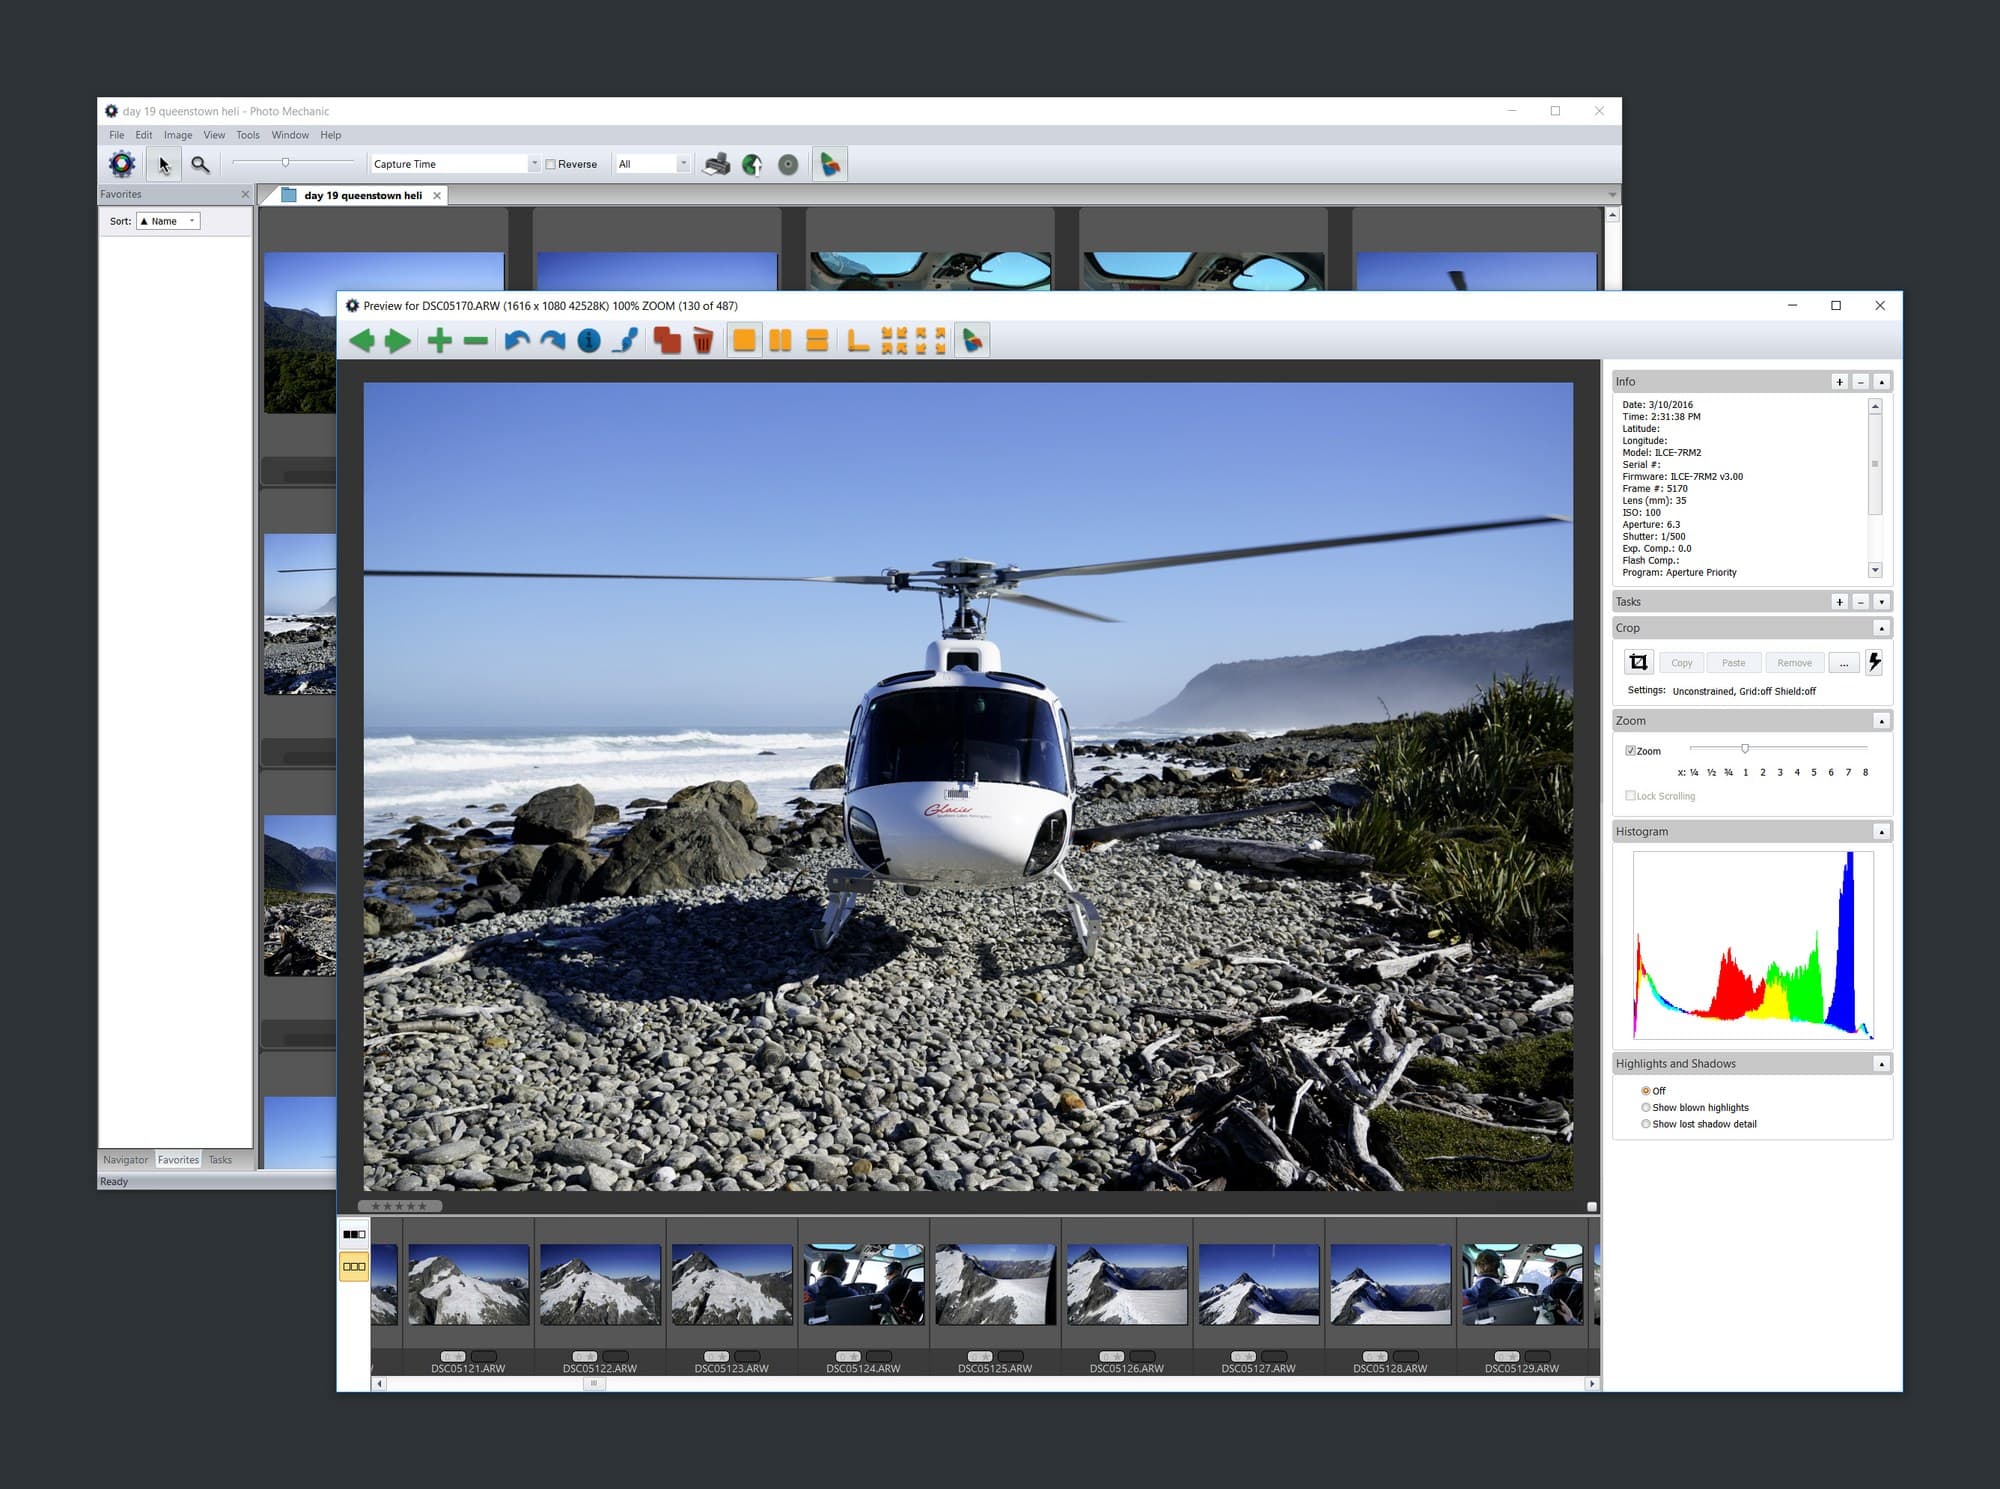
Photo Mechanic 5: Powerful though not the most aesthetically appealing UI to work in..
The benefit of simply viewing the embedded JPEG is that loading and going between photos truly is instant. Though for my exact needs, it leaves me wanting more. My typical culling process is not based on viewing the overall composition. I usually want to zoom 100% into the photo to see if the focus is sharp — for example if I have many similar shots of the same scene and only want to keep the one with the best focus, especially when I shoot with manual focus. Furthermore, sometimes I don't know whether I should keep a photo until I tinker with basic Develop settings in Lightroom like tone and cropping.
For the first issue about not being able to see the original, I reached out to the maker of Photo Mechanic. They offered one workaround for not being able to render RAWs as an option in the Windows version: just telling my camera to shoot RAW+JPEG. Photo Mechanic then displays the pair as one item and lets me view the full-size image quickly. Seems interesting but that would significantly increase my storage needs while I'm traveling. If my New Zealand trip exceeded 800GB I can't imagine how many more SD cards I'd have to carry along if I had RAW+JPEG enabled.51
Then there's my desire for some basic editing functionality during culling just to see if a shot is worth keeping. Ideally, I would be able tag photos in Photo Mechanic from a set of photos I had already imported into Lightroom, and be able to see the new selections automatically appear in a rating filter I had in Lightroom. That would let me select a photo in Photo Mechanic, see it appear in Lightroom and then tinker with Develop settings or further zoom into the photo if it's one of those shots where I'm not sure I want to keep it yet. Like a two-way sync.
I do recognize that there is tremendous value in only having a quick preview functionality and I'll keep tinkering to try to change or improve my workflow with it in some way.
But here we are in 2018 and Lightroom feels like a sluggish, unwieldy behemoth. Is history set to repeat itself?
It looks that way. Adobe recently spun off a simpler version called Lightroom CC. That's not the Lightroom Classic CC I've been referring to in this article. If I had to guess, it seems like Adobe has some different goals for Lightroom CC:
- Entice new photographers and inspire casual photographers to try out the Lightroom ecosystem.
- Enable entirely new and simple synced and mobile workflows for the casual user, functionality enabled by requiring all photos to be backed up to Adobe's cloud. Also, remove the traditional pain point of storage management.
- Make some extra money in the process by requiring everyone to pay for each terabyte of cloud storage. (Though it appears that the most you could ever have is 10TB which excludes most prosumer/professional photographers.)
Lightroom CC is a native application for your computer along with companion mobile apps. It has a much simpler interface. There are no module tabs like in Lightroom Classic CC, just a pane on one side that is like a basic Library module for browsing and managing your imports. And then there is a pane on the right that can expand to show Develop-like functionality, now called Edit. It's definitely more pleasant on the eyes. Labels and sliders are larger and easier to use on 4K display.
Upon importing a set of photos, Lightroom CC immediately goes to work uploading all of those massive RAW files. You can pause it temporarily, but eventually they will need to be uploaded. You can specify how much of your local drive to give up for the photo cache and Lightroom CC will selectively remove and download photos when that cache gets filled.
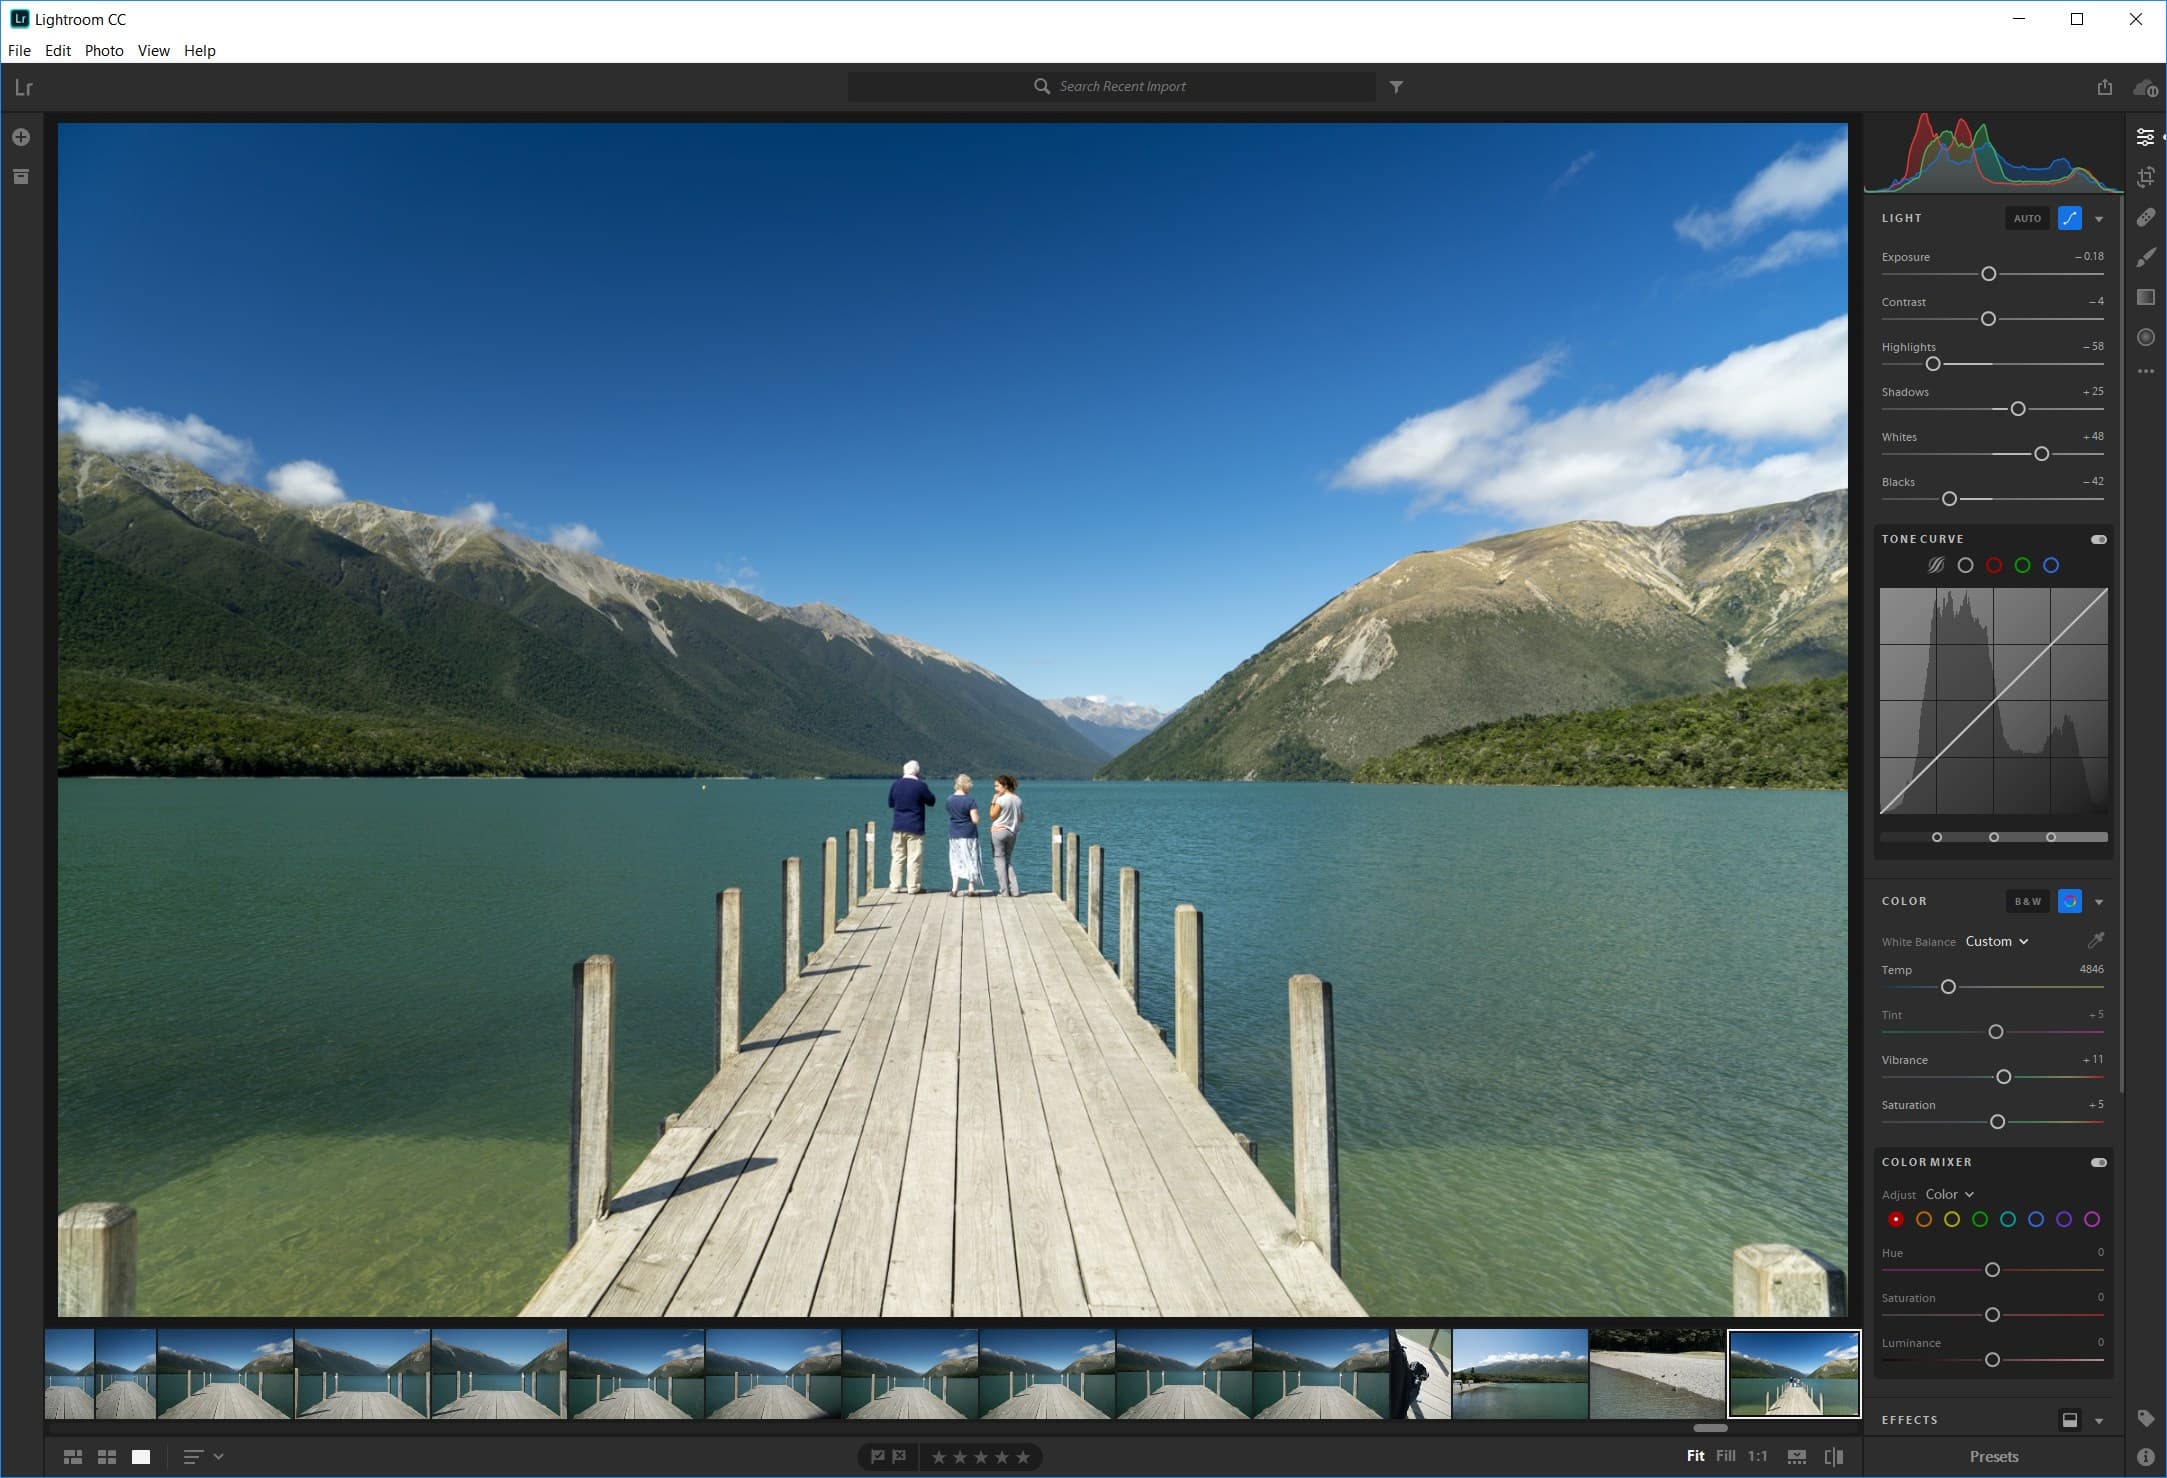
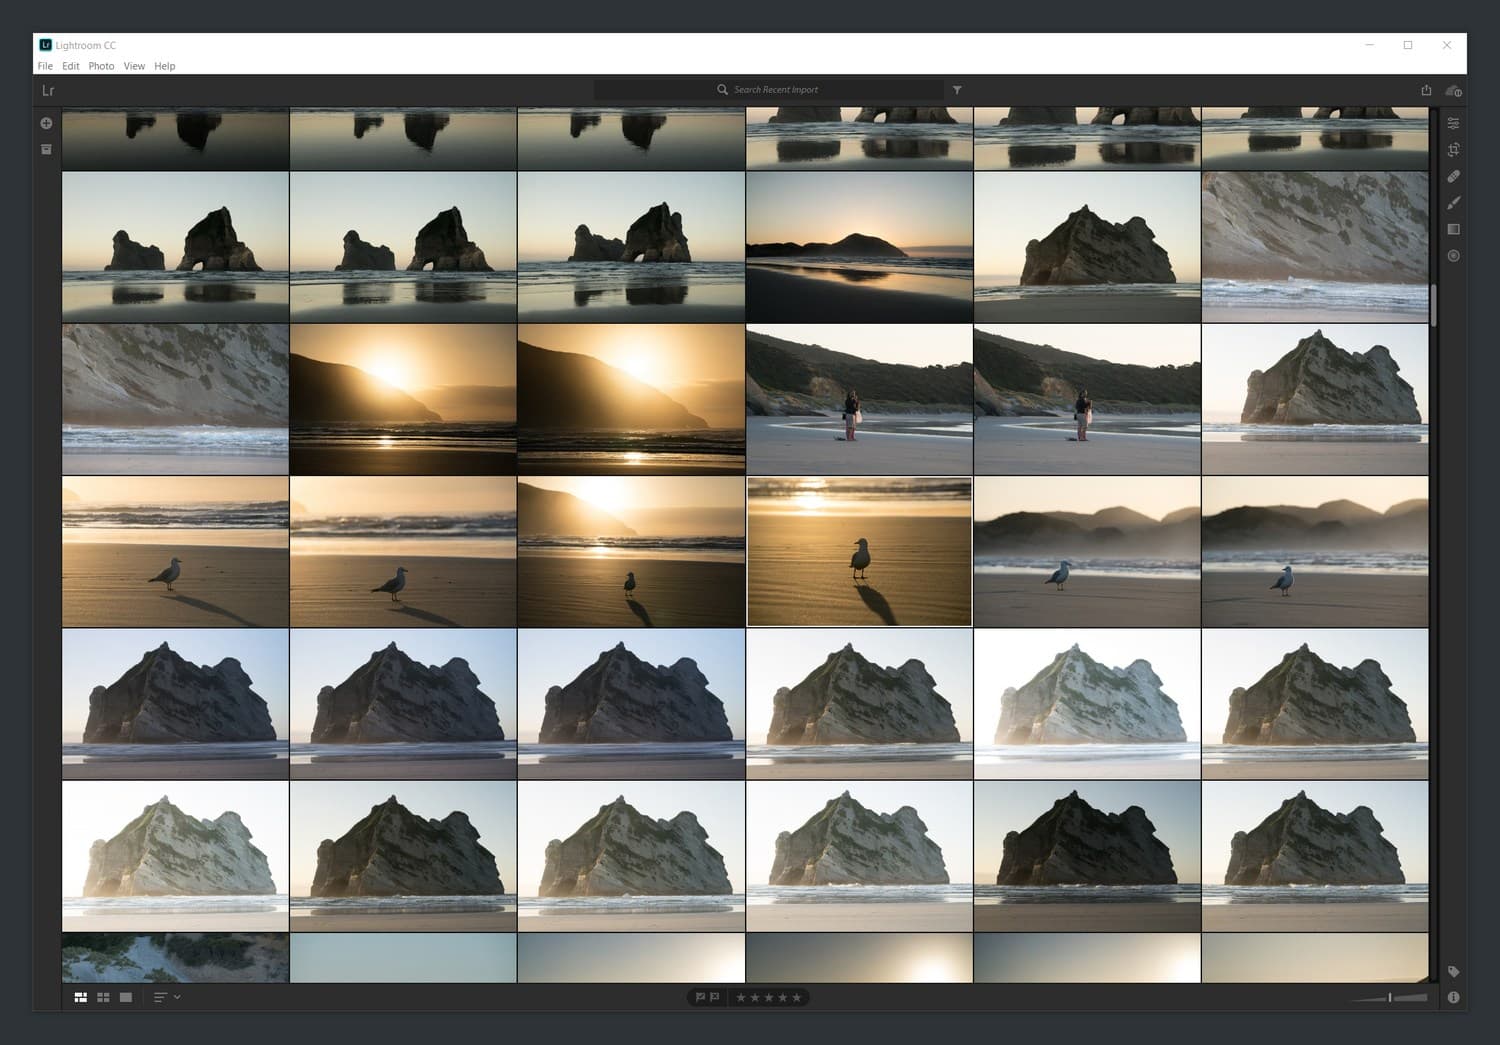
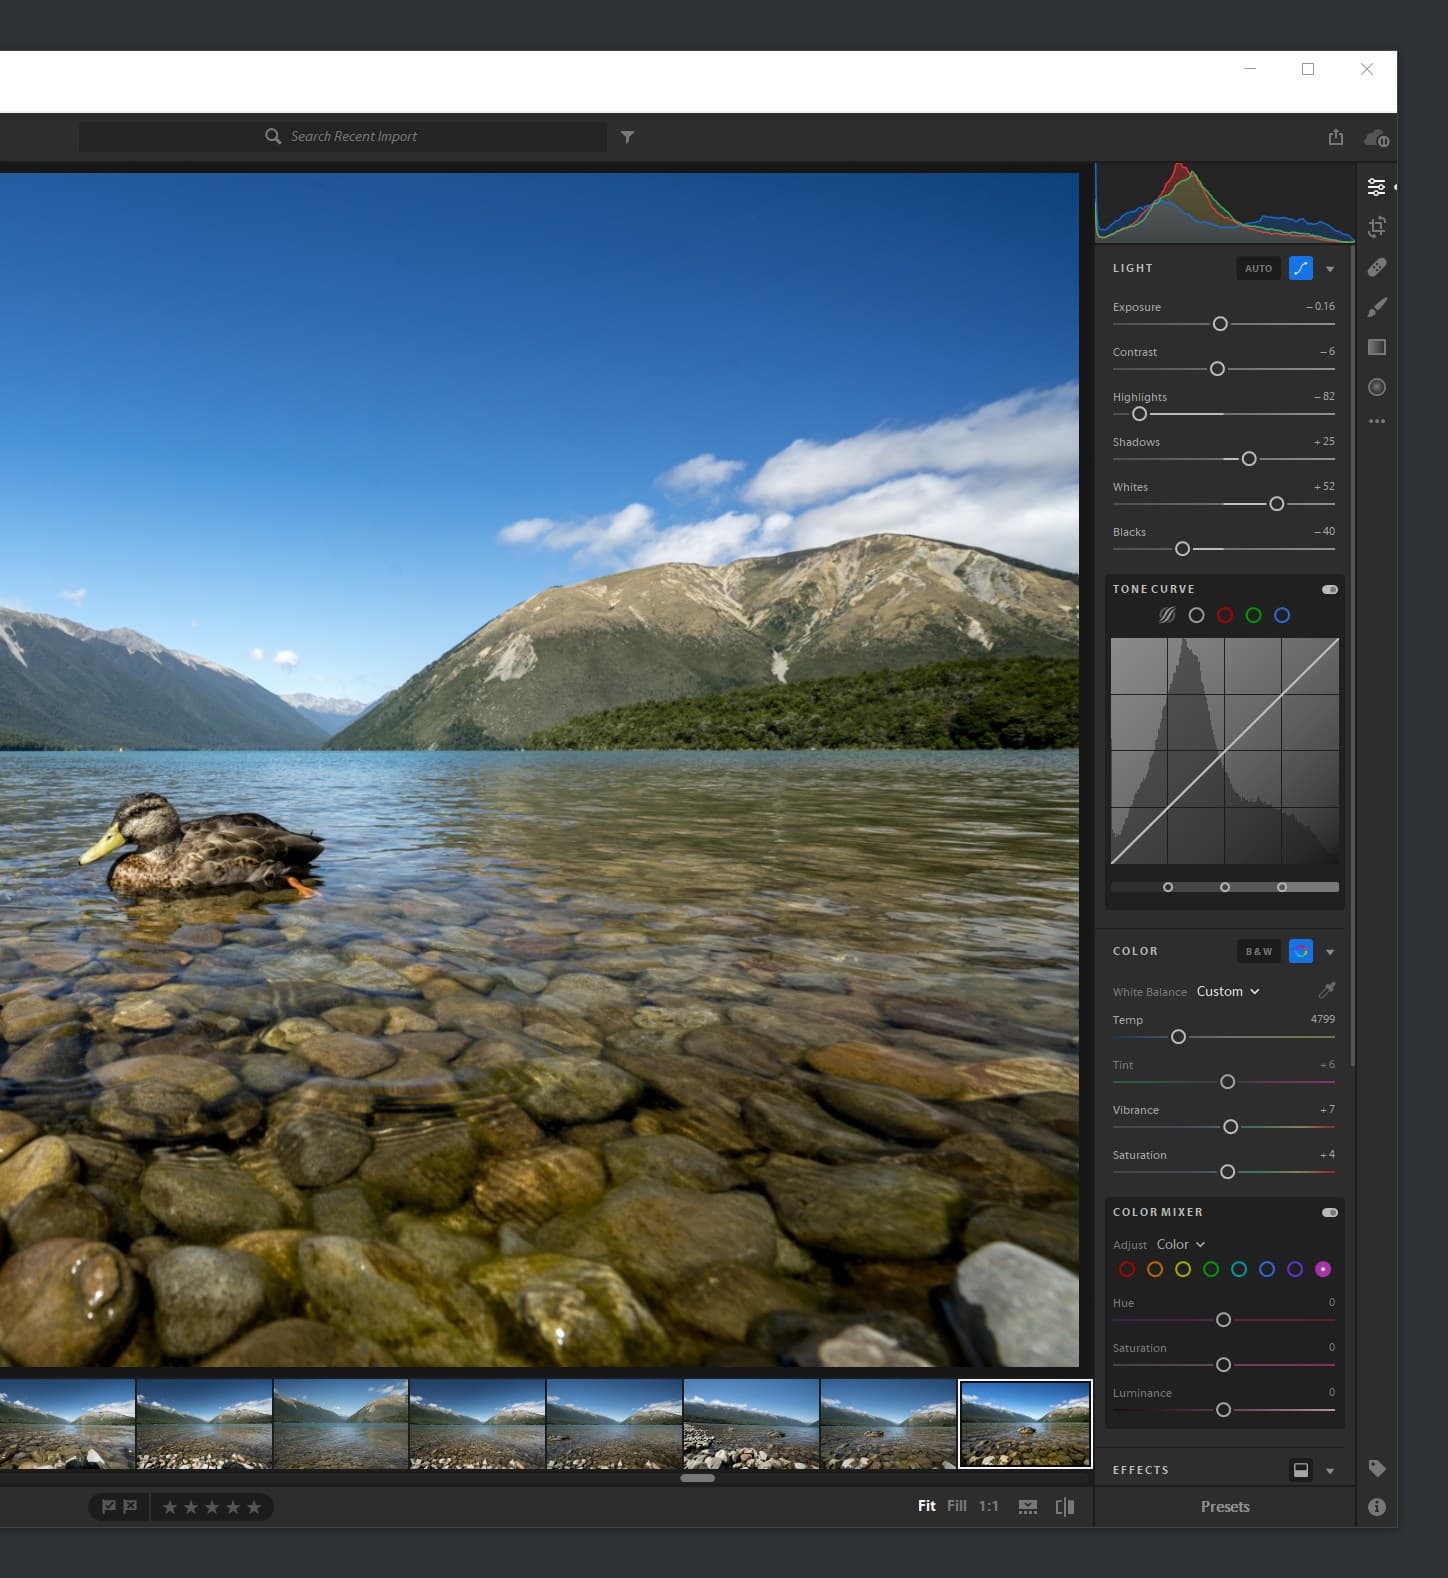
Top and bottom right: Nelson Lakes National Park, New Zealand.
Bottom left: Wharariki Beach and the Archway Islands, New Zealand.
Performance-wise, it felt identical to Lightroom Classic CC in my brief back and forth comparison between the two applications. I think it was just the less cluttered and simpler interface that tricked me into liking Lightroom CC more initially and thinking it felt faster than it actually was.
If I like the UI of Lightroom CC more, then why don't I just use it? It definitely lacks a few things. Well, I shouldn't say lack because the targeted audience for Lightroom CC probably doesn't care about these things:
- Ability to merge HDRs or stitch panoramas. This is a big one.
- Ability to split original files across various drives (I love my NAS flow)
- Support for multiple catalogs
- Support for tethering and watched folders (Though I've only ever used this functionality once for a portrait studio)
- Color labeling
- Ability to set custom sort order
- Range masking
That list used to include presets and tone curve adjustments but they were added recently.
Another part of the Lightroom CC story is around using machine learning — Adobe calls their tech Sensei and it appears to be used in two ways so far. First, the "auto" button now takes the shot into account and tries to find ideal settings for it compared to other shots.52 Second, Sensei enables easier searching by automatically tagging photos with keywords.
While I like the pitch and how bold Adobe is being with the cloud and machine learning approach, I won't be leaving Lightroom Classic CC anytime soon. Classic is for the high volume photographers that can handle and prefer to manage their own asset storage (and have numerous backups) and who aren't keen on doing any kind of real editing on a mobile device.
But Lightroom CC is good for one thing: it shows me that Adobe knows what they're doing and can make some good software. I hope that this will trickle its way down into future Classic improvements. And if one day Lightroom puts multiple cores to use efficiently, you can be sure I'll come back here with another long post about building a 24+ core machine optimized for Lightroom.
Please share :)
If you enjoyed this post, please share it with your friends and followers. It took me several months of spare time to write this and is currently my longest article out of 1,200+ on this site.
1 Which is still a bit overkill for what I use it for. I could downgrade to a Chromebook, 12" MacBook or Microsoft Surface Pro.
2 Even the iMac Pro's Radeon Vega 64 doesn't compare to the Nvidia GTX 1080 Ti (86.4 GPixels/s vs 1080 Ti's 139.2 GPixels/s and other such metrics) and definitely not the ultra high-end Titan Xp and Titan V.
3 Looking at the Aurora HDR site now, I can definitely tell they have toned it down a tad. They used to have insanely over the top default settings and over-processed HDR marketing images.
While I'm on the subject anyways.. I really, really loathe the current trend of compositing photos. You've no doubt seen this practice on some popular Instagram accounts. It's the practice of taking parts from several different photos and combining them into one to appear as though it was actually captured from a camera. Photo look too good to be true with a perfectly placed flock of birds right in the perfect spot in the background? Likely composited shots. Unfortunately, it's also common to use the clone tool to add or remove significant parts of the photo to get a desired effect. I just feel like it's lying to the viewer way more than boosting shadows or adding vibrance would be.
4 If you're new here this was a reference to my day job, I've been a product designer and prototyper at Twitter for the last 5 years.
5 On a busy day on a trip I may shoot something like 500-750 shots. And if I am in a certain city for a few days, I will try to make one photoset out of that, which leads me to having a couple thousand shots that I would ideally like to whittle down to 50-100 to edit and export.
6 Enabling Profile Corrections has an impact on performance so it is advised to do this step last. Any local adjustments, spot removal, et cetera you do have to get remapped to the new location of every pixel after profile corrections. That being said I often forget to enable this and have to redo some of my settings to compensate for that, so I often go against the grain here and set as a default setting. Unless I know I will need to do a lot of spot removal or local corrections, I disable it first, then apply it at the end.
7 And apparently there is also a performance impact associated with having a ton of installed presets as they need to get generated every shot in the Develop module. But I haven't personally noticed anything of the sort and it's likely that the recent Classic CC update addressed this.
8 My first summer job when I was in high school involved building tons of computers at a time for a local computer parts e-commerce retailer and installing them in schools.
9 Which doesn't seem like a priority for me right now as very few games and applications can actually take advantage of SLI graphics cards.
10 Even if you had an equally clocked 7700K and 8700K, I'm not sure the 7700K would beat the 8700K in Lightroom as there are other benefits that come with the 8700K and Z370 chipset, like faster base RAM speed support (DDR4-2666MHz compared to the Z270's 2400MHz).
11 In a nutshell: Intel has different processor lines — the 8700K belongs to the "mainstream" CPU line but there is also the High-End Desktop (HEDT) line. The HEDT line is actually based on a new variant of two older microarchitectures (Skylake and Kaby Lake) but now denoted with -X to specify a new X299 chipset (named Basin Falls) instead of an older Z-based chipset.. And I already lost you. One thing to note is that we're on the 3rd generation of Intel desktop processors using a 14nm process, each with rather incremental improvements. The next big update is rumored in Q2 2018 and will be a 10nm process with a code named Cannon Lake microarchitecture. So if you can wait until then to build a computer, you might have some impressive CPU/chipset options at your disposal.
12 The higher end boards in the Maximus line feature capabilities like replacing the VRM heatsinks with a hybrid heatsink/waterblock that allows overclockers to add it to their own custom water-cooling loop. While I do plan to overclock a bit, I don't care enough to go beyond my AIO liquid cooling setup. I've done real water-cooling in the past and it was a hassle I don't care to deal with for this PC build.
13 And then the ridiculous $3,000 Nvidia Titan V based on the Volta GV100 architecture was released with even better performance, though aimed more at the AI and machine learning developer crowd than the gaming crowd.
14 While it is impressive, there is some new technology coming soon to replace GDDR5X VRAM. First there's the incremental update of 10nm GDDR6 that Samsung has just started manufacturing. Then there's insanely fast HMB2 VRAM. HBM2 has some benefits over GDDR5X like lower latency, better efficiency for the supplied bandwidth, smaller chip footprint and less power draw.
15 Depending on what kind of cryptocurrency is being mined, either Nvidia or AMD Radeon GPUs may be preferred.
16 SLC flash stores one bit per cell (a "memory cell" is a floating gate transistor) and is the most expensive and fastest kind of storage. It's common for enterprise uses but not for consumer uses. MLC flash stores two bits of data on one cell (no idea why they call it multi though) and has a longer lifespan with more read/write cycles. TLC flash stores 3 bits of data per cell but is cheaper, a bit slower and has the worst lifespan compared to the rest. There's also even denser quad bit QLC flash that is not quite as common right now but could become more popular for affordable solid state storage.
17 In the section earlier in the post where I talked about why it's a good time to build a PC, well extremely high RAM prices is definitely one counterpoint. But it looks like prices might decrease in 2018.
18 In a Ryzen rig there is something called Infinity Fabric (I swear I'm not making this up) that is like an interconnect between a set of CPU cores (which they call CCX) tied to the same frequency as the memory controller. That means overclocked memory on a Ryzen machine seems to unlock a lot more performance when dealing with more than 4 cores.. but I digress.
19 XMP is an Intel feature is separate from the official standard from the JEDEC organization called SPD for setting memory timings automatically. Both of these just make it easier to setup your RAM so you don't have to do it manually. If you had an AMD system though, you may not see XMP fully supported. Another thing to note, if you buy really fast RAM, lets say something crazy like DDR4-4000, it could be a gamble as to whether your computer could actually even run the RAM that fast with XMP settings given that it's such a higher frequency than Intel's DDR4 supported frequency of 2666MHz and you're basically overclocking and putting stress on the Integrated Memory Controller.
20 But as mentioned earlier, RAM that fast is not offered in 2x16GB kits, and at that speed it's a gamble as to whether your motherboard and processor would even be able to handle running them at their rated speeds. Not to mention if you have an aggressive CPU overclock, there's a chance you won't be able to run the RAM that fast either. Given their exorbitant costs, it's definitely not worth the hassle in my opinion for an extremely negligible performance increase.
21 I have also seen DDR4-3600 CL15 but they seemed way more expensive, harder to find and only available in 8GB sticks and not 16GB like I was searching for.
22 And if you really want to know more, there's one more wrinkle here: every PSU has its own efficiency curve that maps the actual efficiency at specified loads. Typically PSUs tend to be the least efficient at very high and very low loads. So if you will be running this machine at high loads all the time (unless you're mining or running benchmarks 24/7, you won't), then it may make sense to look for a higher output and more efficient PSU where you won't land near the end of this efficiency curve.
23 Not sure if you have a wide-gamut display? Here are two resources that let you switch the profile on a photo to see the difference: one, two.
24 P3 would be better for me as it has more of an equal expansion into reds and greens over sRGB, compared to just greens but more on that later..
25 Don't be fooled by "HDR" monitors that show off impressive color accuracy numbers, that's only in HDR mode which given the current state of HDR you won't be using for most applications (basically only for gaming).
26 I was ideally looking for a larger display, something in the 32-34" range, so that running 4K with no scaling would be more acceptable instead of needing to run 125% UI scaling in Windows
27 With my current setup of a 10-bit panel and an 8-bit input, there is still get some benefit: better color representation and depth. However, it's now of extreme importance to ensure you're working in a color-managed workflow otherwise 8-bit input on a 10-bit panel will just make everything look super saturated. For example, viewing a photo in the native Windows 10 photos app looks incorrect (at the time I wrote this article). A color-managed workflow is always important, but is especially noticable here.
28 Not to be confused with the Rec. 2020 WCG "wide color gamut" standard for UHD content that is legitimately a massively wide gamut that no consumer display comes close to these days... yes, all of this is confusing as heck.
29 Apple created Display P3 based on DCI-P3 but using the 2.2 gamma from the sRGB color space instead of 2.6, as well as a different white point.
30 Even with the different gamma in Display P3 — macOS and iOS are color managed so they could remap correctly when detecting content made specifically for DCI-P3.
31 But why does this matter if we typically end up publishing on the web to a more limited color profile? You always want to preserve as much camera data to work with to stay future-proofed. There will be better displays and ways of displaying your photos online in the future, so if you ever want to revisit an old shot it will be nice to have all the original data lying around for you to remap to another profile then.
32 Now if you were a professional you may care even more about things like the type of backlight as well as the uniformity of illumination and consistency of color across the display.
33 If you're really, really hardcore you can even run the processor entirely without an IHS. There are kits out there to ensure that your attached heatsink/waterblock gets attached very precisely as to not damage the die. But I'll pass on that.
34 Binning is the process of basically overclock testing the CPU to see how good the silicon is and how much of an overclock it can sustain and at what voltage. This is a very common process for PC enthusiasts — there are even sites/forums where you can purchase "binned" RAM, CPUs, graphics cards, et cetera at a price premium.
35 The USB link for the liquid cooler doesn't power it but simply provides a data connection to the PC so that the Corsair Link software can control the pump and fan speed.
36 I tend to use BIOS and UEFI interchangeably. This motherboard (and all modern ones going probably close to a decade back) has a UEFI but lots of things are still labeled as BIOS, perhaps to not confuse users that know the BIOS term already, I don't know.
37 I never used Windows 8 but the Start menu used to be a much more obtrusive full-screen menu, so folks seem to love the return of the traditional menu. For those desiring even more customizability, there is Start10.
38 And while I'm on the subject of things that feel like macOS — there's a Night light feature that seems to be table stakes these days (macOS, iOS and Android Oreo have equivalents).
39 Installation was a bit convoluted, it's a service that always has to take up resources and run in the background and only works in certain programs and not, for example, with Google Chrome.
40 Instead of entirely limiting my real estate by scaling everything like macOS appears to do. But yes in general any kind of UI scaling that is not 100% or 200% is generally bad news and has the potential to lead to blurry pixels. And yes, some application chrome does appear very small on this display but I'm right at home at this size.
41 Though I stopped using Windows around the XP era (and very briefly used Windows 7 and not as a primary machine).
42 Well sometimes, this can happen asychronously.
43 Note: only the default setting is truly secure. It is possible that some rogue applications could automatically accept the UAC dialog if set to any lower settings that don't fully hide the desktop.
44 I also had to use Keytweak again to make a few unused keys (I used the Number pad +/- keys since I don't have a keyboard with a numeric keypad and those keys go unused) to the brightness control function keys. For some reason I was unable to get it to work just by using the scan code number for the original keys.
45 I also found it harder to use catalogs across Windows and Mac. Since the paths are entirely different even for files stored on the NAS it takes more work to switch between computers, though I recall it being possible to ease this with some SQLite batch scripts on the Lightroom catalog to modify the paths each time you switch machines.
46 Though there is one plugin I'd like: either a focus mask or at least something to show me the focus point(s) I used when I took this shot. Though that wouldn't help with shots where I used the focus-and-recompose technique.
47 If you're doing heavy editing on a particular photo, like with the adjustment brush, you may want to disable this, do your edits, then renable it at the very end as there are some accuracy and performance costs associated with this.
48 I started with XMP settings for this RAM (3200 CL14) and decided to see if I could maintain the same low latency but increase the clock. I nudged it a bit higher to 3333 with 1.4V and it stayed stable. As explained in the memory section of this post earlier, you want low timings at a fast clock. To beat CL14 at 3333 (8.4ns) I'd have to run something like CL15 at 3600 (8.33ns). And that would barely beat it. Other high-end RAM kits that support XMP settings of CL16 at 3800 or CL17 at 4000 would not beat CL14 at 3333. And besides, those are increasingly very high overclocks and at that speed you would risk memory controller stability when paired with a very high cpu overclock for less than a 1% performance gain. I decided my slight modification on XMP settings were great and already much faster than the Coffee Lake reference of 2666MHz.
49 HDR and panorama appear to be among the least effective
50 The Photo Mechanic macOS version can render the RAW but not the Windows version. And these embedded previews that come straight from the RAW won't look like the processed previews in Lightroom though as they did not go through Adobe Camera Raw.
51 When traveling I never delete the SD cards. I import and transfer them to another drive I have on me so I can have two copies until I get home and can safely back them up. Storage concerns while traveling aside: The Photo Mechanic folks did tell me about a way to delete the JPEGs to save disk space after I've completed my culling.
52 Fortunately, Lightroom Classic CC also gets this feature and it definitely tames auto more, but I'm not a fan of its propensity to crank up the vibrance and saturation as well.