Amazon's Simple Storage Service, S3, is quite wonderful. It's cheap, secure and virtually infinite in storage capacity. Some people have begun utilizing S3 to host files for their website that would otherwise be expensive in bandwidth costs to serve from their own server. I actually used to host all static template images on this blog from Amazon S3 as I was under the impression that it would decrease load time considerably. Such was not the case and I noticed that S3 introduced moderate latency before files were downloaded. Among other reasons, it was because files hosted on my S3 account only came from one US datacenter location.
Enter Amazon CloudFront. CloudFront is a CDN, or Content Delivery Network. It utilizes Amazon S3 but distributes your data out to multiple datacenter locations, ensuring faster access times through low latency file hosting for your website users. To be specific, CloudFront operates out of the following locations:
United States
- Ashburn, VA
- Dallas/Fort Worth, TX
- Los Angeles, CA
- Miami, FL
- Newark, NJ
- Palo Alto, CA
- Seattle, WA
- St. Louis, MO
Europe
- Amsterdam
- Dublin
- Frankfurt
- London
Asia
- Hong Kong
- Tokyo
What makes CloudFront so great is that it is, in my opinion, the first consumer-friendly CDN service. That is to say that it is cheap for its low-latency CDN offerings, easy to sign up for and start using. It also holds its own against professional CDN services like CacheFly. There are small downsides to CloudFront compared to expensive CDN solutions. For one, it takes some time (up to 24 hours) for file changes and updates to be pushed out to CloudFront edge servers. Regardless, I was eager to test it out for myself.
Setting up CloudFront
This is what Amazon says you need to do to get a CloudFront distribution working:
- You place the original version of your objects in your Amazon S3 bucket.
- You call the CreateDistribution API, which will return your distribution’s domain name.
- You create links to your objects in your web site or web application using the domain name.
I'm going to assume that you already have an Amazon Web Services account. If not hop over here and get signed up - don't worry it really is cheap. I store around 35GB on S3 and my last monthly bill was only 6. CloudFront introduces additional charges on top of S3 storage, but it's nothing insane.
Once you're signed up, enable Amazon S3 and CloudFront on your account. You'll need to grab your account access identifiers (Access Key ID and Secret Access Key) from the AWS site as well.
To interact with S3 you can use a number of tools, or interact with the API directly through your own code or a popular S3 library if that's your cup of tea. I personally use Panic's Transmit for my S3 needs but the current version has not yet been updated to support CloudFront distributions. S3 Bucket Explorer and S3Fox can handle CloudFront distributions. I'm going to use S3Fox for the purpose of this article and "step 2" of Amazon's instructions which details using the CreateDistribution CloudFront API.
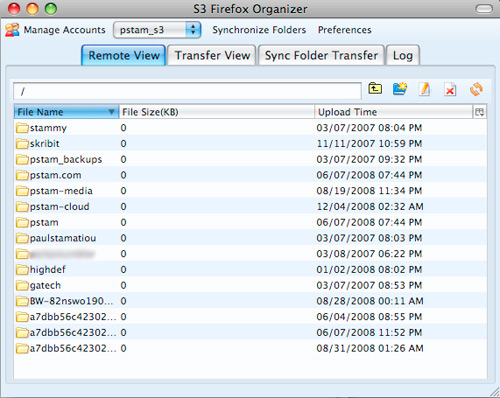
Install and setup S3Fox in your Firefox browser, as discussed briefly in How To: Bulletproof Server Backups with Amazon S3 and give it your account access identifiers.
You should be looking at something like this now, listing your S3 buckets. You might not have any, so click the new folder icon and create an S3 bucket. Buckets are Amazon S3 lingo for folders, although technically S3 has no sense of folders.
To The Cloud!
Now that you have a bucket you want to associate with CloudFront (it will serve as the "origin"), you'll need to get a CloudFront distribution up and running. You will need to come up with a DNS record CNAME you want to add to your domain that will be used as the URL to serve your newly CloudFronted files. For example, I added a CNAME record to be used with CloudFront on PaulStamatiou.com called turbo. With that, URLs for CloudFront files begin with this:
https://turbo.paulstamatiou.com/
Right-click the bucket you wish to use as the origin for your CloudFront distribution and select Manage Distributions. Fill out the desired CNAME (to be setup later) and click Create Distribution. This might take a few seconds and a refresh or two.

Adding a CNAME DNS Record
The last bit of the equation is to hit up your web hosting provider or whoever takes care of your DNS and create a CNAME record. For me, that is controlled by Media Temple Hosting. I logged into their account center and found what they call my domain's zone file. I added a record, changed the value to CNAME and typed in the full URL including CNAME for the address name, in this case it was cache.skribit.com. For the data field, I entered in the cloudfront resource URL, which can be found from S3 Fox as shown in the image above. That was d27d77md6bgrrn.cloudfront.net. for me. Notice that I intentionally put a dot after the ".net" TLD. Some DNS services like the dot there, some don't, so you'll have to find out what the rules are for your particular DNS host.

I had already lowered the TTL (Time To Live) value so once I saved the CNAME record it was live almost instantaneously.
Make It Public
We're almost there. Now we need to upload some files to test it out and edit the Access Control List (ACL) to ensure that it is public and anyone online can view those files. Go back to S3Fox and browse to the bucket you tied to your CloudFront distribution. You can either edit the ACL on the bucket level and apply to subfolders so that everything is public, or you can do it on file or subfolder basis. I prefer the ease of making the entire bucket public.
Right-click on the bucket, select Edit ACL and check off the box under the Everyone row and Read column. Select Apply to subfolders and click Ok.

Once you have uploaded some files to your S3/CloudFront bucket and ensured that the ACL allows public read access, try accessing the new CNAME. If you have a file called untitled.txt right inside the bucket, then your resource URL would be:
http://[CNAME].[DOMAIN].[TLD]/untitled.txt
If you receive some XML Access Denied error, then you need to go back to the ACL settings and double-check read access is enabled for everyone, or that you have the proper URL. If you don't receive an XML error but instead receive a 404 and the URL redirects to the root domain, then your CNAME DNS record has not fully propagated yet so just give it some time.
Ready to Roll
So you're all setup with CloudFront! One example use is hosting all of your WordPress images and javascript files on it. To make things easy and maintainable, I recommend keeping the same directory structure (wp-content/uploads, wp-content/themes, et cetera) in your S3/CloudFront bucket.
For Skribit, we plan on using CloudFront to serve the javascript files required for some of our widgets. That way the widgets load quickly regardless of the viewer's location and websites using our widgets won't experience downtime or sluggish loading times if anything happens to our server.
You can test the load times of your site or application with Pingdom's Full Page Test to see how CloudFront has changed things. Keep in mind that it might take some time for the new files to get pushed to the CloudFront edge nodes.
Caveat Emptor
Now to get back to the drawbacks I briefly mentioned at the beginning of this article. One of the larger issues with serving files from your application server and from a CDN is that the CDN can't process server-side files. I usually rename my javascript files to .js.php and add in some gzip compressing code at the top and bottom of the file to compress the file when served. Most people got around this issue in S3 by setting the Content-Encoding header to gzip via an S3 API call.
However, CloudFront does not currently automatically detect if a browser accepts gzip encoding. There are some technical ways around this, such as getting your application to detect if the browser accepts gzipped files and then serve the right file (compressed or uncompressed), both of which you have on CloudFront. This is a bit out of the way for some people like me, so I had to make the decision between serving files locally and compressed, or on CloudFront and uncompressed.
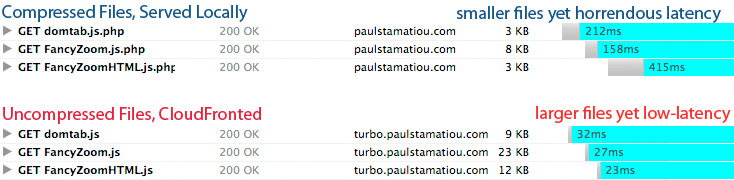 Tested via Firebug in Atlanta, GA (no CloudFront edge servers are actually in Atlanta).
To make myself clear, it is possible to serve compressed content from CloudFront, but not for the average, not-programmer user, so they will likely face the local & compressed versus cloudfront & uncompressed issue. If you want to look into serving compressed files through S3/CloudFront, take a look at the popular AWS::S3 Ruby library to write your own scripts and adjust things like the Content-Encoding and Cache-Control headers yourself.
The next issue with CloudFront deals with origin to edge server communication. CloudFront grabs files from the origin server (S3) when it sees a new file that the edge servers don't yet have, but other than that it won't necessarily update all edge servers the instant a file is modified (and retains the same name). It can take up to a day for all edge servers to have the same file. As Wayne Pan mentioned, the best solution is to version your files and give your application the logic it needs to be able to change the files it uses, rather than rely on the same file and same file name and have different CloudFront edge servers potentially serve up different versions of the same file.
CloudFront pulls from S3 only if the CF node doesn’t already have a local copy. This means that the only way to push out a new file is to change the filename. (style.v1.css, styles.v2.css, etc.) This means that your framework will have to take advantage of this. Without file versioning you’re at risk of serving stale files from different nodes on CloudFront.
Usage Reports
Wait a few days then login to your AWS account and download your CloudFront Usage Report. While Amazon doesn't provide terribly detailed information through it, you will be able to see where people are accessing your files from. It's a neat metric to look at, albeit Google Analytics does a better job of this.
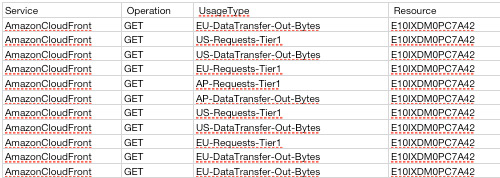
Shown above: data transfers from the United States, Europe and Asia Pacific.
Overall
I'm pretty happy with Amazon's first CDN offering, CloudFront. It's extremely easy to setup and affordable to boot. I was able to get it running from scratch in under 5 minutes, including CNAME DNS propagation. While it might not be mature enough yet with advanced usage reporting for companies to use in place of Akamai, Limelight or CacheFly, it certainly has potential.
Will you be incorporating Amazon CloudFront into your site or application?
Update: Commenter Brad Hanson cleared some things up:
Actually, Amazon does not automatically push your files out to the edge locations. A file only gets pushed to an edge location when someone requests the file and the edge does not have it. It then fetches it from S3 and all subsequent requests will be served directly from the edge.
File are guaranteed to stay in cache for 24 hours of inactivity, before being removed and being required to fetch from S3 again.