My recent article, DIY: 200 Dollar PC, proved to be quite popular with over 50k pageviews in the last few days. The Intel D201GLY2 motherboard that I linked to in the last article drove so much traffic to Newegg that the item has since been "deactivated" and gone out-of-stock indefinitely. Taking that subtle hint, I will be writing follow-up posts documenting my experience with this computer, software I configure and so on. I guess people rather enjoy finding out about affordable and useful hardware.
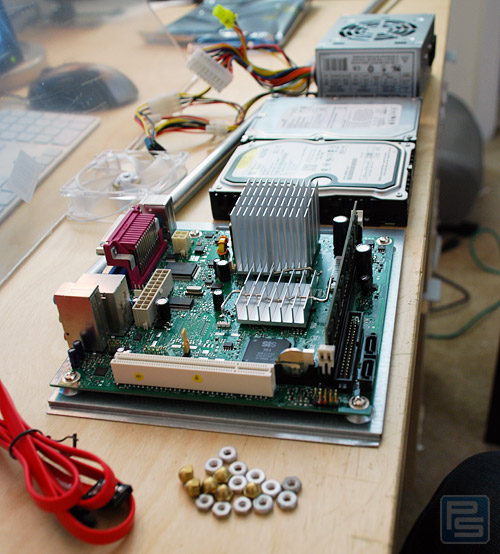
 The power supply at the end will be replaced with a PicoPSU.
As you might have expected, I deviated from my original 200 plan for my own needs with this box. I will end up using this as file server for my local network so I bought a 750GB Seagate Barracuda from a B&M Fry's Electronics store for 159. To keep the software setup simple and avoid partitioning, I will be using a Western Digital Raptor hard drive (was lying around at home from an old RAID setup) for the Ubuntu Linux operating system.
For the case, I purchased the APEX MI-100 case mentioned in the first article but I quickly changed my mind and decided to build my own case. That and the MI-100 has a loud power supply. However, I was able to salvage the motherboard tray (always handy when building your own case) and the power switch. I have a 120 Watt PicoPSU power supply on the way, so this thing will be just about silent except for hard drive noise (as with most 10k+ RPM drives, the Raptor whines) when I'm done.
The case will be constructed with a few layers of 1/4-inch thick acrylic/plexiglass. That is, one layer will have the motherboard, and another layer the 2 hard drives. Layers will be separated with 3/8-inch aluminum tubing and fastened with #8-32 threads and bolts. It might end up looking something like a cube.
First Impressions
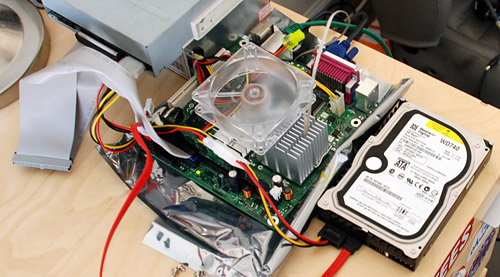
 Temporary setup whilst installing the OS.
When I got the parts earlier this week I hastily set it up to install Ubuntu and get a feel for the machine. The Ubuntu install went well and didn't take more than 20-25 minutes. The 1.2GHz processor is enough for using the computer as an Internet client with apps like Thunderbird, Firefox, Pidgin and so on working flawlessly with the amount of available horsepower. I was able to play movies in their original size (DivX movie used about 60% CPU in VLC Player), but playing them in full screen mode instantly started dropping frames.
Another thing to note is that the northbridge chip gets a little toasty so you can either have a 40mm fan directly on top of it or better yet just a slow 80mm or larger fan blowing across the motherboard. It doesn't have to be fast, just a slight breeze will do. Otherwise, the Zalman ZM-NB32 passive northbridge heatsink has worked well for me in the past.
Video Hacks
That brings me to my only issue with this board - video. The SiS 964 has horrible Linux support. Upon first install, there will be lots of apparent signal noise and things will appear very distorted on the screen. The default SiS module in Xorg doesn't play nicely. To get around that I lowered the screen resolution so I could at least see what was going on (the lower the resolution, the less distorted the picture was). The easy workaround is to just tell Xorg to use the VESA module by running
sudo dpkg-reconfigure xserver-xorg
and selecting the default responses for everything else. Doing so reconfigures Xorg to use the VESA driver for generic video cards. However, this approach utilizes none of the hardware acceleration supported by the SiS chip, thus resulting in poor glxgears numbers. It works alright for regular 2D stuff but even things like scrolling in a browser are slow.
Fortunately, Sergey Kiselev posted his modified SiS Xorg module and xorg.conf file online. Installing those can be done simply with (assuming Sergey's sis_drv.so module is on your desktop):
cd /usr/lib/xorg/modules/drivers/
sudo mv sis_drv.so sis_drv.bak
sudo mv ~/Desktop/sis_drv.so sis_drv.so
Then I edited xorg.conf (/etc/X11/xorg.conf) to add lines from Sergey's xorg.conf that mine didn't have. For me this included the Files and Module sections as well as the following lines within the Device section:
bash
Option		"EnableSiSCtrl"		"yes"
Option		"XvDefaultAdaptor"	"Blitter"
This hack allowed me to get the computer to run 1680x1050 resolution but I was not able to get it to run the native 1920x1200 resolution my monitor supports. I'm still tinkering with that.
The Next Step
Once I get the case all figured out, the next step will be configuring Samba to share the 750GB drive on the network. Samba lets you share files, folders, drives and printers, and lets you control the permissions each user has with those resources. It's a much better solution than trying to share an NTFS-formatted drive on Linux.
Additionally, it is always a good idea to format the drive you're going to be sharing with a file system that's easy to work with on the host OS. NTFS in Linux is still a work in progress for the most part, so I will likely be using xfs as it works better with the types of larger files I will be sharing.
Going with Linux for this computer is definitely the harder way. Had I chose to use Windows XP I wouldn't have any video issues as SiS has working Windows drivers and all I would have to do is share a folder or install an FTP server program. Where's the fun in that though?
Thanks to Aron Schatz at ASE Labs for pointing me to Sergey Kiselev's Xorg modules.
Thoughts? What do you think so far?
One More Thing
You can tweak OS X Leopard's Time Machine app into working with NAS Samba shares, doubling the utility of this cheap computer.
Run this in Leopard's terminal to get Time Machine to recognize "unsupported network volumes".
defaults write com.apple.systempreferences TMShowUnsupportedNetworkVolumes 1
Maybe I should have titled this post DIY: Time Capsule.. more on that later after I test it out myself.