HOW TO Quickie: Change OS X Icons
After using that new Mac of yours for a while, you might want to give it a unique feel and customizing various aspects of the operating system to your liking. The easiest method is to change the icons of your hard drive or other applications. You can find some exclusive icons at many websites such as InterfaceLift.com.
The first thing you are going to need to do is browse an icon site and download your favorite icon set. Most icon sites package the download in a .sit file extension, so you will need a program to decompress it, such as StuffIt Expander. After you have extracted your icon set, find a particular icon you want to use and figure out what you want to use it on, such as your hard drive on.
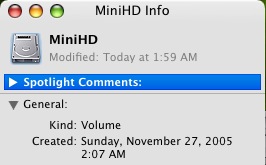
Select the icon to use and right-click and select Get Info from the file menu. This can also be done by selecting the icon and pressing Command-I. The info pane will popup. At the top of this pane you will see a small preview of the icon. Click on that preview to select it, then go to theEdit menu and select Copy.

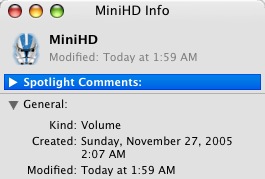
Next, go to the Finder and select the object which has the icon you will be changing. This can also be done for objects, eg hard drives, on the desktop. Right-click and Get Info once again, select the icon preview and go to the Edit menu and choose Paste. That's it!
If you want to undo your action and revert to the default icon, just to in to the Get Info pane, select the icon preview and Edit > Cut.