Getting started with drones
Everything you need to know about how drones work, how to fly them and modify them.
Drone. Quadcopter. Phantom. Dronie. You’ve no doubt heard about these terms with increasing gusto in recent months. They are everywhere in the news now; from seeing more dronies slide into your Twitter timeline and taking dronecations with Travel By Drone to an influx of startups taking drone tech to new heights. Heck, even Martha Stewart got in on the act with her piece on drones in TIME yesterday.
UPDATE: The DJI Phantom 3 is now out and it's my current pick for getting started with drones. There are two models that both include cameras, gimbals and video transmitters: DJI Phantom 3 Professional and Phantom 3 Advanced.
What exactly am I talking about when I say drone? Drone tends to imply a fully autonomous, sometimes GPS-guided unmanned aerial vehicle. While much of what I’m about to discuss can be modified to fly autonomously, I am more or less referring to radio controlled multi-rotor aircraft for the purposes of aerial photography and videography.
My interest with R/C began more than two decades ago, much like most of you I bet. I was always tinkering with small electric cars, then nitro cars and eventually nitro planes. I hadn’t touched an R/C toy until one late night in the Twitter office months ago. I heard a high-pitched whine a few desks over and went to investigate. One of our engineers was playing with a tiny quadcopter, the $35 Estes Proto X. I bought one and had some fun with it and didn’t think much of it.
Now more cognizant and curious about these flying machines, I began noticing drone culture grow around me at a rapid clip. Friends started getting into quadcopters and YouTube became inundated with drone GoPro videos. It wasn’t until my coworker David Chen, now an engineer at a drone startup, started posting tweets like this that I became hooked.
Lombard st from the above. pic.twitter.com/jh9AIVQrk3
— David Chen (@chenosaurus) March 28, 2014Why now?
But why haven’t we had any innovation or such interest in this space since those R/C toys in 90’s? Electric quadcopters have been attempted in the past but with no way to sense position and effectively control each motor independently, they were impossible to fly and had poor airtime due to inefficient and memory-effect susceptible NiCad battery packs.
There are a few reasons but they all start with one thing: smartphones. Consumer quadcopters are now possible — and affordable — due to advancements in cell phones and the associated economies of scale. Modern quadcopters use the same kinds of magnetometers, gyros, accelerometers, radios, GPS modules and processors as those used in our phones. Likewise, battery technology advancements pursued through the demand of laptops, tablets and smartphones have also made their way into the foundation of this drone movement.
However, it's the GoPro and YouTube revolution that really spurred drone growth. Tiny, high-resolution video cameras mounted to quadcopters capturing amazing videos posted online for all to see and get excited about. Which then led to more developments like 3-axis gimbals to stabilize video. Now anyone can capture smooth professional aerial footage like filmmaker Philip Bloom.
For all of human history our perspective has basically been stuck at eye-level and now for the first time in history we can see the world the way the birds do.
That right there is why I'm excited about drones, why I bought one and why I'm writing this article. I have always loved photography and now I have a new tool to get creative.
What are some popular models?
To give you a better idea of the multitude of multi-rotor UAV offerings and their capabilities, I've compiled a small list of models that I feel have been receiving quite a bit of buzz online. There are dozens of models I'm leaving out. This list is ordered by price and coincidentally they're also increasing in size. Keep in mind that some of these are kits and do not include all parts necessary to fly.
-
Estes Proto X, Hubsan X4, Nano QX and Crazyflie Nano
These small quadcopters are made for indoor flying and typically have 4-7 minutes of flying time. Buy extra props as you will crash many times. The Crazyflie is the most interesting of the bunch in that it's hackable and you control it via a USB transmitter (you can then hook up an Xbox control to your computer).
If you want to spend just a tad more, there's an emerging new class of micro quads filling in the gap between more expensive models. Models like this $195 Super-X feature brushless motors and hackable firmware just like their bigger brothers. (Hat tip to David!)
-
XHover MXP230, Lumenier QAV250 and Blackout Mini H
Made more for hobbyists and tinkerers, these small quads are largely do-it-yourself and might require some soldering to get things hooked up. The frames are extremely rigid composite plastics or carbon fiber and they're powerful enough to hold a small camera and FPV setup.
You might be able to mount a GoPro but not with a gimbal. Some folks mount a small $90 Mobius Action Camera or "808 #16" keychain camera instead of a GoPro. These quads are fast, durable and acrobatic. Flight times are in the 5-8 minute range depending on battery. See how fun they are to pilot in this video. That being said, they are extremely powerful for their size (some of them can dish out over 2kg of thrust) and are ideal for experienced pilots wanting to fly fast and aggressively.
-
DJI Phantom 2 / Vision+DJI Phantom 3 Professional and Phantom 3 AdvancedUPDATE: The Phantom 3 has arrived. It comes in two variants: The Phantom 3 Professional with a built-in 4K camera and the Phantom 3 Advanced with a 1080p camera. Both are ready to fly and include the HD video transmitter, camera, gimbal and much more. This would definitely be my pick now. It even has indoor positioning sensors that allow it to navigate better in confined spaces where GPS is not accurate enough.
The most popular and consumer-friendly quadcopter by far, the Phantom 2 is the quickest way to get a camera in the sky. Various models include the Phantom 2 itself, the Phantom 2 with a gimbal for a GoPro and the Phantom 2 Vision+ which includes its own camera and video transmission system. Flight time is in the 18-20 minute range for the Phantom 2 and up to 25 minutes for the Phantom 2 Vision+. However, this convenience comes at the cost of limited customizability — you can only stuff so much inside the closed frame.
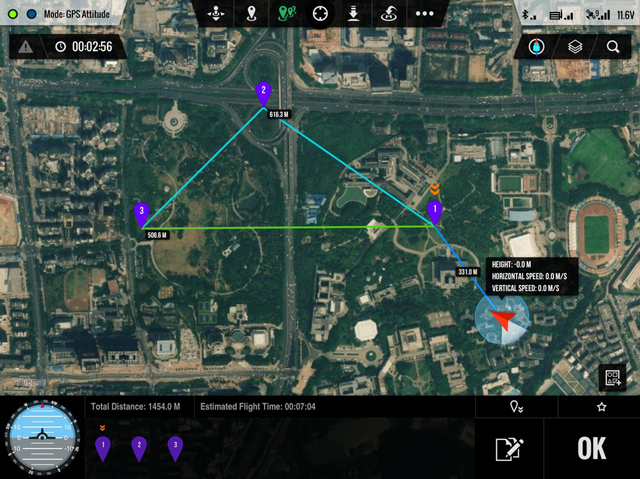
The Vision+ model now has an autonomous mode called Ground Station. It can fly a path of up to 16 GPS waypoints created on your mobile device with their app. While it is flying autonomously, you can focus on controlling the camera.
-
3D Robotics IRIS
Often considered a Phantom 2 competitor, the IRIS has autonomous waypoint-following functionality similar to the Phantom 2 Vision+. While it has poor battery life in the sub-10 minute range (when a gimbal is used), the IRIS is based on the open source UAV autopilot firmware APM:Copter. This provides a versatile feature set: no limits on the number of GPS waypoints, auto takeoff and landing, geo-fencing support and more.
-
DJI Flame Wheel F450 (quad) and F550 (hex)
Another hobbyist/DIY kind of aircraft, these models are larger and more robust than the DJI Phantom quadcopter. With the camera mounted in the front, propellers don't end up on your video. You can purchase just the frame and pick out your own motors, ESCs, autopilot system, transmitter/receiver, propellers, gimbal, battery and so on. Larger payload means you can get away with attaching cameras like the Sony RX100 and NEX 7. Hexacopters like the F550 tend to have better yaw control than quads.
There is also the OFM Seeker-450 and TBS Discovery Pro which are both somewhat based on the F450 frame. The former's claim to fame is a 62mph top speed while the latter is made for aerial videography boasting long range control and video transmission in addition to a video switching ability to switch views between 2 cameras (one for FPV flight and the GoPro).
-
DJI S1000 and CineStar-8
Now we're definitely in the professional range. Drones in this tier can take 10+ pound payloads, ideal for toting DSLR cameras like the Canon 5D Mark III and can keep flying even if one motor dies. Or delivering champagne by air in Las Vegas if that's your thing.
$0–150

$400–700

$679–$1500


$1500–$3000


$3000–∞

Drone FAQ
The concept of purchasing a quadcopter became tangible once I learned how easy to fly they were. While functionality varies by model, most use autopilot systems that interpret your commands (throttle, yaw, pitch, etc) and splice that with input from various sensors to maintain altitude as well as position regardless of wind. Piloting one of these drones is not a matter of juggling stick control to correct then eventually overcorrect movements (unless you're brave enough to switch to manual mode).
What if I lose signal? GPS-enabled drones will often record a position before takeoff so if you ever lose signal it will fly home and land.
Can I control the camera? Most gimbal-equipped drones let you adjust the pitch (pointing straight ahead or down) of the camera but that's it. You put the GoPro into a recording mode before takeoff. You're not supposed to remotely trigger the GoPro with Wi-Fi since operating on the same frequency could interfere with controls (the Phantom 2 Vision+ is the exception).
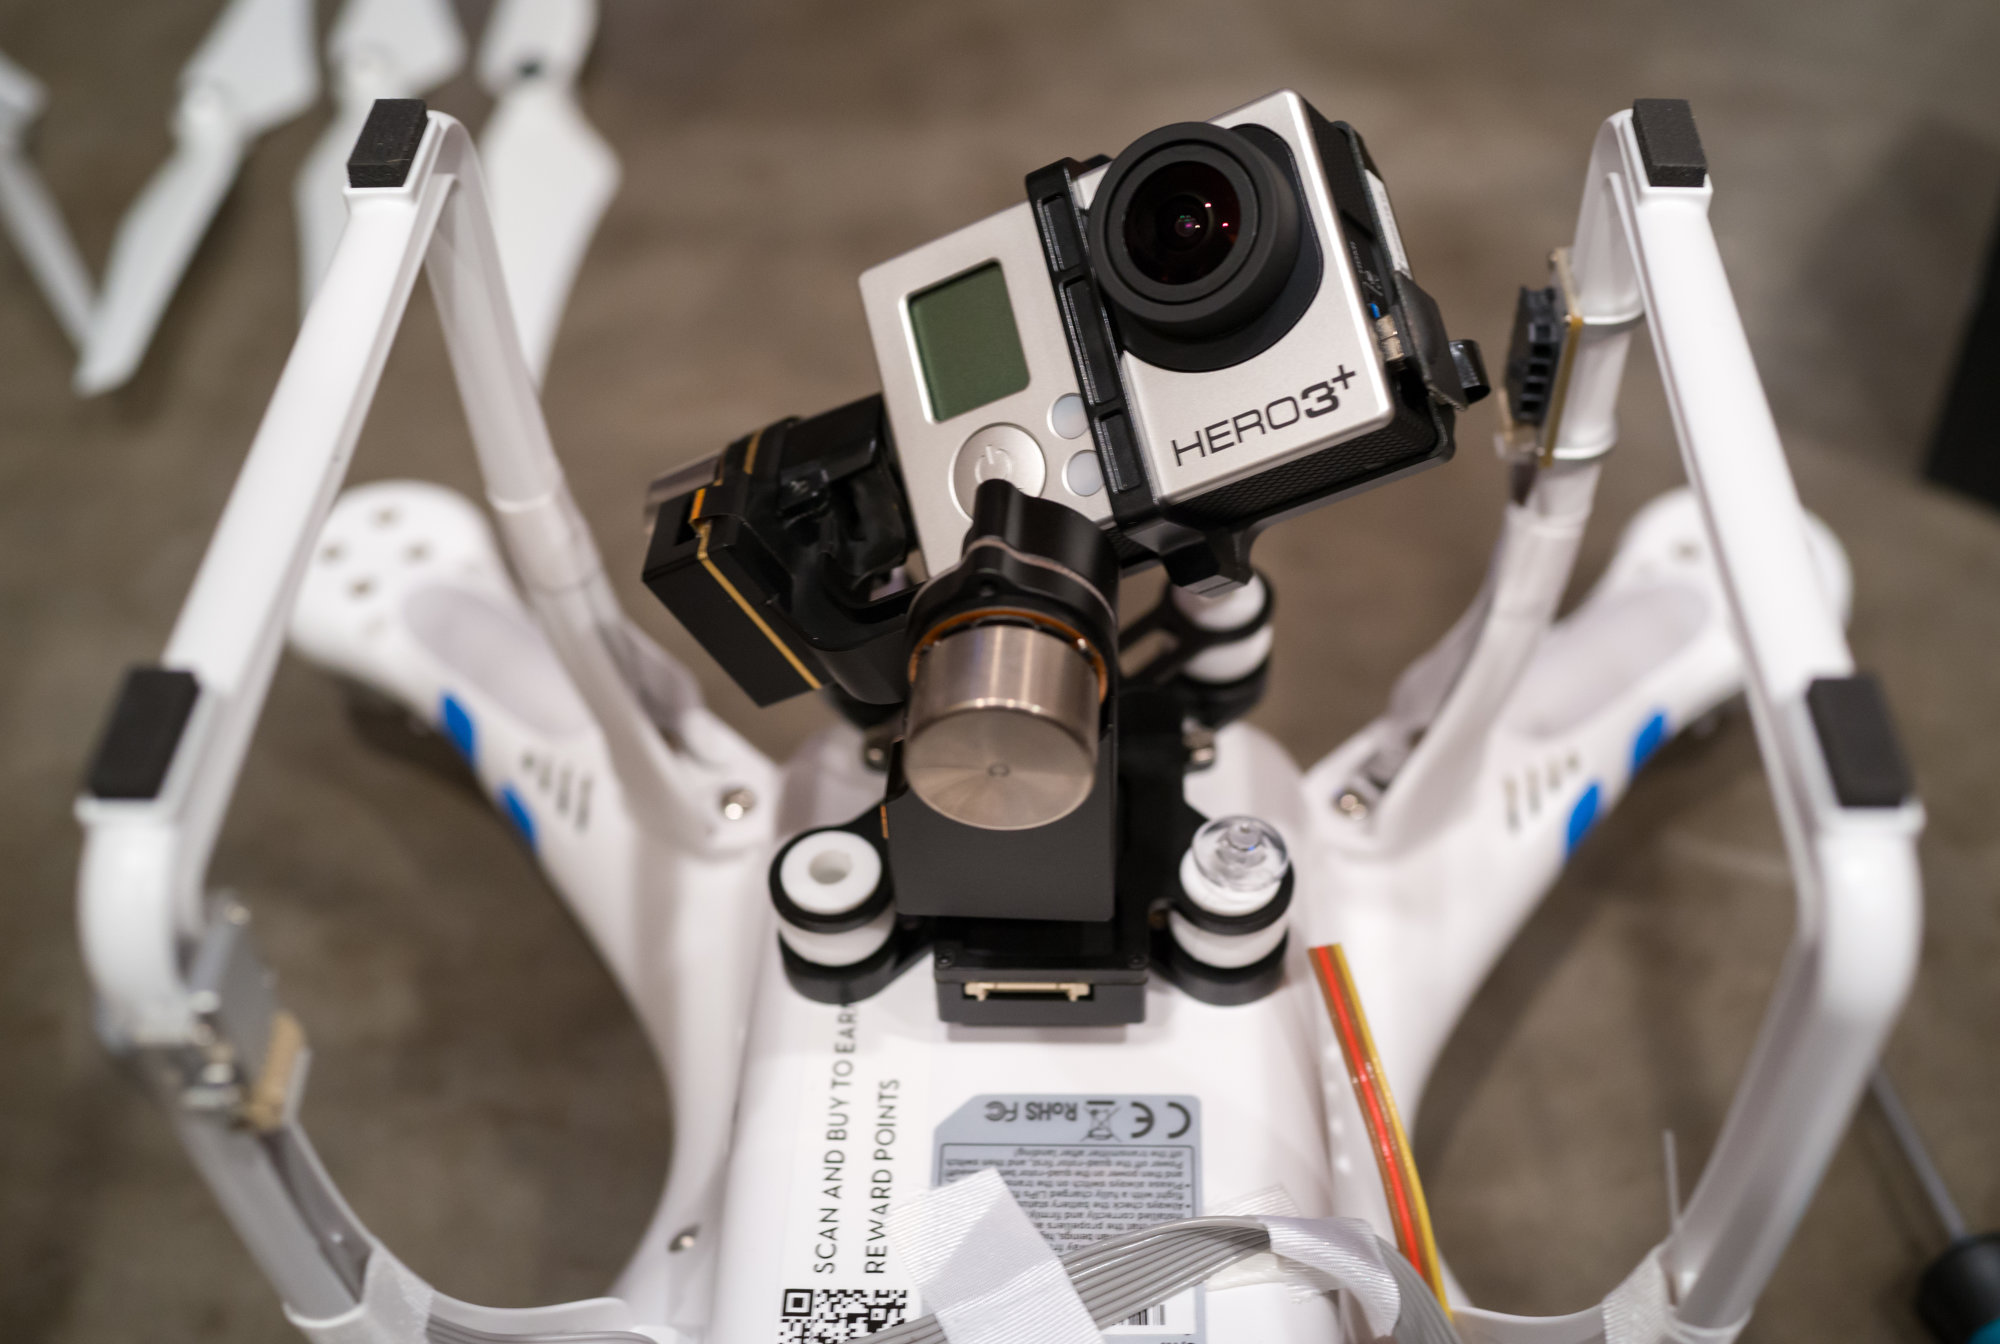
The gimbal is arguably the most important component for any budding quadcopter pilot looking to capture great footage from above. The gimbal actually gets IMU data — inertial measurement unit; data representing the complete velocity and orientation of the aircraft from various sensors including an altimeter, accelerometer and gyro — from the autopilot system to determine how to best position the camera with a combination of instant pan, tilt and roll adjustments (though some gimbals like the H3-3D have their own built-in IMU). And while you can't completely control the camera or rotate it 360 degrees, it's easy enough to fly wherever you like. Here's a video of the gimbal in action keeping the GoPro stable:
What's the range? Radio range is said to be 0.62 miles. Your drone will be a dot in the sky at that point. Which is why it's handy that some autopilot systems like the Naza-M V2 found in the Phantom 2 let you enable a course lock mode that translates your controls based on the drone's orientation; so back always means back, even if the drone is pointing another direction.
How high can it go? Legally your drone cannot exceed 400 feet above ground level in FAA-regulated areas, but technically most big quadcopters like the Phantom 2 and larger are more than capable of exceeding 3,000 feet up, above the clouds. This may require upgraded antennas though.
How fast can it go? Again, this depends on the drone. Some of the larger quads can hit 60mph with no wind, but the Phantom 2 tends to perform at a more sane 25-33mph. You can squeeze the top speed out of your drone by switching to a flight mode called Atti (more on this later) that will let you fly a bit faster and aggressively. This is what it looks like pulling away and then going up:
Can I do flips and rolls? The Phantom 2 can but only in manual mode. It's extremely tricky. You lose lots of altitude when doing them so if you don't catch it, you'll hit the ground quickly. Other quads like the QAV250 can do these no problem and are durable enough that crashes shouldn't be as much of an issue.
Why the Phantom 2?
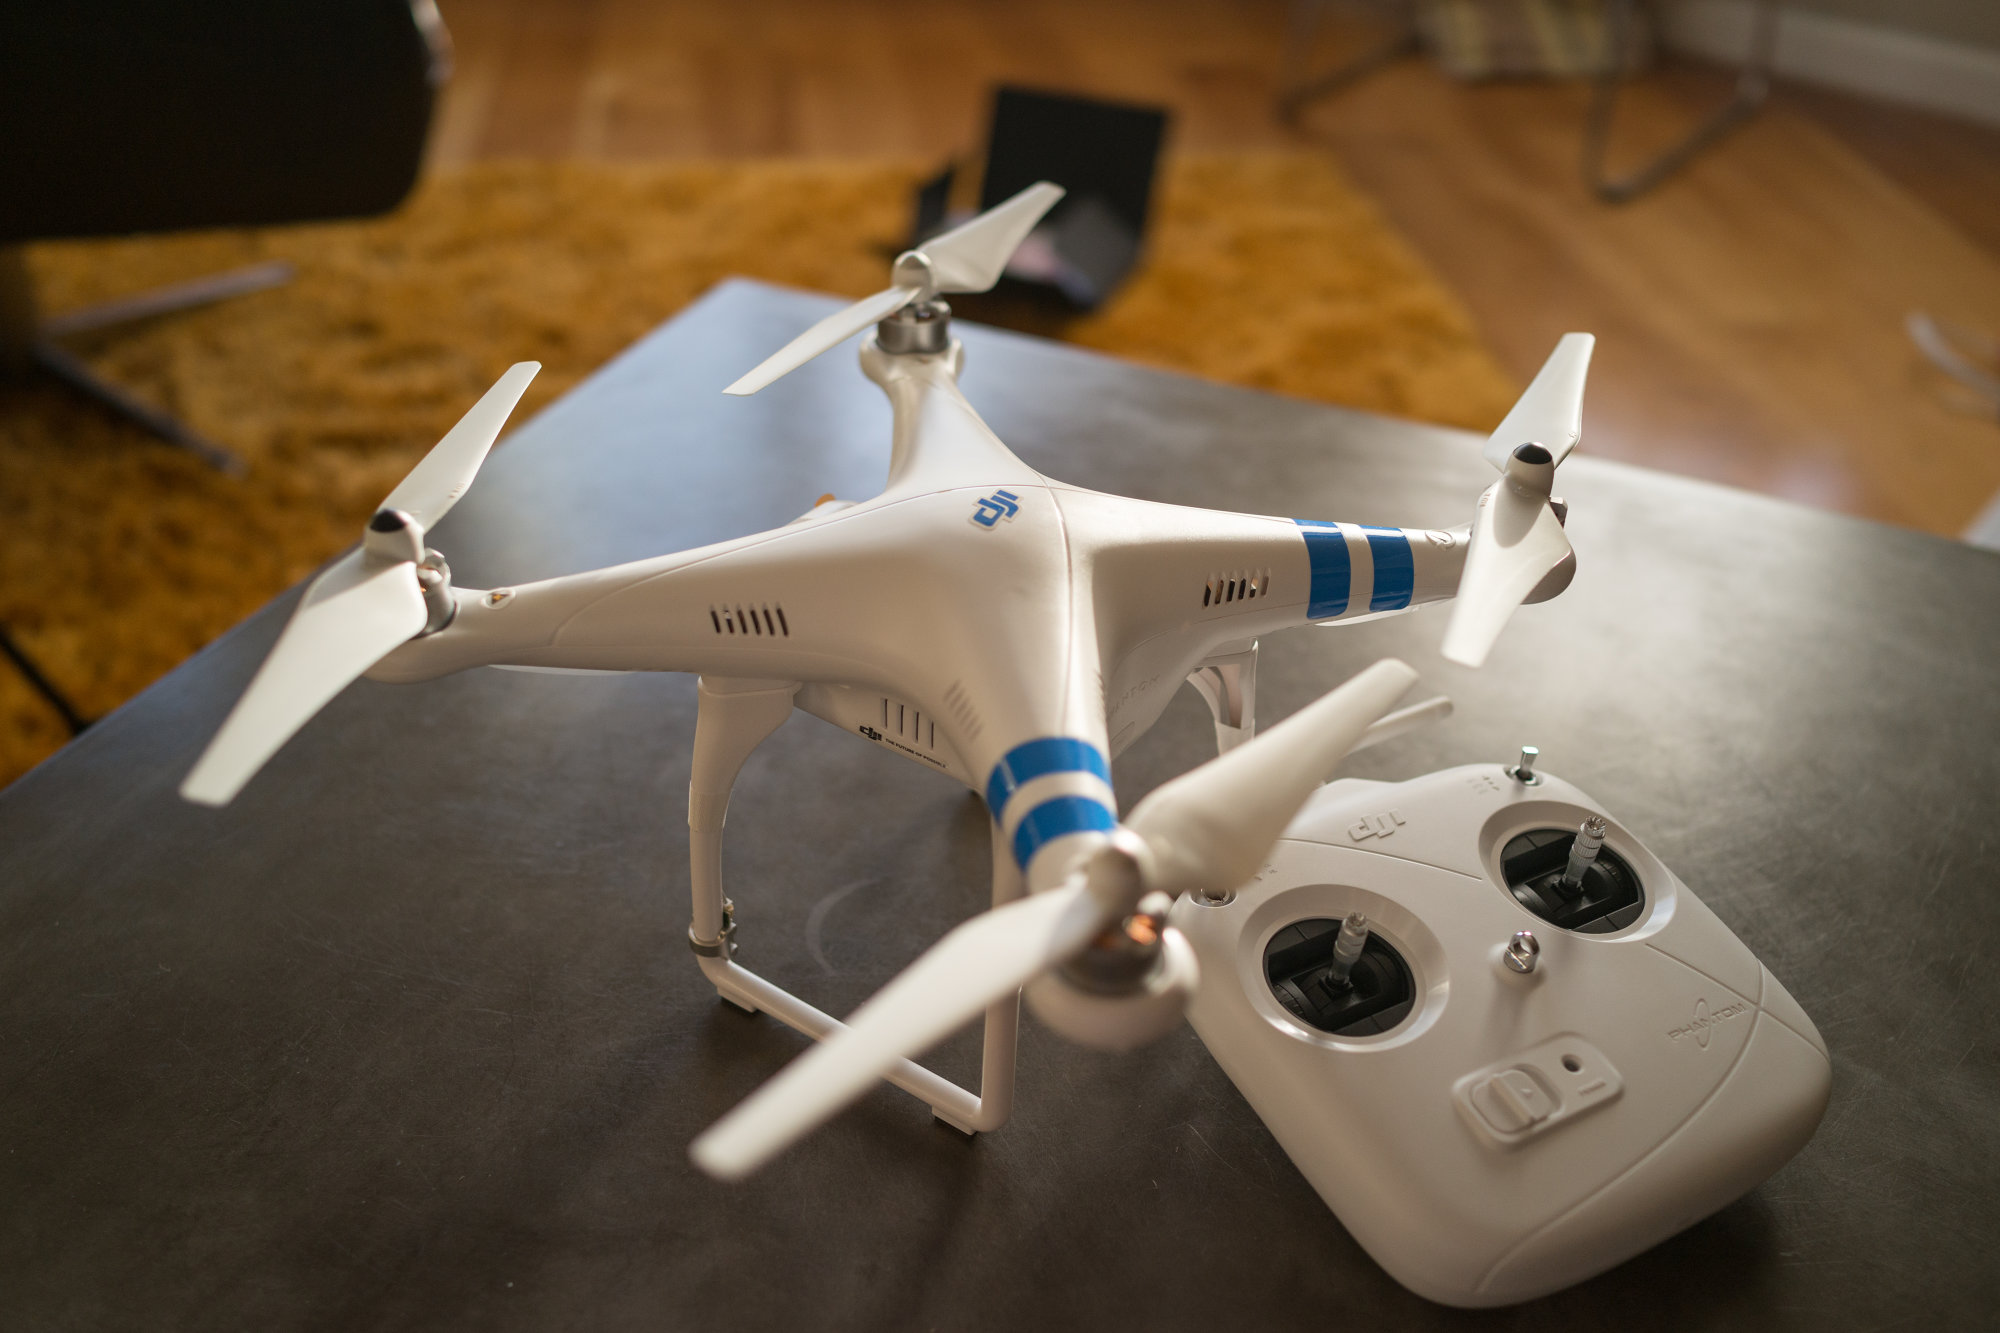
Short answer: If you're just getting started with drones, the DJI's Phantom line of drones has the largest community of users, compatible parts, is ready to fly and most importantly very easy to fly. It's the least risky choice. Though now that my hands are a bit dirty, I've gotten a lot of flight time under my belt and I don't mind soldering stuff, my next drone will probably be a custom build and based on a larger frame like the F450 mentioned above.
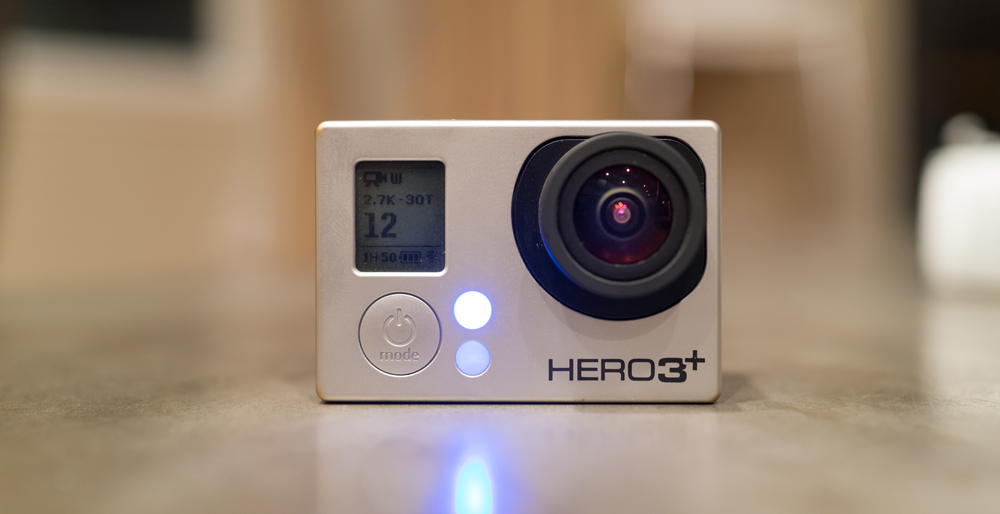
But why did I get the regular Phantom 2 instead of the Vision+ model? Well for one I wanted an excuse to get a GoPro that I could use for other things too. It also came down to image quality. The Vision+ quality is not quite as capable as the GoPro Hero 3+ black edition. Also, when a new GoPro comes out I can just stick that in instead of buying a new drone.
Phantom 3 update: The Phantom 3's camera is much improved and I would now be perfectly fine with using it over my GoPro Hero 4 when flying. Though I use my GoPro for many other things, so I still definitely put it to work and highly recommend having one for other photography needs.
Parts list
NOTICE: This build list was made with the Phantom 2 in mind. If you opt for the new Phantom 3, much of this is irrelevant since it includes the gimbal, camera and video transmitter. Just buy the DJI Phantom 3 Professional or Advanced and you're good to go!
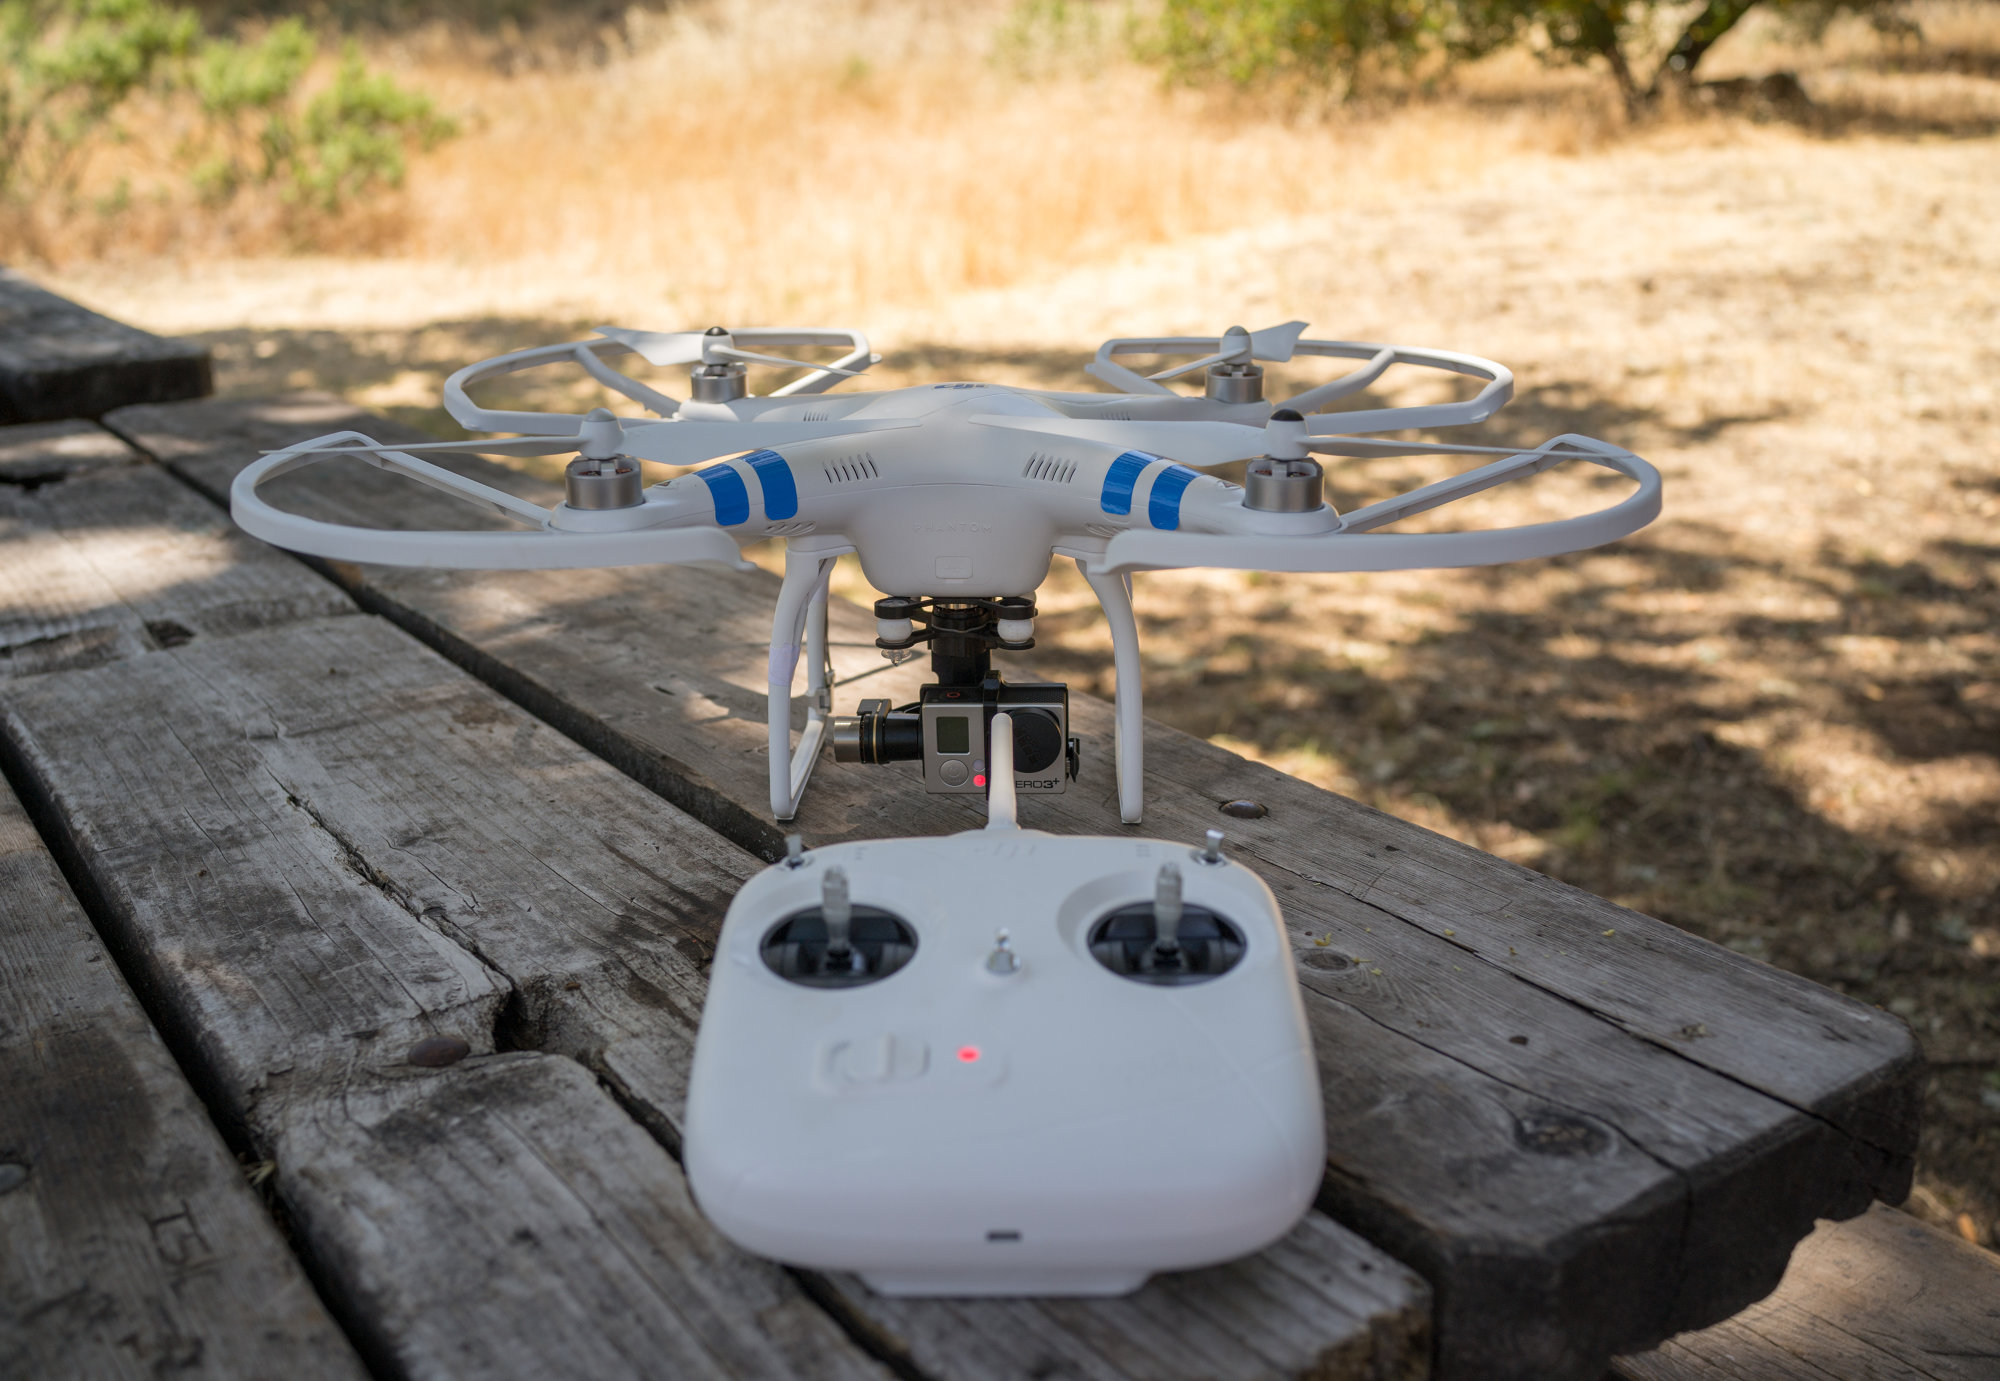
Considering I largely became interested in drones through watching Amit Gupta's tweets (he did the first dronie), I bought my Phantom 2 with Zenmuse H3-3D gimbal from his store Photojojo.
I've split this list up into essentials (just the Phantom 2, gimbal and GoPro) and a sections for miscellaneous parts required to setup a first-person view system. There are various routes you can go, some more complex than others so I've listed a few alternate parts in descriptions.
-
DJI Phantom 2 with Zenmuse 3-axis H3-3D gimbal$959
The dronie machine.
-
Extra Phantom 2 battery$129
Get an extra 15-20 minutes of flight time per battery.
-
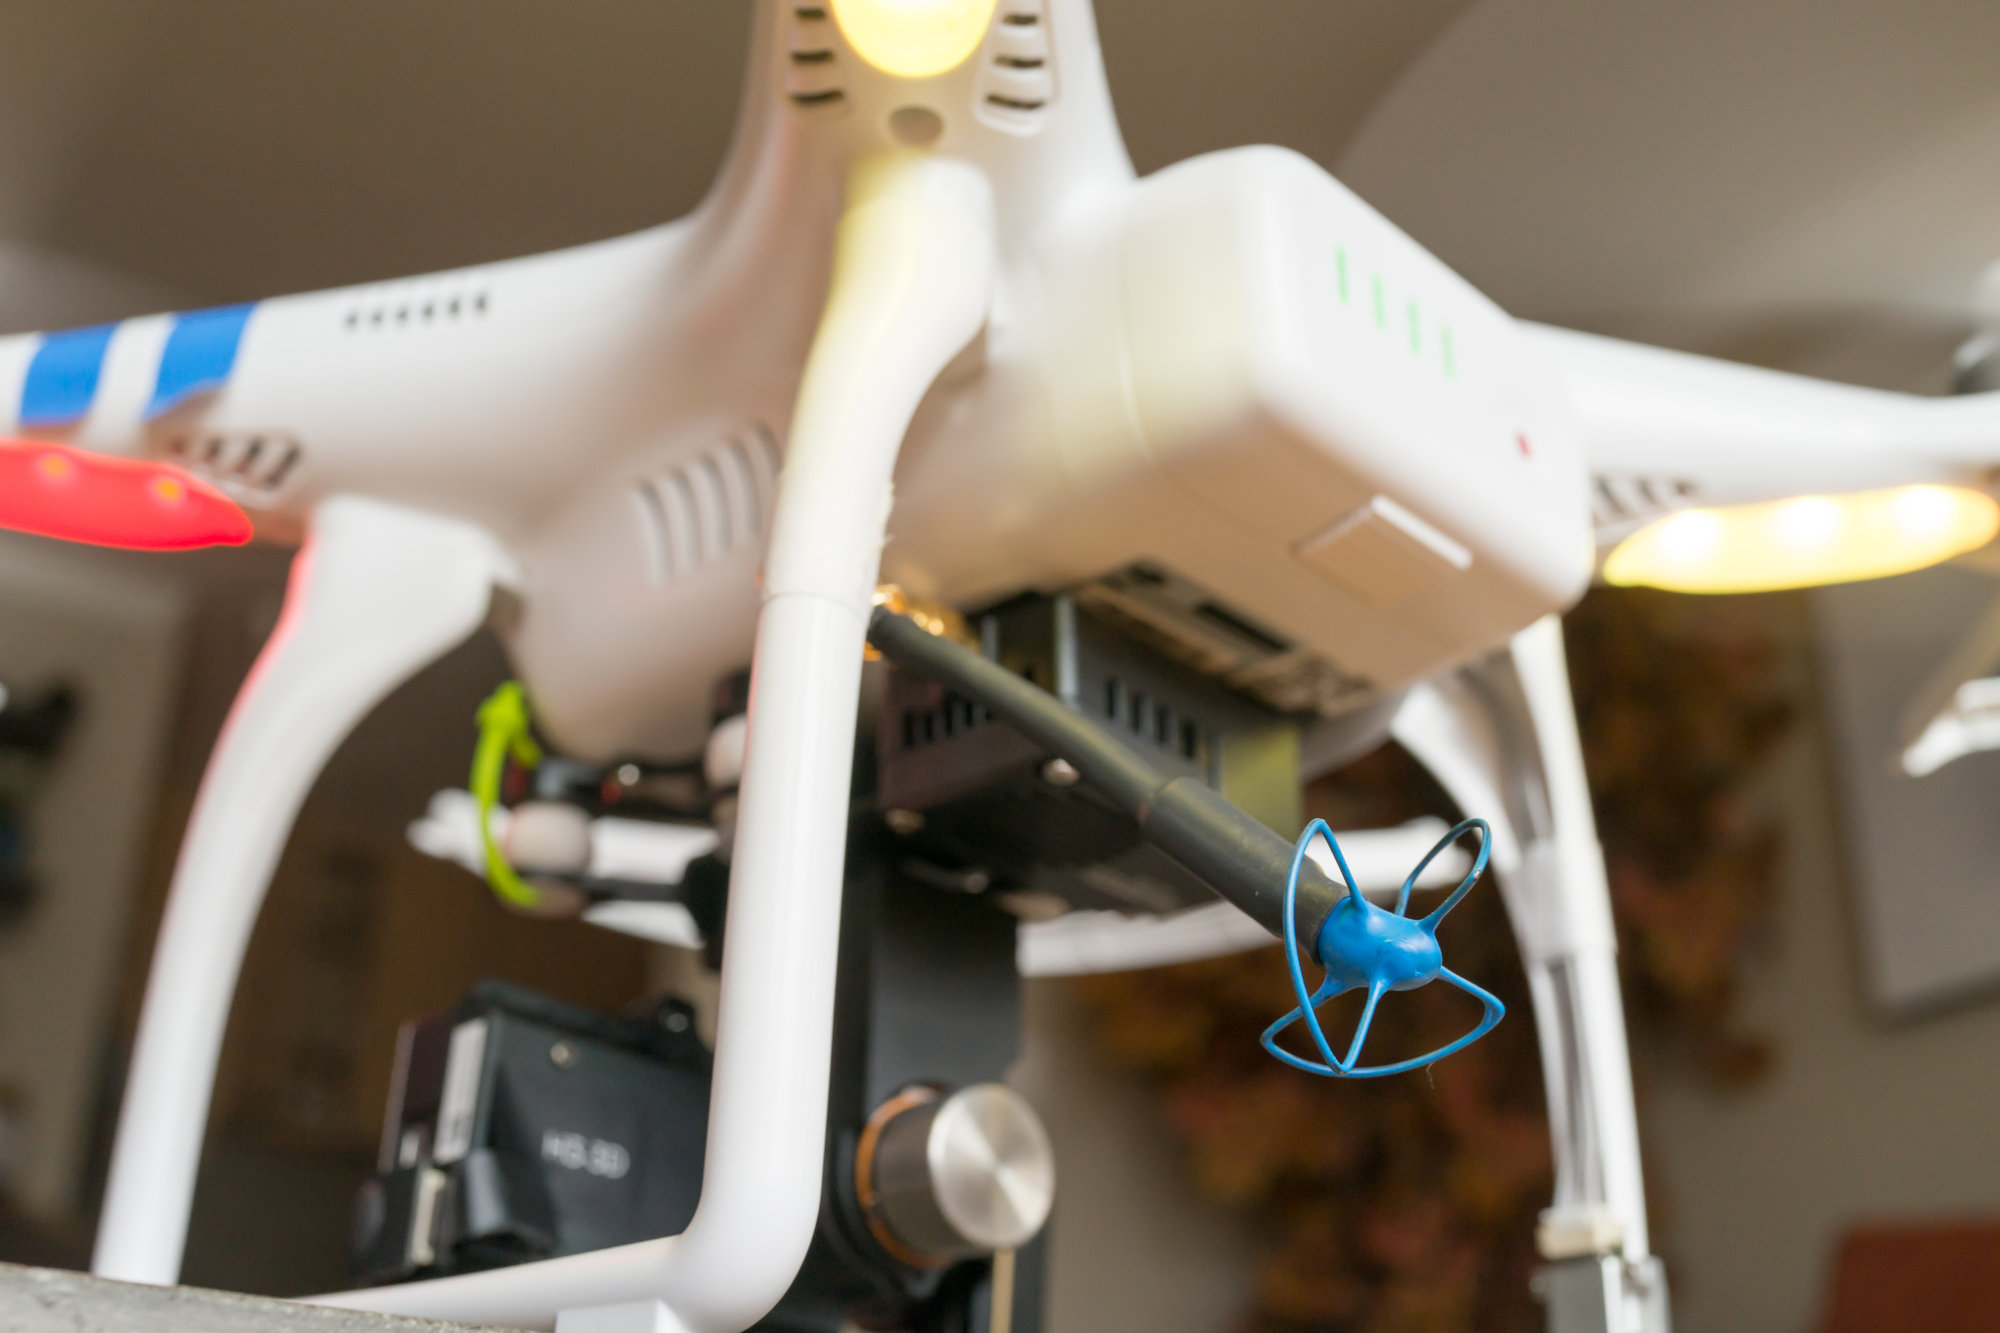
DJI Phantom 2 prop guards$19
As you learn to fly you will either need to buy extra propellers or prop guards. Your pick.
-
GoPro HERO3+ Black edition$399
The best GoPro out right now. Though the GoPro Hero 4 is rumored to come out later this year, bringing questions to light like will the Zenmuse gimbal support a slightly different form factor and weight GoPro?
-
64GB Lexar microSDXC card$63
This model comes with a handy microSDXC USB reader.
-
DJI AVL58 5.8GHz video downlink$209
DJI's own video transmitter. I didn't actually end up using the included receiver since the monitor I purchased has one built-in. That makes for a simpler controller/monitor setup. However, if you don't mind the extra installation work you can purchase a video transmitter on its own, like the Immersion RC 600mw transmitter.
-
DJI FPV cable and hub$16
Necessary if you buy the AVL58 video transmitter kit and you don't plan on soldering. Makes for an easy FPV install. You plug in the gimbal, iOSD Mini and video transmitter to this.
-
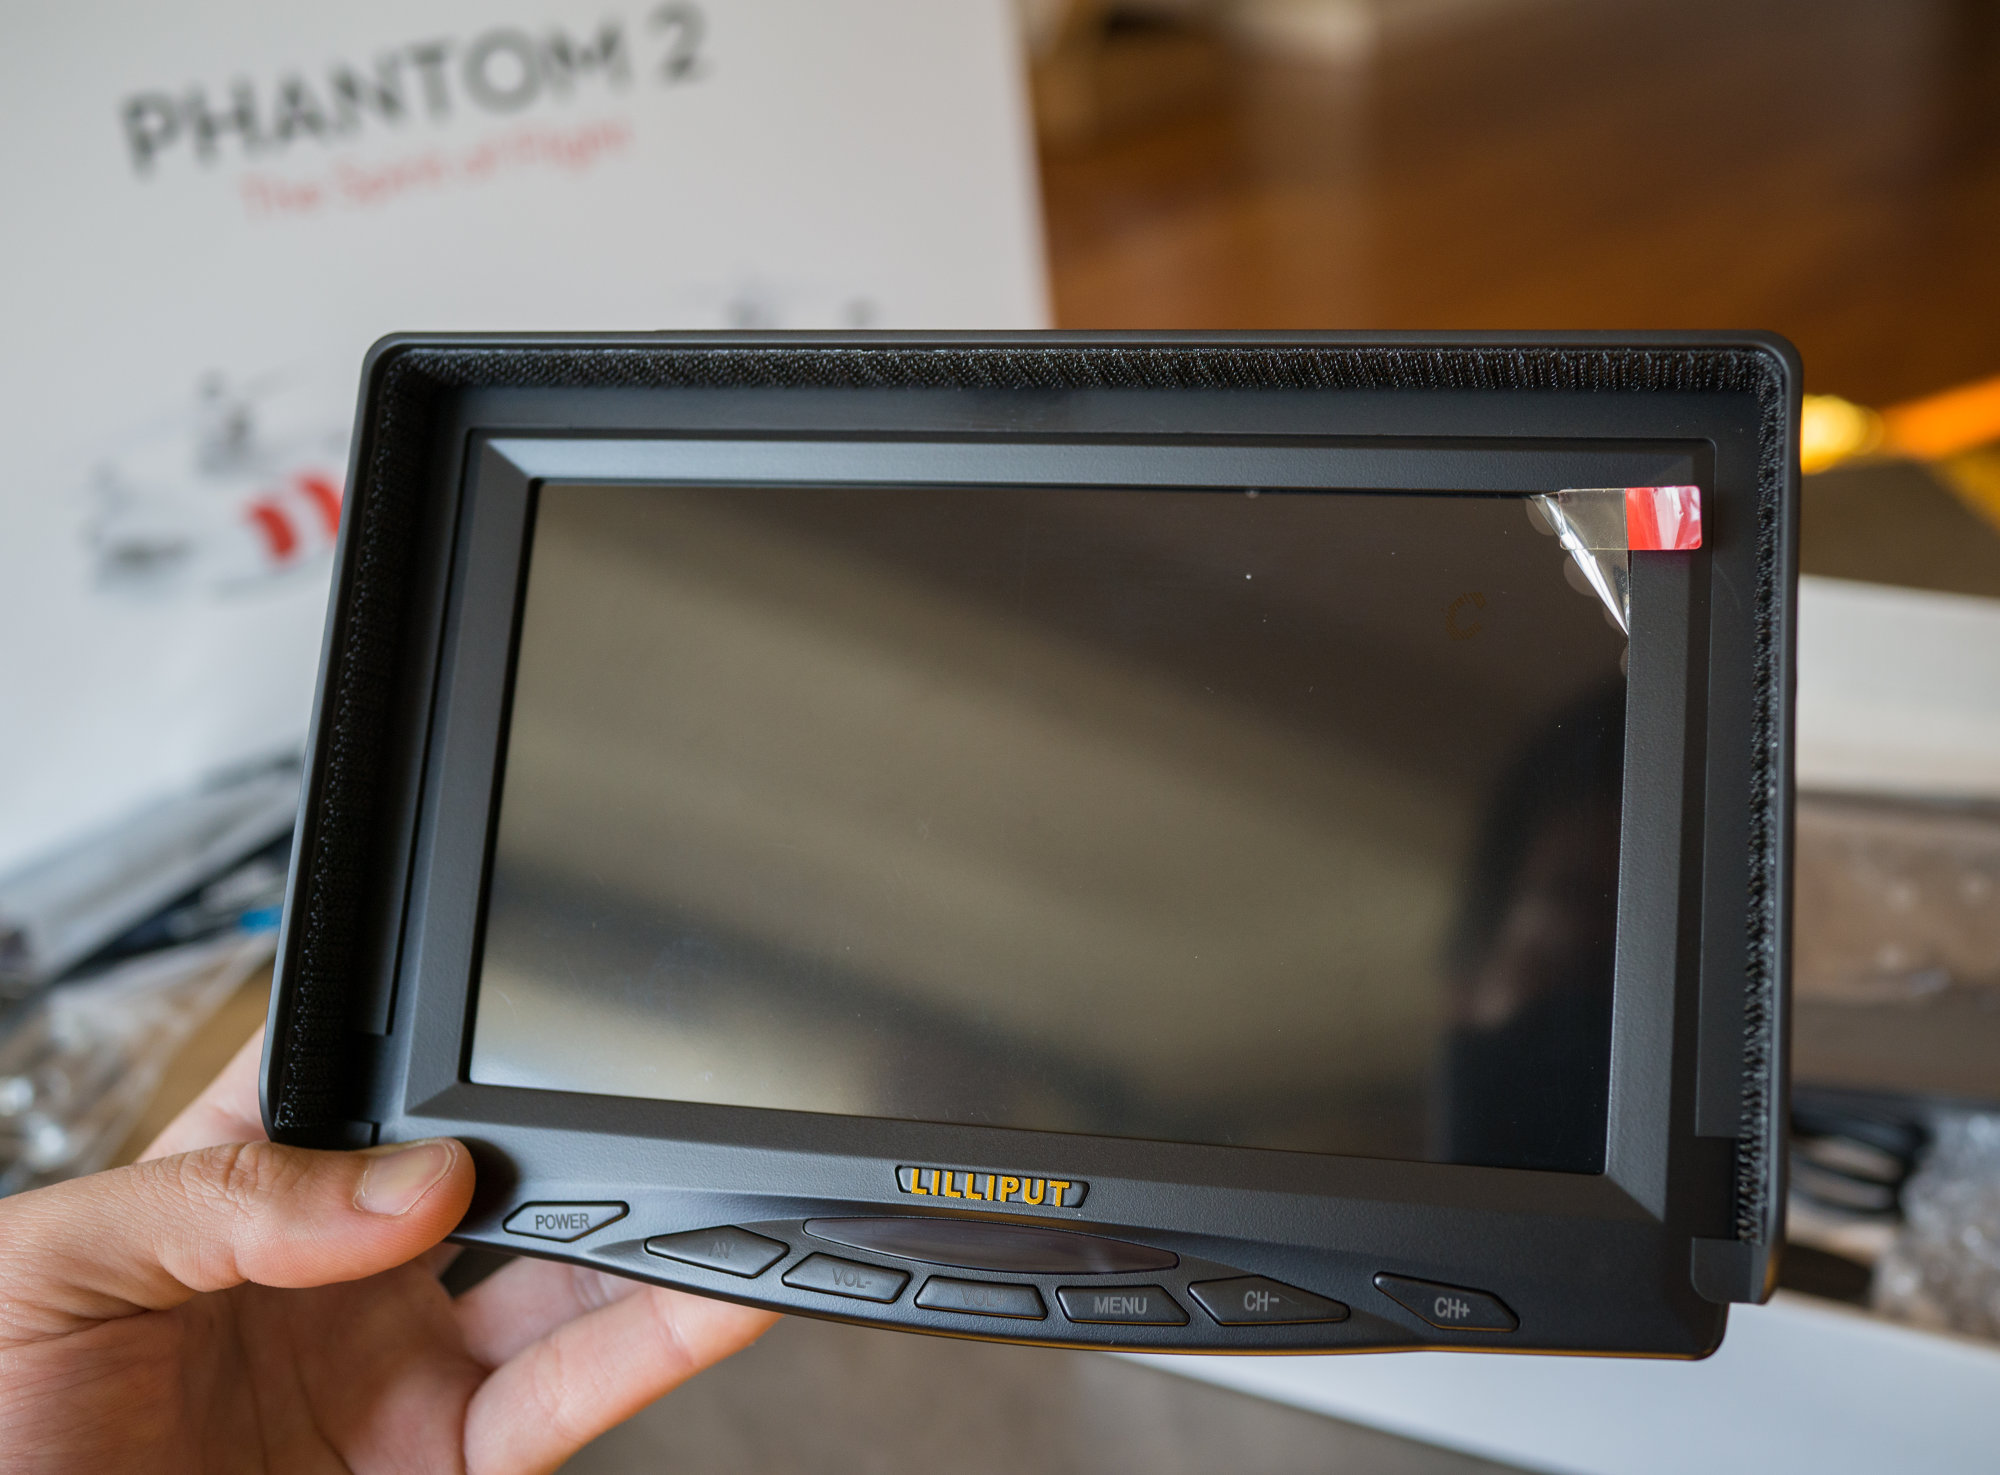
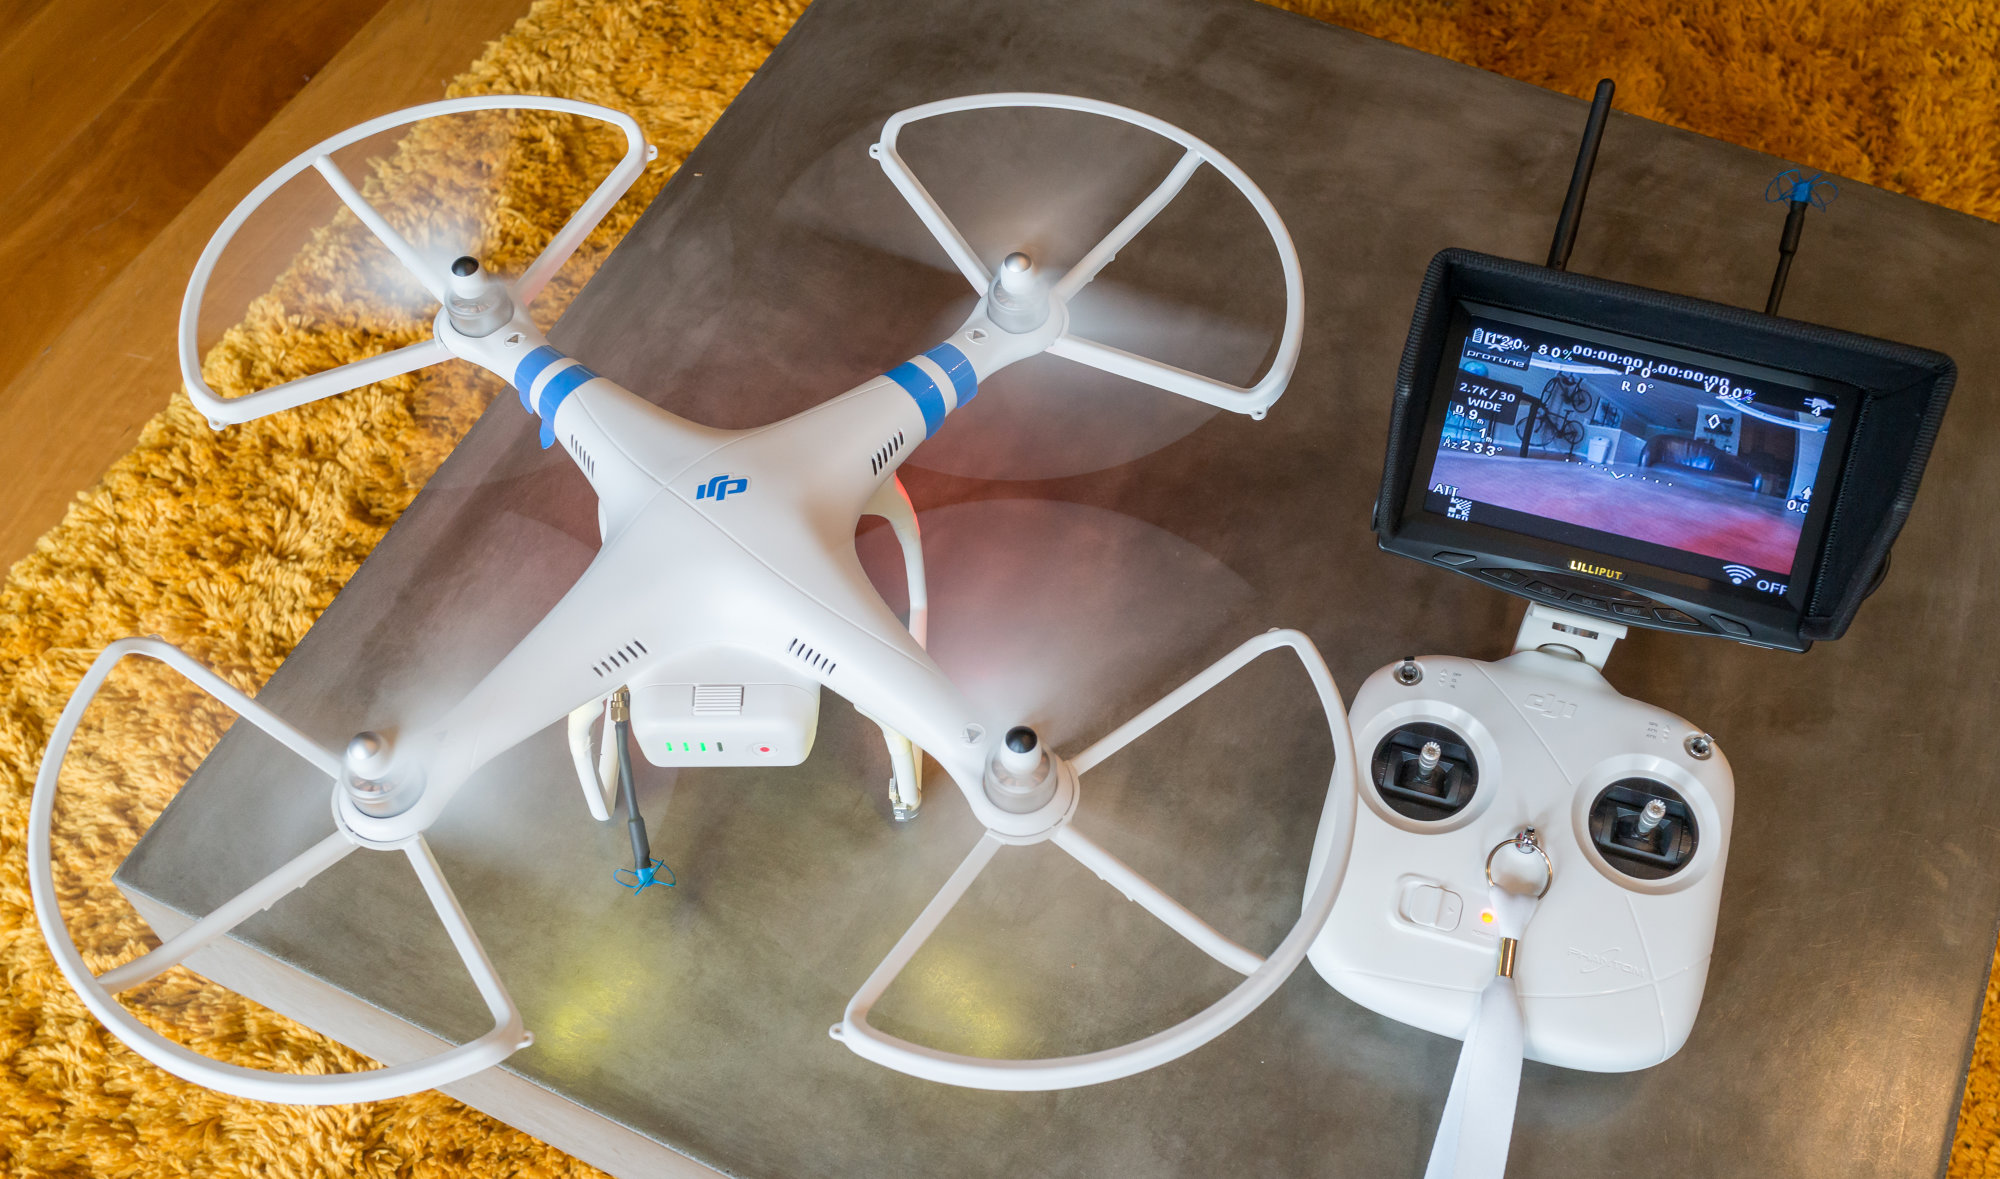
Lilliput 7" 329/DW monitor$249
A good 800x480 resolution mid-range display with built-in 5.8Ghz dual-receivers. Includes generic Canon LP-E6 style battery so you don't have to get an external battery pack.
-
DJI iOSD Mini$69
This little device connects between the GoPro's video output and the video transmitter. It provides an onscreen real-time display of flight parameters that makes it easier and safer to fly with FPV.
-
IBCrazy 5.8GHz Bluebeam Ultra antenna set$65
For those seeking even further FPV video transmission range.
-
3D-printed monitor mount for DJI controller$34
I had initially purchased this CRW carbon fiber monitor mount and while it is high quality and sturdy, I couldn't resist having a simple one-piece mount that simply snaps onto the controller.
-
Neck strap balancer$12
Now that you have a heavy monitor mounted to the back of your transmitter, it's completely out of balance and quite annoying to hold for long periods. A neck strap is the solution but mounting one as is will be unbalanced. Use this add-on to move the mounting point an inch or so back. While the linked item also has a piece to mount your monitor, I did not use that piece. I prefer having my monitor mounted further back and not right on top of my controls.
-
$2,173
TOTAL
Essentials
FPV add-ons
-
Soldering iron, heat shrink tubing, wire cutters, zip ties...~$100
If you end up deciding to do a cleaner yet more advanced FPV install which requires creating your own wire harness, you'll need some parts. In particular, you'll want to have extra velcro tape or double-sided foam tape on hand for mounting the iOSD Mini and video transmitter. If you have a Fry's electronics store in your area, that's the place to visit.
-
Extra GoPro battery$16
The GoPro Hero 3+ black edition can record for about 75 - 90 minutes depending on the recording mode, but the Phantom 2 battery lasts about 15-20 minutes and charges the GoPro at the same time so you only need extra batteries if you plan on using your GoPro elsewhere.
-
GoPro Dual Battery Charger$27
I had first purchased this cheaper generic brand set of 2 batteries and charger. The charger build quality was rather low and it became annoying to properly fit the batteries in there to charge so I decided to get this official charger instead.
Optional for FPV
Optional for GoPro
Unboxing


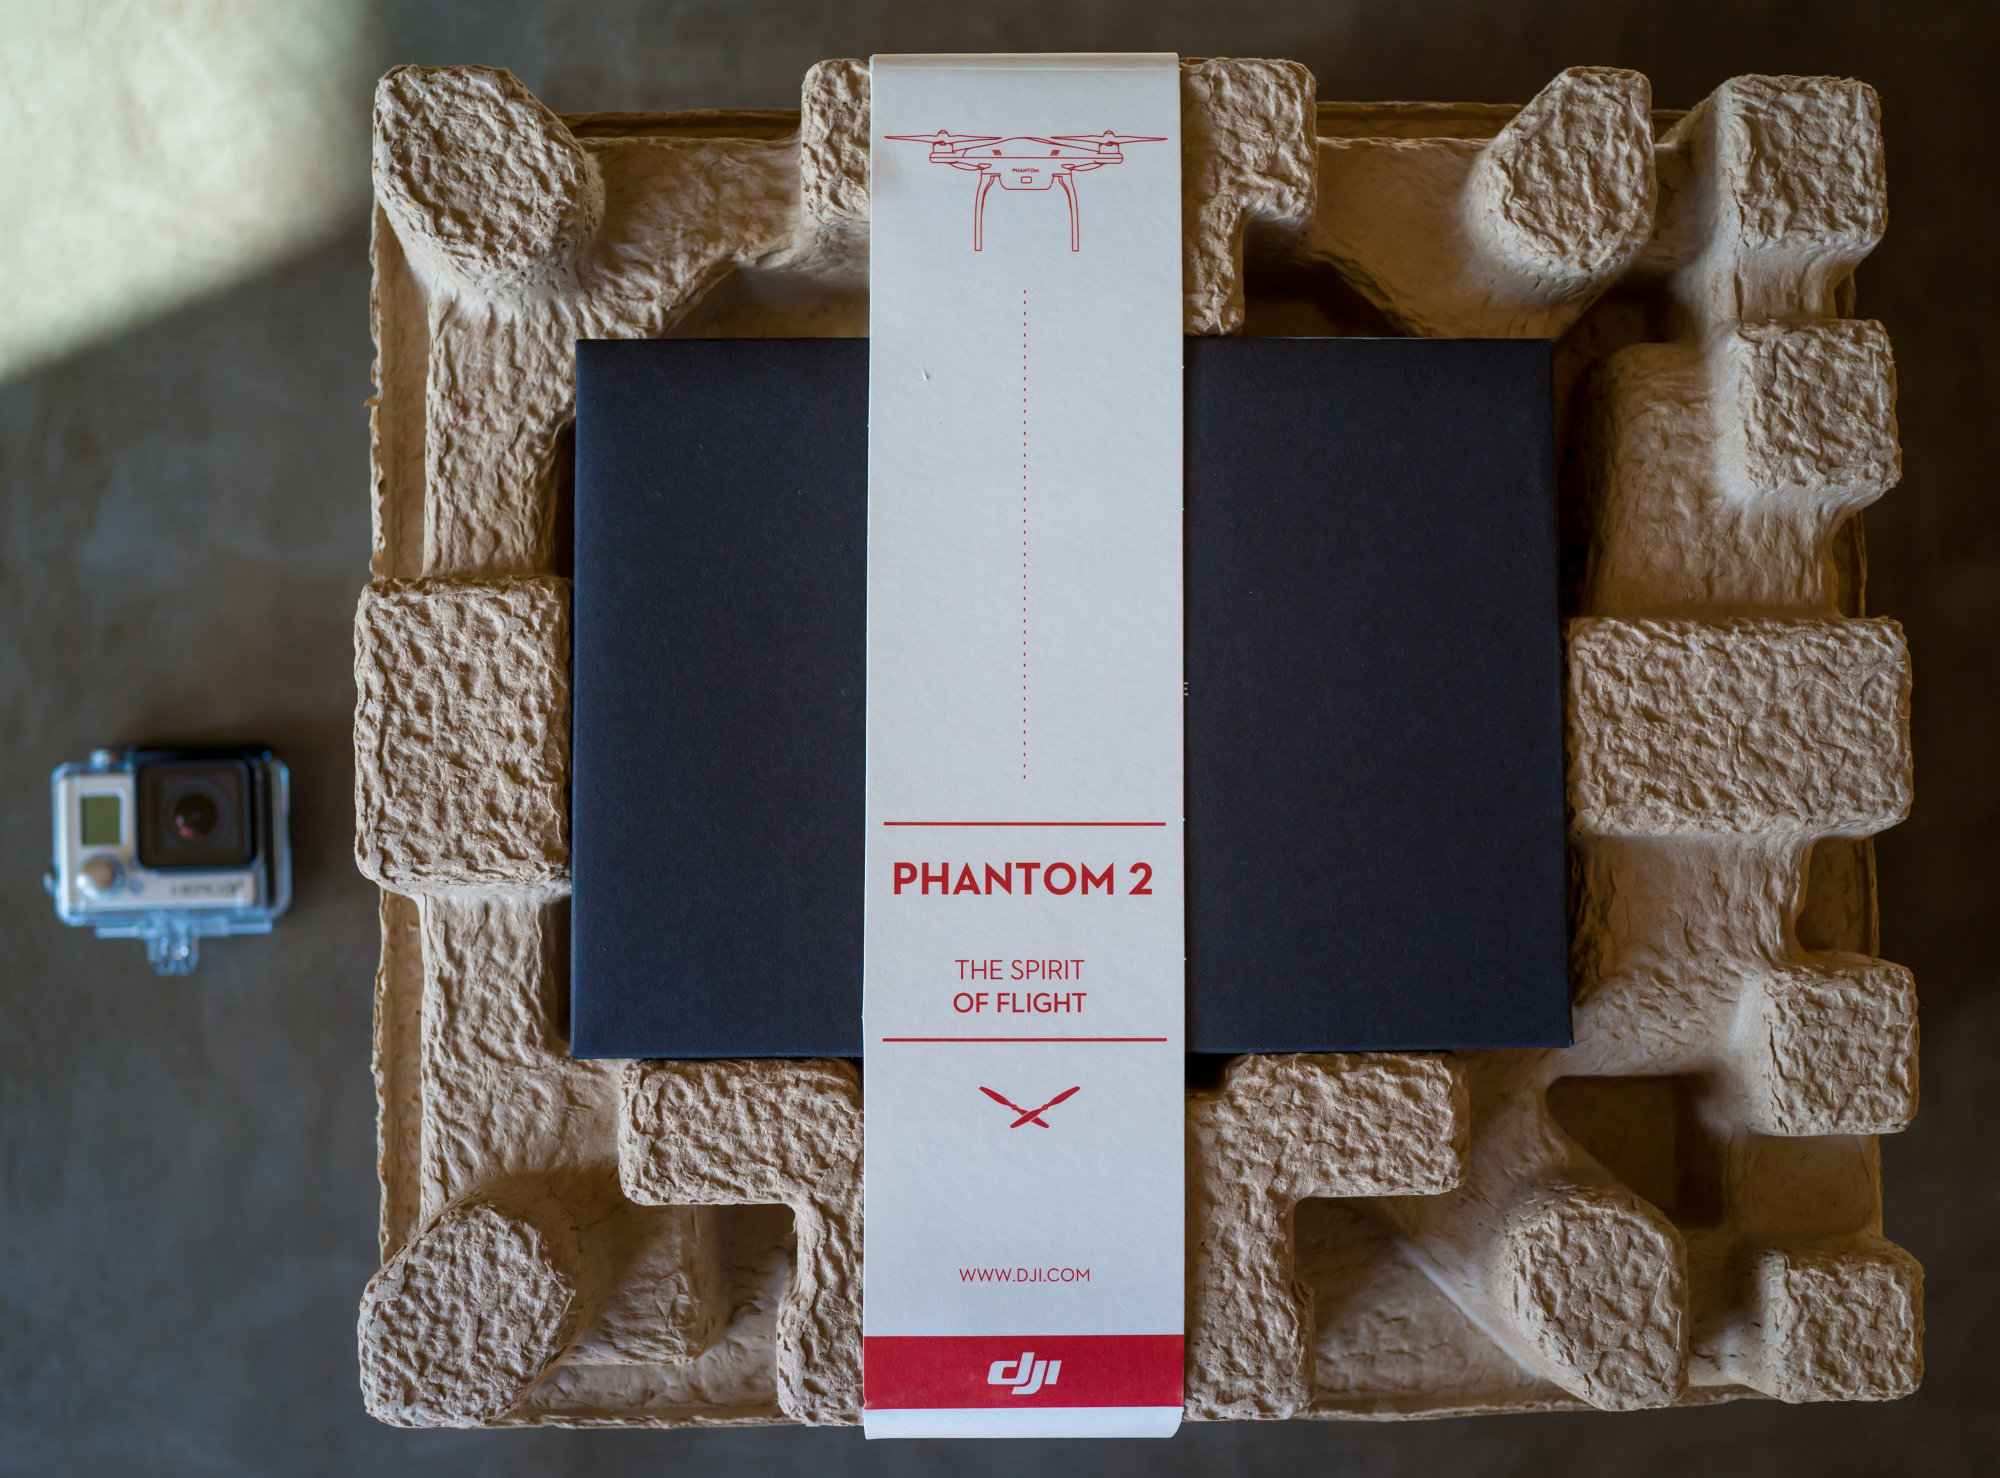
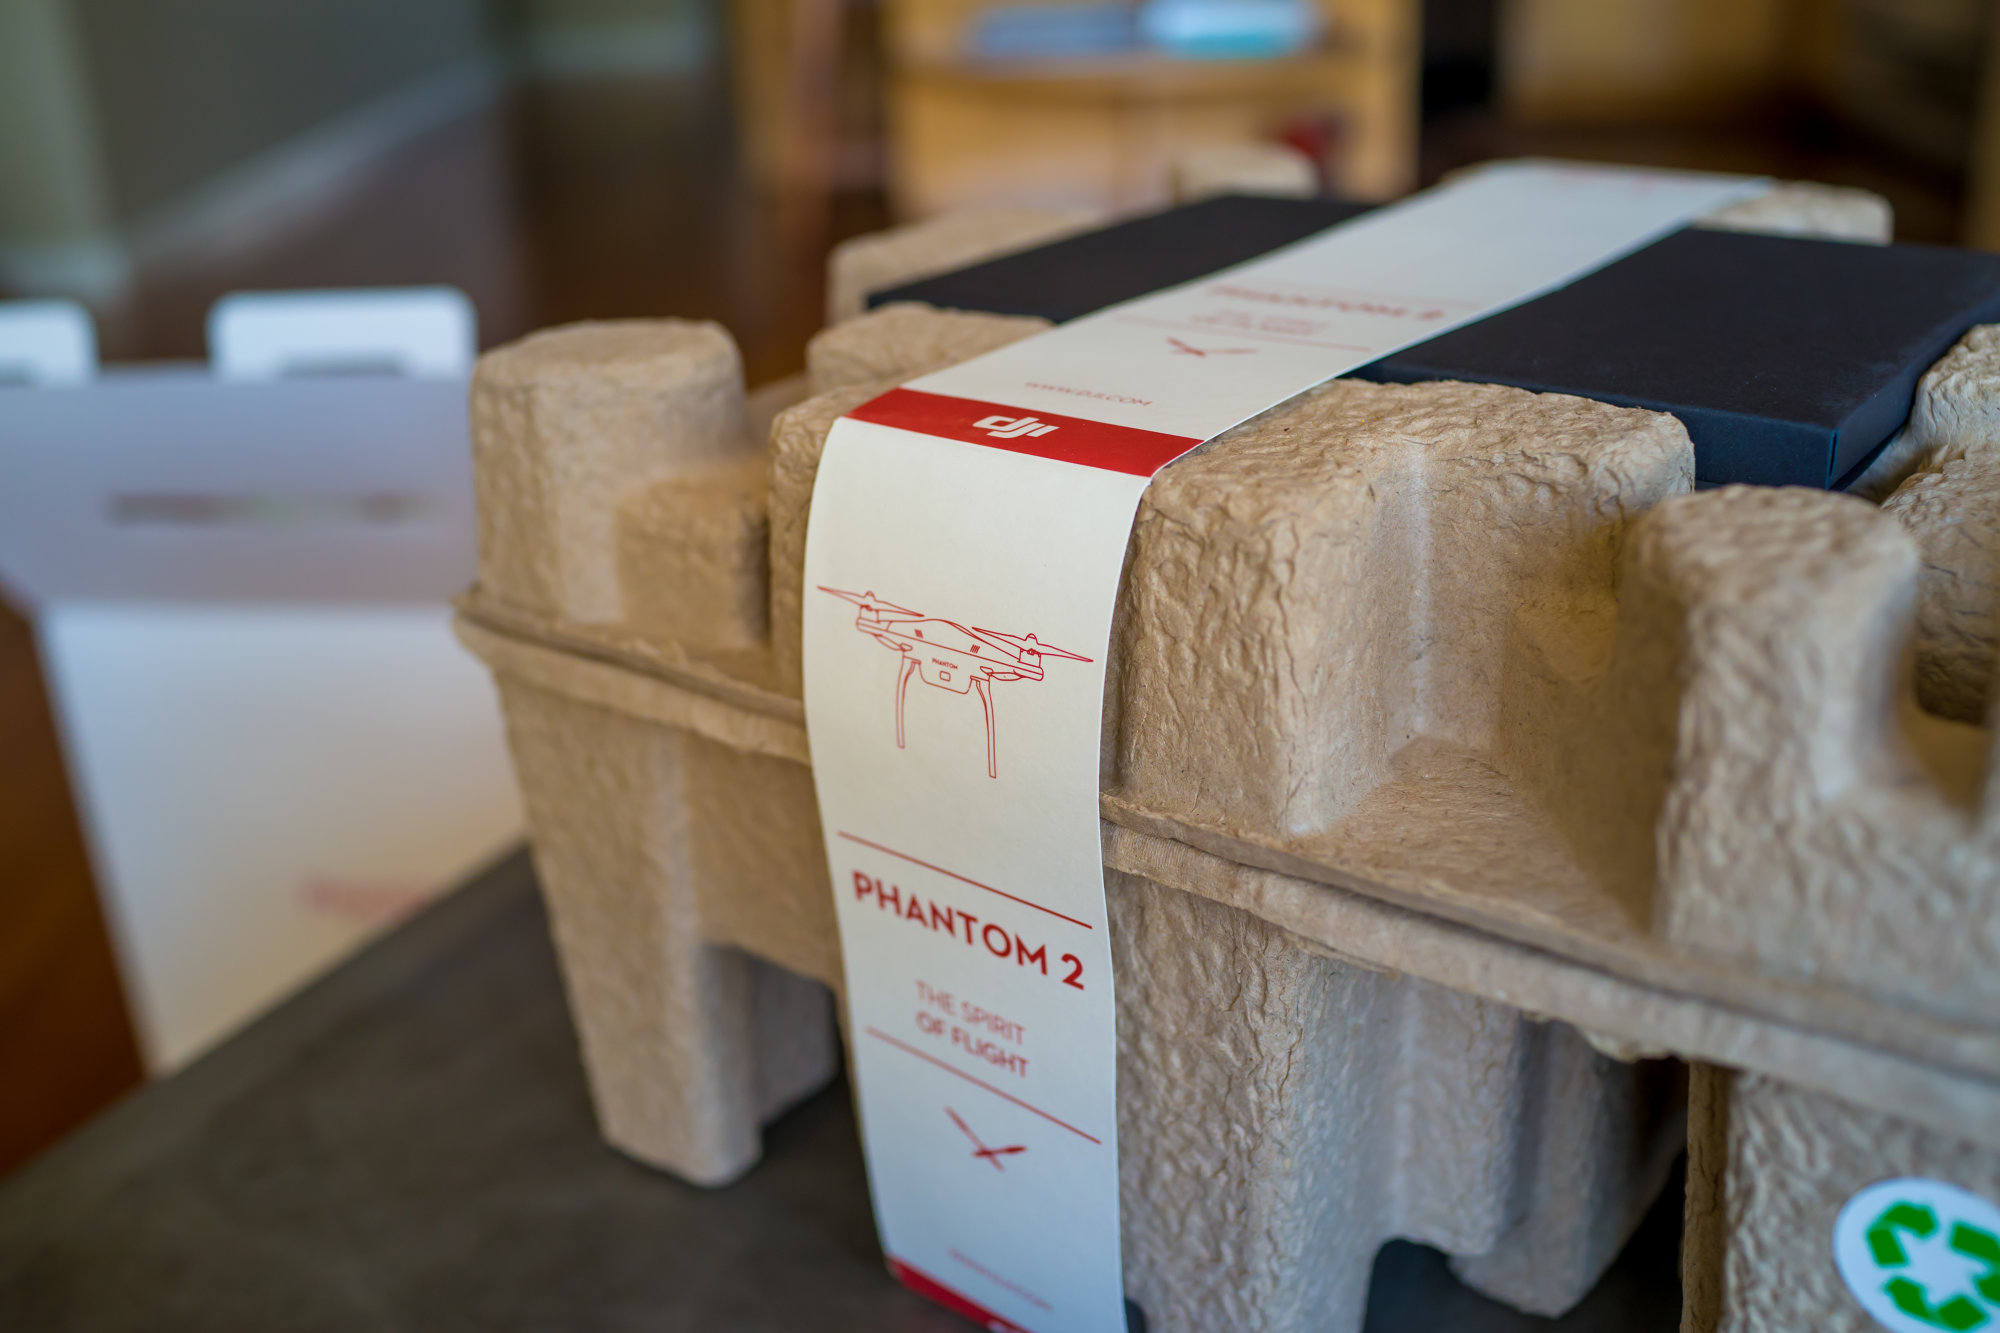

The main thing to pay attention to during setup is that two motors have little dots on their rotor shafts. Those motors get the props with black tips that require counter-clockwise rotation, while the other motors get the silver tip props that screw on clockwise.


Basic setup
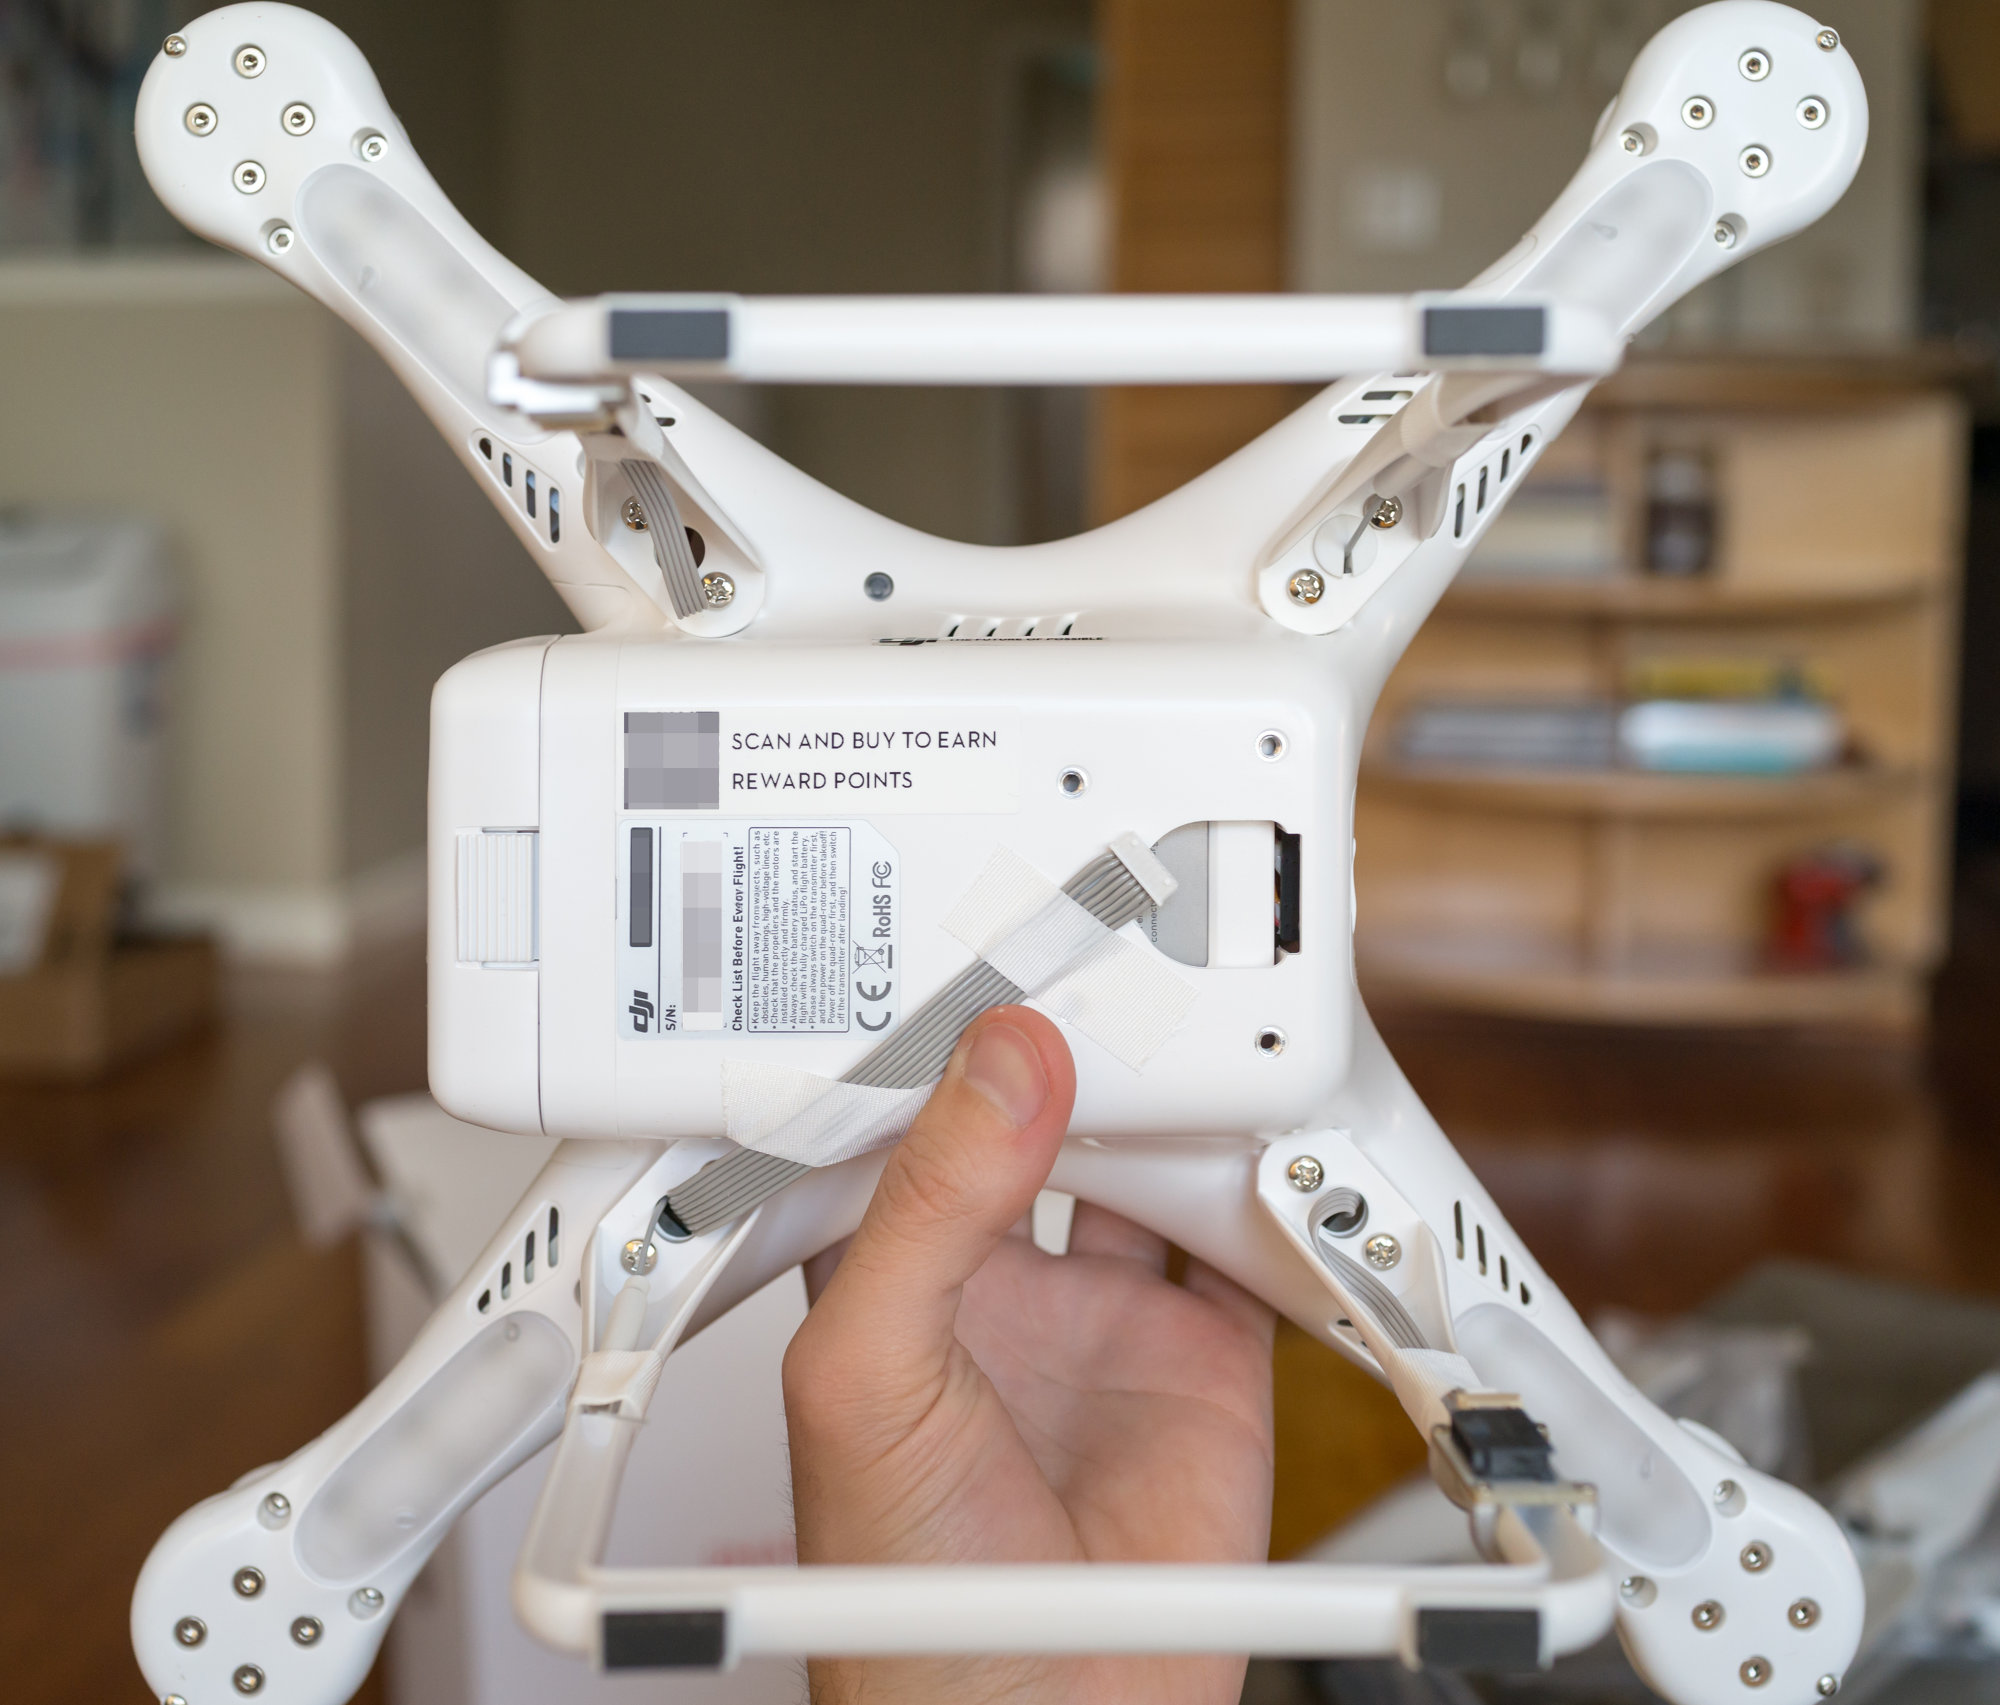
Now that everything's unboxed there are only a few things to do. Install the gimbal and GoPro, charge the battery, attach the propellers, update the firmware and calibrate the compass. Attaching the gimbal itself is easy but pay close attention to the instructions and only use two of the securing pins (it comes with 4 but 2 are spares!). For extra security in the event of a crash or hard landing I placed a loose ziptie in one of corners as seen here. Otherwise the only things holding up the GoPro are the rubber dampers (which have undone themselves on me once or twice) and the plastic pins.

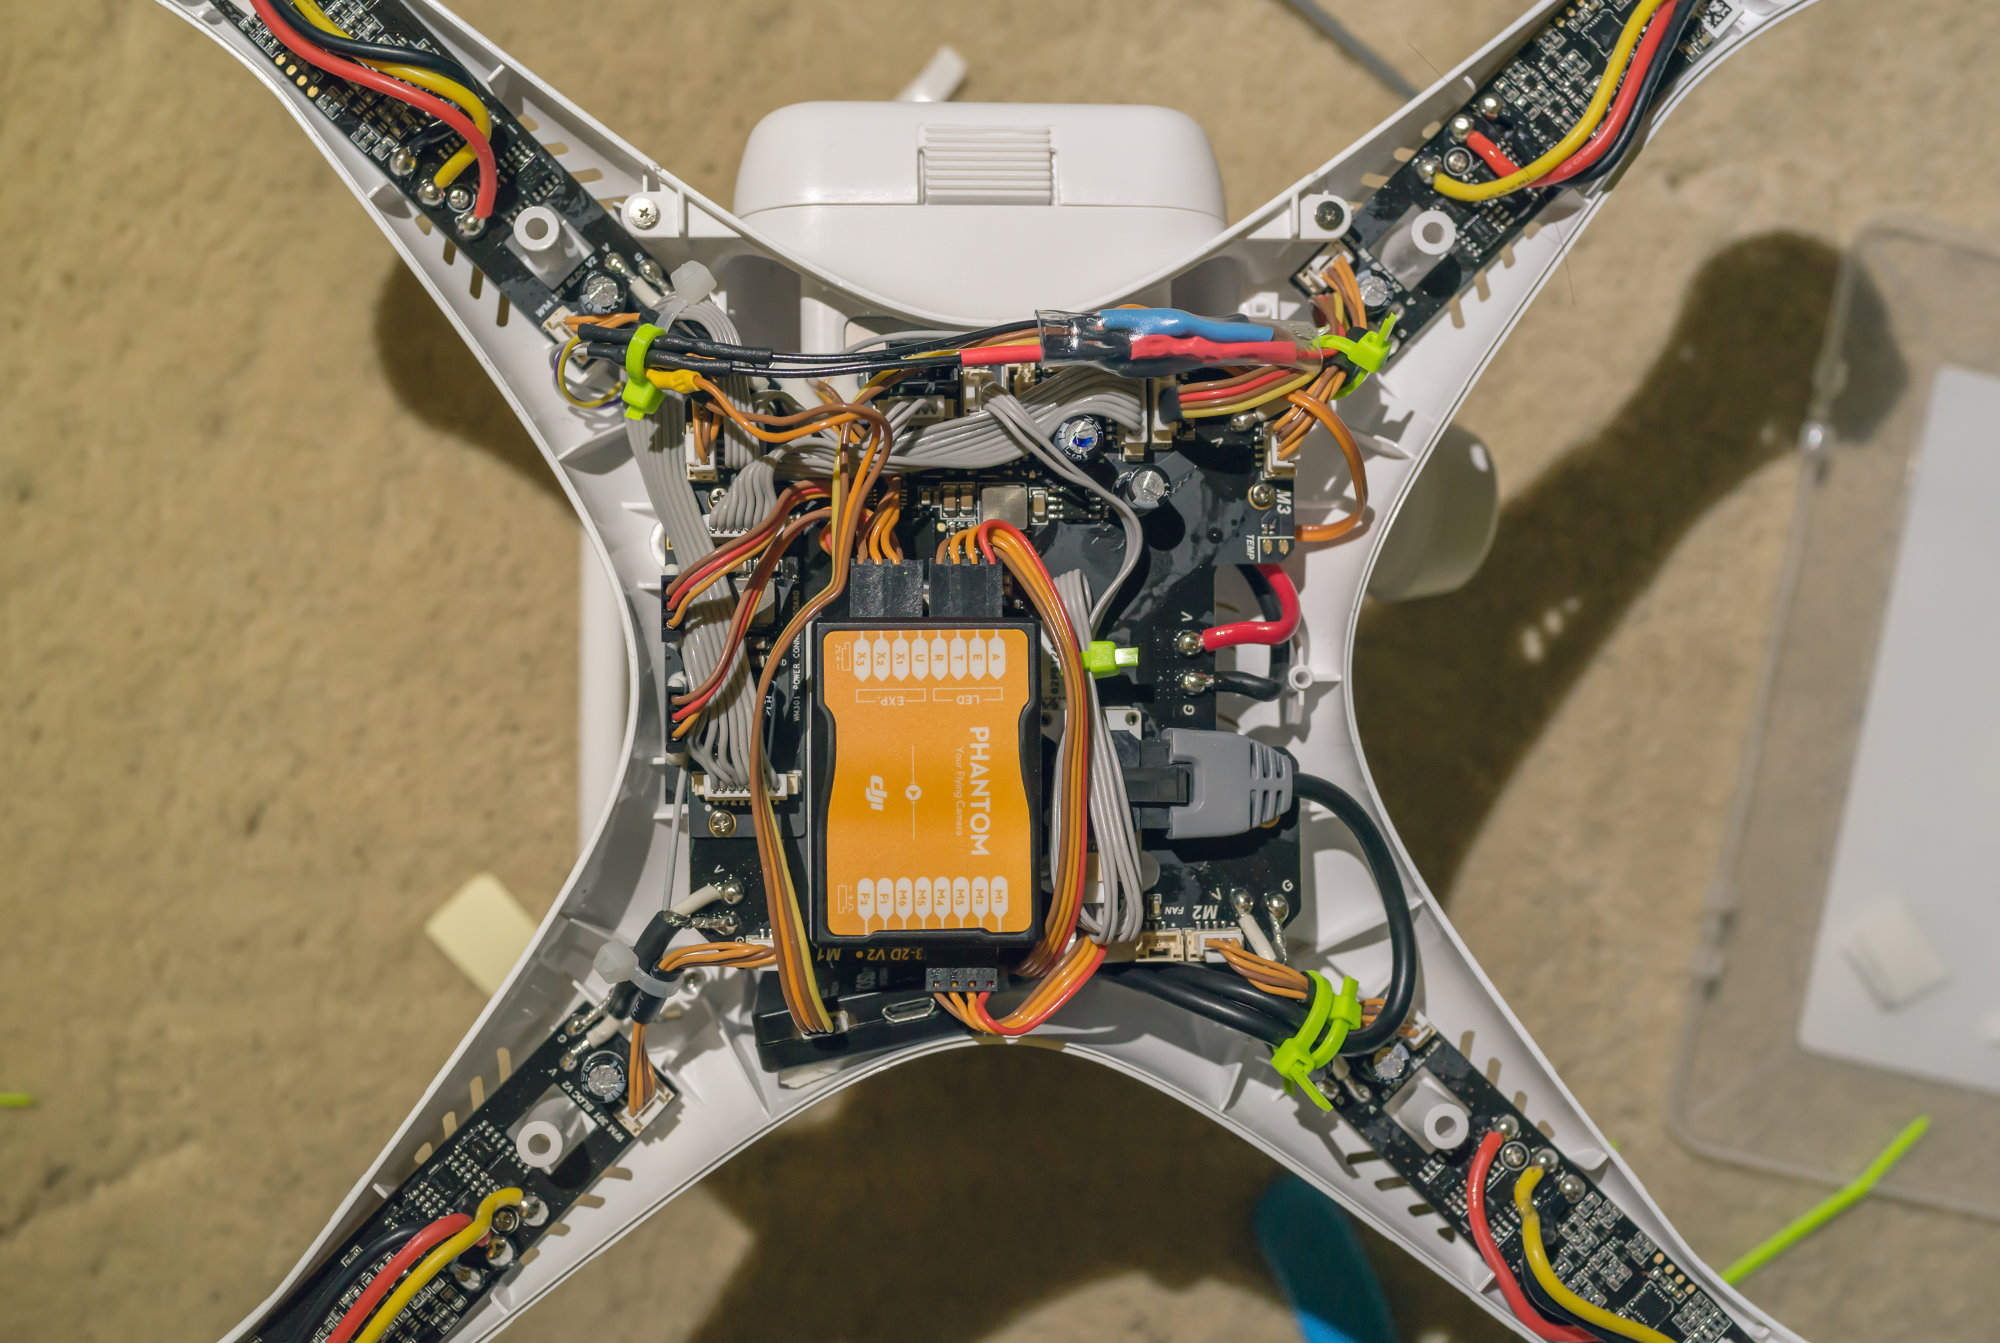
Start the Zenmuse H3-3D gimbal installation watching this great video tutorial by DJI. The unexpected hitch is that the gimbal needs a small PCB called the anti-interference board that you must plug in. Now you could attach it under the Phantom but I'm not a fan of having unnecessary PCBs and wires hanging around.
I opted to do an internal install of the board. There's a perfect place inside the frame where it can screw right in next to the flight controller; no double-sided sticky tape required! This video goes through the details of the internal installation. It requires routing the gimbal cable through another leg of the landing gear to be closer to the new PCB mounting point. It'll take another 10 minutes, including opening the case, but it's a much cleaner install in my opinion.

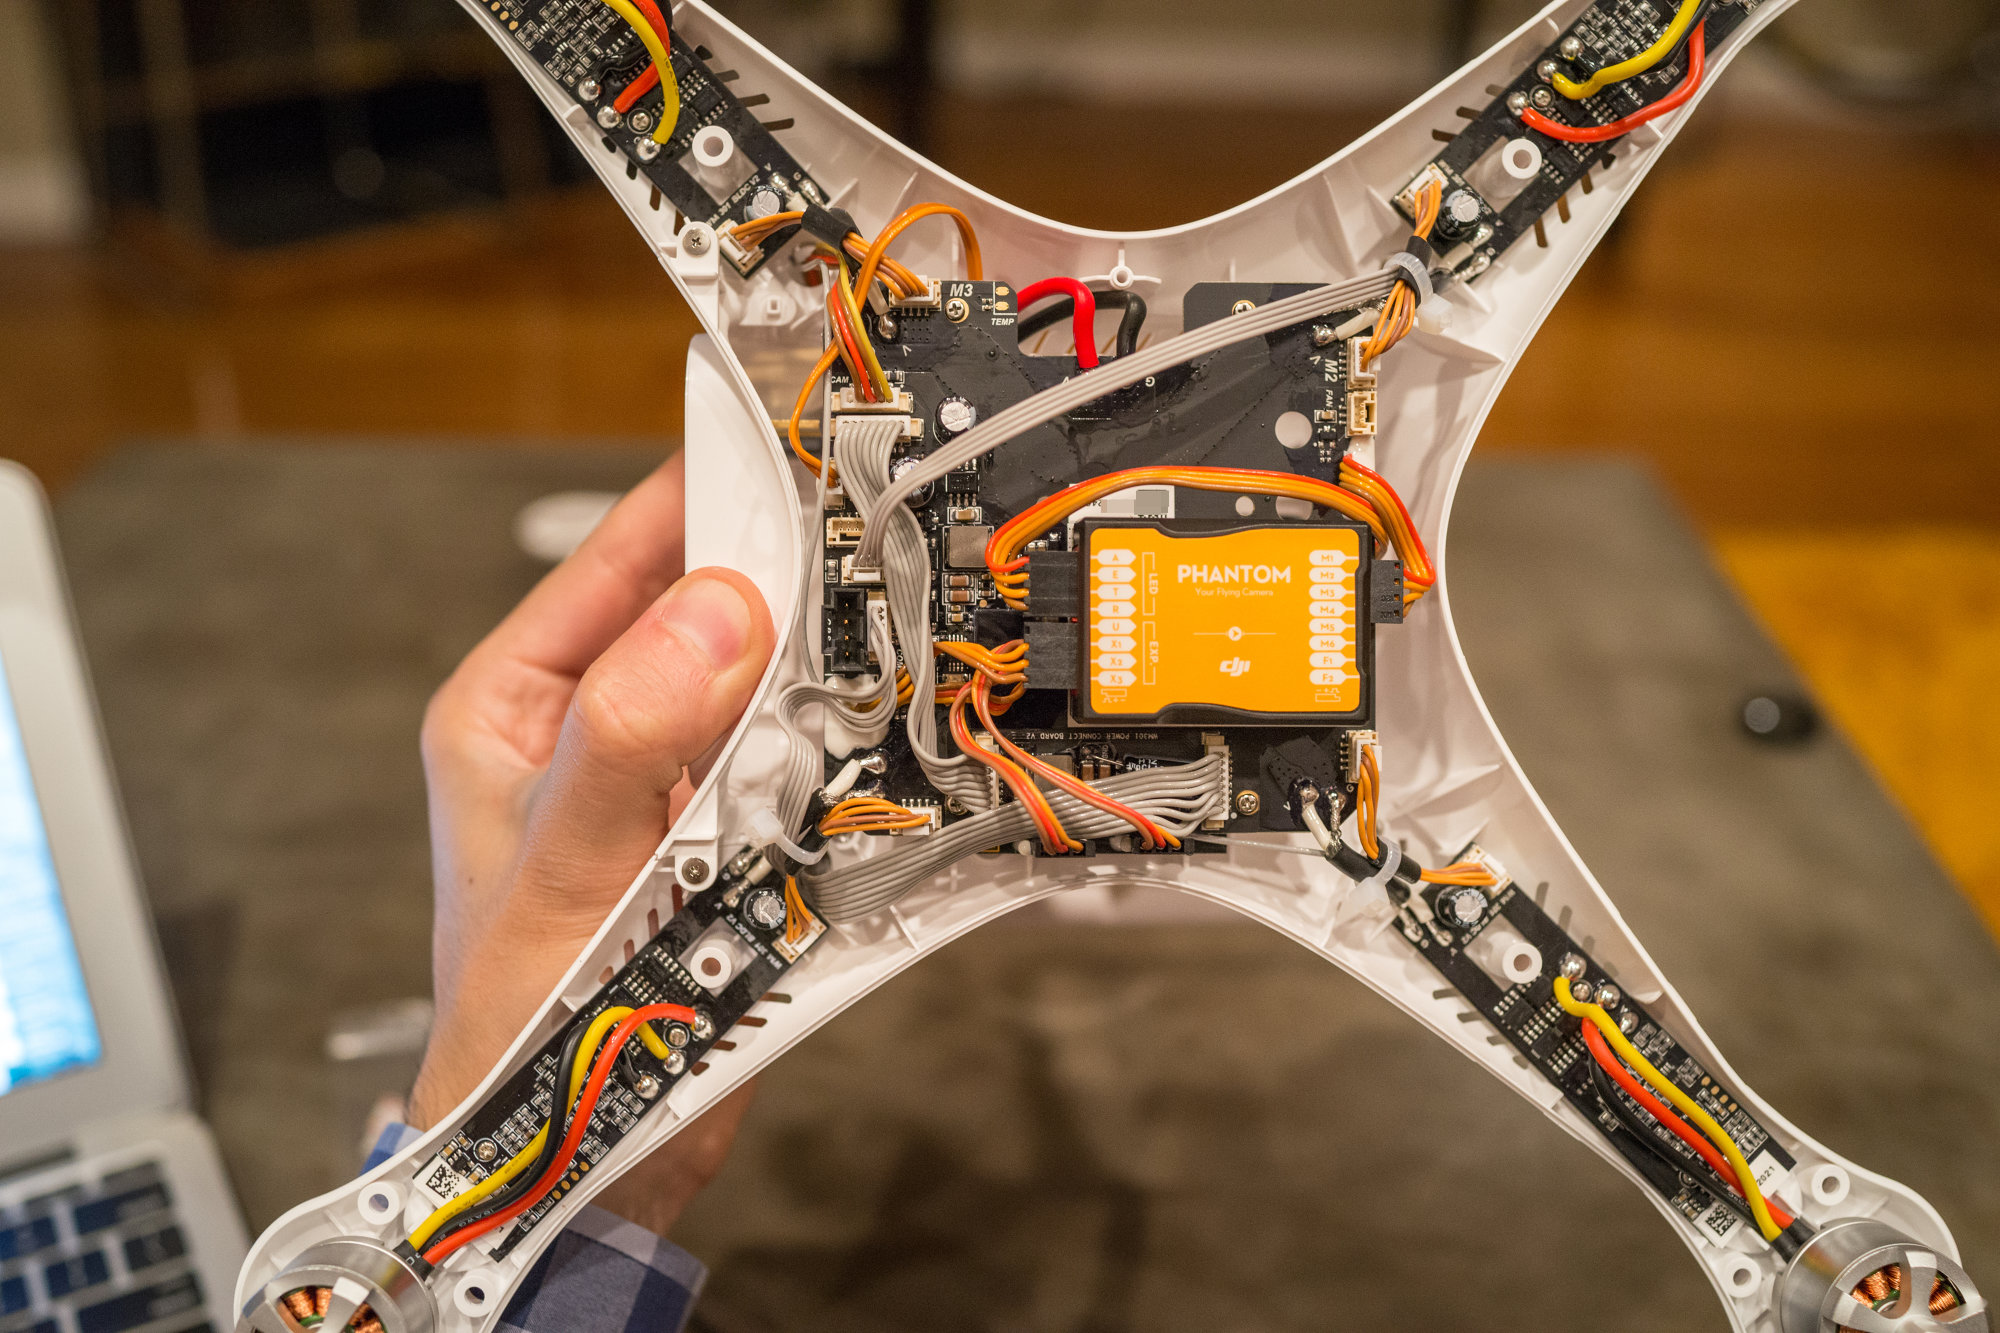
You can see the anti-interference board with two 8-pin cables running to it screwed in neatly right under the orange flight controller (the Naza-M V2).
A word of caution: The flat FFC cable providing the video out connection for your GoPro is extremely delicate. It's unfortunate the new Zenmuse gimbal uses this tiny cable instead of the GoPro's built-in expansion port (the HERO Bus port) like the last generation did.

In fact, a common modification is taking the PCB that contained this port from an older H3-2D gimbal and modifying the H3-3D to use that port instead. Until then, the gimbal comes with an extra cable and you can buy spares for $4. I'd also suggest placing a tiny sliver of electrical tape on it so it's harder to tear.
Firmware updates
At this point your Phantom is ready to fly and record videos. I would actually suggest flying it a few times first before installing the video transmitter and other FPV parts. Just so you can get a hang of it and leave the FPV flights for when you're an experienced pilot. And besides, you're probably itching to get this thing in the air anyway.
You might have noticed micro-USB ports on both the Phantom and the transmitter. That's used to plug into your computer's USB port to update the firmware for various improvements and bug fixes served up by DJI, in addition to tweaking settings.
Start by downloading the Phantom 2 and Phantom 2 RC Assistant Software.
To be on the safe side, you may want to remove the props from your drone. Make sure you have a fully-charged battery in it, plug it into your computer, turn on the transmitter first then the Phantom. Now open the Phantom 2 assistant software (here's a quick video). It will automatically search for firmware updates and let you update. Follow the instructions and you're done.
After the firmware update you can browse around the app. It has quite a few screens and lets you control many aspects of the Phantom 2 from fine-tuning the gimbal tilt, setting limits for how high or far your Phantom 2 can go away from you to configuring low battery and critical battery limits. For the most part, you don't need to change any other settings right now.


Now power down your Phantom 2 and close the app. Plug in and power on your Phantom 2 transmitter and fire up the PhantomRC assistant software. Go ahead and update the firmware on the transmitter if there are any updates available. You can also calibrate the control sticks if you wish.
GoPro setup
Update: The GoPro Hero 4 is out now. Much of this setup information still applies however.
There are just a few things to tweak on the GoPro before getting in the air. Turn on Wi-Fi on the GoPro and install the GoPro mobile app. It's much easier to configure things through the mobile app than fiddling with the tiny menu. First off, tap the button in settings to automatically set the date and time.
Unfortunately for us, the Hero 3+ is built to have optimal focus for subjects closer than 5 feet — ideal selfie/action sports distance. The older Hero 3 model was actually focused to infinity. This means that with the Hero 3+ you are ever so slightly shooting out of focus when flying from your drone where you would ideally want to focus to infinity. A popular GoPro mod fixes this by rotating the lens just 2mm clockwise. I haven't quite worked up the bravery to do this to my new GoPro yet, but it's something to keep in mind if you're paranoid about image quality.
One more thing I'll mention is the use of aftermarket GoPro lenses and filters. You may be drawn to using a circular polarizer or ND grad filter on your GoPro depending on what you're filming. A word of caution: The Zenmuse H3-3D gimbal is built to balance the Hero 3+'s weight. It will have to work extra hard to balance it if you add any kind of lens to the front and may eventually cause the motors to burn out. I tried using a protective lens initially and it definitely seemed like the gimbal was not happy so I opted not to use it. But if you're curious anyway, a popular filter holder is called the LayerLens.
Video modesBefore I had my Phantom I had assumed most people would use the Wi-Fi remote to remotely trigger photos from their GoPro. Unfortunately, you can't use the Wi-Fi features of the GoPro in flight due to potential signal interference, so the two options are to either run the GoPro in time-lapse mode or video.
I've been using mine in video mode. While the allure of shooting in 4K is strong, the Hero 3+ Black edition only shoots at a max of 15fps; that's too choppy to be usable for anything other than stills. I shoot in 2.7K (2716x1524) video mode at 30fps in Protune mode with Auto White Balance, GoPro Color and ISO limit of 400 (anything higher looks worse, only use those if you don't plan on flying in daylight).
Why Protune? Protune mode jacks up the bit-rate and lowers compression. You get larger files and you can only use certain frame rate settings but the quality is better. If you definitely plan on doing any color grading or other post-production video work, change the color setting to flat. This mode tries to reduce shadows and highlights a bit as an attempt to look like there's an increased dynamic range.
There are other video modes that support 120fps, allowing you to enable slow-motion for your videos in post. I don't think any of them are good for flying. The two modes are 720 "Wide" and 720 "Narrow" at 120fps. The wide version introduces significant aliasing and while the narrow version has good quality video, it's a crop so your field of view won't be as much fun while up in the air.
The way I see it your two options are 1080 at 30fps or 2.7K at 30fps. While not as sharp as its 30fps ilk, 1080 at 60fps can be enticing for less rolling shutter in fast action shots like flying very low and fast across the ground or doing quick yaw pans but suffers in anything other than optimal daylight. 1440 at 30fps is good too but who wants a 4:3 aspect ratio video?
Shoot video and take photos at the same time!If you don't have a strong reason to shoot in 2.7K or with Protune, you can actually enable a mode that can shoot 1080 at 30fps and take a shot as fast as every 5 seconds. You end up with a good quality 1080p video and nice stills that are easy to flip through. No more hunting for a good frame without motion blur to export and post on Twitter.
To enable this mode, go to Capture Settings in the GoPro's menu then flip to the icon of a camera and a video camera pointing to each other. You'll find the settings in there!
Disable OSDAfter you're done tinkering with settings, turn off the GoPro's Wi-Fi and then go through the settings to turn off OSD (on-screen display). This will come in handy when you install the FPV gear and don't want the GoPro's video output overlay overlapping with your Phantom's iOSD Mini output. This setting appears to only be available on the GoPro menu itself, not in the app.
That's it! I could write an entire post about what to do with your video after you've taken it, but for now I'll suggest the basic video functionality built into Lightroom. In Library mode the right pane lets you adjust basic corrections in addition to applying the same custom presets you use for your photos. It's not Final Cut Pro or After Effects but it's pretty quick for cleaning up single clips before exporting.
Where and when to fly
Okay, you're finally ready to take to the skies. Now, where to fly for the first time? In recent months there has been a flurry of news about the legality of flying consumer UAVs. There was the story about two drone pilots getting arrested for flying near the George Washington Bridge at an altitude of 1,000 feet or the one about a police helicopter attacking a Phantom 2. There was the news around the banning of all drones in national parks due to various incidents. Recently the FAA announced an investigation into the drone pilot that filmed a fireworks display.
It seems like there is some story popping up every month about a quadcopter incident. So where can you fly safely?
A website called Don't fly drones here has mapped out some no fly zones based on some known banned zones and FAA rules. Start by reading this FAQ about FAA UAV regulations. For the most part safe flying boils down to these tips:
- Fly no higher than 400 feet above ground level. If you want to be extra safe, you can program your Phantom 2 in the assistant software app to not go higher than this.
- Never fly directly over people or vehicles. This includes roads and highways.
- Avoid all federal and state property. Post offices, national parks, courthouses, city halls, et cetera.
- Stay 5 miles away from all airports. Two miles away for small airports.
- If someone is annoyed by your flying, land and leave.
- Avoid powerlines and radio towers. Aside from being another thing to crash into, there have been numerous reports of signal interference messing up drone control links. I've heard too many stories of people crashing near Twin Peaks in San Francisco due to the strong radio signals up there.
- Don't fly in strong wind. If the wind is stronger than your drone can fly in one directly, it'll only drift away from you. 20mph winds seem to be the limit for Phantoms. This is what my Phantom looks like trying to hover in place in strong 20mph wind:
The FAA is also trying to ban first-person view flight and flying your UAV beyond line-of-sight. It appears to be up for debate whether this is actually a law and enforced at the moment.
You may want to consider joining the Academy of Model Aircraft. Membership (about $58 per year) includes $2.5M liabilty insurance. When done in a safe environment, flying can be enjoyable and result in some great aerial videos. It could even save lives, like this recent story where an amateur drone pilot found a missing man.
All that being said, head to Google Maps and find a large open area to visit on a sunny day with no wind or people.
Your first flight!
Now that you know what it means to be a safe, legal and responsible drone pilot, head to a nice field and calibrate the compass on your Phantom 2. Calibration is necessary since Phantoms are shipped around the world and depending on where you live on Earth, the magnetic field is a bit different. This process should be done any time you fly in a different city, or if you ever catch your drone unable to fly straight or hover properly without drifting.
Compass calibrationTurn on your transmitter, then your Phantom. Enter compass calibration mode by flicking the top right switch ("S1" — the one with GPS and two ATTI labels) all the way up and down at least 5 times until the two rear lights on your Phantom turn yellow. At this point, you need to rotate your Phantom 360 degrees until the lights turn green. Then you flip it so that it's vertical (rotate 90 degrees clockwise) and rotate another 360 degrees until the light blinks green. Now you're set!
Turn on your GoProAnd have it start recording. You want to turn the GoPro on before your Phantom 2 is powered up. Otherwise, the gimbal will be active and fighting against you as you try to push the GoPro buttons. You never want to overpower the delicate gimbal, so if you must interact with the GoPro while the Phantom is on, use another hand to hold the GoPro while pressing buttons.
Always wait for GPS lockFor your first flight and the majority of your flights you want to fly in GPS mode. Always keep the top right switch in the GPS position. When you power up your Phantom, always wait until the lights begin flashing green quickly. This usually takes about 10-15 seconds but could take longer. It means your Phantom has successfully locked on to several GPS satellites and has recorded a home location. If you ever lose signal or manually trigger fail-safe mode by moving the S1 switch to the bottom setting, rest assured your Phantom will fly back to this position and land on its own.
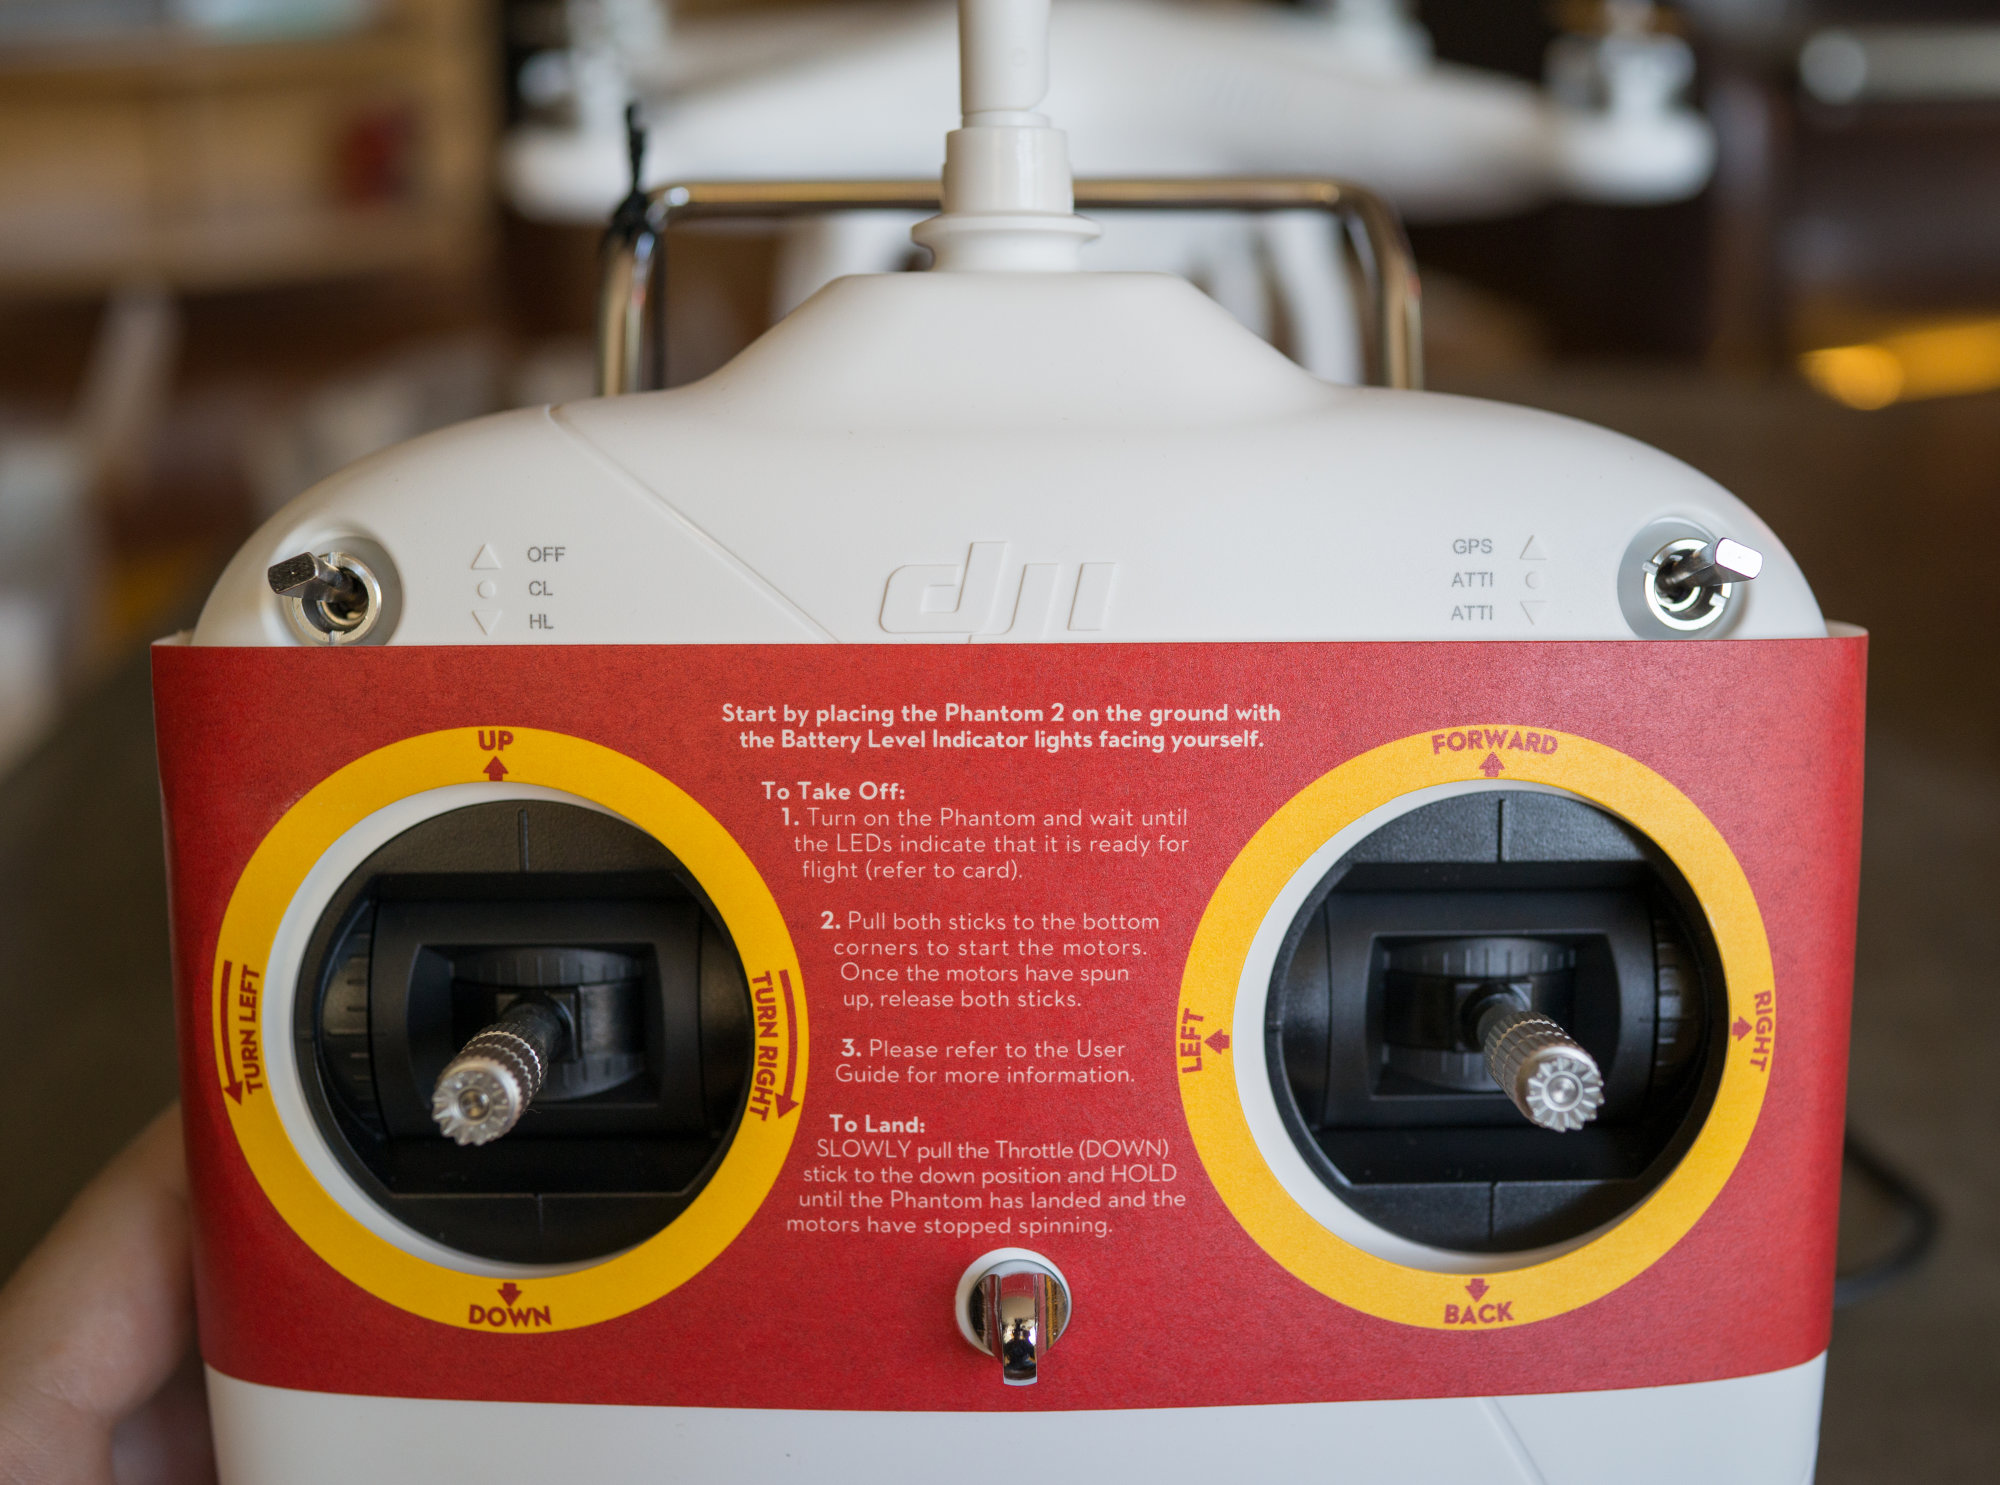
Takeoff!First, place the drone in front of you with the GoPro facing forward and the battery facing backwards. Execute the so-called Combination Stick Command by putting both sticks in either the bottom left corner, bottom right corner or towards the center. The props will now spin to life at a low RPM.
Slowly push up the throttle until the Phantom starts hovering. Get it up about 10 feet in the air and start playing with some of the controls to familiarize yourself. That's pretty much it! I'll let you have fun with it now.


If you ever need to come down fast (the max descent speed of a Phantom is about 2 meters per second), come down while going forwards or backwards instead of straight down. Otherwise there is a chance you will experience VRS — vortex ring state. VRS arises when your aircraft gets caught in its own downwash while descending, resulting in reduced lift. Your drone will then become extremely unstable and plummet out of the sky. You don't want this.
I think I just lost signal. What now?If you waited for GPS lock before takeoff, your drone will wait a few seconds then fly back to the GPS position it recorded. On its return it will fly up high before coming down to the position. This is normal, so don't get worried when you see it going up. That being said, as the Phantom flies closer to you, you can try to regain control by flipping the top right S1 switch up and down and back into GPS mode. Hopefully you will never experience a signal loss if you fly within line-of-sight and away from large sources of interference.
LandingYour Phantom will begin flashing red slowly when the first battery alert level is hit. When you hit the critical battery level, the lights flash quickly and your Phantom will begin providing less and less thrust, forcing a landing.
As for how to land, needless to say you should land very slowly on a flat surface (don't land on dirt either, it'll get all over your GoPro and stick to your gimbal dampers). Landing too hard can crack the landing gear and potentially damage your gimbal. This is why a common Phantom modification for new pilots is installing taller landing gear or wrapping the bottom of the gear in that black foam covering made for pipes.
Here's an example of a windy landing on a small slope. Not too much different, bring it down slowly and fly into the wind as much as necessary:
Your next few flights
As you experiment with flying your drone higher and further away from you, you might want to consider playing with the Home Lock or Course Lock modes that are part of the Intelligent Orientation Control mode. They come in handy when your drone is too far away to visibly determine which way it is pointing. The IOC modes map your transmitter controls to your drone's original orientation that you set before takeoff (or later on during flight) so backwards always goes backwards, forwards always goes forwards, et cetera.
IOC is disabled by default and needs to be turned on with the Phantom assistant software we used earlier to update the firmware. Click the "Phantom" button on the top bar of the app, say yes to the dialog, then visit the IOC tab under Advanced and enable it. Note: Enabling this Naza-M mode changes how some of the LED indicators act, so please give this a look before flying again: Original Phantom LED indicators vs Naza mode indicators.


These modes are identified on the top left switch of your transmitter as HL and CL.
Course Lock: The Phantom intelligently maps your inputs based on the original orientation recorded before takeoff. You could spin your drone as much as you wanted but regardless of its new orientation, it will always go backwards when you pull back, always go left when you tell it and so on. No more trying to think about what direction you want the drone to go and then parse its current orientation before providing input.
Home Lock: Similar to course lock, except it now keeps your original GPS location in mind and sets up a 30 foot circle around you. All commands now align with the home point, so if you hold backwards forever and it enters this circle around you, it will hit the edge of the imaginary circle and stay there, instead of going backwards past you forever. For example, if you tell it to fly to the left, it will fly left but along a circular arc.
It's a bit complex to explain exactly how each mode works, fortunately these videos do a superb job: Course Lock explained, Home Lock explained.
If you like the safety and ease of flying with home lock, you may want to get in the habit of setting an HL/CL orientation and home point before takeoff. After your Phantom gets GPS lock, flip to CL or HL mode, wait for the LEDs to flash green and yellow, then switch the CL/HL switch to off. Now you can enable home lock or course lock at any time during the flight. If you ever question which way your drone is heading, simply flip to home lock mode then just pull back on the right stick and it'll be coming directly to you. If you're so inclined for whatever reason, you can set a new home point or course lock orientation while in flight.
That being said, you may not want to use these IOC modes when flying with the FPV setup I describe below. The controls would not map as you expect from looking at the screen. But if you get tired of looking at the screen and just want it to fly back home, home lock mode is for you.
We're not done yet, there are even more modes! You might be wondering what the other ATTI modes under GPS are on the top right S1 switch. These are customizable in the Phantom software after enabling Naza-M mode but the default is GPS (top), Attitude (middle) and Failsafe/Return-to-home (bottom).
What is attitude mode? Attitude mode only maintains altitude for you automatically and does not provide any other automatic corrections. For example, on a windy day the Phantom will hover in place in GPS mode. In attitude mode, the Phantom will drift away with the wind. Any inputs you provide must be manually corrected otherwise it will keep flying in that direction even when you let go. It does not autostabilize and halt any momentum it had, like it would in GPS mode when you release the sticks. Attitude mode gives you more control and the ability to fly faster at the expense of doing extra work.
There is one level beyond attitude mode — full manual. You can opt to set this as the lowest S1 switch position instead of failsafe mode in the software. I would not recommend anyone fly in full manual, but it can be done and lets you fly at crazy tilts.
FPV Setup
Your first few flights you're just learning how to control your quadcopter and getting used to it being further and further away from you. You start getting interested in the GoPro footage you're capturing but realize it's a bit of a guessing game, especially when you're so high up you're not even sure what direction your drone is pointed. First-person view systems let you see what your drone sees and this is great for a few reasons. Aside from the evident cool factor, you can more readily frame your shots and of course fly without line-of-sight.
There are a few components involved with the typical FPV setup: the display, video transmitter, video receiver, an OSD module and the camera. The display could be a small 7-inch monitor like I chose, but it could also be a set of FPV goggles, like those offered by Fat Shark or the Zeiss Cinemizer OLED goggles. It's a personal preference but I tend to prefer using my FPV system as something I glance at while keeping line-of-sight with my drone most of the time. I'm not a fan of being completely immersed in an SD-quality video (though you can install nifty head-tracking modules). And you often want to see where your drone is in relation to other objects around it that you can't see if you're only looking ahead of it.
In my case, the flight camera is the GoPro. Some FPV purists actually hate the idea of using a GoPro as the flight cam. The argument is basically that the GoPro is too wide-angle thus making it hard to judge depth and much easier to hit something. In addition the GoPro has some video out lag; somewhere around 100ms. Absolutely true. If you do plan on using your FPV system to, well, fly while solely looking at it, you may want to consider a more advanced setup where you have a tiny low-res CCD or CMOS flight camera hooked up to the video transmitter and leave the GoPro to record on its own. You could even set it up to let you switch video signals if you have a spare channel on your third-party R/C transmitter, but I digress.
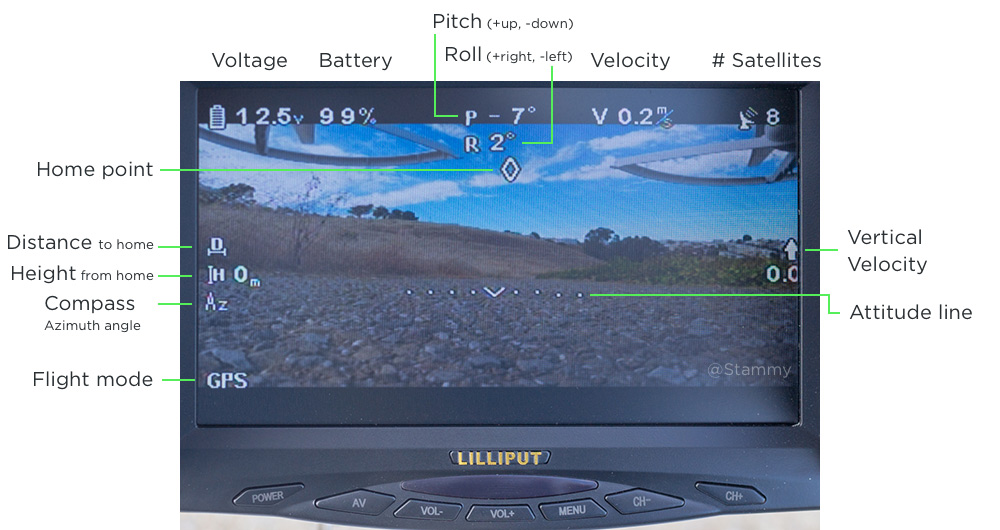
Last but not least, we have a module called the iOSD Mini. This category of device displays telemetry and flight data on your screen, making it easier and safer to fly. Here's a quick flight I recorded with my camera looking at the FPV display:
As I spin the Phantom around, notice the diamond shape that moves across the screen and then turns into an arrow and degree. That tells me where home is so even if I'm all spun around I know where to go to get back.
You have a few options for setting up the video transmitter and iOSD Mini. If you purchased the DJI FPV hub and cable set you won't need to do any soldering and can just plug a few things in. Here's a quick guide for how that works. When you're done it may look something like this:
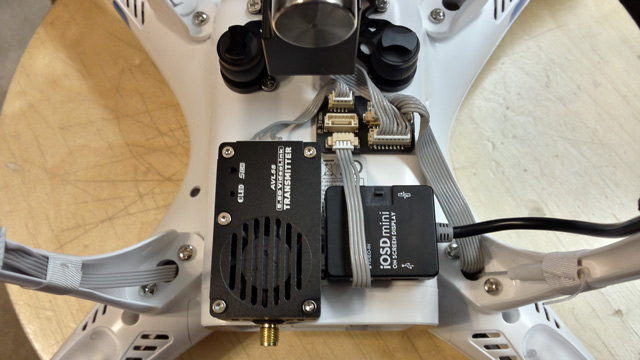
However, I found that mess of cables outside of the Phantom rather upsetting. I decided to mount the iOSD Mini inside the Phantom and ditch the FPV hub as it required being fed the gimbal cable making it tricky to get the wires to all come to one place.
You can watch this video to get a sense for the wire layout for soldering. The overall install requires opening up your Phantom again, moving the CANbus adapter inside, soldering and heatshrinking the wires, then mounting the iOSD Mini and transmitter. It can be done in about 30-45 minutes.

I initially purchased the DJI AVL58 video downlink since I wanted an easy setup but wound up going the hard way and soldering it for a clean install. If I did this over again I would have saved some money and simply purchased the smaller ImmersionRC 5.8GHz video transmitter. The AVL58 has a tiny high-pitched fan that is rather annoying. If you decide to go the ImmersionRC route, do your research as I believe it operates on different frequencies and you may need to buy a specific monitor.
Install the Bluebeam antennasInstall the 3-lobe Bluebeam on the Phantom and the 5-lobe on the Lilliput display. The display has two antennas, it doesn't matter which one you put it on. The display automatically switches to the antenna with the best signal. Also, never power up your Phantom without an antenna attached to the video transmitter. You could fry it.


Since I purchased the Lilliput 329/DW monitor with a built-in receiver I don't have to install an external video receiver. I do, however, need to set the channel so it can tune into the Phantom's video broadcast. The Lilliput display's channels are set via a series of little dip switches behind it. Unfortunately, the channels listed on the display and those listed on the back of the video transmitter are not exactly the same.
Given that the Lilliput supports 31 channels it takes a while to go through every channel to find the match. I did the hard work for you and found that Channel 16 on the Lilliput works well with Channel 8 on the AVL58.
Mount the displayNow all you need to do is snap on the 3d-printed monitor mount I listed in the parts list and screw in the monitor. It makes for a very clean setup but you'll quickly notice that it's now a chore to hold the transmitter with the new, unbalanced weight. It's vital to get a neck strap and latch it onto the strap balancer (not pictured here) I put in the build list. This extends the strap mounting point back an inch or two.


Optional: Before we call it a day, plug a micro-USB cable into the port on the iOSD Mini and plug that into a PC to update the firmware. Yes, a PC. Unfortunately at this time DJI does not have a Mac firmware updater for the iOSD Mini. However, I list this as optional because as of this writing there hasn't been a firmware update in 6 months so it's likely your iOSD Mini will ship with the latest firmware.
Your first FPV flightBy now you must be eager to go about your first epic FPV journey, but I'd suggest starting small. Fly within line-of-sight and glance down at your FPV display once your drone is high enough to be clear of any obstacles. Just keep in mind if that you fly too far away you might lose R/C signal, even though you can still see the video just fine. The control system and video system are entirely separate.
If you see the bottom left of your display show "FS" then "GHome", then you've gone far enough to lose signal. Your Phantom will begin flying back to your home point like this:
Advanced
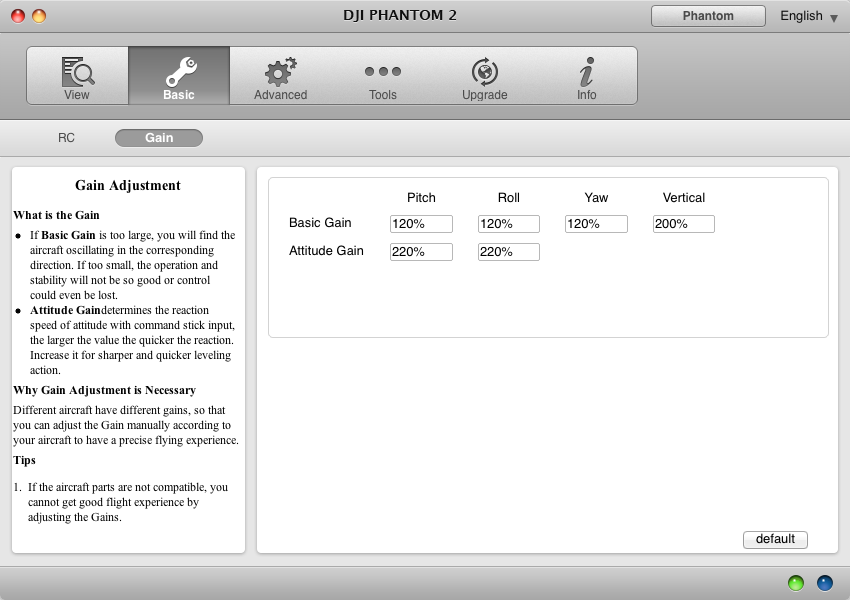
Now you're a professional drone pilot. You fly in attitude mode half the time and get a kick out of experimenting with various gains adjustments in the Phantom software. Now that you've mastered flight control, what's next?
Install a live GPS trackerTraditionally drone pilots will install small GPS trackers like the Fi-Li-Fi in their aircraft so that they can locate it in the event of a crash. These would typically be tiny boards that take a GSM SIM card. Others would even purchase tracking cell phones made for kids like this one where a simple SMS would auto-reply with GPS coordinates.
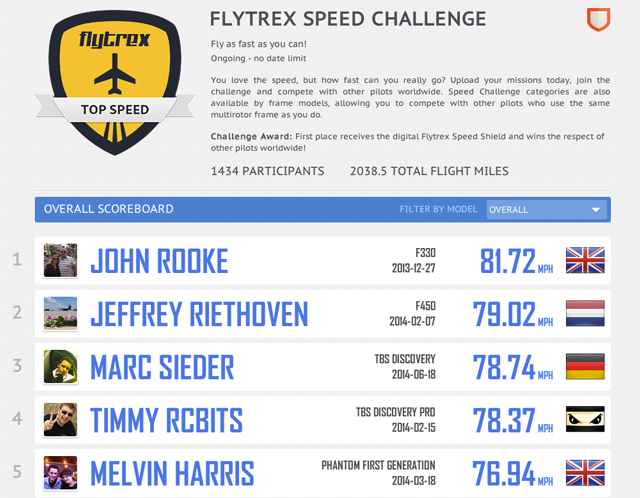
A company called Flytrex took that concept and ran with it. Take a look at the Flytrex Live. It broadcasts a myriad of flight data in real-time using GSM to their website. This lets you share live flight stats and compete with other pilots for fun with various challenges like top speed, top distance as well as earn badges the more you fly. This kind of reminds me of Strava's segments feature but for drones. I haven't installed one yet but this is a very unique and enticing offering.
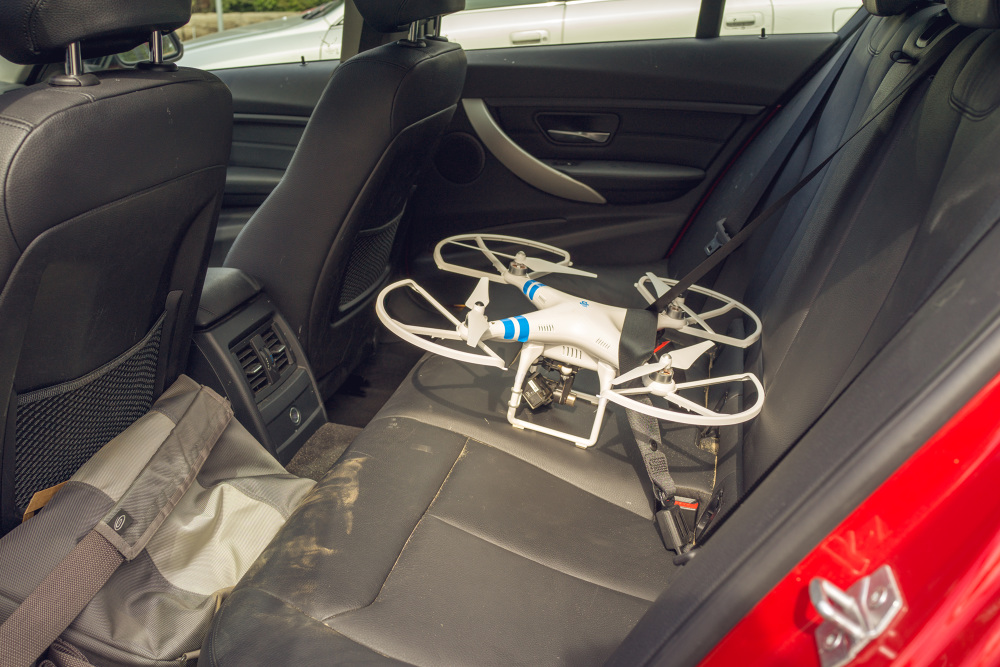
Once you’re comfortable flying in a variety of places and conditions you might want to start traveling with your drone. You’ll need some kind of case for your drone gear. The popular choices are the GoProfessional hard case as well as the Think Tank Airport Accelerator and Vanguard Up-Rise II 48 DSLR backpacks.
Is it safe to fly in GPS mode?Check the K-index before you fly. GPS satellites are susceptible to changes in the space weather such as solar flares creating geomagnetic storms on Earth (no I'm not making this shit up). The K-index, created by NOAA, quantifies these disturbances based on data from multiple ground-based magnetometers across the world. Don't fly if it's above a 4. There's even an Android app for that.
Go fasterStock motors not cutting it for you? You can change those too. A popular modification is swapping out the stock motors for ones called Anti-gravity MN2214-11 by Tiger Motors, but you can look into other models. Those motors allow you to takeoff faster and maneuver more quickly. And you get about ~1 minute of extra flight time as they're more efficient. The downside is that you likely won't be able to use the nice self-tightening DJI props and will have to start buying other props that might require balancing.
If you're interested in changing your motors, you might be wondering how those kV ratings work. A kV rating is the RPM the motor will spin per volt with no load attached. The higher the kV the more top-end it will have at the expense of acceleration and torque. A lower kV motor will accelerate faster at the expense of top-end speed. It's a tradeoff. The kV rating is indirectly correlated to the number of wire windings on the rotor's motor poles.
Increase your rangeThe stock Phantom range is 1 kilometer, more than enough to be a tiny spec in the sky and near impossible to fly with line-of-sight. However with the popularity of FPV flight, the control system is usually the first thing to lose signal. There are a few common options here:
- Modify your stock DJI transmitter to use a better antenna. This involves opening up the transmitter, removing the stock antenna/cable and laying down a U.FL to RP-SMA pigtail and mounting the screw connector to the original location of the stock antenna. From there you can screw on a 5dBi or larger antenna like what you'd find on a wireless router. And if you want to get crazy you can even have the cable go to a Wi-Fi power booster before connecting it to the antenna.
- Upgrade the entire control system to something like a Futaba T14SG or D8FGS. You'll have to install a new receiver inside the Phantom but the increased range and model memory inside the transmitter will set you up for many more drones to come. However, the best part is the programmable transmitter allowing you to flip a switch to temporarily slow down the yaw rotation so you can take nice and slow video pans. With the stock DJI transmitter it takes extra attention to have your drone do a very slow 360 spin so you can capture crisp video.
- If the 2.4GHz band is still letting you down, switch to a UHF control system. A long range control system like DragonLink or ImmersionRC EzUHF transmits on the 433MHz band at around 250-600mW. This kind of setup will ensure you can control your drone from up to 15 miles away. Not only are these systems good for long distance but also for flying in conditions that may have high interference. Do your research as some of these systems may require an amateur radio license to operate in the United States.
Has R/C flying lost its luster? There are a few ways for you to make your drone autonomous. You can turn your regular Phantom into one that supports Ground Station, the mode that lets you set up to 16 GPS waypoints via iPad. Doing this requires installing the DJI 2.4G Bluetooth DataLink. Installation is complex and requires a lot of finesse to fit the components inside your Phantom, but this is the easiest way to automate your non-Vision+ Phantom. Why would you want to do this? Imagine letting your Phantom fly itself so you can focus on your FPV screen to record great footage.
But the Ground Station is only for iPad (what about us Android folks?) and has some significant limitations. The next option is not any easier but opens the doors to letting you do just about anything autonomous with your Phantom. That is to convert your Phantom into an ArduPhantom by ditching the DJI Naza-M V2 flight system in favor of something like the APM 2.6 flight controller or 3DR Pixhawk. Installation is a bit hectic and involves removing the mainboard of your Phantom and building your own little frame inside.
With your ArduPhantom you now have a completely hackable, Arduino-compatible autonomous aircraft for your tinkering pleasure. Want to have your copter fly to the exact same place every day and piece together a 365-day sunset timelapse? You could do that.
Waterproof your PhantomAh yes, the magestic over the ocean drone shot. We all know how alluring that can be for any drone video. But the risk of crashes that completely tank (pun intended) your Phantom can be discouraging. Fortunately, you can have your drone's internals waterproofed! This doesn't mean sealing the entire frame, it's simply a treatment for the drone internals with a hydrophobic chemical.
Now that you're waterproofed and ready to fly over water, you still might want another safety mechanism — a buoy that inflates automatically when it detects water. If your drone crashes in the middle of open water and then sinks.. that's going to make recovery rather difficult.
And if you really love flying around water, you could build a waterproof quadcopter like the QuadH2O. No more worries about flying in the rain or snow!
In this article I went over setting up an analog video transmitter that transmits SD video to your display. If you want to really submerse yourself into the flight with live HD FPV video, adding a Lightbridge video downlink will be just the ticket. Though at $1,400 it's more expensive than the Phantom itself so this is aimed at larger drones that have two cameras and allow a separate transmitter to control the gimbal. That way you can have a dedicated camera man and a dedicated pilot.
But if you plan on doing all this stuff, maybe it's time to graduate from the Phantom 2 and build your own drone? The more electronics you add the more weight and power draw on your Phantom, significantly reducing your once close-to-20-minute flight time.
The future of drones
While this article was mostly centered around consumer use for videography, there's tremendous potential for drones to help us with other problems. Soon, "sense and avoid" technology like the eBumper being developed by Panoptes will become the norm for drones as they become smarter about their surroundings and safer to fly.
We have lightweight, strong materials. We have affordable electronics and accurate sensors for effective flight control. We have efficient BLDC motors. But we're not quite there with the battery tech. The future requires better batteries.
If we figure that out, we'll have drones that can fly longer and support larger payloads. Imagine what we could do with that. Maybe if solar panels get some leap in efficiency in the next 20 years or we get better with wireless energy transfer, we'll see drones that can stay in flight forever.
What would your drone do?