How To: HDR Photography Basics (Part 1)

July 23, 2009

Thanks to my second Ford Fiesta Movement mission (much more on this later once I get around to reviewing the 2011 Fiesta), I recently jumped head first into HDR photography. HDR, short for High Dynamic Range, is a “set of techniques that allows a greater dynamic range of luminances between light and dark areas of a scene than normal digital imaging techniques” according to Wikipedia. In short, it involves taking several photographs of the same subject at different exposures, and then using software to combine them for a stunning photograph.

This post is part of a series:

I Still Don’t Know What You’re Talking About

You might not be familiar with the term, but chances are you’ve run across some amazing photographs, especially if you hang around Flickr, that looked a bit.. surreal. Well to be exact, it all depends on how the HDR image is created. Some HDR creations are comprised of many individual photographs to get a better dynamic range and result in a more realistic representation of the subject, while other HDR styles go for a creative and exaggerated look. Here are a few examples of what I’m talking about:

HDR Lamborghini GallardoHDR Photo by Robert Himler using 5 exposures (-2,-1, 0, +1, +2) taken with a Nikon D300.
HDR Photo of Norway by Maciek Duczynski
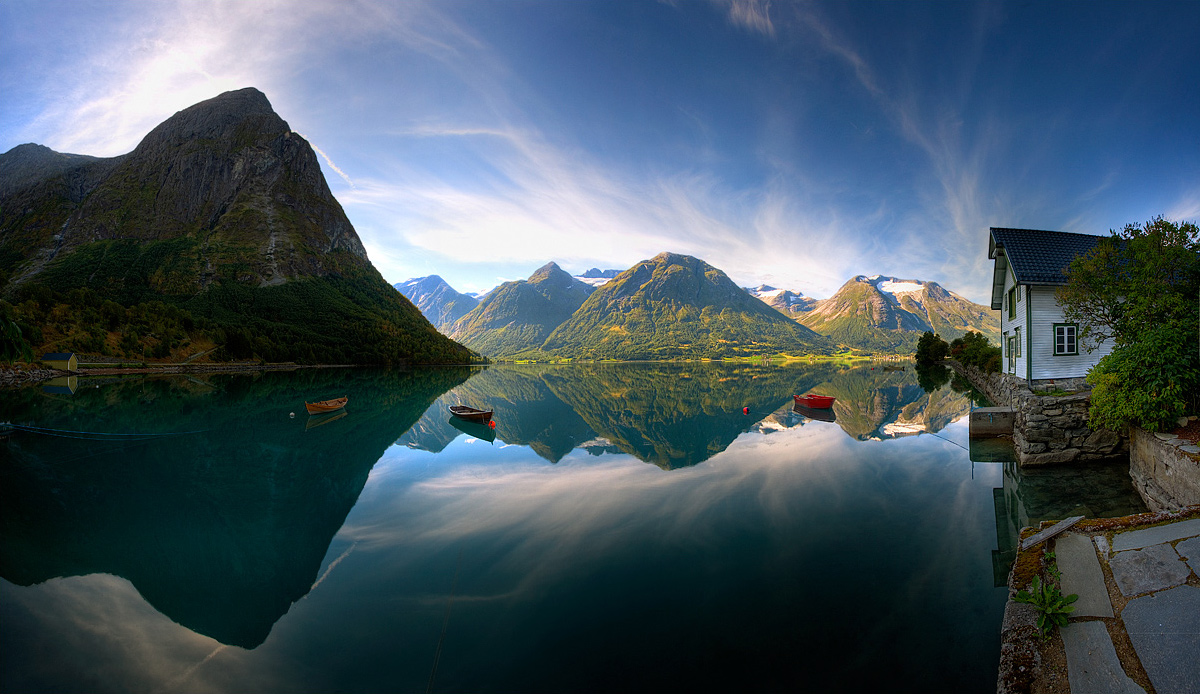
HDR Panorama photo by Maciek Duczynski in Norway taken with a Canon EOS 5D and stitched from 4 vertical HDR photos (3 exposures with a 1.66 EV step).

And now some HDR photographs employing a more artistic than true to life style:

HDR photo of Midtown Atlanta
HDR Photo by Rick Austin of the Colony Square area of Midtown Atlanta, Georgia.
HDR photo of a Corvette taken with a fisheye lens
HDR Photo of a Corvette by Jason Bouwmeester with a 15mm fisheye lens.
HDR Photo of Porsche GT3 RS
HDR Photo of a Porsche GT3 RS by Geri Amani.

That should give you a pretty good idea of what an HDR photograph can look like. For more examples, you might want to take a look at the HDR group on Flickr.

Where are the 32 bits/channel LCD displays already.. it’s 2009!

Unfortunately for us, all of these HDR images we see on the web and in print have been “compressed.” Not in the sense of file size or quality, but in the sense that most techniques result in a 32 bits/channel HDR photograph, which can’t be displayed properly on 8 bits/channel LCD displays (6 bit if you’re on a recent 13-inch Unibody MacBook Pro! ugh).

Clarification: When talking about color depth in the context of an LCD display, color depth refers to the number of levels each color (channel) can render instead of the summation of the number of colors the screen can render. For example, you likely have an 8 bits/channel LCD display (2^8 levels of Red, 2^8 levels of Green, 2^8 levels of Blue) capable of producing 16.7M unique colors, and you probably work with or view 24 bpp (bit per pixel) images (also 16.7M colors) or 32 bpp images (also 16.7M colors but with an additional 8-bit alpha channel). Anyways, the point I’m getting at is that 8 bits/channel for your LCD display is pretty much the same as 24 bits/channel True Color. Now compare that 8 bits/channel from your LCD display to a 32 bits/channel HDR image. That’s why tone mapping is necessary to properly display all details of the original image on current displays. In other words, your operating system might tell you that you’re running 24-bit graphics now, but I assure you your display is still 8 bits/channel or so.

As such, they must be converted to 8 bits/channel using processes that adjust highlights, shadows, luminance among other things (depending on how it’s done) to fit within the 8-bit range. Before this conversion, the HDR photo can be considered “unprocessed”, much like a film negative or RAW file shot with a DSLR camera — you can’t see all of the captured detail until the RAW file is processed for printing or monitor displaying. I’ll show you how to process an unprocessed HDR photograph with a technique called tone mapping, which displays highlights and shadows contained in the unprocessed HDR image. As a sidenote, HDR imaging uses floating-point numbers instead of integers to allow for what’s called an open-ended brightness scale that can adapt to fit the needs of your particular HDR image. You don’t need to know any of this to make your first HDR image, but it just goes to show a bit of the tech behind HDR.

What You Need

  • DSLR Camera – I think this one’s a no-brainer. Why does it have to be a DSLR camera? For one, we need to have lots of control over everything – ranging from using RAW files to adjusting exposures with auto-bracketing (sometimes marked as Auto Exposure Bracketing).
  • Tripod – Okay, this one isn’t completely mandatory, in fact I didn’t use a tripod for any of the test shots I will be sharing with you in the next post(s), but I did stabilize the camera against a sturdy object. HDR imaging involves taking several (usually at least 3) photographs of the exact same subject without any movement of the camera. If you don’t think you can pull that off (especially with cameras that don’t have auto-bracketing that allows photographers to take all 3+ shots continuously), it’s not the end of the world — most HDR imaging software can do some basic image alignment. Oh but how do you create HDR images of moving subjects you ask? That’s a topic for another post.
  • Computer – Also a no-brainer. It doesn’t really matter whether you have a PC or Mac as great HDR software exists for both operating systems (even some good stuff out there for *nix users too). That being said, I’ll be using my Mac for this series of posts.
  • HDR Imaging Software – This is where things get a bit tricky. There are lots of free and paid tools that can help you create your HDR masterpieces. I’ll go into much more depth in the next post, but Photomatix Pro is my current favorite. Unfortunately Photomatix Pro is rather expensive, so I will also be sure to talk about free alternative such as FDRTools Basic and Gimp with an HDR plugin.

What’s Next

This introductory post was just to familiarize you with High Dynamic Range imagery if you haven’t delved into it before. The next post or two in this series will go over how to setup auto-bracketing on a DSLR camera in addition to various other settings that are useful when shooting with HDR in mind, as well as creating the actual HDR images with different kinds of HDR imaging software. If you have any questions I can answer in the next post or if I’ve made a mistake in this post (I’ve been up all night..) and you can help clear things up, please leave a comment.

Thanks to the person that suggested this article on my Skribit account!

Have you experimented with HDR imaging before? Do you shoot with a DSLR?

Other DSLR Posts on PaulStamatiou.com:

Paul Stamatiou runs on the Genesis Theme Framework

Genesis Theme Framework

Genesis empowers you to quickly and easily build incredible websites with WordPress. Whether you're a novice or advanced developer, Genesis provides the secure and search-engine-optimized foundation that takes WordPress to places you never thought it could go.

Take advantage of the 6 default layout options, comprehensive SEO settings, rock-solid security, flexible theme options, cool custom widgets, custom design hooks, and a huge selection of child themes ("skins") that make your Genesis site look the way you want it to. With automatic theme updates and world-class support included, Genesis is the smart choice for your WordPress website or blog.

41 comments … read them below or add one

  1. Rob Schultz says:

    I’ve been looking forward to this write up. Get some sleep and then post the next part in the series!!

  2. Looking forward to the next posts, I’ve been messing around with this technique for a little while now. You can get some pretty amazing results if you do it right. I’ve messed around with Photomatix (the trial) and Photoshop’s HDR plugin.

    By the way, you have a typo. The second time you mention Photomatix you throw an ‘r’ in there (Photomatrix).

  3. Tyler Goss says:

    I believe that i remember reading somewhere on flickr that you can turn a photo into an HDR photo with only one picture. I dunno if they were right or not but I just thought I would let you know.

    • Eugene says:

      Tyler: you’re absolutely right. It’s possible to use a single RAW file to create a so-called pseudo-HDR image. I’ve used this technique on a few occasions, particularly for scenes which change rapidly, such as an incoming wave.

    • The technique you’re talking about creates a “simulated” HDR image. Basically, you take the RAW file of a shot and make two more versions of it in the photo editor of your choice. You should adjust one of them to be 1 EV (or maybe 1.5 EV) brighter than the original, and the other to be that same amount darker than the original. Then when you use Photomatix or whatever you choose, you have three photos to use. It doesn’t always turn out a good photo, but the other guy above or below me (wherever this comment shows up) got a really good shot this way.

  4. Eugene says:

    Nice, you finally got around to the HDR post(s).

    With regard to owning a dSLR camera: it will definitely help, but it’s not an absolute requirement. There are some really good prosumer “dSLR-like” cameras out there (such as the Canon G10) that can 1) take RAW images and 2) shoot a bracketed sequence.

    Looking forward to the next series of posts, especially the one incorporating Ford Fiesta!

  5. Well actually, You can use some point and camera. Specifically, if you have a Canon camera, you can most likely install a firmware that will allow you to control manual settings and shoot in raw. (see:http://chdk.wikia.com/wiki/CHDK)

  6. I agree that a DSLR would be the best choice, but I’ve done some surprisingly good HDR work with my pocketable Canon A710/A720 cameras. If you download the unofficial CHDK firmware hack, you can enable auto-bracketing. And the best camera is the one that you have with you…

    • I’d heard about CHDK but didn’t know too much about what it could do as I haven’t had any first hand experience.. but I just checked and it appears there is now a Beta build of CHDK for my SD990IS! I might have to try this out soon.

  7. Dan Huang says:

    That’s Robert’s 2005 Verde Ithaca Gallardo! It became my background as soon as he showed it to me — that kid is extremely talented.

    Good tutorial Paul, gonna try this out.

  8. I love your photos… I’ve never done much nature photography but I’d love to get outside and do some stuff like this! Thanks so much

  9. hey, stammy, what’s with the blank “*name* this comment posted on twitter” comments? Are they just tweeting a link to the article?

    • I use Backtype Connect to suck in related conversations from Friendfeed, Twitter, etc. I just noticed an issue though where some tweets were duplicated with one of them being blank.. trying to solve that now.

  10. Colin Devroe says:

    Excellent write up about both HDR and LCD color ranges/specs. I’ve never done HDR but, now that you’ve written this, I think I’ll give it a whirl.

  11. Jason says:

    Thanks for featuring my image of the Corvette (pixelens photogrphy). Nice write up!

  12. I’ve had pretty good results with my first day of messing around with HDR:

    http://www.flickr.com/photos/zacharytamas/3753820366/

  13. blauereiter says:

    Thanks for the informative write-up. I’ve heard about HDR here and there but never quite figured out what it was about. I still think a tripod is a must when doing HDR though; its going to be tough stitching your images if they don’t align somehow. Were any of the shots above done without a tripod ?

  14. Great article Paul. Sometimes i see hdr images that are far to overprocessed and look unreal. I hate that.

    Here’s my latest Hdr – This was taken in my grandmas cellar used as shelter in World War 2 -http://bit.ly/JqGjr

  15. Geri Amani says:

    Hey there — thanks for referencing my pics — unfortunately I DONT use HDR! Cant stand the process, its too automated. I do everything by hand in photoshop ;)

    • Yikes, sorry for the mixup Geri. I somehow found that image searching by the HDR tag on blogtog. If you want to provide some details about your hand photoshop’d processes I can update the article.

      Thanks,
      Paul

  16. Now that HDR has integrated into the world of photography,
    there are a few new styles of HDR starting to crop up around
    the internet.

    For those who are interested in trying their hand at one of them I have just finished writing a tutorial for “Dark Style HDR”

    Which you can view with the link below:

    http://www.mrdphotography.co.uk/tutorials/darkstylehdr/ds-hdr-tutorial-index.htm

  17. Michael says:

    Thanks a lot for sharing!

    Here is cool online HDR photo tool. You can create stunning pictures from one photo

    Online HDR photo tool

    Hope, you’ll like it!

  18. Karl says:

    Hey Paul –

    I have a kind of different question for HDR – I saw an HDR image you took of a Subaru fish-tailing with dirt flying over the car. My question is how did you take a moving HDR image? I am working with the Cannon 5D. Any help would be great!!

    Cheers,
    -Karl-

  19. Erin Kiskis says:

    Hey Christopher,

    I'm the Community Manager for Ruba (http://www.ruba.com) a new visual travel website that's focused on helping users discover the best places and experiences for their next trip. I noticed you quite a bit about travel & travel sites and thought you may be interested in learning more about us! If you'd like to reach me about our site, i'm at erin[at]ruba.com – thanks!

    Erin

    This comment was originally posted on http://www.soitscometothis.com/)“>So It’s Come To This:

17 Trackbacks

  1. [...] above when viewing full post) was featured over on Paul Stamatiou’s blog in an article title How To: HDR Photography Basics (Part 1). Thanks Paul, glad you liked it enough to use [...]

  2. [...] How To: HDR Photography Basics (Part 1) — PaulStamatiou.com (tags: HDR photography tips tutorial howto) [...]

  3. [...] can do it yourself! In the first post I went through the basics and some of the geeky bits about HDR photography: from showing off example HDR images, detailing why HDR images need to be processed and what [...]

  4. [...] to the third and likely final part of my series on High Dynamic Range photography. In the first part I covered what HDR imaging actually is and how it works while the second part went over DSLR camera setup for [...]

  5. Percocet….

    Percocet. Neo percocet. Effects of long term percocet use. Bioavailability of percocet. Long term use of percocet….

  6. [...] How To: HDR Photography Basics (Part 1) – The first in a three-part series of beginner tutorials. [...]

  7. [...] How To: HDR Photography Basics (Part 1) – The first in a three-part series of beginner tutorials. [...]

  8. [...] How To: HDR Photography Basics (Part 1) – The first in a three-part series of beginner tutorials. [...]

  9. [...] How To: HDR Photography Basics (Part 1) – The first in a three-part series of beginner tutorials. [...]

  10. [...] How To: HDR Photography Basics (Part 1) – The prototypal in a three-part program of originator tutorials. [...]

  11. [...] How To: HDR Photography Basics (Part 1) – The first in a three-part series of beginner tutorials. [...]

  12. [...] How To: HDR Photography Basics (Part 1) – The first in a three-part series of beginner tutorials. [...]

  13. [...] How To: HDR Photography Basics (Part 1) – The first in a three-part series of beginner tutorials. [...]

  14. [...] secrets to making great shots? :p go nuts. oh and High Dynamic Range this one is pretty good; How To: HDR Photography Basics (Part 1) ? PaulStamatiou.com __________________ mike [...]

  15. [...] How To: HDR Photography Basics (Part 1) – The first in a three-part series of beginner tutorials. [...]

  16. [...] a great tutorial as well: HDR Tutorial | High Dynamic Range Tutorial This guy has a good tutorial here as well and he used one of my photos of Midtown Atlanta as an example [...]

Leave a Comment

*

Leaving so soon?

Don't forget to check out the Reviews and How-Tos, or read a random post.