A few weeks ago my DNS provider Zerigo sent an email stating that due to recent infrastructure upgrades they would need to raise their prices. For my meager DNS needs that ended up being a huge price hike: from $39 per year to $25 per month1. Prices were set to take effect a month later.
I decided to put my current dev work — designing and building new photoblog functionality to showcase my Japan trip photos — on hold to move away from Zerigo. I chose to switch to AWS Route 53.
I was able to successfully get my DNS running on Route 53 and pointing to my Heroku setup rather quickly. Though everything was working, I realized I was running an unsupported configuration. Namely that I was using DNS A records to point to the root of my domain. Heroku explains the problem with this zone apex approach on cloud hosting providers:
"DNS A-records require that an IP address be hard-coded into your application’s DNS configuration. This prevents your infrastructure provider from assigning your app a new IP address on your behalf when adverse conditions arise and can have a serious impact to your app’s uptime. A CNAME record does not require hard-coded IP addresses and allows Heroku to manage the set of IPs associated with your domain. However, CNAME records are not available at the zone apex and can’t be used to configure root domains."
I felt uneasy about this and wanted to make sure my site would just work at all times. I didn't want to leave myself with future technical debt due to a hacky solution.
There were other options available but moving over to Amazon S3 site hosting with CloudFront was the most intriguing:
- It supports zone apex domain hosting with Route 53’s ALIAS DNS record.
- I would save $34/month by moving off Heroku. I was only on Heroku since I had used ruby rack with my Jekyll setup to do some basic URL 301 redirection to preserve an old permalink structure I had. After some research I found out how this could be done on S3 hosted sites as well.
- I already use CloudFront, S3, Glacier and Route 53 so it’s nice to keep all of my eggs in one big Bezos basket.
- Although I had previously hosted all assets on CloudFront (CSS, JS and images) I would still see a huge performance boost by having all requests hit CloudFront.
I've known about S3 site hosting since it was launched but was always wary about how it would perform when I wanted to update current files. Previously I thought that CloudFront only updated files every 24 hours. That concern became a non-issue when I discovered a great ruby gem that calls CloudFront's invalidation API when pushing s3 sites.
With my research done, I began the migration process.
Moving from Zerigo to Route 53
When it comes to moving domains and hosts, the name of the game is minimizing downtime and DNS propagation. It's vital that you keep both sites running so that folks with old DNS records can still load a version of your site until the propagation completes.
I exported my DNS records from Zerigo2 imported them on Route 53, waited a while for the new DNS records to be active for good measure, then pointed my registrar Namecheap to the new Route 53 servers.
That only took a few minutes through the Route 53 web console. At this point I had Route 53 working with my old host Heroku.
S3 website hosting 101
The next step was to enable S3 static website hosting and get my Jekyll site running exactly as I wanted it before adding my domain. I had to create buckets where I would store my site's static files. Amazon suggests you create two: one for no-www and one for the www version of your domain. For example, www.paulstamatiou.com and paulstamatiou.com. But since we will be using CloudFront from the get–go, only one bucket is required (your root domain bucket). More on that later.
What if someone's squatting on my domain name bucket? I found myself in this predicament. Someone was squatting on the paulstamatiou.com S3 bucket. I asked on the AWS forums and they replied stating that the buckets don't need to be exactly the same; it's just to make sure you don't get confused during the setup process.
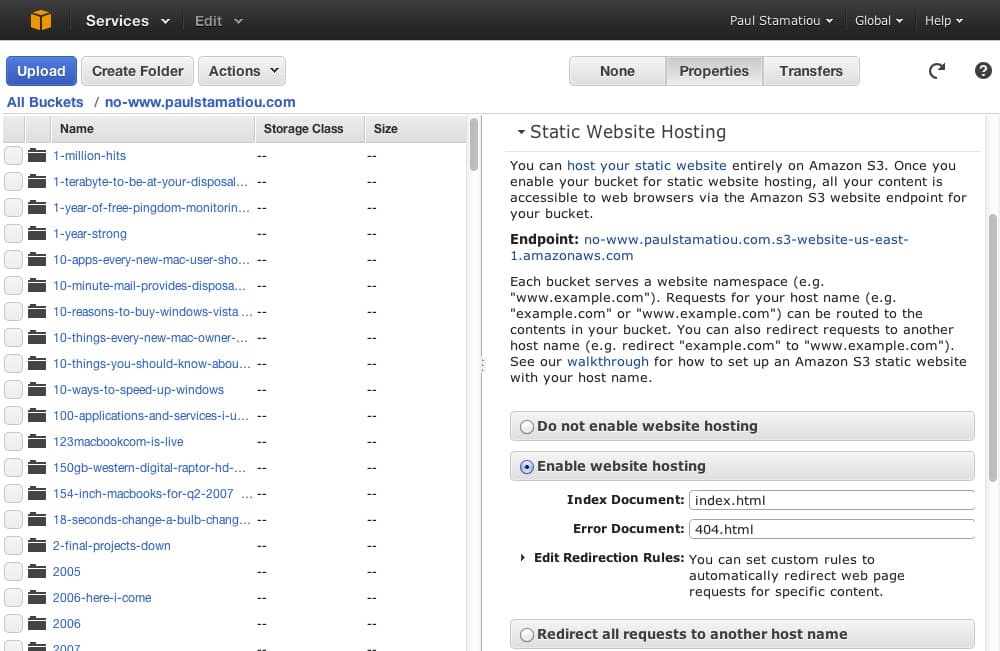
Open the S3 web console and select your root domain S3 bucket. Click on Properties and scroll to Static Website Hosting. Select "Enable website hosting" and enter in your index and error documents. For me this was index.html and 404.html. Take note of the Endpoint URL listed here, you'll need that later.

Enabling static website hosting for an S3 bucket
Now you'll have to make this bucket public (unless you enjoy editing object ACLs for every file you upload). This can be done with a simple bucket policy:
{
  "Version": "2012-10-17",
  "Statement": [
    {
      "Sid": "PublicReadGetObject",
      "Effect": "Allow",
      "Principal": {
        "AWS": "*"
      },
      "Action": "s3:GetObject",
      "Resource": "arn:aws:s3:::YOUR-ROOT-BUCKET-HERE.com/*"
    }
  ]
}
Copy that policy, adding your bucket name where indicated. On the same S3 web management console page, scroll up to Permissions and expand it. Click on "Add bucket policy" and paste the policy. Now any files you upload to this bucket will instantly be web accessible via the Endpoint URL provided.
As mentioned earlier, we are only enabling site hosting and adding a public policy to the root domain bucket since a www bucket is not required when creating a CloudFront-backed S3 site.
Your first S3 site push
The next step is to get your static site running as you like before adding a custom domain. I'm going to speak in terms of my Jekyll setup but it should apply to other static site generators too.
I installed the s3_website gem. It looks for the default Jekyll _site folder to publish to S3. First run s3_website cfg create in the root of your Jekyll directory to create the s3_website.yml configuration file.
You will need to put your AWS credentials into that yaml file. To be safer, I recommend you create IAM AWS credentials and supply those instead. IAM stands for Identity and Access Management — basically you are creating a new user role that does not have 'root' access. In the event that your IAM keys are ever compromised, the attacker would only be able to mess with your bucket, not your entire AWS account. And since you likely already have your static site backed up on GitHub you'd only need to redeploy your site.
Amazon does a great job going through the specifics of creating IAM credentials so I won't delve into it. The gist of it is that you'll need to create a new group and user. You'll attach that user to a group for which you create a new policy that provides the group with S3 read/write access to only your single bucket where you have site hosting enabled. This group will also need to have CloudFront invalidation access. The new user will have its own access keys that you'll use to fill out s3_website.yml along with the bucket name.3
s3_id: ABCDEFGHIJKLMNOPQRST
s3_secret: YourPasswordUxeqBbErJBoGWvATxq9TJJTcFAKE
s3_bucket: your-domain-s3-bucket.com
Now you have the basic functionality needed to do your first push. Just run s3_website push. When it finishes, visit the Endpoint URL mentioned earlier to see your live site.
Fixing URLs
My previous blog setup stripped out all trailing slashes from my URLs even though Jekyll already generated posts in the "title-name/index.html" structure. With S3 site hosting you'll have to keep trailing slashes (unless you prefer having your URLs end with .html, I don't). While URLs without trailing slashes worked for me, there was an unnecessary redirect to the URL with a trailing slash. As such I made sure to change all site navigation and footers to link to pages with the trailing slash to bypass that redirect.
I changed the Jekyll permalink configuration in _config.yml from /:title to /:title/. Then I made sure to change pages like about.html to about/index.html as well as update my sitemap.xml to have trailing slashes for all posts and pages.
In addition, I updated my canonical URL tag to include URLs with trailing slashes. The canonical tag helps Google differentiate between duplicate content and tells it which to use as primary.
<link rel="canonical" href="http://yourdomain.com{{ "{{ page.url | replace:'index.html','' " }}}}" />This is mandatory when hosting on S3 with CloudFront since users will be able to access your site from either the root or with www.4
Setting up redirects
At this point I only needed to get my URL redirects in place before I could continue setting up my domain. When I ran my site with WordPress I had a different permalink structure. My post URLs contained the year, month and day in addition to the post slug. I still receive quite a bit of web traffic from users clicking on old links to my posts on other sites. If I didn't take care of this with redirects, users would be presented with a 404 and have to search to find what they were looking for.
I used to have a few regular expressions with rack rewrite that did everything I needed. And before that, a simple .htaccess configuration. There is no equivalent with S3 site hosting that can accomplish this in a few lines. There are S3 bucket-level routing rules but they're fairly basic. However, S3 does allow 301 redirections on an object-level basis.
I used the s3_website gem to create objects for the old URL structure and specify a "Website Redirect Location" value. All that was necessary was filling out the redirects section of s3_website.yml in this format:
redirects:
  # /year/month/day/post-slug: post-slug/
  2008/04/05/how-to-getting-started-with-amazon-ec2: how-to-getting-started-with-amazon-ec2/
Unfortunately with over 1,000 posts on my site originally created in the old permalink format, it would take hours to manually fill out the configuration. Thanks to Chad Etzel for writing this bash one-liner that goes inside of my Jekyll _posts directory and outputs a list of post redirections ready to paste:
(for file in `ls _posts`; do echo $file | sed s/.markdown//g | awk -F- '{slug=$4; for(i=5;i<=NF;i++){slug=slug"-"$i}; print $1"/"$2"/"$3"/"slug": "slug}'; done) > map.txt
Now all I had to do was another s3_website push to update the site and create all of the empty objects that redirect to the new URLs. A quick test of several pages revealed that everything was redirecting smoothly.
Creating a CloudFront distribution
Go to the CloudFront web console and click Create Distribution. Follow along as documented by AWS here in this guide. Make sure to put your domain name — both with www and without — in the Alternate Domain Names/CNAMEs section.
Take note of the CloudFront URL as well as your Distribution ID. The latter can be found by selecting the distribution then clicking "Distribution Settings." Copy and paste this ID into your s3_website.yml file for cloudfront_distribution_id.
Wait for the distribution to deploy and ensure that your site loads when you visit your CloudFront URL.
Whenever you run s3_website push, the gem will now also tell CloudFront to invalidate its cache of the URLs you just updated (if any).
Note for people with over 1,000 pages: The CloudFront invalidation API has a limit of 1,000 files per invalidation request. You'll see an error like this at the end of an otherwise successful s3_website push:
AWS API call failed. Reason:
<?xml version="1.0"?>
<ErrorResponse xmlns="http://cloudfront.amazonaws.com/doc/2012-05-05/"><Error><Type>Sender</Type><Code>BatchTooLarge</Code><Message>Your request contains too many invalidations.</Message></Error><RequestId>288b0f29-7c58-82e2-3c21-73785f54b166</RequestId></ErrorResponse> (RuntimeError)
This means that if I update things on my site that affect all pages when generated, not all pages will update immediately when pushed. They won't be served until the CloudFront cache naturally runs its course, which is 24 hours by default. This is called the expiration period and can separately be controlled by adding a Cache-Control header to files when uploading or changing the Object Caching section of your CloudFront distribution and specifying a Min TTL. If you are using the s3_website gem, you can specify object-level cache control with the max_age setting.
Hooking up your domain to CloudFront
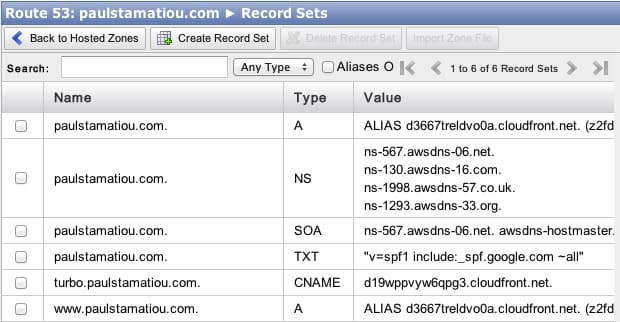
Visit the Route 53 web console and open up your hosted zone for your root domain bucket. You will only be editing two A records. One for the root and one for www (you might have previously added this as a CNAME, you can change this now).
Note: This step will start pointing your domain to the new site, away from your old server.
Click on the www A record, set Alias to Yes then place your cursor in the Alias Target field. A dropdown with your new CloudFront distribution should display. It may not load for you until a few minutes after the distribution has finished deploying. It would often hang for me at "Loading Targets..." too.
I was able to get it working by just pasting the CloudFront URL in there — it immediately detected it. Click Save Record Set. Do that again for the root domain A record. The values of your two A records should now begin with ALIAS:

Propagation
Your domain name will begin pointing to your new CloudFront distribution shortly. It may begin working for you in a few minutes, but it's best to keep your old server and DNS active for a few days.
You can force a root DNS server dig trace to update your computer's DNS if you like:
dig YOUR-DOMAIN.com +trace @a.root-servers.netAfter a few days, log into your old server and see if there are still any requests being served. It should be idle or only receive hits by some bots occasionally. It's now safe to pull your old DNS. For me that meant deleting the domain from Zerigo.5
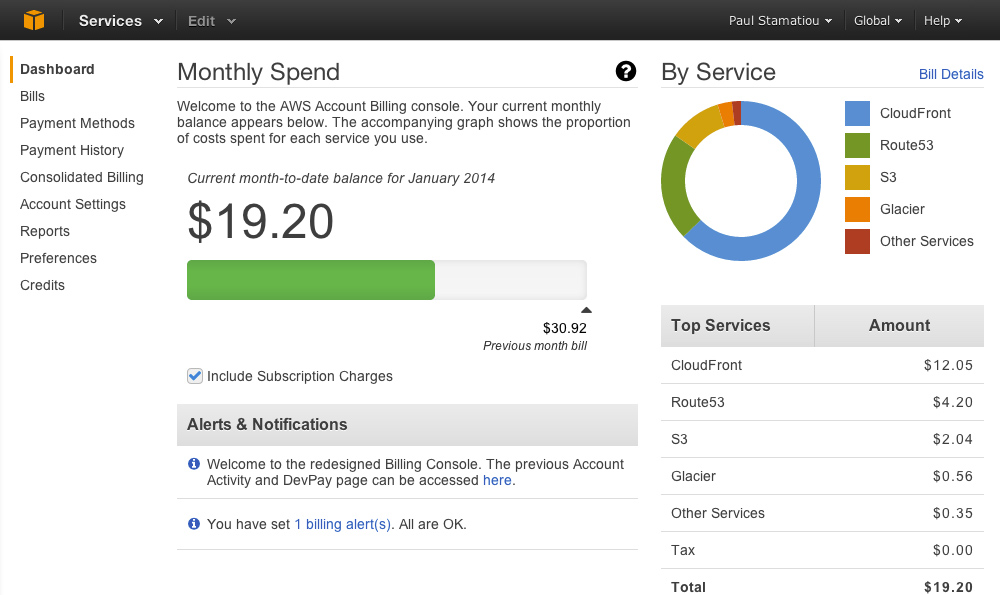
Congrats! Your site is now hosted on S3 with CloudFront (and very fast). From now on you can see all of your hosting expenses in one place:

AWS billing dashboard
About those CloudFront logs..
While creating your CloudFront distribution you specified an S3 bucket to store logs. You might be wondering what you can do with those. If you already have a website analytics service like Google Analytics or Gaug.es (I use both), you probably don't need to worry about this. But if you're curious about them, they're a bunch of gzipped logs that look like this:
 # Version: 1.0
 # Fields: date time x-edge-location sc-bytes c-ip cs-method cs(Host) cs-uri-stem sc-status cs(Referer) cs(User-Agent) cs-uri-query cs(Cookie) x-edge-result-type x-edge-request-id x-host-header cs-protocol cs-bytes
2014-01-10  20:48:52  AMS1  12179 109.128.79.246  GET d3667treldvo0a.cloudfront.net /review-beats-studio-by-dr-dre-and-monster-noise-canceling-headphones/  200 http://www.google.be/url?sa=t&rct=j&q=&esrc=s&source=web&cd=1&ved=0CDAQFjAA&url=http%253A%252F%252Fpaulstamatiou.com%252Freview-beats-studio-by-dr-dre-and-monster-noise-canceling-headphones%253Futm_medium%253Dbt.io-twitter%2526utm_source%253Ddirect-bt.io%2526utm_content%253Dbacktype-tweetcount&ei=r1zQUuPbO9Sn0wWKjoCAAg&usg=AFQjCNFEXXTT3tVBByvtwIFRkdMuNKhtyQ&sig2=P4KrKFKN17_7GD1I1-z8VA&bvm=bv.59026428,d.d2k Mozilla/5.0%2520(Macintosh;%2520Intel%2520Mac%2520OS%2520X%252010_8_5)%2520AppleWebKit/537.71%2520(KHTML,%2520like%2520Gecko)%2520Version/6.1%2520Safari/537.71 - - RefreshHit  WxFbgCF8cHHbNbThYhVsk-hgiq2IgKWbkgzU91ERYF6bSetGhZ2BKQ==  paulstamatiou.com http  790
2014-01-10  20:48:52  AMS1  4078  109.128.79.246  GET d3667treldvo0a.cloudfront.net /js/stammy.js 200 https://paulstamatiou.com/review-beats-studio-by-dr-dre-and-monster-noise-canceling-headphones/  Mozilla/5.0%2520(Macintosh;%2520Intel%2520Mac%2520OS%2520X%252010_8_5)%2520AppleWebKit/537.71%2520(KHTML,%2520like%2520Gecko)%2520Version/6.1%2520Safari/537.71 v=10  - Hit TCLtU2PADnfuucltg2DCj4kBOYzVA2f3QqRMiIoVILOkt1rA--BD_g==  paulstamatiou.com http  383
Services like S3Stat, Cloudlytics and Qloudstat can analyze them and make nice traffic dashboards for you. Or you can setup your own server running AWStats to analyze the logs. This is most likely overkill for you and you should disable logging to save money on S3 costs.
Questions?
If you have any questions about this process, I'd suggest skimming through the amazingly detailed Amazon docs or ask me on Twitter.
Performance
Moving to S3 site hosting on CloudFront is just one step to having a performant static website. Basic Souders rules still apply: reducing requests and file sizes, caching properly, reducing or moving render-blocking javascript and so on. I still have some tweaks to make as suggested by Google PageSpeed Insights and WebPageTest. Now's a good time to enable gzip compression with s3_website if you haven't already.
I previously hosted all of my CSS, JS and images on another CloudFront distribution that I CNAME'd to turbo.paulstamatiou.com. I will continue to use that for images, since I'd prefer not to have gigs of blog post images in the same repository and taking up space on my computer.
However, I have since changed my Grunt setup to compile and serve CSS and JS on the root domain. This way I don't have to separately upload them to my other CloudFront distribution. I manually append a version query string6 to them when I make deploy new versions. I still have to spend time to investigate things like grunt-usemin to solve my CSS and JS versioning issues.
1 That was the grandfathered-in price too!
2 And I made sure to remove the Zerigo-specific NS records from the export.
3 If you have spare time it's best to put your AWS IAM credentials in your .env and add it to your .gitignore so you don't commit them to your GitHub repository.
4 Though that functionality is readily available with regular S3 hosted sites (no CloudFront), sites hosted on S3 with CloudFront are unable to redirect from www to no-www (or vice versa) at this time. As long as you have the canonical tag setup it's no biggie.
5 Even though I had since moved my domain to Route 53, it was still serving up DNS to users that had old DNS that still thought my site was hosted on Heroku. I know this is the case because I had previously prematurely deleted it on Zerigo after switching to Route 53 and a bunch of people on Twitter said my site stopped working for them.
6 I also changed my CloudFront distribution to allow query string forwarding.