Photoshop Quickie: Unsharp Mask & High Pass Filters

July 27, 2006 · 9 comments

If you’re looking to expose some detail on any of your photos and have Photoshop, check out these easy tips. I’ve been using the first one, unmask sharpen, for a long time, but more recently with some stuff at work and it makes a huge difference. It seems to add fine detail to images and lessen the appearance of blurryness. Open up an image in Photoshop and navigate to Filter » Sharpen » Unsharp Mask. In the window that pops up, set the amount to 100%, radius to 0.5 pixels and keep the threshold at 0 levels. Click OK. That’s it! I’ve found that this works particularly better on some photos than others; non-macro shots seem to fare better.
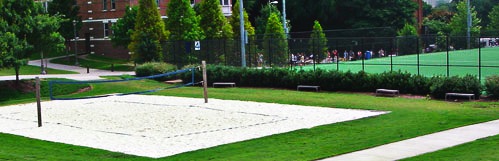
Original

Photoshop Quickie - Unsharp Mask
This is a part of Georgia Tech’s West Campus. In the background is the world’s largest (or so we’re told to believe) astroturf field.

After 1 Unsharp Mask Application

Photoshop Quickie - Unsharp Mask
Notice how the people in the back are more defined as are individual blades of grass.

After 2 Unsharp Mask Applications

Photoshop Quickie - Unsharp Mask
Finding the right balance is key. Go too far and you’ll wash out the colors. For example, the grass here isn’t as green as the photo above it.

I wouldn’t recommend using more than 1 or 2 unsharp masks as it can start to deteriorate the quality of the photo. Another powerful photo enhancement can be done with the High Pass filter. Open up a new image, duplicate the image layer and go to Filter » Other » High Pass. Select a Radius from somewhere between 5 and 10 pixels; play with them and see what looks best on your particular photo. Hit OK. The layer will look a little weird right now, that’s normal.

If you go to your layers window, you should have 2 layers – the untouched original and the duplicate which we applied the filter to. On the filtered layer you were just working on, right-click and select Blending Options. In the main window under General Blending, set the blend mode to Overlay. Click OK and you’re done.

Before High Pass

Photoshop Quickie

After High Pass

High Pass

Learn to mix these two filter techniques together and you can easily turn a mediocre photo into a masterpiece worthy of your flickr account.

While we’re on the subject of Photoshop, Bryan created an excellent screencast tutorial of clipping masks in Photoshop. It’s a decent 50MB download but has many tips that the Photoshop newcomer will find essential.

PaulStamatiou.com runs on the Thesis Theme for WordPress

How smart is your Theme?  How good is your support? Check out ThesisTheme for WordPress.

Thesis is the search engine optimized WordPress theme of choice for serious online publishers. If you’re a blogger who doesn’t understand a lot of PHP, Thesis will give a ton of functionality without having to alter any code. For the advanced, Thesis has incredible customization possibilities via Thesis hooks.

With so many design options, you can use the template over and over and never have it look like the same site. The theme is robust and flexible enough not only to accommodate a site like PaulStamatiou.com, but also to enable the site to run far more efficiently than it ever has before.

{ 2 trackbacks }

Photoshop Quickie: Perspective Crop — PaulStamatiou.com
May 28, 2009 at 12:22 am
How To: Get Started with HDR Photography (Part 3) — PaulStamatiou.com
August 31, 2009 at 1:15 pm

{ 7 comments… read them below or add one }

1 Dat Nguyen July 27, 2006 at 4:05 am

That high pass tip is great. It sharpens and brings out a lot of details without giving you that halo effect sharpening filters can give you. Good stuff.

Reply

2 Paul Stamatiou July 27, 2006 at 4:23 am

The effect is similar to the sponge tool set to saturate… kinda.

Reply

3 Ryan Williams July 27, 2006 at 10:44 am

Hehe, the high pass has been a vital part of my toolbox for quite some time now. It’s definitely one of those particularly juicy tips.

My personal configuration differs from yours slightly though: I use soft light rather than overlay as the layer mode, and pretty much always use a high pass strength of 6.0.

My reasoning behind this is that the overall goal of the technique is to bring out the detail, which is best done by emphasising the lights. Overlay has a tendency to also emphasise the darks, which can result in some parts muddying out (for example, the body of the trees in your example photo) and sometimes makes the lighting look slightly surreal.

Reply

4 Paul Stamatiou July 27, 2006 at 11:36 am

Thanks for the alternate method Ryan, I’ll give that a whirl next time.

Reply

5 Aqua Curve July 27, 2006 at 4:19 pm

Wow, this tutorial is great. It sharpens and brings out alot of features in the shot. This worked great for me.

Reply

6 Dustin July 27, 2006 at 4:19 pm

This is pretty nice but doesnt it increase jaggies? For instance the top of the volleyball net looks like a stairstep moreso than the original picture.

Reply

7 barber October 9, 2007 at 11:24 am

someone lives at georgia tech!

Go Jackets!!!!

Reply

Leave a Comment

You can use these HTML tags and attributes: <a href="" title=""> <abbr title=""> <acronym title=""> <b> <blockquote cite=""> <cite> <code> <del datetime=""> <em> <i> <q cite=""> <strike> <strong>

Previous post:

Next post: