By the time most people read this post I will have stayed in three different hotels in New York, New Jersey and Maryland while trekking along with Challenge X teams for their final competition. That means I have had a chance to glance through several terms of service agreements for various hotel internet connections. They usually include some clause stating that they retain the right to monitor your online activities and so on - Orwellian Big Brother stuff. The same generally goes for places that have free or for-pay Internet connections. Although, with unsecured Wi-Fi Internet connections it's more an issue of other users sniffing your data with network analyzer tools like Wireshark.
If you're paranoid about those types of privacy and security issues and you happen to have access to a server with SSH, you can securely send your Internet data through your server in an encrypted network tunnel. SSH tunnels are nothing new and there are many ways of setting them up, even standalone applications that can do it for you. You can even setup specific tunnels for different ports, such as for securing your email. For now, I'm just going to deal with securing HTTP traffic.
Tools
I'm doing this on my Mac, but you essentially just need terminal access. (However, configuring your browser to work with the SSH tunnel will vary.) If you're on Windows, there is always PuTTY.
Fire up a terminal session and enter in the long SSH command below. Naturally, change out the username and domain info for the server you're using.
ssh -D 8080 -f -C -q -N myuser@myserver.com
If you want to find out the specifics of those flags, the ssh man page gives a good rundown. The 8080 number is the port that I will be sending traffic through instead of the regular HTTP port 80. You can pretty much use any port number, but port 8080 is the standard HTTP alternate as defined by the IANA (interesting link nonetheless).
Config
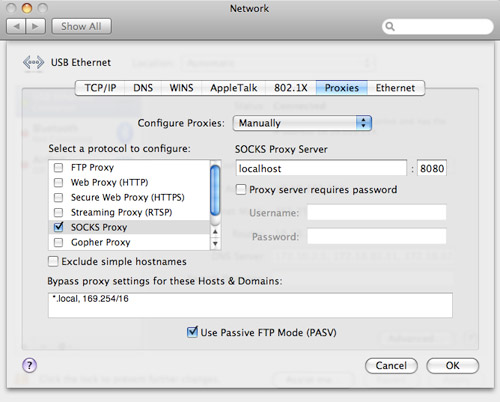
If prompted for a password, enter it. The SSH tunnel is now active, barring any errors. Now you just need to get your browser to use it. For Safari this is a very simple process. Head over to System Preferences » Network » Advanced » Proxies. Click the checkbox next to SOCKS Proxy, supply "localhost" with port 8080 for the server and click OK, then Apply.

The changes should be automatic in Safari. You can check by visiting a site like What's My IP. You're good to go if it displays the IP address of your server, not your computer.
How often do you use networks you don't trust? How do you deal with them?