I normally try to avoid server/unix jargon on this blog but as you can tell I have become infatuated with Amazon's affordable storage solution, S3, as of late. We all know that it is important to keep recent backups of anything you value at all, so why not automate the process? Until I started tinkering with S3, my server backup process involved manually downloading and compressing the contents of my server and storing the compressed file on my hard drive. That usually took longer than I'd like so I wouldn't do it terribly often. The main benefit of backing up with S3 is that you take advantage to your server's high-speed connection and bypass the need to download files over your connection, as well as safely store files somewhere other than your own server.
For the most part, I took the advice of John Eberly in his automated S3 backups article. However, I did several things differently so I thought I would show what I did in an easy-to-follow format. The fruits of my labor come into play near the end with a simple shell script I wrote that compresses my entire server httpdocs directory (similar to public_html or www-type folders on other servers), does a mysql dump of my WordPress database and sends a tar.gz file of them to a backup bucket I have on my Amazon S3 account.
S3 Basics
I'm going to assume that you already have an Amazon S3 account. Login to amazon.com/s3 and find your Access Key ID and Secret Access Key on the AWS Access Identifiers page. If you're still hesitant about giving S3 a try, take a look at this.
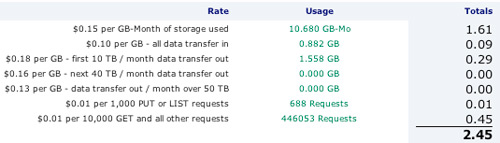
That's my S3 bill for last month. I use S3 a good bit and I haven't even hit 3 per month yet. You literally have nothing to lose.
I can has bucket?

Now that you have your S3 information, you'll need to create a bucket to store your server backup data. A bucket in S3 lingo can simply be considered a top level directory. Buckets work like regular folders, although technically S3 must be tricked into using folders within buckets with specially-crafted filenames like example_folder/yourfile.jpg. Bucket names are globally unique, so you have to pick a name that isn't already taken. To easily interact with S3, I recommend the S3fox Firefox add-on.
 S3fox's listing of my buckets
To create a bucket in S3fox, right-click anywhere in the right pane and select Create Directory. Now you have your bucket.
Setting up Ruby & s3sync
To interact with S3 with my shell script, we'll need to install s3sync, a popular Ruby program for interacting with S3 over a command line. As such, you'll need to install Ruby if your server doesn't have it already. The following commands need to be run on your server, so SSH into it (ssh you@yourserver.com in Terminal on OS X, Putty on Windows).
sudo yum install ruby libopenssl-ruby
I have the yum package manager installed on my server, so installing Ruby was trivial. If you don't have yum, apt-get or emerge on your box, you can install Ruby and the SSL library libopenssl-ruby via RPM with rpm -Uhv ruby-*.rpm. Or you may opt to build it yourself with the source and ./configure && make && make install.
Ensure that Ruby is actually up and running with the following command. It should return your Ruby version. Mine was ruby 1.8.5 (2006-12-04 patchlevel 2) [i386-linux].
ruby -v
Now to actually download and decompress s3sync. But before you do this, make sure you are in an appropriate directory. I extracted the s3sync folder in my home directory, ~/. You can determine where you are by running pwd, print working directory. Some of the commands below might not work without sudo in front of them, if you are not already logged in as root or a privileged user.
wget http://s3.amazonaws.com/ServEdge_pub/s3sync/s3sync.tar.gz
tar xvzf s3sync.tar.gz
rm s3sync.tar.gz
cd s3sync
mkdir certs
cd certs
wget http://mirbsd.mirsolutions.de/cvs.cgi/~checkout~/src/etc/ssl.certs.shar
sh ssl.certs.shar
cd ..
mkdir s3backup
S3sync is now decompressed within its own s3sync folder in your home directory, along with a subdirectory certs containing SSL files to be used later, and another subdirectory s3backup where temporary backup files will be stored while they are being transferred to S3.
Giving s3sync your S3 info
In the s3sync folder, edit s3config.yml with your Access Key ID, Secret Access Key and directory for SSL certs. The directory will be ~/s3sync/certs if you followed this guide. Just to be safe you might want to give it your full path, such as /var/www/vhosts/yourserver.com/s3sync/certs or whatever it may be.
Making the Shell Script
Go into the ~/s3sync folder (you should already be here) and open up a text editor to create the actual backup script below. I'll be using vi but you can just as easily create the file in something like TextMate and FTP it into the appropriate place.
vi s3backup.sh
Now that you're in vi, press i to enable insert mode, and type the following code. You can paste it but sometimes a bit will get cut off from the top, so be on the lookout.
#!/bin/bash
# directory structure:
# ~/s3sync has scripts
# ~/s3sync/s3backup is a folder for temp backup files
cd ~/
BUCKET=your_bucket_name
DBNAME=your_database_name
DBPWD=your_database_password
DBUSER=your_database_user_name
NOW=(date  +_%b_%d_%y)
tar czvf httpdocs_backupNOW.tar.gz httpdocs
mv httpdocs_backupNOW.tar.gz s3sync/s3backup
cd s3sync/s3backup
touch DBNAME.backupNOW.sql.gz
mysqldump -u DBUSER -pDBPWD DBNAME | gzip -9 > DBNAME.backupNOW.sql.gz
tar czvf server_backupNOW.tar.gz DBNAME.backupNOW.sql.gz httpdocs_backupNOW.tar.gz
rm -f DBNAME.backupNOW.sql.gz httpdocs_backupNOW.tar.gz
cd ..
ruby s3sync.rb -r ––ssl s3backup/ BUCKET:
cd s3backup
rm -f *
IMPORTANT: This script is written for my (mt) (dv) 3.0 server which uses "httpdocs" as the public web folder. If your server uses another folder, please change that wherever it appears in the script. Also edit the first few lines with your database info and S3 bucket name. Once you've typed that and edited the necessary information, press esc to exit insert mode, then press :wq and then enter to save and quit vi.
IMPORTANT 2: Use full directories if you can. For example, cron jobs are often run as a different user than you so running "cd ~/" will result in a different path and be bound to mess things up. In my case, I replaced "cd ~/" with "/var/www/vhosts/paulstamatiou.com" but it varies with each server config.
If you try to run that script now, it won't work for several reasons. First off, it doesn't have the proper permissions.
sudo chmod +x s3backup.sh
Now your script is executable, but if you ran into the same problem I did and received a "bad interpreter" error, you can run this:
dos2unix s3backup.sh
Test it out
Everything is setup and all you need to do is execute the script. Make sure you're in the ~/s3sync folder and run s3backup.sh.
sudo ./s3backup.sh
You will be asked for your password and then things will begin whizzing by your terminal as files are compressed. Script execution time depends heavily on how many files are being compressed and uploaded. For me, the entire process takes around 65 seconds with a 60MB server backup ending up on S3.
When I was testing this script I had put the source/destination paths in the wrong place while running s3sync.rb with the --delete (sync) flag and lost all of my backup files from the past year. I recommend making a test bucket if you plan on playing with s3sync.rb/s3cmd.rb directly.
Automate, Automate, Automate!
Okay so now you're hopefully grinning after s3backup.sh worked flawlessly. If not, leave a comment and I'll try to help troubleshoot the issue. The next step is to get this running every day, week, month or however often you would like to backup your server files and MySQL database.
Fortunately my server and many others have cron job folders in /etc. If a script is put in the cron.daily folder for example, it will be run daily. If put in the cron.monthly folder, the script will be run monthly. I decided to set this script up to run daily so all I had to do was copy s3backup.sh into the /etc/cron.daily/ folder.
sudo cp ~/s3sync/s3backup.sh /etc/cron.daily/
Feedback
I wrote this post rather hastily as I have to begin studying for final exams for my summer courses, but if you see anything that doesn't seem right, please let me know. Also, you are following this how to on your own and I am not liable should you somehow reformat your entire hard drive. If you have never touched a unix system in your life, I don't think this is the best article to start with. If you're a Linux guru and know of a few ways to optimize anything in this post or my shell script, I'd love to hear about it.
UPDATE: In the recent version of s3sync, you will have to update s3config.rb and change the confpath to this:
confpath = ["./", "#{ENV['S3CONF']}", "#{ENV['HOME']}/.s3conf", "/etc/s3conf"]