Update: I have written a third article for this series. You can find it here.
After my first Azureus article received lots of popularity, I decided to write a follow up article. Several people have contacted me, expressing their interest in a simple guide they can follow to optimize Azureus further and increase functionality via plugins. Today I will cover changing the incoming TCP listen port, the SafePeer plugin and the RSS Import plugin.
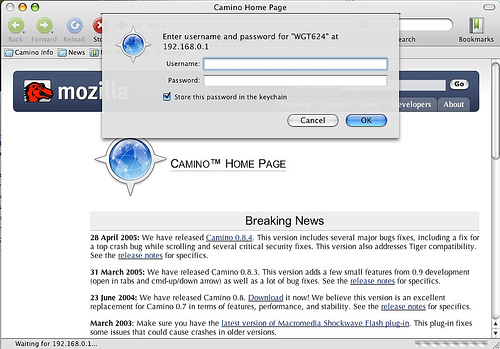
First off, I am going to show you how to change the incoming TCP listen port. It has come to my knowledge that some ISP's or universities throttle traffic on ports, such as 6881, commonly used for filesharing protocols. By default, port 6881 is set in Azureus as the incoming TCP listen port, through which the torrent data will be sent. After you've opened up Azureus, make your way to the preferences pane, then connection. The first box will be Incoming TCP listen port and should already have a value of 6881. You will want to change that value to any unassigned port in IANA's port assignments or any port from 49152-65535. For the purpose of this article, we will use port 49155. Enter that in the box and click save. You might not feel the effects until you restart Azureus and some of your current transfers might hiccup while Azureus switches over to the new port. Remember the port number you used, it will come in handy soon.

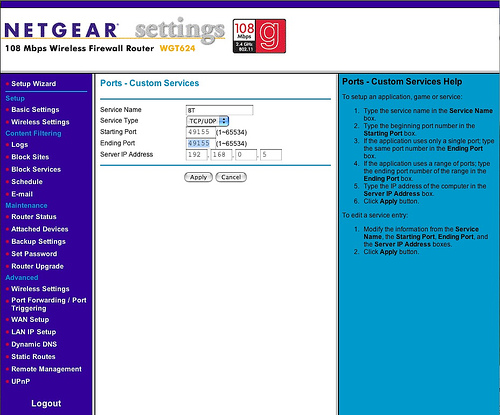
If you are running a router, you will want to enable portforwarding so that your torrents get all the attention they need. I have a NetGear router, so I log in to the browser based setting by accessing 192.168.0.1 in a browser. The IP you need to access will vary from router to router, but you should be able to find that out, as well as the default login and password, on your manufacturer's support website. If you don't have much time, this list should have what you're looking for in terms of login and password.
Once you've logged into your router, find the link that says Port Forwarding or something to that effect, and follow it. Click Add Custom Service or whatever your particular router calls it. Most routers I have worked with ask for the computer's local IP, service type, the name you will call this port forward, and the port you wish to forward. For this, you need to select TCP/UDP for the service type. Using TCP and UDP is a failsafe as Azureus only uses TCP but future versions might incorporate UDP since there is a UDP enabled tracker setting in preferences. This will allow you to upgrade to future versions of Azureus and not have to go back to your router to configure port forwarding. Next, type in something for the name of the service and then the port you wish to use. Finally, enter your computer's local IP which can be found by Start>Run>cmd>ipconfig>"IP address" in Windows or Applications>Utilities>Terminal>ifconfig en0>"inet" in OS X (this assumes you are using the ethernet adapter en0). Type this local IP into your router's portforwarding page and make sure to click Apply.
Plugins
SafePeer
The SafePeer plugin ensures that your Azureus client does not connect to any IP's considered to be related to government or media organizations that monitor filesharing traffic, greatly reducing your chances of getting caught for downloading something you should have purchased. Download the latest version of the SafePeer plugin and just drag the folder to the Azureus plugins folder. You can find that directory in Options>Plugins. Installation for this plugin is now complete, all you need to do is restart Azureus.

The first thing you will notice is that Azureus will appear to hang when loading. Don't worry this is normal while the SafePeer plugin starts doing its thing.
You can see the list of what is blocked by going go Options>IP Filters.

RSS Import
The idea behind the RSS Import plugin is to automatically import an RSS feed from your favorite torrent site and, based on your filter, download the latest episode of a television show you've been following, etc.
Installation for RSS Import is identical to the SafePeer installation; drag and drop the RSS Import folder in to Azureus's plugins folder. Now you have to configure it. Head over to Options>Plugins>RSS Importer and take a gander at some of the options. First, activate the plugin by checking the first box. The second field is for you to enter the RSS feed of your favorite torrent site. The third field is the most important. It sets the filter for which you want to wring your torrent feed through.
For example, I entered in top.gear.*;fifth.gear.* for two of my favorite cars shows on BBC2 and 5 TV. The dot in top.gear.* means that it will allow any single character in between, such as a space or a bracket. This is crucial since different torrent creators name their files differently and as long as you have the crucial information and nothing extra, you should be set. The semicolon in between top.gear.* and fifth.gear.* separates the two entries. You can have as many entries in the filter as you want, as long as they are separated by a semicolon. If your torrent file is named with something like hdtv or any other attribute you are looking for, make sure to add that into the filter. The asterisks act as a wildcard, allowing any other characters in the torrent name.
The next setting you might want to consider changing is "Recheck channels every x minutes." It has a default value of 10 minutes, but I recommend changing it to 30 or 60 minutes as torrent sites already have enough traffic as it is, they don't need you hitting them every 10 minutes. Click Save and restart Azureus. The next time your torrent site updates its feed, Azureus should automatically download the files you want based on your filter criteria.

Hopefully, this article was easy enough to follow. Feel free to comment or contact me if you have any questions or problems.